I like tiny and sweet things, which obviously means I was meant to like cookies. And I like them more so if they have even tinier and sweeter things on top of them – stacked cuteness, so to say.
One of the cookie sets I made for Practice Bakes Perfect (PBP) Challenge #16, Sweet Shoppe, fits this description nicely. When I received requests to do a tutorial about it, I was pretty much delighted and gladly agreed. Not only did I have a lot of fun making these cookies the first time, but I also loved that PBP - so writing a tutorial gives me the opportunity to prolong that whole experience. Last but not least, it adds another layer to the challenge – my first repeat cookies ever!
These cookies are somewhat elaborate and are perfectly suited for a special occasion, like a girls' afternoon tea get-together or a birthday party.
Due to a lot of steps, tools, and drying time, the tutorial will be split into two parts. Today, we will start by getting our trays ready and preparing the flowers to decorate our sweets!
Here's a list of what you will need:
- 1 to 2 (2.8-in/7-cm) hexagonal cookies, iced in plain white, completely dry; to hold mini macarons
- 1 to 2 (3.5-in/9-cm) hexagonal cookies, iced in plain white, completely dry; to hold mini cupcakes
- Medium stiff-consistency white royal icing
- Pastry bag(s)
- #14 star tip (Wilton)
- #2 round tip
- Medium stiff-consistency purple royal icing (Wilton Rose and Purple)
- #1 round tip
- Wax paper/ baking paper
- Flower nail (Wilton)
- Stiff-consistency pink royal icing (Wilton Rose, Creamy Peach, Brown)
- Stiff-consistency dark pink royal icing (Wilton Rose, Creamy Peach, Brown, Burgundy)
- Pastry bag(s)
- Two #101S petal tips (Wilton)
- #57S petal tip (PME)
- Beadwork-consistency yellow royal icing (Wilton Golden Yellow)
- #1 round tip
- #59S/59° petal tip (Wilton)
- Flat brush, to help shape petals when necessary
- Water, to dampen and clean brush
- Cloth, to take excess water off brush
Cookie Trays with Lambeth-Style Border
We'll be making two sizes of trays: a small (2.8-in/7-cm) hexagonal one to fit mini macarons, and a larger (3.5-in/9-cm) hexagonal one for mini cupcakes. (The macarons and cupcakes will be the subjects of Part Two of this tutorial.) And we'll be using the same Lambeth method of overpiping to make all of the tray frames, no matter the size of the tray.
First, fit a pastry bag with the #14 star tip, and fill it with white royal icing (RI). Starting in one corner of an iced and dry hexagonal cookie, pipe a spiral consisting of four loops. Let the last loop extend into a straight line to the next corner. Repeat this process until you have covered all sides of the cookie.
Using the same pastry bag, pipe tiny swirls in the corners of the frame that extend into the interior. Try to stay close to edge of the cookie, as you will need enough space on the inside for the mini cupcakes and macarons! Let everything dry about 30 minutes.
Now switch to your #2 tip, and pipe white lines on top of the tray frame. Start with one of the sides, and pipe a curl at the left hand corner, extending it into a straight line that gently slopes down to the right hand corner. Then pipe a similar, but shorter curl on top of the corner swirl at the right hand corner. Repeat this process until you have covered all of the sides and corners. Immediately pipe a second set of lines on top of this first layer. Again, let the lines dry about 30 minutes.

As the last step, pipe a third layer of lines with the purple RI and a #1 tip.
Repeat this entire process to complete a few trays. Now, all your trays need is some drying time, and they will be ready to receive their sweets.
Flowers
We'll be making two different flowers as decoration for the sweets: a rose with open petals (about 0.9 in/2.2 cm diameter) and a peony (about 0.8 in/2 cm diameter). You will need six flowers of each type, or twelve in total, but it doesn’t hurt to make a couple more.
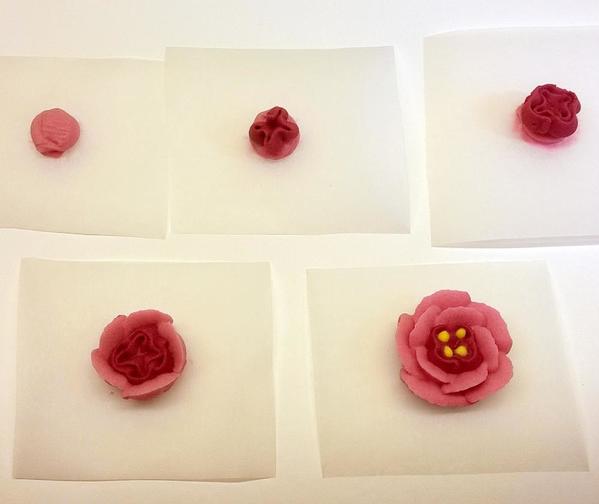
Let’s start with the open rose. Attach a piece of wax paper to your flower nail with a dab of pink RI. Pipe a little mound of RI in the middle (about 0.3 in/0.8 cm diameter). Then using the dark pink RI with one of your #101S tips, pipe four small loops on top of the mound, keeping the narrow end of the tip facing up and the wide end facing straight down. Add a second layer of loops around the first to complete the flower center.
Now, using the light pink RI with the #57S tip, pipe five overlapping petals around the center of the rose. Again, keep the narrow end of the tip facing up, and angled slightly outward (about 35 to 40 degrees). Pipe a second layer of five overlapping petals, offset to the first. This time the tip should be angled outward about 45 to 50 degrees. For the stamen, add four yellow dots in the center of each of the inner loops using a #1 round tip and RI of beadwork consistency.
To make the peonies, attach your second #101S tip to the pastry bag filled with light pink RI, and repeat the first three steps of the open rose. To make the outer petals, attach the #59S/59° tip to the bag with dark pink RI. Pipe four overlapping petals to slightly cover the inner light pink loops, taking care that the narrow end of the tip is facing up, of course, and that the tip is angled inward about 45 degrees. Add a second layer of five petals in this same fashion.
The flower will probably not look perfectly round at this point - oftentimes the ends of the petals stick out at the bottom. With the help of a damp brush, you can easily remedy this situation. Simply use the brush to push the flower into a nice round shape, taking care to dab any excess water off the brush with a cloth. Then pipe the stamens, just as you did for the rose, and that’s it.
Now, we have our trays ready, and the flower decorations waiting to be put to good use. Next time, we will "bake" some cute little treats, so stay tuned (Part Two should post in a couple of weeks) and, in the meantime, have a look at the preview!
Cookie and photo credits: Leoni Eckart

 Leoni Eckart, aka Laegwen, started her baking career way before her own memory sets in, decorating Christmas cookies with her mother (at least that's what she's been told!), and has never entirely stopped puttering around in the kitchen since. Her first decorated cookies as an adult were her own wedding favors, and then, over Christmas 2014, her cookie fever went into overdrive! As of present, it shows no signs of cooling off. You can find Leoni on Facebook here, or you can reach her by email at laegwen@outlook.de.
Photo credit: Leoni Eckart
Note: Get Inspired with Laegwen is a bimonthly series of cookie decorating tutorials that follow Leoni Eckart's personal experiments with gumpaste, royal icing, and other cookie decorating materials and methods. This article expresses the views of the author, and not necessarily those of this site, its owners, its administrators, or its employees. To read all of Leoni's past Get Inspired tutorials, click here. And to catch all of our Cookie Connection tutorials, click here.


Comments (17)