Practice Bakes Perfect Challenge #28: Tutorials


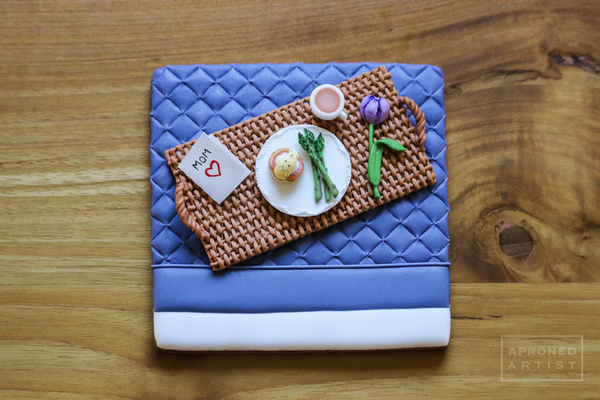
Has everybody seen the latest Cookie Connection tutorial by @Aproned Artist? In it, she shows you, step-by-step-by-tiny step, how to create this spectacular Mother's Day "Breakfast in Bed" cookie:

Final%20Breakfast%20in%20Bed

In this tutorial, you will learn how to make that puffy quilt, that basketweave tray, those tiny foods, and the card - everything you see in this picture. When I first read this tutorial, all I could think about was what an incredible wealth of knowledge this one tutorial contains! And then, I got to thinking about how many tutorials have been posted here on Cookie Connection over the last several years by so many inspiring cookie artists, from @Yankee Girl Yummies and @Dolce Sentire - Aixa Zunino to @Lucy (Honeycat Cookies), @Laegwen, and @Manu biscotti decorati (just to name a few). Those tutorials cover the whole range of cookie decorating skills and levels of experience, from the most beginner to the very advanced.

I don't know about you all, but I am always so inspired by these tutorials, and have every intention to try my hand at them, but rarely seem to find the time. Well, if you are like me, and have been looking for an excuse or occasion to try one of the amazing project tutorials here on Cookie Connection, then here is your big chance!

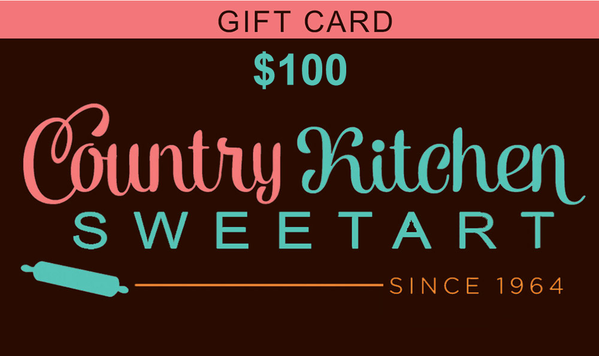
We will get to the details of this challenge in a moment, but, first, let's talk about the fabulous prize, which will be awarded to one lucky challenge entrant, chosen at random from among all of the challenge entries. And that prize, generously donated by Country Kitchen SweetArt, is . . .

CKGiftCard

Yes, another $100 gift card, but this time for goodies on the fabulous Country Kitchen SweetArt site - one of the places that Cookie Connection host @Julia M. Usher most frequently shops. The last gift card we gave out (two challenges ago) was such a hit that Julia decided it was high time to give out another one! Thanks to Autumn Carpenter and the team at Country Kitchen SweetArt for making Julia's wish come true!

Now, back to the challenge at hand! What I would like you to do is to select a cookie project from the "Project Tutorial - All" blog category here on Cookie Connection, and use the tutorial to create that project. There are literally dozens and dozens of projects from which to choose, dating all the way back to 2013, for cookiers of ALL levels of experience. In the general spirit of these Practice Bakes Perfect challenges, I strongly encourage you to choose a project that stretches your current skills, suits your level of experience, and/or teaches you a new skill.

The project tutorials on this site are even split into different levels of difficulty for you! For instance, to find all intermediate-level project tutorials, you need only to click on the blog category "Project Tutorials - Only Intermediate Cookies," a subcategory under "Blog Collections" in the column on the right side of the "Blog" page.

PBP 28 Screen Shot

And it's that simple - pick a project tutorial, make the project, and show us what you made! Well, not exactly, but mostly, so let's talk about the rules for this challenge!

Rules:

1. Pick a project tutorial, and create that cookie project.

2. The project tutorial you choose must be a Cookie Connection project tutorial from one of the following categories on this website:

3. Your finished cookie project must be substantially similar to the finished project shown in the tutorial. You may, however, make incidental changes, such as colors (if color is not the primary focus of the project) or adapting a project to a different season, as long as those changes do not affect or interfere with the skills/elements that are essential to the chosen tutorial.

4. In the comments to your entry, please provide a link to the tutorial you have chosen and credit the author of the tutorial using the tag (@) feature. (For instance, write "Tutorial by @Manu biscotti decorati", if Manu was the author.) If you have made any adaptations, such as color choice or seasonal change or the like, please also tell us about them.

5. Please refrain from using any copyrighted characters or art in your projects. Some of our contributors have used copyrighted art in their tutorials (with permissions from the copyright holders, of course). However, Julia does not want to monitor whether you also sought permissions to use these peoples' art in this challenge, so please avoid the following tutorials:

6. As always, we ask that you make a brand new set of cookies for this challenge.

7. Think outside the box, take some healthy risks, and HAVE SOME FUN.

To enter:

  • Please post an image of your cookie project to the site under the Practice Bakes Perfect clip set no later than May 27, 2018 at 5 pm central.
  • Because these challenges are ongoing, we ask that you put "Practice Bakes Perfect Challenge #28" in your photo caption AND in a tag, so that we can tell the challenges apart from month to month. Please use the main title field to uniquely name your cookies as you normally would.
  • Please also assign other relevant clip sets and tags to your images, as you normally would. (Meaning don't just use the Practice Bakes Perfect clip set and leave it at that, or your photos won't easily be found with keyword searches.)
  • You can enter more than once, but please post only one clip of each distinct entry/cookie project. Multiple clips of the same entry/cookie project are not allowed unless added in a comment beneath the one primary clip.

After the challenge has closed on May 27, we will announce the winner in the Saturday Spotlight the following weekend (June 2). The next challenge will be announced after that Spotlight.

And one last thing . . . This is NOT meant to be a competition. The only person you should be competing against is yourself. Period. These challenges are intended to inspire the artist in you and push you to be the best cookie artist YOU can be at this snapshot in time. Remember, the whole point of this exercise is to get you out of your comfort zone - to "take healthy risks," as my wise-beyond-his-years son always reminds me. Plus, prizes are given entirely at random, so healthy risk-taking has its own rewards!

I would love to chat with you as you journey through this process, so if you have any questions about the challenge, are having trouble getting started, need help bringing an idea to life, want technical advice, or need clarification of a challenge rule, please leave a comment below or send me a Cookie Connection private message.


Christine Donnelly began her professional baking career at 16, when she was hired on the spot at her local bakery to work the counter and decorate cakes. After detours to college and law school, she worked as a trial lawyer in Chicago for many years, ultimately leaving that career to become a stay-at-home mother to her two children. In her “retirement,” she continued to bake at home, at last finding her preferred artistic medium in decorated cookies. In February 2013, Bakerloo Station was born with a presence on both Facebook and Instagram. Christine makes cookies to balance her left brain, to inspire and share creative ideas, and to feed those needs that only art can satisfy.

Photo credit: Christine Donnelly

Note: Practice Bakes Perfect is a bimonthly Cookie Connection blog feature written by Christine Donnelly that poses inspiration or challenges to get you to stretch as a cookie artist - for practice, for prizes, and for fun! Its content expresses the views of the author and not necessarily those of this site, its owners, its administrators, or its employees. Catch up on all of Christine's past Cookie Connection posts here.

Attachments

Images (4)
  • Practice Bakes Perfect Challenge #28 Banner: Photo by Steve Adams; Cookie and Graphic Design by Julia M Usher
  • Breakfast in Bed Cookie: Cookie and Photo by Aproned Artist
  • $100 Country Kitchen SweetArt Gift Card: Photo Courtesy of Country Kitchen SweetArt
  • Tutorial Categories on Cookie Connection Blog: Screenshot from Cookie Connection

Add Comment

Comments (19)

Newest · Oldest · Popular

I love this challenge for many reasons - but especially that it recognizes the many great tutorials on our site and their wonderful contributors! I can't wait to see what people do!

What a great challenge, Christine @Bakerloo Station   Whenever I read tutorials, I think they are so great and that I am going to try them someday but someday hasn't come to me until now.    Thank you, you really let us go forward.  

What a great idea, Christine! There are a few projects here that I have always wanted to try and this is the occasion to pick one (or two) of them! 

Can’t wait to see the gallery with all the different outcomes!

I also wanted to extend a personal thank you to Autumn Carpenter and Country Kitchen Sweet Art for jumping in and so generously donating the gift card! Woo hoo! If you haven't seen her site, I strongly urge you to check it out (even before we determine who gets the gift card). It's a treasure trove of everything for decorating and one of few spots I always go to first for my decorating needs. In addition to having  a huge selection, their service is exceptional!

I was looking at one of tutorials and it talked about to make isomalt.  I use isomalt nibs rather than make isomalt.  Is it okay to use the isomalt nibs or do I have to make it from scratch?

Econlady posted:

I was looking at one of tutorials and it talked about to make isomalt.  I use isomalt nibs rather than make isomalt.  Is it okay to use the isomalt nibs or do I have to make it from scratch?

I'm not sure what tutorial you're talking about on Cookie Connection, but I don't recall one that ever made isomalt from scratch - it's not easily made at home. Can you point me to the tutorial you're looking at? (Send the link.) And, yes, you can start with isomalt  nibs or granules.

Julia M. Usher posted:
Econlady posted:

I was looking at one of tutorials and it talked about to make isomalt.  I use isomalt nibs rather than make isomalt.  Is it okay to use the isomalt nibs or do I have to make it from scratch?

I'm not sure what tutorial you're talking about on Cookie Connection, but I don't recall one that ever made isomalt from scratch - it's not easily made at home. Can you point me to the tutorial you're looking at? (Send the link.) And, yes, you can start with isomalt  nibs or granules.

Your right she started with granules.  Isomalt nibs are so easy I can’t imagine using granules.  They are expensive, but I like easy.  I’m thinking about the 3D lantern.  I’ve never done a 3D project and I the lantern caught my attention.  Unfortunately next week we start a remodel and I leaving until it’s done.

Econlady posted:
Julia M. Usher posted:
Econlady posted:

I was looking at one of tutorials and it talked about to make isomalt.  I use isomalt nibs rather than make isomalt.  Is it okay to use the isomalt nibs or do I have to make it from scratch?

I'm not sure what tutorial you're talking about on Cookie Connection, but I don't recall one that ever made isomalt from scratch - it's not easily made at home. Can you point me to the tutorial you're looking at? (Send the link.) And, yes, you can start with isomalt  nibs or granules.

Your right she started with granules.  Isomalt nibs are so easy I can’t imagine using granules.  They are expensive, but I like easy.  I’m thinking about the 3D lantern.  I’ve never done a 3D project and I the lantern caught my attention.  Unfortunately next week we start a remodel and I leaving until it’s done.

Granules are so easy as well (you can melt them the same way as the nibs, though I don't, as I don't own a microwave). Not sure what all the hoopla is about the nibs, quite honestly, when the whole process is so simple and fast to begin with. But they are the same material, so you could use either in this tutorial.

Last edited by Julia M. Usher
Julia M. Usher posted:
Econlady posted:
Julia M. Usher posted:
Econlady posted:

I was looking at one of tutorials and it talked about to make isomalt.  I use isomalt nibs rather than make isomalt.  Is it okay to use the isomalt nibs or do I have to make it from scratch?

I'm not sure what tutorial you're talking about on Cookie Connection, but I don't recall one that ever made isomalt from scratch - it's not easily made at home. Can you point me to the tutorial you're looking at? (Send the link.) And, yes, you can start with isomalt  nibs or granules.

Your right she started with granules.  Isomalt nibs are so easy I can’t imagine using granules.  They are expensive, but I like easy.  I’m thinking about the 3D lantern.  I’ve never done a 3D project and I the lantern caught my attention.  Unfortunately next week we start a remodel and I leaving until it’s done.

Granules are so easy as well (you can melt them the same way as the nibs, though I don't, as I don't own a microwave). Not sure what all the hoopla is about the nibs, quite honestly, when the whole process is so simple and fast to begin with. But they are the same material, so you could use either in this tutorial.

I’ve only used nibs.  The tutorial showed her putting it on the stove with a candy thermometer.  I just melt the nibs in the microwave and when I’m done I let them cool and they can be used again.

Econlady posted:
Julia M. Usher posted:
Econlady posted:
Julia M. Usher posted:
Econlady posted:

I was looking at one of tutorials and it talked about to make isomalt.  I use isomalt nibs rather than make isomalt.  Is it okay to use the isomalt nibs or do I have to make it from scratch?

I'm not sure what tutorial you're talking about on Cookie Connection, but I don't recall one that ever made isomalt from scratch - it's not easily made at home. Can you point me to the tutorial you're looking at? (Send the link.) And, yes, you can start with isomalt  nibs or granules.

Your right she started with granules.  Isomalt nibs are so easy I can’t imagine using granules.  They are expensive, but I like easy.  I’m thinking about the 3D lantern.  I’ve never done a 3D project and I the lantern caught my attention.  Unfortunately next week we start a remodel and I leaving until it’s done.

Granules are so easy as well (you can melt them the same way as the nibs, though I don't, as I don't own a microwave). Not sure what all the hoopla is about the nibs, quite honestly, when the whole process is so simple and fast to begin with. But they are the same material, so you could use either in this tutorial.

I’ve only used nibs.  The tutorial showed her putting it on the stove with a candy thermometer.  I just melt the nibs in the microwave and when I’m done I let them cool and they can be used again.

You have to monitor the temperature for best results with granules (another reason I don't use a microwave with them), but that's not so hard to do if you have a candy thermometer. Basically, the nibs are granules that have been heated to the proper temperature and then been allowed to set. So they save you the time of sticking a thermometer in the granules, but that's all. I guess I prefer cheaper!

Julia M. Usher posted:
Econlady posted:
Julia M. Usher posted:
Econlady posted:
Julia M. Usher posted:
Econlady posted:

I was looking at one of tutorials and it talked about to make isomalt.  I use isomalt nibs rather than make isomalt.  Is it okay to use the isomalt nibs or do I have to make it from scratch?

I'm not sure what tutorial you're talking about on Cookie Connection, but I don't recall one that ever made isomalt from scratch - it's not easily made at home. Can you point me to the tutorial you're looking at? (Send the link.) And, yes, you can start with isomalt  nibs or granules.

Your right she started with granules.  Isomalt nibs are so easy I can’t imagine using granules.  They are expensive, but I like easy.  I’m thinking about the 3D lantern.  I’ve never done a 3D project and I the lantern caught my attention.  Unfortunately next week we start a remodel and I leaving until it’s done.

Granules are so easy as well (you can melt them the same way as the nibs, though I don't, as I don't own a microwave). Not sure what all the hoopla is about the nibs, quite honestly, when the whole process is so simple and fast to begin with. But they are the same material, so you could use either in this tutorial.

I’ve only used nibs.  The tutorial showed her putting it on the stove with a candy thermometer.  I just melt the nibs in the microwave and when I’m done I let them cool and they can be used again.

You have to monitor the temperature for best results with granules (another reason I don't use a microwave with them), but that's not so hard to do if you have a candy thermometer. Basically, the nibs are granules that have been heated to the proper temperature and then been allowed to set. So they save you the time of sticking a thermometer in the granules, but that's all. I guess I prefer cheaper!

Thanks for explaining granules to me.  It’s been an excellent education.

Pat Gottschalk posted:

This is the perfect challenge that I would love to do but can you move the date back?  With Teacher Appreciation, Mother's Day and Graduation, I don't have time to do it! 😂


I can't answer this. Tagging @Bakerloo Station, so she can make the call.

Pat Gottschalk posted:

This is the perfect challenge that I would love to do but can you move the date back?  With Teacher Appreciation, Mother's Day and Graduation, I don't have time to do it! 😂


Hi Pat!  Thanks for your question.  Unfortunately, due to some scheduling issues on this end, we are not able to extend the deadline for this challenge.  I do hope you will still find time to enter!

Post
×
×
×
×
Link copied to your clipboard.
×