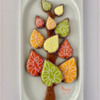
 I have been so looking forward to autumn and its colors that this month you will get more colorful leaves! They are lacier than my macramé leaves of last month, and are also arranged in a cookie composition that looks like a tree.
- Cookie dough of your choice
- 3 nested teardrop cookie cutters (See dimensions in Step 1, below. You can also use any nested leaf or heart cookie cutters of your choice.)
- 1 long tree trunk cookie divided into three parts (Templates and dimensions are also in Step 1.)
- Sugarcraft knife (or equivalent), to hand-cut cookies
- Royal icing:
- White piping-consistency, in pastry bag with PME #1 tip (or equivalent)
- Yellow flood-consistency plus any other colors you want, in tipless pastry bags with openings equivalent to Wilton #2 tip
- Brown flood-consistency, in tipless pastry bag with opening equivalent to Wilton #2 tip
- Scribe tool or paint brush with rounded handle end, to texture icing
Step 1: The cookies
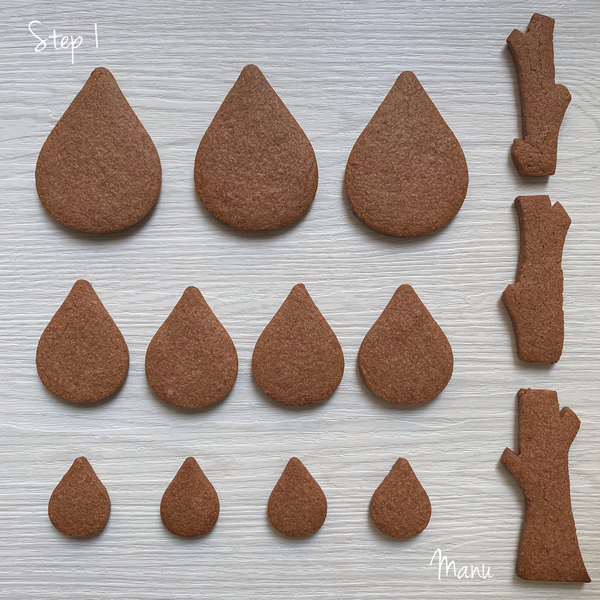
Here's a visual summary of the cookie shapes and sizes that you should have after all 14 cookies in this project have been baked. Cut the cookies to your preferred thickness, and bake them according to your recipe.
I've separated the pieces that you will need into the following two categories:
- 11 leaves (I used all of the cutters from this four-piece set except the smallest one.)
- 3 large (7.6 x 5.6-cm/3 x 2 1/4-in) leaves
- 4 medium (5.6 x 4.1-cm /2 1/4 x 1 5/8-in) leaves
- 4 small (3.5 x 2.6-cm/1 3/8 x 1-in) leaves
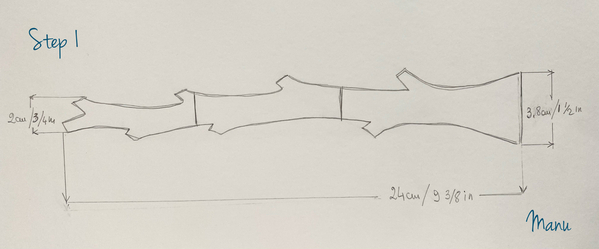
- 1 (24-cm/9 1/2-in-tall) trunk with stumps on the sides. (Note: The trunk template below is sideways.) The trunk measures about 3.8 centimeters (1 1/2 inches) at its widest end (or base) and gets thinner toward the top. The top end is about 2 centimeters (3/4 inch) wide. Cut the trunk cookie, before baking, into three roughly equal parts for easy serving. Use my trunk template, or simply design your own trunk, and divide it into parts as you wish.
Step 2: Decorate leaf cookies
a. Using white piping-consistency royal icing and a PME #1 tip (or equivalent), pipe a long squiggly line all around a leaf cookie (I started with one of the large ones). The icing should be of a consistency that flows smoothly from the pastry bag. It should bend easily, yet hold a tight line at the same time. Your hand should move like the needle of a sewing machine in a zig-zag pattern to end up with a squiggly heart-shaped outline. I like to pipe a continuous outline, but you can stop at any time, or just pipe a sequence of small “U”s to make tiny arches along the border. (For that approach, see Steps 2a to 2b of my past tutorial here.)
b. Now, pipe a line all around the cookie about 0.2 centimeter (1/16 inch) from the cookie edge. This line should roughly cut through the middle of the squiggly outline, so that only tiny arches will be seen once the space inside the outline is flooded in the next step.
c. Flood the cookie using yellow flood-consistency royal icing and a Wilton #2 tip (or equivalent) to end up with a heart-shaped leaf with a delicate lacy border. Let the icing dry completely before proceeding to the next step.
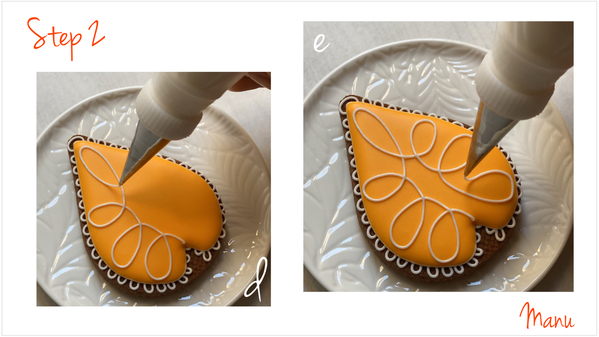
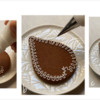
d. Once again, use white-piping consistency royal icing and a PME #1 tip (or equivalent) to decorate the yellow icing on the leaf. Start at the base of the leaf, where the two lobes of the leaf intersect. Focus on one half of the leaf by piping a continuous line of loops, three to the side and a fourth one at the tip of the leaf.
e. Continue piping, repeating the same design on the other half of the leaf. It is far easier to pipe this pattern than to explain it in a tutorial (![]() ). Using a projector is definitely not worth the effort, but, if in doubt, trace an outline of the cookie on paper and practice piping there first.
). Using a projector is definitely not worth the effort, but, if in doubt, trace an outline of the cookie on paper and practice piping there first.
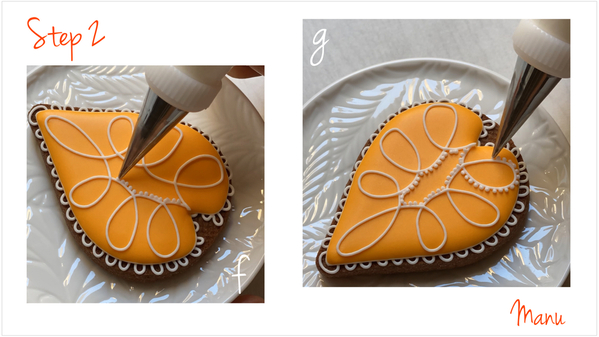
f. Let the icing loops set, and then, using the same white icing and tip, pipe little dots along the internal edge of the interior holly leaf-shaped area formed by the loop pattern.
g. Continue piping little dots all around each loop to complete the leaf.
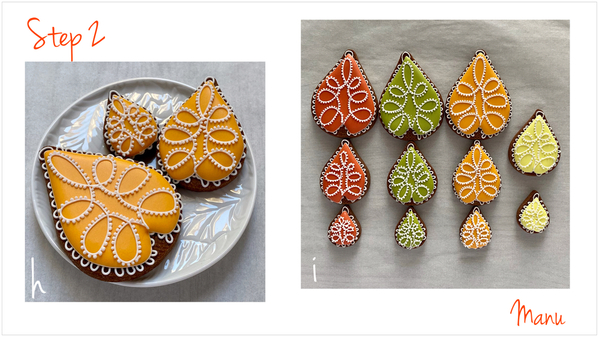
h. Decorate two more leaves of different sizes using the same flood icing color.
i. Tint additional flood icing as you wish, and decorate the remaining leaves just as you did the first set. You can bake and decorate as many leaves as you like, of course. I did eight more leaves in different fall colors.
As they say, a picture is worth a thousand words, but a video is worth even more! So here’s a video recap of Step 2:
Step 3: Decorate tree trunk cookies
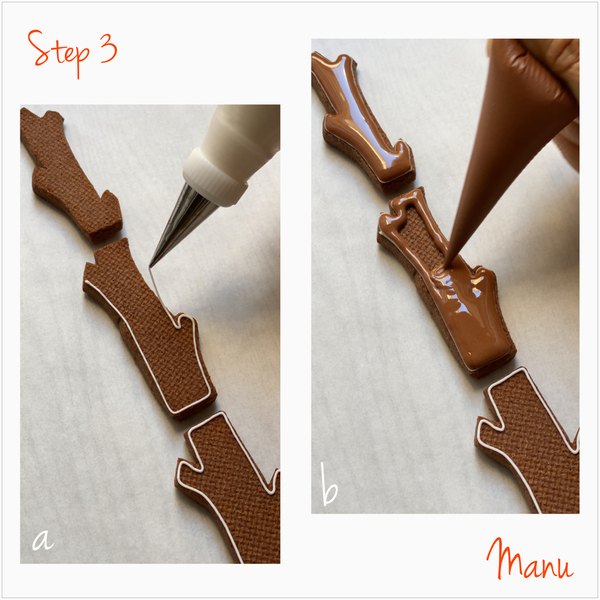
a. Outline the three parts of the trunk cookie using white piping-consistency royal icing and a PME #1 tip (or equivalent).
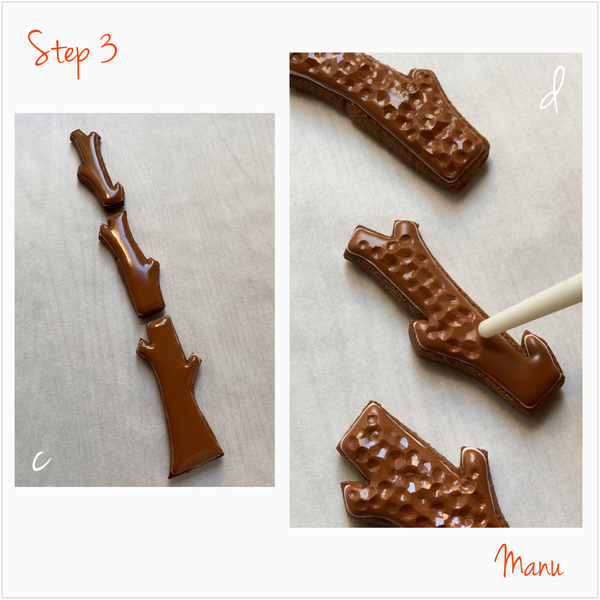
b. Flood the cookies with brown flood-consistency royal icing using a Wilton #2 tip (or equivalent).
c. Let the icing set for a while, just until a thin crust has formed. Drying time could be one to a few minutes, depending on your initial icing consistency and ambient conditions (humidity level). It is quite dry where I live in Italy, and my icing sets very quickly.
d. Now, crack the icing by repeatedly pushing the soft, round handle end of a scribe tool or paint brush into it. The idea here is to simulate tree bark. Let the icing dry completely.
Once again, here’s a video recap of this step for those of you who like to see action:
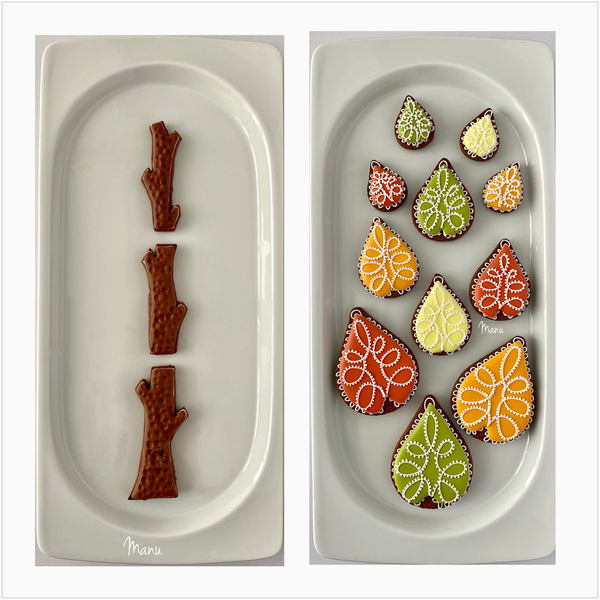
And, last, here’s a visual recap of all 14 decorated cookies:
Now that all of the cookies have been decorated, let’s assemble them! Ta da!
I leave you with some other colorful fall cookie project ideas, all shared in past years on Cookie Connection. Just click this link to go to the Made by Manu section of the Cookie Connection blog, and scroll down to find all of them. Enjoy!
Happy fall!
Manu 🍁🍃🍂

Manuela Pezzopane, affectionately called Manu by her friends and family, is a fan of everything handmade, and professes to have tried every possible hobby. However, it wasn’t until the end of 2014, when an American friend invited her to a Christmas cookie exchange, that she first discovered decorated cookies. In 2015, after watching Julia M. Usher's videos and signing up on Cookie Connection, Manu finally attempted her own. Since then, cookie decorating has become Manu’s passion. You can follow Manu on Facebook and Instagram, or email her at manubiscottidecorati@gmail.com.
Photo and cookie credits: Manuela Pezzopane
Note: Made by Manu is a Cookie Connection blog feature written by Manuela Pezzopane, where each month she shares the method behind a magical cookie of her own making. This article expresses the views of the author, and not necessarily those of this site, its owners, its administrators, or its employees. To read all of Manuela's past Made by Manu tutorials, click here. And to see all of Cookie Connection's tutorials, click here.










Comments (13)