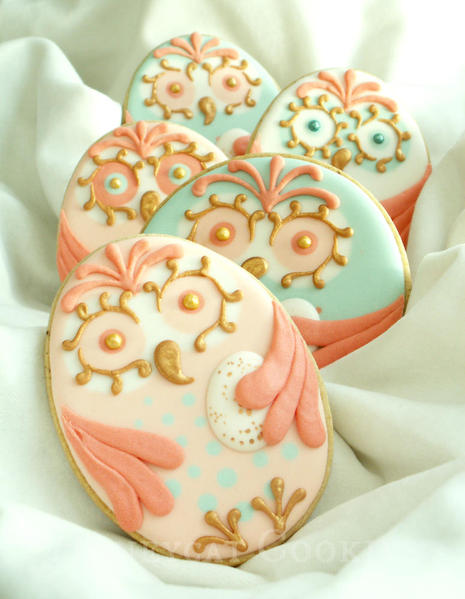
Easter may be a bit later than usual this year, but that's given me plenty of time to come up with a new design to share with you. I'm particularly fond of these little fellows. They're such solemn owls, with an important job of caring for those eggs, while their ladies are out doing whatever it is lady owls do.

I started out with the idea of creating an owl on an egg, as I only have a narrow owl cutter, and I wanted a fat, friendly owl shape. I had thought to alter the egg, but once I'd sketched it out a few times, I realised it doesn't actually matter - to look like an owl, a cookie can be almost any shape, as long as it has two large eyes and a beak! (One of these seems to have eaten too many cookies and is no longer egg-shaped . . .) Such accommodating little creatures!
What you will need:
- An egg-shaped cutter of your choice (mine is 4 inches tall)
- A print-out of small egg shapes (mine are 1 inch tall)
- Acetate, parchment paper, or silicone tracing sheets for piping transfers
- Four colours of icing in thick flood consistency (approximately 15 seconds); all four will be used on the owl, and one will also be used for the eggs
- Stiff beige icing (approximately soft toothpaste consistency)
- Piping bags and tips no. 3 and no. 2
- Scribe tool or toothpick
- Gold or bronze lustre dust and clear extract or alcohol to dilute
- Fine food-safe paintbrush
- Large sugar pearls or dragÉes for the eyes
- Edible marker and ruler (optional)

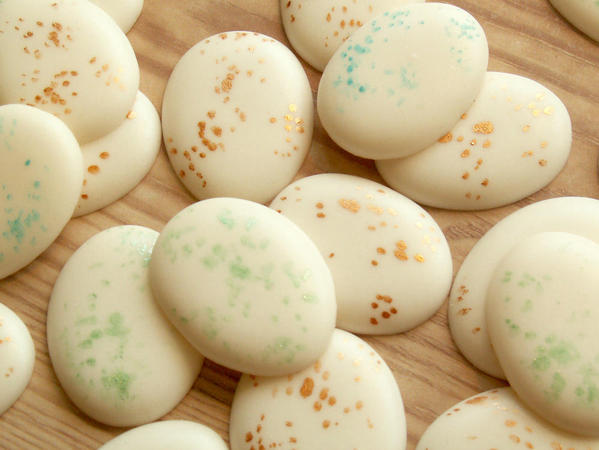
I started with the royal icing (RI) transfers for the baby eggs, selecting an egg shape from an image search and copying it into a Word document. After re-sizing to just under an inch tall, I copied and pasted it as many times as I needed eggs.
Tip: Always make several more RI transfers than you will need, especially if the shapes have any intricacy to them, as they break so easily.
I piped my transfers onto acetate here. I normally use silicone sheets designed for this purpose, and the transfers lift off beautifully; but it's not so easy to see through those sheets, so I thought I'd try out acetate. It worked very well, only the sheets aren't as flexible, so I probably won't use it for very delicate shapes.
Using the colour you've chosen for your eggs and a tip no. 3, pipe and flood each egg in one go, if necessary using a scribe tool to tease out the icing to the right shape. Set these eggs aside to dry thoroughly, overnight if you don't use a fan or dehydrator.
Once dry, it's time to speckle the eggs! I have tried thinning brown food colouring with water and "splattering" it using a toothbrush, and although it worked (see my dragon eggs here), I found it was difficult to get a strong enough colour whilst still being easy to flick over the eggs.
So for these eggs, where I wanted the pattern to show up clearly, I decided to simply mix up some metallic lustre paint (by diluting lustre dust with alcohol-based extract) and to paint on the speckles in random groups and sizes. No need to be careful or accurate here.

Now it's time to move on to the owls!
Have all four thick flood colours ready with no. 3 tips. This will keep the mixing of the icing simple (fewer consistencies), but it does mean you may need to shake the cookie or use a scribe tool to help settle the icing after each section is piped. On the other hand, it greatly reduces the washing up afterwards!

1. If you don't fancy centering the eyes "by eye", draw a line dividing the cookie in half vertically. About one-quarter of the way down, mark a horizontal line. Divide this line into three: the one-third and two-thirds marks are the centres of the owl's eyes.
2. Choosing one of your colours, pipe a central blob on each mark, and add a dragÉe, pressing it down into the blob.
3. Pipe a thick border in a second colour around each of these blobs, using a scribe tool if necessary to tease out a circular shape. With the third colour, pipe a thick border around both eyes in a figure eight, linking the two in the centre.
4. Outline and flood the rest of the cookie in one of your colours, obviously a different one from the outer border of the eyes. Add further interest to the body by piping a series of diminishing spots in vertical lines.
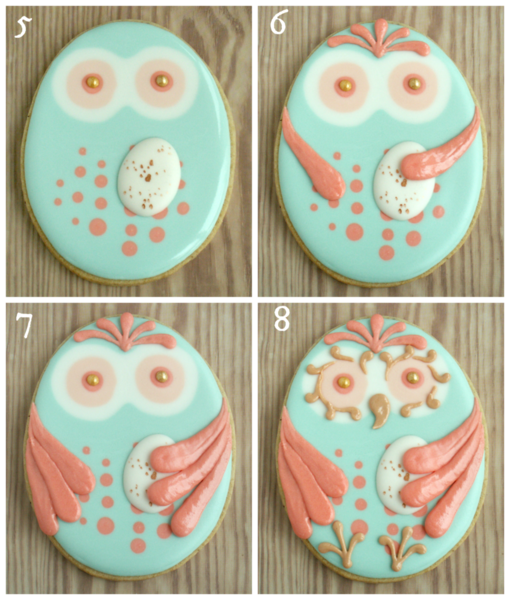
5. Before the body dries, drop one of the small eggs onto the body. Now set the cookie aside to dry thoroughly, to the point where it is safe to pipe on top, i.e., overnight or several hours in a dehydrator.
You now need just one of your thick flood colours that contrasts the main body colour, in a bag with a tip no. 3, and also your beige piping icing in a bag with a tip no. 2.
Tip: I always have a clean wooden board by my side for practising icing "moves"! I practised the sweeping movement required for these wings several times on the board first. You need to pipe more slowly and with greater pressure to start with, to give a fatter end to the feather, and gradually release the pressure whilst sweeping around and up to the side of the owl.
6. Start with the tip of the top feather over the egg, and repeat on the other side. Each feather will need to form a crust before the next feather is piped. Pipe in the head feathers with the same technique, but make them smaller.
7. As each previous feather has crusted, pipe the next one.
8. With the beige icing and the same technique, but with a tip no. 2, pipe the feet, a fat beak, and curvy beading around the outside colour of each eye. For the latter, I piped a fat dot on the outer eye colour, dragging it inwards and sweeping around the circular border of the middle eye colour.
Once the beige icing is dry, paint over it using the metallic lustre paint. (You will likely need to dilute the lustre dust again, as the alcohol rapidly evaporates.) Then nestle all your little owls with their precious cargo in a soft nest. (Or eat them!)
What I want to know is why they've been left looking after the eggs, and where did all their little partner owls go? Could it possibly have been to a giant owl party somewhere in Utah?
Cookie and photo credits: Lucy Samuels


Photo credit: Lucy Samuels
Note: What's New, Honeycat? is a bimonthly Cookie Connection blog feature written by Lucy Samuels, which pushes the cookie envelope every other month with innovative cookie design ideas and tutorials. Its content expresses the views of the author and not necessarily those of this site, its owners, its administrators, or its employees. To catch up on all of Lucy's past posts, click here.


Comments (15)