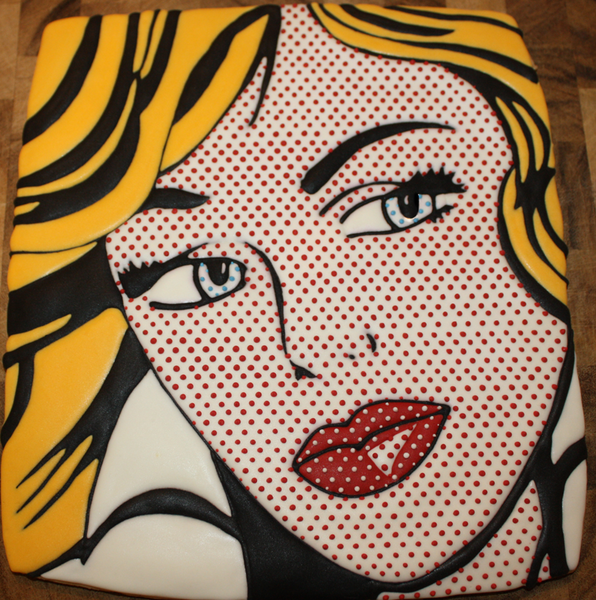
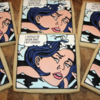
Rarely does a cookier make a mark on the cookie kingdom with one set. But when this month’s featured cookier, Stephanie Kappel of The Hungry Hippopotamus, appeared on the scene in 2011 with her Lichtenstein pop art cookies (two photos below), it seemed as if all of the cookie world stopped mid-decorating to catch their breath. (The gasps uttered were in sheer amazement.)
But Stephanie isn’t a one-cookie gal. No sirree! Each time she posts to Facebook or her site, she stuns us with an equally elaborate and perfectly crafted cookie.
I recently had the pleasure of “meeting” Stephanie via phone to swap notes in preparation for Cookie’sCool, where she’ll be appearing as a featured presenter in November. Her thoughtful approach to planning for this event – and to all of her work – piqued my interest. So I decided then and there that she’d make a great Close-up this month – and the first in my series of interviews with Cookie’sCool instructors!
![]()
JMU: Hi, Stephanie. It was great chatting with you the other day! I’m looking forward to getting to know you even better in this interview. It’s hard to believe that you’ve only been decorating since 2011 – and even harder to believe that you went straight from getting an MBA to cookie design. What prompted this career change?
![]()
SK: Thank you, Julia! It was so nice speaking with you too! I appreciate the opportunity to continue our discussion.
In 2007, I was hired by the Executive Director of a new company. Over the next two years, the two of us developed and launched a $4.9 million foundation. I learned about every aspect of building and running a business: strategic planning, marketing, finance . . . we did it all. With this experience, and my newly acquired MBA, I was inspired. I decided to leave my work at the foundation and took the plunge. I started my dream business, The Hungry Hippopotamus, in 2011.
![]()
JMU: Most cookie businesses have overtly cookie- or sweets-related names, but yours is named after your favorite zoo animal. There must be a special significance to the name The Hungry Hippopotamus! Do tell!
![]()
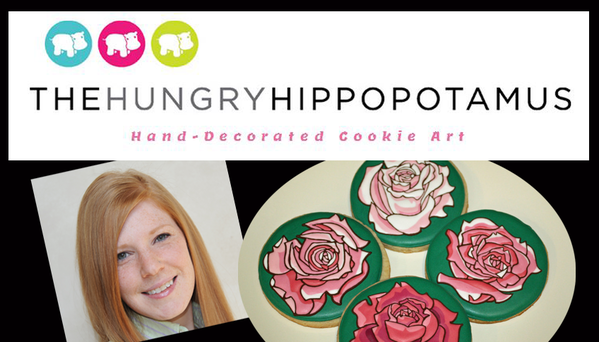
SK: I wanted a name that would be unique and memorable. As I began to navigate the cookie world, I discovered The Sweet Pudgy Panda and the name spoke to me. I threw around a few names of my own, but kept coming back to The Hungry Hippopotamus. Once my graphic designer took my vision and created the perfect logo, I knew The Hungry Hippopotamus was it.
![]()
JMU: How, if at all, has your MBA served you in your cookie business?
![]()
SK: My MBA has helped me keep a business focus in an industry that is inherently personal. With every order, you get a little glimpse into someone’s life. It’s hard not to get caught up in the emotion of a project. Ultimately, however, a successful company is one that is able to both manage projects effectively and deliver the best possible product to the customer.
![]()
JMU: I know you make cookies for sale and also teach cookie art classes from time to time, but can you elaborate on the scope of your cookie business? For instance, roughly how much of your time is spent producing cookie orders versus teaching cookie decorating versus doing other cookie-things? Is your cookie business a full-time job for you? How many cookies do you produce in a typical week? I know, my mouth runneth over with questions! ![]()
![]()
SK: The Hungry Hippopotamus is my full-time job and one that I love due to its flexible nature. I have a young son (17 months) at home, so being able to move around my hours is a must. Every week here is different. I’d say that between five and ten dozen cookies make it from my mixer to the mail each week. I’ve recently been dedicating more time to developing curricula for future class offerings. I’m currently working on an advanced level class as well as some project-based classes.
![]()
JMU: How did you hone your cookie craft in such a short while? How/when did you know you were ready to start selling your work?
![]()
SK: Practice! In cookie decorating, the basics are EVERYTHING. I spent A LOT of time practicing the fundamentals. Lucky for me, the technical part of decorating is one that I enjoy the most. Once I started decorating cookies, I couldn’t stop. Throughout my life, I’ve dabbled in many different artistic mediums, but I enjoy drawing the most. When I discovered cookie decorating, I was pleasantly surprised by how similar the two are.
I knew I was ready to start my business once I had gotten a significant number of inquiries from people about my cookies. To see if the idea was viable, I put together a business plan and did quite a bit of research. Fortunately, all signs pointed to yes. ![]()
![]()
JMU: Are you a one-cookier operation? Or do you employ other cookie fairies to help with cookie production or other work?
![]()
SK: I am a one (wo)man cookie band. ![]() Depending on the hour, I am the creative director, the lead decorator, the customer service manager, the principal videographer, the web master . . . you name it!
Depending on the hour, I am the creative director, the lead decorator, the customer service manager, the principal videographer, the web master . . . you name it!
![]()
JMU: And where do you work? Out of your home? Or in an outside kitchen? If the latter, do you rent or did you buy? And how did you settle on this mode of business operation?
![]()
SK: I work out of my home kitchen, just outside of Philadelphia. My kitchen is certified by the health department and registered with the FDA. Working from home allows me to keep my overhead costs low while affording me a flexible schedule.
![]()
JMU: What’s been the single most challenging experience you’ve had while running your business, and how did you overcome that challenge, assuming you did? ![]()
![]()
SK: The biggest challenge for me is educating customers. The cookie is well on its way to being respected as an art form, but we still have a long way to go. I try to help my customers understand what goes into making cookies - time, sweat, tears . . . okay, maybe not tears. Okay, maybe a few tears. The more educated consumers become, the more sugar artists will become respected and properly compensated for the energy and love baked into every bite!
![]()
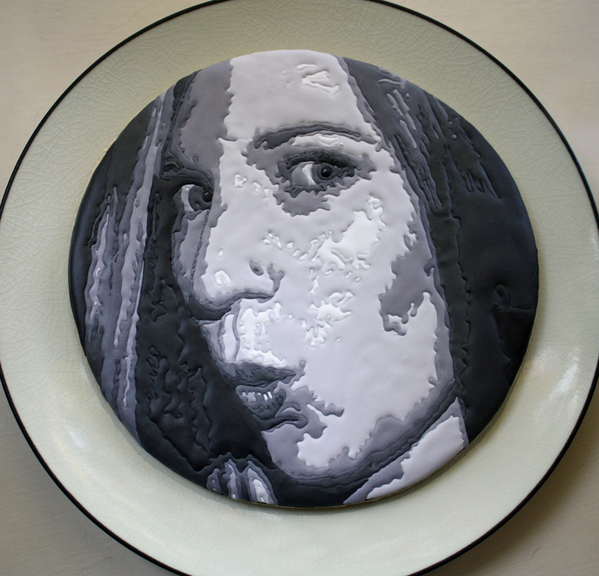
JMU: Most cookie decorators have a dominant style, but your work seems to span a very broad range of looks and techniques, from character and cartoon-y cookies to intricate wet-on-wet portraits like the one of you (above) and more fancy, frou-frou work. Would you agree with this assessment? How would you characterize your personal style?
![]()
SK: I totally agree! My portfolio spans a wide variety of styles mostly due to the custom nature of my business. I would never have imagined creating a cookie with a saxophone and laptop riding a bicycle or a guy getting therapeutic advice about his marketing campaign without the suggestions of my customers. That being said, I love helping clients’ ideas come to life! As a common thread, I would say that all my cookies showcase attention to detail, a high level of technical execution, clean lines, and love.
![]()
JMU: Of the many gorgeous cookies you’ve made, which is your favorite? Why? And can you give our readers a mini one-paragraph tutorial about how you made it?
![]()
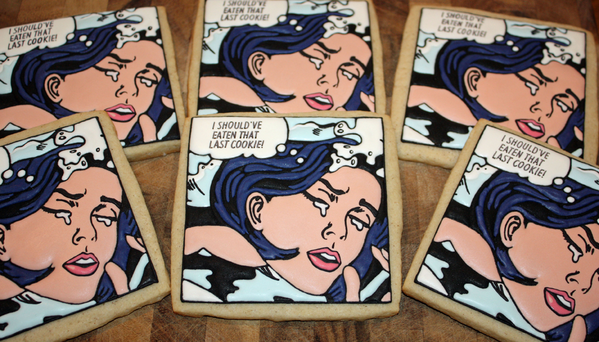
SK: It’s hard to pick a favorite, but the “Drowning Girl” cookie (above) is definitely up there. Lichtenstein’s pop art is the perfect subject matter to translate into a cookie. Making the cookie gave me the opportunity to reproduce a famous piece of art, while giving it a cookie twist. I am really happy with the result!
I’ve made this cookie several times since the original and here’s my preferred method: Start off with a 4 x 4-inch square cookie. Pipe all the black first (except for the face and water detail). Let the black dry for at least an hour or two before moving on. Next, start flooding. I try to flood areas that will get details added on top first (i.e., the face, white wave, and speech bubble). Since the waves have a wet-on-wet effect, flood the white water first, shortly followed by the blue. Next, flood the hair. Once the cookie is completely flooded, onto the fun part – details! Add the details from top to bottom. Start with the speech bubble. Next, add the water detail. Lastly, pipe the face. Allow at least an hour or two before flooding the mouth and tears. VoilÁ! Note: I used a No. 1 tip to pipe almost this entire cookie. The only time I used a No. 2 was to flood the face and shoulder.
![]()
JMU: So, I know you teach cookie art classes in and around your hometown of Holmes, Pennsylvania. How did you get started teaching classes?
![]()
SK: After I started decorating, I received quite a few messages asking if I teach classes. I knew that offering classes was no small undertaking. I am unable to offer classes in my current work space at home (due to zoning regulations), making the situation even more complex. I had been casually looking for the right venue for quite a while and happened to have dinner at the new Sheraton in King of Prussia a few months ago – it was perfect! Once I secured the venue, I started working on my curriculum (which I had been thinking about for quite some time too). I’m looking forward to my next classes in May and many more this year!
![]()
JMU: You said that you knew the hotel would be perfect for teaching, but how did you know? What features were you looking for in a venue? Does the hotel assist with the organization of your classes, or do you do the classes all by yourself?
![]()
SK: As part of my previous job, I did event planning (with an educational focus), so I knew that a hotel could offer exactly what I was looking for. The hotel is brand new, offering a state-of-the-art facility, plenty of space for students to work, and easy accessibility from neighboring states (NY, DE, MD, NJ).
I work with the Director of Catering at the hotel to secure the space, time, date, and equipment (furniture). On class days, I bring all of the decorating equipment with me and am responsible for all of the setup and breakdown.
![]()
JMU: How did you go about setting the price and structure of your classes? By structure, I mean length, number of students, format (hands-on or demo), and content covered.
![]()
SK: When planning my classes, I try to think like a student. What topics/techniques would I like to learn? How would I get the most out of my class? What makes taking a class worth the time and money? With these questions in mind, I first choose the topics and techniques and then plan the timetable accordingly. I incorporate a mix of demo, hands-on decorating/instruction, and Q & A to ensure that class is interesting, fun, and, of course, educational. My classes are on the smaller side (six students) to ensure that everyone gets plenty of one-on-one attention. My goal is for each student to leave class both armed with new techniques and completely inspired to go forth and create!
![]()
JMU: What are your top tips for readers who want to start teaching their own classes? Top three dos? Top three don’ts?
![]()
SK:
DO take the time to find the right location – Make sure the space is adequate for both you and your students. Think about things like: Is there about two to three feet of decorating space per person? Is there easy access to a bathroom? Is the location easy to find?
DO include variety – Having a balance of demonstrations, hands-on decorating, and open forum allows you to keep things fun and interesting!
DO think of yourself as an expert – Even if you haven’t taught a class before, students are looking to you as the expert. You should think of yourself that way too.
DON’T forget to practice (at least in your mind) – Teaching a class comes with lots of details. Thinking through exactly how your class will run or even doing a trial-run will help you to identify all the small details you might have otherwise overlooked.
DON’T be rigid with your timetable – Every student is different. Some techniques might come easily to some, but not to others. Be flexible to ensure that all students receive as much hands-on instruction as they need.
DON’T wait until the last minute – Do yourself a favor and plan ahead. Going into class prepared and organized can mean the difference between you feeling confident and not.
![]()
JMU: As I mentioned earlier, you’ll also be teaching several classes at Cookie’sCool in Genoa, Italy later this year. Can you tell our readers a little bit more about that class structure, or those class projects, and how it/they might differ, if at all, from your normal teaching?
![]()
SK: In Italy, I’ll be teaching five hands-on classes. Each two-hour class will cover a different project, and I’ll alternate between demonstration and working with students as they decorate. Due to the classes being shorter than my classes here, I’ll be focusing on teaching two to three techniques per class. I am in the process of finalizing the projects now, but plan to cover character cookies, quilting, lettering, royal icing transfers, wet-on-wet piping, and damask-style piping.
![]()
JMU: Is this your first trip to Europe to teach? If not, what can you tell readers about how cookie decorating and teaching cookie decorating in Europe are similar to or different than in the United States? If so, how do you think the experience is going to be similar to or different than what you normally do, and how are you preparing for this event as a result?
![]()
SK: Yes, Cookie’sCool is my first European class. I expect teaching in Italy to be a completely unique experience and I am so exited! To prepare for the event, I’ve looked to seasoned cookie artists for advice on teaching abroad. Not surprisingly, they were very open and willing to share what they’ve learned. One of my favorite tips – enjoy every minute!
![]()
JMU: Last but not least, a forward-looking question. (Call me nosy, but I love getting the inside scoop about where people are headed next!) Interest in cookie decorating seems to be exploding in all corners of the globe. Would you agree or disagree? How, if at all, is this expanding interest going to affect what you do with cookies going forward?
![]()
SK: I would definitely agree! I am so inspired by artists from all over the world. To me, one of the most exciting things to see is how cookies are affected by local art, fashion, food, culture, etc. Of course, I would love to continue to travel abroad and make cookies – I’ll call it a sweet dream for now. ![]() Thank you so much for chatting with me!
Thank you so much for chatting with me!
All cookies designed, crafted, and photographed by Stephanie Kappel.
Interested in learning more about Stephanie? You’re in luck! She recently joined us for a live (text-based) cookie chat; just click here for a transcript of that chat.
Or visit with Stephanie anytime online:

Cookier Close-ups is the place on Cookie Connection where we celebrate the change-makers of the cookie decorating world. Whether forging new enterprises, inventing novel decorating techniques, or consistently charming us with their cookie decorating prowess, each of our featured thought leaders has redefined in his/her distinctive way how we interact, create, or otherwise do business here in cookie space!
If there are other cookiers you'd really like to get to know, please post requests in this forum. We'll do our best to round them up for an upcoming Cookier Close-up! Thanks!



Comments (2)