First, my apologies (especially to Timea) for getting seriously behind on these Close-ups! My 3-D cookie competition planning and some personal distractions (mostly my home renovation) have left me with little time for anything else! But onward – this interview with our April 2019 (and November 2018!) site artist, Timea Gazdagné Görbe aka @PUDING FARM, is sure to be an interesting one!
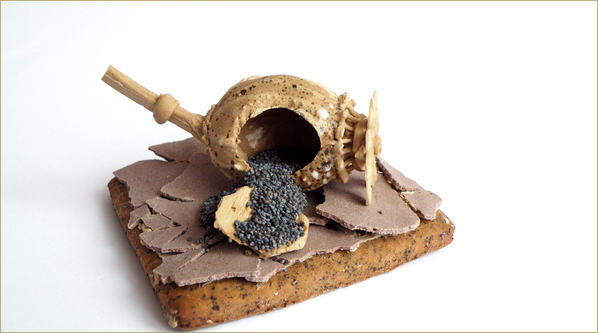
I say this because Timea has a very eclectic background, as we learned in her intro forum post back in November. She also creates some very original cookies. As way of reminder, Timea harks from Mór, Hungary, and has done everything from study with the Hungarian State Ballet Institute to act and do voiceovers for Hungarian television. She has also tried her hand at countless crafts - freehand graphics, portrait drawing, leather craftsmanship, jewelry-making, and even Native American plaiting and woodcarving – all before settling on gingerbread baking and decorating as her primary hobbies in 2006. While a relative newcomer to Cookie Connection, having just joined us in August 2018, Timea has been honing her decorating skills for about 12 years. Early on, she decorated her gingerbread with monochrome royal icing, solely for the delight of her family and friends. But, recently, she has explored more colorful and elaborate works. Because she likes challenges, and because it’s the tiny details that inspire her most, Timea has focused on recreating snapshots of nature in 3-D using royal icing. It’s one of these very delicate and realistic creations (pictured below) that first brought Timea’s work to my attention. I think you’ll see why!
Wow, right?!
In this interview, we’ll dive deeper into Timea’s cookie life to learn about how she honed her skills and how she makes some of these wonderful creations. Let’s get started!
![]()
JMU: Hi, Timea! It’s so great to finally be getting this interview off the ground! Thanks for your patience with me, and your time spent translating everything so painstakingly back and forth between two languages! I’d like to start back in 2006, when you first got into gingerbread baking and decorating. How on earth (and why) did you transition from “full-body”, very active pursuits, like dance and acting, to decorating, which relies mostly on one’s eyes and hands and is relatively sedentary? Was this a difficult transition to make? Why or why not?
![]()
TGG: First of all, thank you for this opportunity. It is a great joy for me! I became very excited after you wrote me about this interview. I'm sorry I couldn't answer sooner because of the translation.
Well, it wasn't difficult for me to get involved in the world of baking. I have a fluid rhythm of life. Because I am a volunteer worker, gingerbread baking is a good occasion to relax and create in my leisure time. I stopped ballet dance early on, because I recognized it wasn’t going to be in my life over the long run. Now I prefer country line dancing to ballet. I also occasionally take part in voicing over and narrating films, which I love very much.
When I was a child, I was a very active little girl. I was constantly moving. When I had no playmate, I always occupied myself: I created something or did handcrafts. My imagination would take over, and I would spend hours on detailed works, so the sedentary part and being alone without a play companion ultimately didn’t matter. And this pattern hasn’t changed today! Both the motion of daily life and the quiet and calm of creation feel good.
![]()
JMU: What was it about gingerbread and royal icing that first caught your interest and still holds it today?
![]()
TGG: Your question reminds me of my first experience with gingerbread. On one occasion as a child, I got a gingerbread heart at a fair (a traditional Hungarian gift). I thought I'd taste it . . . but when I bit into it, the experience was horrible. I thought it was good to eat . . . (More on this point in the last question of this interview.)
Fortunately, gingerbread decoration came back into my adult life in a better and more interesting way. I read a job announcement put out by a gingerbread manufacturing company. My eyes lit up! I was very attracted to the idea of that job, but I had never before baked or decorated gingerbread. I quickly borrowed some books from the library that described the history of making and decorating gingerbread. I had to bake and decorate some gingerbread cookies as soon as possible in order to take them as reference works to the job interview. I made traditional Hungarian embroidery motifs on 20-centimeter (about 8-inch) gingerbread hearts. I didn't take the job for various reasons, but my love of gingerbread has remained, and it is my husband's favorite sweet to this day. It is a pleasure for him when I bake it, because he loves the smell and taste of my soft gingerbread.
![]()
JMU: So you've lived and breathed gingerbread for quite a while! ![]() But, what makes gingerbread decorating more appealing to you than some of the other hobbies – like drawing and jewelry-making – that you’ve pursued over the years?
But, what makes gingerbread decorating more appealing to you than some of the other hobbies – like drawing and jewelry-making – that you’ve pursued over the years?
![]()
TGG: Most of my former hobbies required the use of chemicals (i.e., glue, paint, lacquer, etc.), such as when making leather pieces. But gingerbread making is a delicious and fragrant hobby. It's really enticing!
It also offers a lot of possibility for creativity by changing forms, colors, techniques, themes, etc. And it is a much greater challenge to create a 3-D project with gingerbread and royal icing than it is to work with paper or leather. These edible mediums give me huge inspiration! Ideas often come to my mind at night, and I can't wait to depict them on paper. It would be much easier and faster for me to translate my ideas from paper into fondant or sugar paste, as my dimensional royal icing work requires many steps and must be done slowly. But after the liquid icing becomes a solid, relatively lifelike, 3-D work, I always feel the time and energy that I put into a project was worth it. What an uplifting feeling - especially if the sight of the finished work brings joy to others.
![]() JMU: Indeed – seeing people’s eyes light up at the sight of one of my cookie projects is also my greatest motivator.
JMU: Indeed – seeing people’s eyes light up at the sight of one of my cookie projects is also my greatest motivator. ![]() How did you first acquire your gingerbread decorating skills? Were you self-taught, and was your learning all by trial-and-error, or did you rely on other teachers, mentors, or resources to help you along? If the latter, who (or what) were those resources, and which most helped your learning process?
How did you first acquire your gingerbread decorating skills? Were you self-taught, and was your learning all by trial-and-error, or did you rely on other teachers, mentors, or resources to help you along? If the latter, who (or what) were those resources, and which most helped your learning process?
![]()
TGG: I acquired my skills completely through self-education. Nobody taught me the basics. I practiced, practiced, and practiced. In those days, we had no internet to search for tutorials. My past experience with leather goods and my knowledge of Hungarian embroidery motifs helped me a lot with my early gingerbread designs. Later on, I saw lots of work on the internet that inspired me to find my own style.
Even a child, I always wanted to make something really original. It is always stimulating to me to design cookies that challenge me and push me forward .
![]()
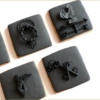
JMU: Your designs certainly are original - no one can dispute that! I especially love your creative use of royal icing transfers, as in the blacksmith set (above) that you did for one of our recent site challenges.
But, I digress . . . How are you now participating in cookie decorating? We know you love to make hyper-realistic works of gingerbread and royal icing that feature nature, but do you sell your cookies? Are you teaching classes? Or are you still primarily making cookies as a hobby for personal enjoyment and sharing with family and friends?
![]()
TGG: In the past, I made gingerbread just for gifts when we visited people. In addition, my friends often ordered cookies because they wanted to give my work as presents to others. I was happy to carry out their ideas, and, as a result, my cookies got as far as Canada, USA, and Germany.
Now, I reserve my 3-D royal icing art works as exhibition material, but I make other cookies on order. I also sell my works as ornaments at nearby handcrafts fairs. Several people have asked me to teach classes, but I would rather share my tricks in friendly meetings as a form of relaxation.![]() JMU: Can you give us more insight into how you weave cookie decorating into the fabric of your broader life? For instance, how much time, on average, do you spend each week working on cookies? Is cookie decorating a full-time or a part-time “job” for you? And roughly what percent of that time is spent on the various cookie-related activities you mentioned in your previous answer?
JMU: Can you give us more insight into how you weave cookie decorating into the fabric of your broader life? For instance, how much time, on average, do you spend each week working on cookies? Is cookie decorating a full-time or a part-time “job” for you? And roughly what percent of that time is spent on the various cookie-related activities you mentioned in your previous answer?
![]()
TGG: Ever since January 2019, when I finished a pastry chef course and passed my exams successfully, confectionery hasn’t just been my hobby; it’s also been my job.
I set my own schedule. Because I rarely sell at fairs, that work doesn't take much time away from general creation for competitions and fun. Some of my works are completed in a few hours, and some last for days or weeks. When I get an order, I give priority to that work. In such cases, I put off my competition work and hobby cookies.
I am now preparing for a few competitions where I will use gingerbread and royal icing, so my work time is currently devoted to those designs. And because I always want to create something new, I spend a lot of time with the design and experimentation.
![]()
JMU: Do you ever envision a time when you will be spending your “cookie time” any differently than you are now? For instance, do you hope to start selling cookies more often or teaching classes? Or stop (or slow down) any of your current competition-related activities? Why are you hoping to move your cookie decorating activities in this direction?
![]()
TGG: I would like to push forward with 3-D royal icing artistry. When I worked as a graphic artist, I tried to make hyper-realistic drawings in my own style. And I would like to take this approach with my patisserie. Later on, I'd like to share my experiences, mostly in free online presentations.
At the beginning, when I had so many decorating questions (and I still have plenty now too), I didn't get any answers. I often see that even basic information about embellishments and techniques is being sold, and it can be very expensive. Unfortunately, many people cannot pay for this information, but the desire to create is in their hearts. That is why I am determined to make simple, but effective photo tutorials.
I don't plan to teach classes yet. I mentioned earlier that I participate in volunteer work (leading free biblical courses), so I connect with many people every day. My baking is primarily a personal hobby that helps me to recharge.
![]()
JMU: Well, however you choose to explore cookies, I am sure you will be doing something new and different! Let’s talk now about your famous poppy seed pod cookies, which were a very new concept when they first posted. I’d love to learn more about how you made them, and the keys for making them so realistic. Can you give us a mini-tutorial in a couple of short paragraphs?
![]()
TGG: Yes, of course! ![]() First of all, my work tools are very simple and accessible to everyone. I don't use pastry bags or tips. I cut the end of simple plastic food bags into different sizes and shapes. I work with liquid food coloring (not dust or gel) and thicken it with icing sugar (aka confectioner’s or powdered sugar). I use only four colors (yellow, red, blue, and green). Different hues are made with cocoa powder, coffee, and active carbon powder. [EDITOR’S NOTE: In the US, active carbon powder is more commonly called activated charcoal or activated carbon. It is made by burning vegetable - and sometimes animal - matter. In the EU, the technical name for vegetable carbon is E153, and it is approved as a natural coloring agent in food and drink. HOWEVER, E153 is not approved for use in food in the US. Some of its uses and (unproven) medical benefits are described here and here.]
First of all, my work tools are very simple and accessible to everyone. I don't use pastry bags or tips. I cut the end of simple plastic food bags into different sizes and shapes. I work with liquid food coloring (not dust or gel) and thicken it with icing sugar (aka confectioner’s or powdered sugar). I use only four colors (yellow, red, blue, and green). Different hues are made with cocoa powder, coffee, and active carbon powder. [EDITOR’S NOTE: In the US, active carbon powder is more commonly called activated charcoal or activated carbon. It is made by burning vegetable - and sometimes animal - matter. In the EU, the technical name for vegetable carbon is E153, and it is approved as a natural coloring agent in food and drink. HOWEVER, E153 is not approved for use in food in the US. Some of its uses and (unproven) medical benefits are described here and here.]
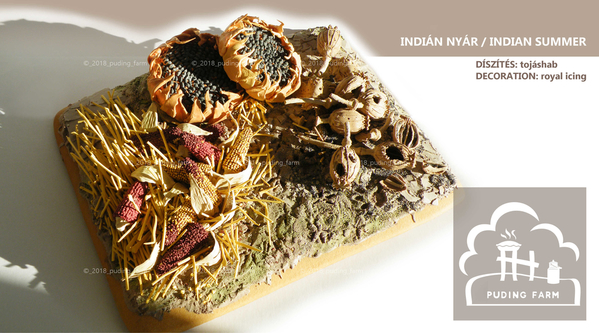
The poppy seed pods were part of a more fully developed project, called Indian Summer (pictured below), which also had royal icing sunflowers and Indian corn.
But, just focusing on the poppy seed pods, here’s a mini-tutorial . . .
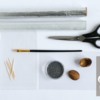
- Plastic (or other) box
- Scissors
- Walnut shell(s)
- Tin foil
- Plastic wrap
- Royal icing:
- light coffee brown thick flooding-consistency (poppy pod and crown)
- light coffee brown piping-consistency (lines on poppy pod)
- white and chocolate brown flooding-consistency (to spatter)
- chocolate brown medium-consistency (for pod crown)
- light coffee brown stiff-consistency (poppy pod stem/peduncle and internal sections)
- Small brush
- Toothpick
- Plastic bags (for piping bags)
- Clear PVC binder cover
- Poppy seeds
Step 1 – Pipe pod parts
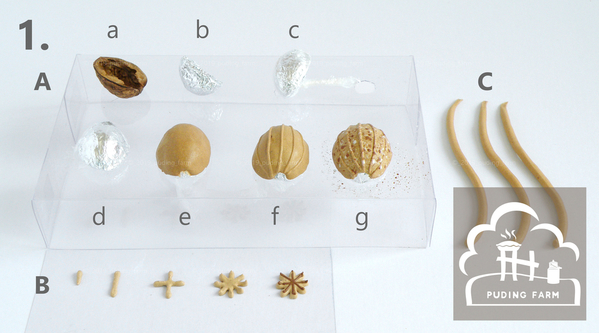
A: Poppy pod, outside
Turn over a plastic (or other) box, and cut several 1/3-in (about 1-cm) holes in it, each about 2 inches (5 centimeters) away from the next one. The holes will be used to anchor the poppy pieces as they get decorated.
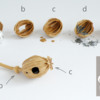
a) Clean a walnut shell.
b) Wrap the shell in tin foil.
c) Cover the shell with plastic wrap as well; collect the excess plastic wrap on the underside of the shell and twist it together to create a “stem”.
d) Insert the twisted plastic “stem” into one of the holes in the box to keep the wrapped shell in place.
e) Glaze the wrapped shell with light coffee brown thick flooding-consistency royal icing, leaving a small semicircle at the base to receive the stem/peduncle later. You can also leave holes elsewhere in the pod, as shown in some of my final pod photos in this post. (Use a small brush to apply the icing, and clean up the bottom edge of the shell with a toothpick before the icing sets.) Let the icing dry completely.
f) Using light coffee brown piping-consistency icing, pipe five lines on top of the shell/pod.
g) Using a clean brush, spatter the pod with white and chocolate brown flooding-consistency royal icing. Let the icing dry completely.
Repeat Steps a to g, above, to make another half-pod. The two half-pods will be joined together in the last step.
B: Crown
Use light coffee brown thick flooding-consistency icing to pipe the star-shaped base of the poppy crown. (I piped on a PVC binder cover, but acetate or parchment paper would also work.) Next, use chocolate brown medium-consistency icing to pipe the thinner lines on top. Again, let the icing dry completely.
C: Peduncle (aka stem)
Using light coffee brown stiff-consistency royal icing, pipe a thick (3/16-in/5-mm) line for the stem. Let the icing dry.
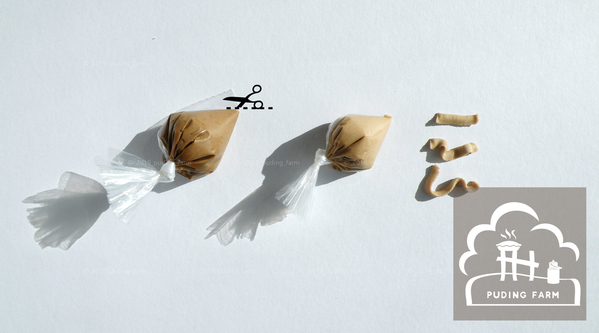
Now, make a small (3/16-in/5-mm) cut along the seam of your plastic piping bag (still filled with light coffee brown stiff-consistency royal icing). This cut will allow you to pipe flat, thin strips (as pictured below) with the same bag! This icing/bag will be used to decorate the inside of the poppy pod in the next step.
Step 2 – Apply internal details and assemble
A: Poppy pod, inside
a) Carefully remove two dried half-pods from the wrapped shells supporting them.
b, c) Using the bag of icing prepared in Step 1C, above, pipe five flat lines along the inside of each half-pod.
d) While the icing is still wet, scatter poppy seeds on the inside of each half-pod. Let the icing dry.
e) Using light coffee brown piping-consistency royal icing, stick together two half-pods. Take care to line up the two semicircles in each half-pod to leave a hole for the stem/peduncle. Again, let the icing dry thoroughly.
B: Final assembly
a) Fit the stem/peduncle into the hole of the poppy pod and secure it in place with a bit of light coffee brown piping-consistency royal icing. Let the icing dry.
b) About 3/16 inch (5 millimeters) from the base of the pod, pipe a thin band around the peduncle using light coffee brown piping-consistency royal icing. Make a groove through the center of the icing band by drawing a toothpick through it.
c) Stick the crown on top of the pod using light coffee brown piping-consistency royal icing. Again, let the icing dry completely.
And we are done!
![]()
JMU: Wow, what a labor of love! Now tell me, what are your best tips for keeping royal icing pieces looking as true to nature as your poppy seed pods?
![]()
TGG: I spend much time examining my selected topic. I do not regret any time spent studying the structure, texture, and environment of an object or plant. That time helps me design different methods and produce unique colors that ultimately create lifelike results. And those results are worth the effort. If I can’t study my subject directly, then my memories, the internet, and books help me.
Because I deeply believe in the existence of a Creator, I really like to capture the details of nature. Studying nature brings me closer to God. And if the choice of a topic is close to me, I make it with my heart and soul! That is my most important tip!
![]()
JMU: What a nice sentiment! Can you pick another one of your recent and favorite cookie projects, and tell us how you made it?
![]()
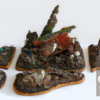
TGG: My latest big project was called Awakening of Nature, pictured below. I started to plan it last autumn, and worked on it over three months. In March 2019, this work received a gold medal at a Hungarian national championship. (I am very happy!) The whole creation is royal icing on gingerbread, but I'd like to share with you just one detail of it: the rotten oak tree bark.
When royal icing is left over after a project, I always spread in on a clear PVC binder cover and let it dry. After it’s completely dry, I store it, leaving it on the plastic. When I need a color, I'll then break off some of the dried icing and crush it to different sizes. It can also be ground to a fine powder. I used this technique to make lichen in this mini-tutorial.
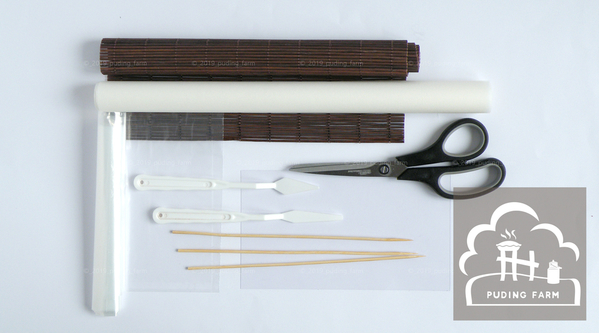
- Palette knife or spatula
- Royal icing:
- thick flooding-consistency in light green, medium green, dark green, light orange, medium brown, and russet red (lichen)
- russet red and brown-grey piping-consistency (oak tree bark)
- russet red stiff-consistency (dry rot)
- Clear PVC binder cover
- Rolling pin
- 2 to 3 bamboo table mats
- Silicone baking paper or parchment paper
- Scissors (to cut baking paper)
- Wooden barbecue skewers
Step 1 – Make royal icing powder for lichen
A: Lichen transfer sheet
Using a palette knife or spatula, spread the different colors of thick flooding-consistency royal icing on a clear PVC binder cover. Let the icing dry thoroughly.
B: Royal icing powder
Break off small pieces of the dried icing made in Step 1A. Grind those pieces into a powder with a rolling pin.
Step 2 – Make and texture oak tree bark
A: Oak tree bark transfer
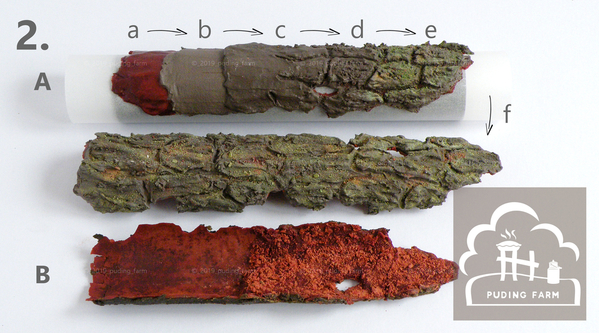
Roll up the bamboo table mat(s) to create a cylinder that’s the size of a small log (or any size you desire). Wrap the “log” with silicone baking paper.
a) Using a palette knife or spatula, spread the russet red piping-consistency royal icing (about 1/16 inch/2 mm thick) along the length of the log to cover the sides and top. Let the icing dry.
b) Spread the brown-grey piping-consistency royal icing (also about 1/16 inch/2 mm thick) on the log. Let the icing dry thoroughly.
c) Again, spread the brown-grey piping-consistency royal icing (now about 3/16 inch/5 mm thick) on the log. Proceed directly to the next step.
d) While the icing is wet, draw irregular lines along the length of the log with a wooden barbecue skewer. Now, draw some shorter grooves perpendicular to the ones just drawn.
e) While the icing is still wet, sprinkle different colors of the powdered royal icing all over the log. Let the icing dry completely, which can take a few days.
f) Gently pull out the bamboo table mats from underneath the log, and then carefully peel away the silicone baking paper from the inside of the bark.
B: Dry rot
Roughly spread the inside of the oak tree bark transfer with russet red stiff-consistency royal icing to create a rustic effect. Sprinkle with russet red royal icing powder, as desired. Let the icing dry.
My finished project picture (at the start of this mini-tutorial) shows that bark of many different sizes and shapes can be made with this royal icing powder technique.
![]()
JMU: Just wonderful! Thank you again for that mini, yet very in-depth tutorial! Now, onto a different topic. How does Hungarian cookie decorating differ from that seen in the rest of the world, in your opinion? Are there special Hungarian cookie decorating traditions, like piped embroidery for instance, or special cookie flavors/recipes that you think our readers should know about?
![]()
TGG: Our original decorated cookie was the so-called mézesbáb (honey puppet), which can still be found at fairs today. Originally, the dough had no honey or spices; it was just used for ornamental purposes. (That's why I had that unpleasant experience as a little girl that I talked about earlier.) The heart, hussar (Hungarian soldier in a calvary regiment), doll, and horse were the most common shapes for the dough. The base dough color was red, and was iced with wavy lines and flowers, each of which had a certain meaning.
Nowadays, decoration is basically no different than in other parts of the world. Modern decoration is becoming more and more popular here, but the most accepted decorations are still embroidery patterns. There are many traditional embroidery patterns that differ in their motifs, such as Kalocsai and Matyó, to name a couple.
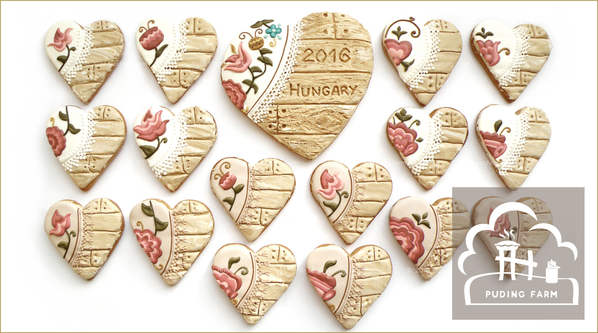
My personal favorite embroidery pattern is called kunhímzés (a Cumanian embroidery pattern). This name is given to the embroidery sewn on pillows in the Nagykunság region. To our knowledge here in Hungary, this embroidery is the earliest of our existing embroideries. It was sewn on flax linen with very fine wool threads. The wool was dyed with plants, for example walnut leaves (brown), elderberry (Cuman blue), straw (yellow), onion peels (golden brown), grape peels (purple), rosemary (green), raspberry (pinkish red), and even horse urine (yellow)! The most popular patterns today are the rose, four-fold forget-me-not, and dancing tulip. Below is a photo of one of my Cumanian-embroidered gingerbread sets.
![]()
JMU: So lovely - and quite different than your other nature-inspired work!
And now, for my usual parting question . . . Where would you like to see yourself in the cookie world three years from now? What are your cookie dreams and aspirations, and how do you plan to achieve them?
![]()
TGG: My answer is very short for this question. I just want to keep my enthusiasm about creating cookies for a long time!
![]()
JMU: Well, here’s to staying fresh and full of innovative ideas for years to come! Thanks again for your Herculean efforts in translating this interview to Hungarian and then back to English, and in drafting not one, but two mini-tutorials! You offered so many great tips and lessons throughout this interview. I am sure everyone who reads it will learn a tremendous amount.
For more information about Timea and her work, please check out her Cookie Connection member profile and Facebook page.
All cookie and photo credits: Timea Gazdagné Görbe

Cookier Close-ups is the place on Cookie Connection where we celebrate the change-makers of the cookie decorating world. Whether forging new enterprises, inventing novel decorating techniques, or consistently charming us with their cookie decorating prowess, each of our featured thought leaders has redefined in his/her distinctive way how we interact, create, or otherwise do business here in cookie space!
If there are other cookiers you'd really like to get to know, please post requests in this forum. We'll do our best to round them up for an upcoming Cookier Close-up! Thanks!














Comments (23)