 I don’t know about you, but Mother’s Day is one of my favorite days of the year. Because my mom is just the best, honestly! I love giving her a treat on any day of the year (and I certainly do so), but on that special day, I love giving even more. She has always been our family's anchor, the thread that holds us together. No matter how stupid or absurd I may be (and I have behaved quite stupidly and absurdly, especially during puberty . . . please forgive me, Mom . . .), she never holds it against me. Instead, she always holds me in her arms and showers me with love. In return, I have been showering her with cookies these past years. She has so many of them now that she has begged me to make some useful cookies - ones that she can hang up and actually decorate her home with. Her wish is my command, so this tutorial is for her as much as for all of you and your mothers. I don’t know your moms, but I am sure they deserve this treat - a big, big heart to show your love and appreciation - just as much as mine.
Here's what you will need:
- 1 (7 1/2-in/19-cm) heart cookie with 4 3/4-in (12-cm) heart cutout in center, and small holes cut into top and bottom
- 1 (2 3/4-in/7-cm) heart cookie, again with small holes cut into top and bottom
- Pastry bags fitted with #2 and #3 round tips, or equivalents
- White royal icing, piping and thin flooding consistencies
- Medium and small soft paint brushes
- Rainbow Dust Pearl Pacific Blue luster dust
- Rainbow Dust Spring Green petal dust
- Light brown royal icing, piping consistency
- Gold luster dust
- Vodka or clear extract
- White ribbon
- Poppy red royal icing, stiff consistency
- Pastry bag fitted with Wilton #59° petal tip or equivalent
- Baking paper squares or equivalent
- Flower nail
- Black nonpareils
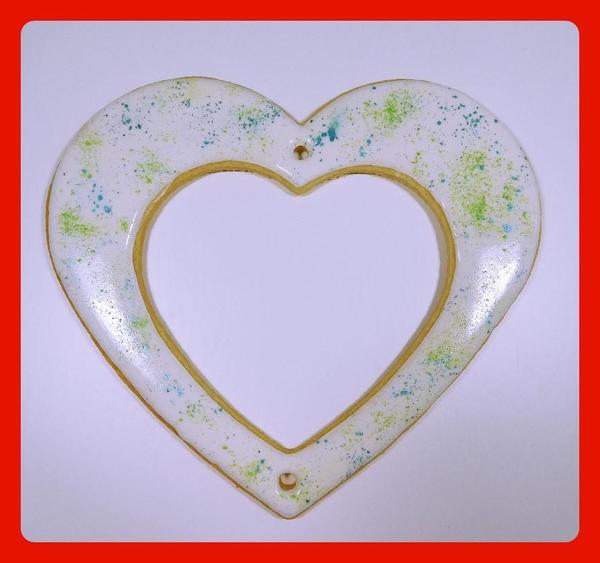
Start by baking the cookies, and don’t forget to punch the small holes in their tops and bottoms before baking. We will need those holes in order to properly assemble the cookie after it's been decorated. To punch these holes, I normally use the end of a wide drinking straw, but the end of a pastry tip is also fine. Just remember that the holes will shrink slightly while baking, so don’t start them out too small. This is what the baked and cooled cookies should look like:
Using a pastry bag fitted with a #2 round tip and filled with white piping-consistency royal icing, outline the cookies, holes included. I am generally not a fan of outlining, because the outlines normally show. But since these cookies are pretty large, we need the flooding icing to be a bit on the loose side, and the outlines act as necessary "dams". And, no worries anyway, as we will hide the outlines with borders later. There is no need to allow the icing to dry after this step.
Before you flood the outlined cookies, get the medium-sized soft brush and luster/petal dusts ready, as you will have to be quick! Now, take a pastry bag fitted with a #3 round tip and filled with white flooding icing, and flood the large heart cookie. Immediately follow up by sprinkling the luster/petal dusts onto the wet icing. To do this, gently dab the soft brush into the dust, shake off any excess dust, and then tap the brush gently above the surface of the cookie. Try not to touch the surface, though, as you will leave marks (clumsy me has done so). If you have thinned your flooding icing to about a 10-second consistency, you should have plenty of time to apply both dusts before the icing sets. Finish the small heart in the same way, though there is no need to hurry this time, as it is just a small cookie.
Let the cookies dry about two hours at room temperature, or 20 to 30 minutes in a food dehydrator. (Gosh, I just love my dehydrator; it makes things so much quicker and easier. Wish I had bought it ages ago!)
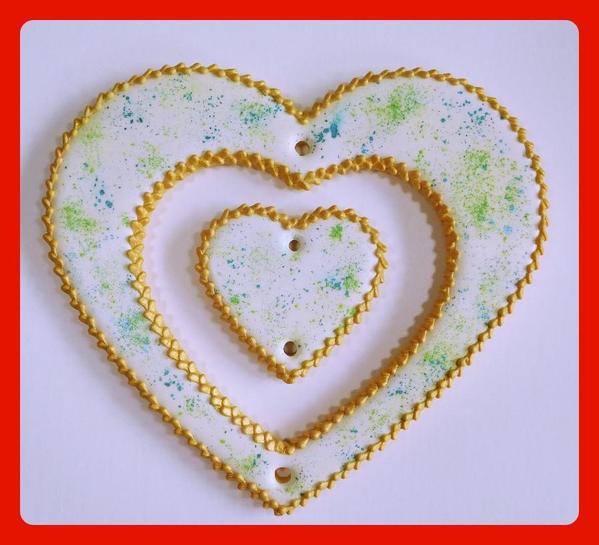
Now, take the light brown piping-consistency royal icing, and apply a border of your choice to the heart edges. I decided to go with a "forked" bead border (meaning a bead border that alternates direction, as pictured below), but anything goes. Let the border dry completely before you paint it. Again, 30 minutes in a dehydrator should be plenty of time, but I like to be on the safe side and normally allow at least one hour. If you paint borders before they are completely dry, the surface tends to break apart and dissolve, leaving ugly little holes that look like moths have eaten away at the icing. Bah!
Once you are sure that the border is dry enough, mix some gold luster dust with vodka or clear extract, and paint it onto the border with a small brush. If you have used light brown icing as suggested, you don’t need to be too precise, as any parts you forget to paint won’t show much. If you used white icing instead, every little part that is not covered with gold paint will jump straight into the eye of the beholder.
Now allow your cookies a good night’s sleep! Eight hours is considered healthy by doctors, and you should follow their advice ![]() . The cookies need to be 100 percent dry to the bone before you can assemble them.
. The cookies need to be 100 percent dry to the bone before you can assemble them.
But don’t worry, no need to get bored in the meantime. We still have the poppies to make! Poppies are my mother’s favorite flowers, but please feel free to use whatever flowers your mother prefers. I have looked long and hard at pictures of a gazillion poppies, and they all have one thing in common – none of them are alike. Most kinds have four petals, though, and those petals go wherever they want. They spread in all directions, fold onto each other, and are even crumpled sometimes. Poppies are true individuals, and that is what I tried to achieve with mine.
Place your poppy red stiff-consistency royal icing in a pastry bag fitted with a curved petal tip (Wilton #59° or equivalent), and attach a baking paper square to a flower nail. I used a rather small tip because I just love small things and wanted to cover the heart in myriads of poppies. But if you want larger poppies, there are petal tips in almost every size. You can make your poppies as small or as gigantic as you like.
Pipe four petals in a circle to make a totally open poppy (see photo below, upper left). To make a mostly open poppy, pipe three petals in a semicircle and a fourth one on top in the middle (upper right). Or pipe two petals in a half circle and two more on top of that (bottom left), or one petal on the bottom with three on top (bottom right). You get the idea, right?
Sprinkle a few black nonpareils into the center of each poppy right after piping. It is somewhat hard to control where these little beads go, so I didn’t truly “sprinkle” them, but placed each one individually. But again, uniformity is not what is required, so sprinkling a few at a time is very much okay.
Once your cookies have had the needed rest and your poppies are dry, you can assemble everything. First, cut an appropriate length of white ribbon to be the hanger at the very top of the heart. Insert this ribbon into the hole on top of the large heart cookie, and tie the two free ends together. Next, tie the small heart into place by connecting the top holes on both cookies with a shorter piece of ribbon. This process works best if you turn the cookies over and knot the ribbon at the back. (Don’t forget to work on a soft surface so you don’t damage the front sides!) Use another small piece of ribbon to secure the bottoms of each heart together, again tying it at the back so the knot does not show. Try to center the small heart as best as possible.
Now, turn over the cookies again, and attach the poppies in various spots with dabs of leftover poppy red icing. Don’t cover all of the cookie with flowers! We want the background to show, don’t we?
Allow the icing under the flowers to dry, wrap the cookie in transparent foil or pack it into a nice box, and wait for Mother’s Day. It’s not that far away!

 Leoni Eckart, aka Laegwen, started her baking career way before her own memory sets in, decorating Christmas cookies with her mother (at least that's what she's been told!), and has never entirely stopped puttering around in the kitchen since. Her first decorated cookies as an adult were her own wedding favors, and then, over Christmas 2014, her cookie fever went into overdrive! As of present, it shows no signs of cooling off. You can find Leoni on Facebook here, or you can reach her by email at laegwen@outlook.de.
Photo credit: Leoni Eckart
Note: Get Inspired with Laegwen is a bimonthly series of cookie decorating tutorials that follow Leoni Eckart's personal experiments with gumpaste, royal icing, and other cookie decorating materials and methods. This article expresses the views of the author, and not necessarily those of this site, its owners, its administrators, or its employees. To read all of Leoni's past Get Inspired tutorials, click here. And to catch all of our Cookie Connection tutorials, click here.







Comments (18)