
Bye bye, sun. Bye bye, sunsets on the beach. Bye bye, mojitos! ![]()
Fall is almost here, and we have to start thinking about changing our bikinis and beach hats for something warmer.
Nope, I’m not speaking about a sweet cup of tea, but about something that is predicted to be a fashion trend this autumn season: tartan and plaid prints.
I hope you said a huge "yes"!
What you'll need:
- Flooded cookie in light peach, orange, or ivory, completely dry
- Stencils (plastic or adhesive ones)
- Airbrush colors (or edible spray colors)
- Vodka, alcohol rejuvenator spirit (such as this brand), or alcohol-based extract
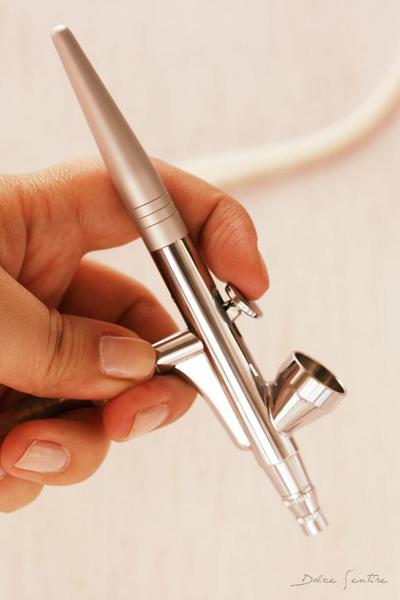
- Airbrush (I use a Dinkydoodle Designs airbrush.)
- Brown and burgundy edible pens (I’ve used Rainbow Dust Coffee and Burgundy.)
- Ruler
Airbrush colors:
You can use a wide range of fall-themed (or other) airbrush colors for this cookie, but here's what I used:
- 1 part Kopykake (Kroma Kolors) Orange + 1 part Kopykake White (color 1)
- 1 part AmeriColor Burgundy + 1 part AmeriColor Maroon + 4 parts of vodka (color 2)
Before starting the tutorial, please consider these few things:
- The goal is to create cookies that imitate pieces of fabric, so you don’t have to be very accurate in your icing, okay? Don’t worry about borders or irregularities on the icing; the icing shouldn’t be perfect this time, so relax!

- Sometimes I use normal gel or paste colors (never powder colors, please) mixed with a little bit of vodka in order to create my own colors that I know I can't find in stores. To avoid airbrush blockage, just be sure to mix a liquid consistency (instead of a pasty consistency) and to mix well.
- Can you keep a secret? I love stencils! Yes, I have a lot of them: both the plastic and the adhesive ones. You can find them in scrapbooking stores (or in the scrapbooking section of craft stores), and they can be directly applied to cookies, allowing you to reproduce a lot of beautiful designs over and over again. For this cookie, we will use both kinds of stencils, but I have to confess that I really adore the adhesive ones, because they are easier to use. (You just have to stick the stencil on the iced cookie, airbrush the cookie, and then peel it off.) And best of all: you can get more accurate results, which means . . . yay, no more color-stained fingers!
 In addition, once used, you just have to wash the stencil with warm water and stick it back on the acetate on which it came; then it is ready to be used again as many times as you like.
 - That all said, adhesive stencils are a scrapbooking/craft product and are not necessarily food-safe, so proceed at your own risk when using them. [EDITOR'S NOTE: As an alternative to adhesive stencils, consider punching out frosting sheets with a craft punch, and using the frosting sheet as the stencil. Frosting sheets conform extremely well to cookies, better than acetate/plastic stencils, and are food-safe, even edible!] In this case, I’ve chosen an adhesive lace stencil that is perfect for making the shabby chic lace effect on this cookie.
Okay. Are you ready to start? Me too! ![]()
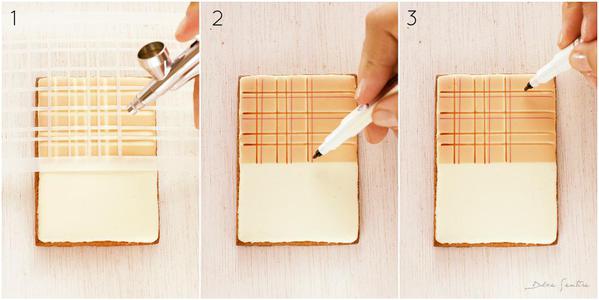
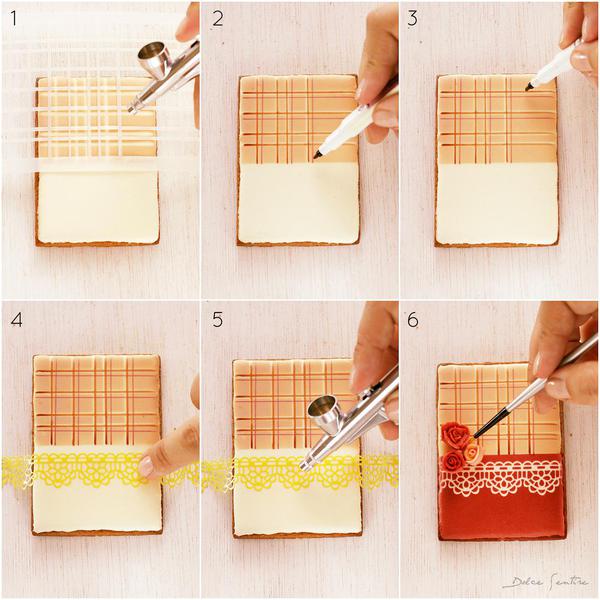
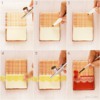
Steps 1, 2, and 3: Start by setting a plastic stencil with a plaid pattern on the top half of the cookie, and then airbrush over it with color 1 (image 1) using two cookies or a Stencil Genie to hold the stencil in place.
Be careful: To prevent color from getting on the bottom half of the cookie, mask it off with a piece of paper and hold the paper in place with one hand as you airbrush with the other.
Complete the plaid design by first drawing vertical and horizontal lines with the brown edible pen (image 2); then, with the burgundy edible pen, draw vertical and horizontal lines slightly offset to the brown lines (image 3). Use a ruler as a guide in order to draw super straight lines.
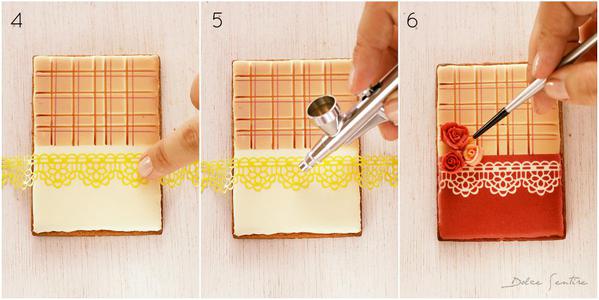
Steps 4, 5, and 6: Now you're ready to move onto the bottom half of the cookie. Stick the adhesive lace tape stencil toward the top of the bottom half. Make sure the stencil is well secured to the royal icing in order to prevent airbrush coloring underflow and to get the most precise design possible (image 4). Then fill your airbrush with color 2 and spray over the stencil (image 5).
Remember: To avoid spraying the plaid half of the cookie, mask it off with a piece of paper as described above.
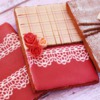
Finally, remove the stencil by peeling it off and . . . voilà! Your rustic, shabby chic, fall-themed cookie is done, give or take a few finishing touches (image 6)!
Quick photo recap:
If you'd like, you can complete the design with piped royal icing roses and a rope border between the top and bottom halves.
Easy, eh? I hope you find this technique useful and fun! Please let me know your questions and thoughts in the comments area below. I'm happy to answer every word from you! ![]()
Cookie and photo credits: Aixa Zunino

 Aixa Zunino is the soul of Dolce Sentire, a virtual corner of sweetness and creativity dedicated to cookie decorating. On her site, this garden engineer, self-taught decorator, and lover of flowers and animals lets her imagination fly, sharing everything she has learned since discovering the world of cookies in early 2012. She combines this activity with courses around Spain (her current home) where she teaches all the secrets to getting dreamy cookies. Meet her on Facebook or her website, and email her your cookie decorating questions or concerns at dolcesentiredolci@gmail.com.
Photo credit: Aixa Zunino
Note: This article expresses the views of the author, and not necessarily those of this site, its owners, its administrators, or its employees. To read more Cookie Connection tutorials, click here.





Comments (19)