During these lazy, hazy, crazy days of summer, I usually like to do a longer running and more relaxed challenge. And after our last 3-D cookie challenge, Practice Bakes Perfect #34, I think we could all use a bit of a breather, no?! So, for this challenge, I would like to go back to the basics and learn to do some painting. I must say, as someone who had not taken an art class since she was in grade school, I found the idea of painting a bit intimidating. I had been decorating cookies with royal icing for literally years before I even put a paint brush on a cookie. It really wasn't until 2015, when I sat across from Monica Holbert (aka Cookie Cowgirl) at the cookie painting table at CookieCon that I finally got up the courage to even try. And you know what? It wasn't hard at all. In fact, it was super fun! AND, it meant I had a huge new tool to add to my cookie decorating tool kit!
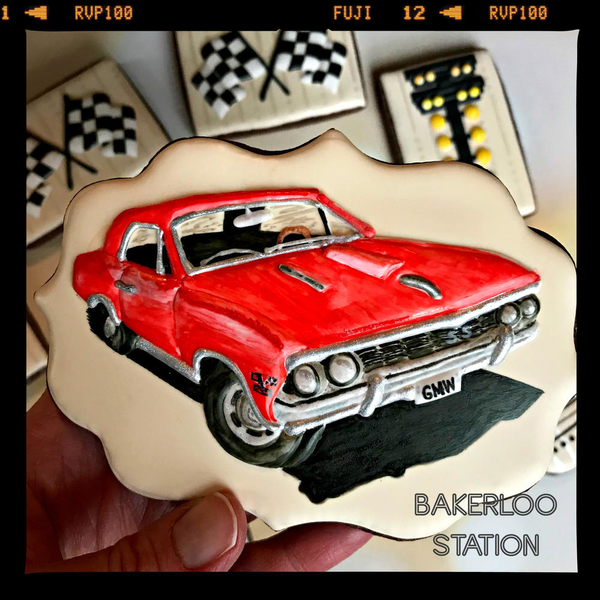
After painting on cookies for just a couple of years, and with no formal art training, I made this cookie based on an old photo of my dad's '66 Chevy Chevelle (*pats self on back*)!
Now, I want all of you, fellow cookie artists, to put a little more "art" into your cookieing too!
Before I talk about the details of this challenge, let's talk about our PRIZE! In addition to acquiring some mad painting skills, one lucky challenge entrant will be chosen at random to win our prize! (Remember, the more times you enter the challenge, the greater your chance to win!) And what, you may ask, is our prize for this challenge? It will be a surprise grab bag of goodies, donated by Cookie Connection host @Julia M. Usher, containing stencils and all kinds of cookie decorating loot.
Now that you have a little extra incentive for participating, let's talk about what I want you to do in this challenge! Simply put, I want you to learn to paint on cookies. The reason I thought this would make an excellent summer challenge is that painting on cookies is not very hard to learn, but it does take a fair amount of practice to master. And what better time to practice than during the slower, freer days of summer?
THE BASICS
Painting on cookies doesn't require a whole lot of tools. Really, you just need some form of edible coloring, a paint brush, and a cookie to paint on! Okay, so maybe it isn't quite that simple, but, really, it's not rocket science, people! I am still very much learning this skill for myself, but this is what I have learned:
Your Canvas. One of the easiest surfaces to paint is glaze icing. This is because glaze icing has corn syrup in it, which creates a shiner, smoother surface that is more impervious to water and liquids used during the painting process. Using glaze icing is a great idea if you are looking to use more of a watercolor painting technique a la Angela Niño of The Painted Box. The next best icing to use for painting is "frankenfrosting," that half-royal-half-glaze hybrid originally created by Anita of Sweet Hope Cookies. You can also paint on regular royal icing, but plain royal icing can be very susceptible to pitting and dissolving during the painting process. So if you prefer to work with royal icing, I would suggest that you add a little bit of corn syrup. In fact, I paint on royal icing all the time, and all I do is add a tablespoon of corn syrup per pound of sugar in my regular royal icing recipe.
You may also paint on materials other than icing, such as fondant or edible paper. The process is generally the same as if painting on icing.
Your Paints. Basically, any edible coloring that you normally use to color your royal icing can be used for painting. Personally, as a beginner, I think the easiest coloring to work with is liquid airbrush coloring. I like to place a couple of drops of the coloring I want to use on a large dinner plate (or a painter's watercolor palette if you want to be fancy!). Then I let it dry and use it like a real watercolor palette. Others, like Angela Niño, take it to the next level by making their own edible watercolors. Angela mixes food gel colorings with large amounts of alcohol and basically distills them down and filters out the solid gel bits. (Check out her original paint-making process here.) You can also paint with dust palettes, like this one by Petal Crafts. Again, you would use a dust palette in the same way as a real non-edible watercolor palette - add a little bit of water or alcohol, and you're good to go! Really, though, the method you choose for your projects is a matter of preference and convenience.
Before we move on, a word about your "paint-thinning" liquid: Generally, I paint with airbrush colorings and water, however when painting with metallic dusts, I use a very high-proof clear grain alcohol. I find that when painting, unless I am going for a watercolor effect where I need to use a lot of liquid on my cookie, plain water works just fine. But when one is trying to create a watercolor effect, using alcohol is a bit better because the liquid evaporates faster and minimizes the risk of icing dissolving and pitting.
Your brushes. Just like having favorite tips, or favorite piping bags, or favorite pens, everyone has a different opinion about the best brushes. I find that regular artist brushes are fine, as long as you use those brushes exclusively for food. The type of brush you need will depend on what you are painting, but I find that it is helpful to have a few different size round brushes, a flat brush, and a fan brush. Here is a useful article from Art Journalist that describes the various types of brushes.
GETTING STARTED
- What’s New, Honeycat? A Little Birdhouse
- What’s New, Honeycat? Handpainted Robin Cookie
- What’s New, Honeycat? Simple Autumn Leaves
- Get Inspired with Dolce Sentire: Christmas Cookie Wreath
- Get Inspired with Dolce Sentire: Dimensional Rose Cookie
- Get Inspired with Dolce Sentire: Handpainted Fabric
The thing I have found about painting (as with anything) is: it is relatively easy to learn, but hard to master, so the key is to practice, practice, practice! That is why I am going to give you an extra few weeks to work on this challenge.
[AUTHOR'S NOTE: As always, if you find additional tutorials, tips, or other information that may be useful to those of us trying to learn painting techniques, please share them in the comments under this post. Likewise, thoughtful discussions of your own "fails" are extremely helpful to others - please do not be shy about sharing! Share. ALL. The. Knowledge.]
And now that you are ready to paint, let's talk about the rules for this challenge.
Rules: PLEASE READ THEM CAREFULLY. Nothing makes me sadder than having to disqualify a fabulous set of cookies because someone failed to read ALL of the rules!
1. Create a cookie or set of cookies that is handpainted with edible paint.
2. You may use only ONE COLOR OF ICING. For instance, If you flood your cookie white, then that is your one and only icing color. You may pipe details that are white and then paint them (or leave piped details that are white), but you are not allowed to pipe details with icing that is any color other than the one you chose to flood your base. (Note: If you are using fondant or edible paper as your "canvas," the same rule applies, and you may use only one color.)
For example, the following cookie was simply flooded and then painted. This type of cookie IS PERMITTED.
Handpainted 3-D Spider Cookies by Evelindecora
The following cookie was flooded and piped in white and then painted. This type of cookie IS ALSO PERMITTED (note the petal dust palette used in this photo):
Dimensional Rose Cookie by Dolce Sentire
The following cookies ARE PERMITTED because the piped details are the same one color (white) as the base flood icing:
Painting for "My Mom" by Teri Pringle Wood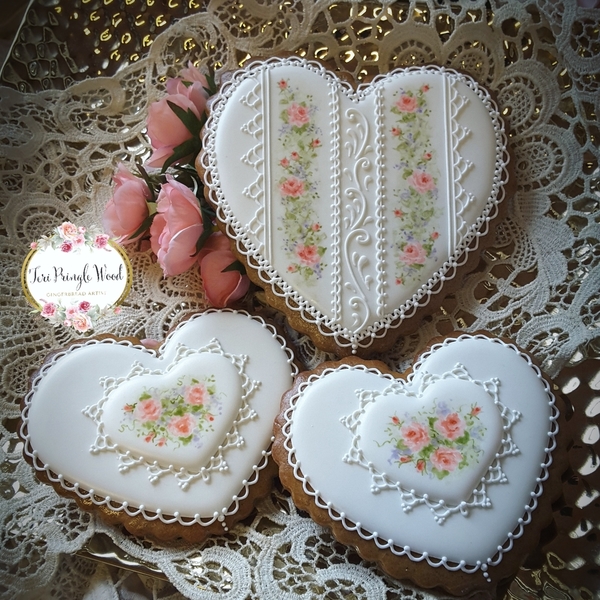
HOWEVER, the following cookie would NOT BE PERMITTED because more than one color of icing was used (to create the pink piped roses and red buds):
Watering Can with Flowers by Di Art Sweets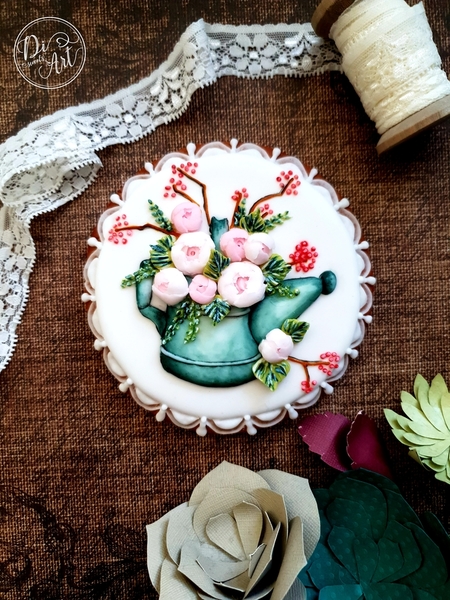
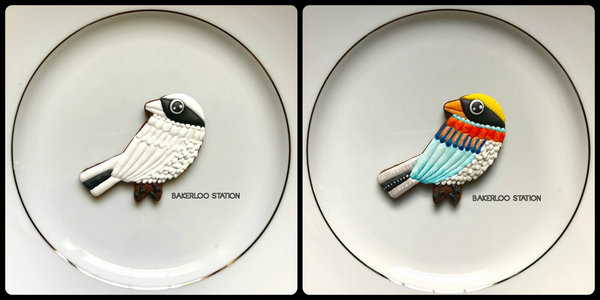
The following cookie would also NOT BE PERMITTED because I used both white and black royal icing to pipe the details. However this cookie would be permitted if I had used white to pipe all of the details and then painted them black.
3. STENCILS may only be used if they are used for handpainting. (Because this challenge is meant to teach you how to paint, I strongly advise that you keep stencil use to a minimum, if at all.)
4. The use of AIRBRUSHES in this challenge is strictly prohibited.
5. Your design must be completely original, and not a copy of any other artist's design. (In my eyes, the more original the entry, the better! And, remember, no copyrighted designs may be used without written permission.)
6. As always, we ask that you make a brand new cookie project for this challenge.
7. Think outside the box, inside the box, and BE THE BOX. In other words, immerse yourself in this challenge by taking some healthy risks, and HAVE SOME FUN.
- Please post an image of your cookie(s) to the site under the Practice Bakes Perfect clip set no later than August 20, 2019 at 5 pm central. (Note: August 20 is a Tuesday, not a Saturday, as usual.)
- Because these challenges are ongoing, we ask that you put "Practice Bakes Perfect Challenge #35" in your photo caption AND in a tag, so that we can tell the challenges apart from month to month. Please use the main title field to uniquely name your cookies as you normally would.
- Please also assign other relevant clip sets and tags to your images, as you normally would. (Meaning don't just use the Practice Bakes Perfect clip set and leave it at that, or your photos won't easily be found with keyword searches.)
- You can enter more than once, but please post only one clip of each distinct entry. Multiple clips of the same entry are not allowed unless added in a comment beneath the one primary clip.
After the challenge has closed on August 20, we will announce the winner in the Saturday Spotlight the following weekend (August 24, 2019). The next challenge will be announced about a week after that Spotlight.
And one last thing . . . This is NOT meant to be a competition. The only person you should be competing against is yourself. Period. These challenges are intended to inspire the artist in you and push you to be the best cookie artist YOU can be at this snapshot in time. Remember, the whole point of this exercise is to get you out of your comfort zone - to "take healthy risks," as my wise-beyond-his-years son always reminds me. Plus, prizes are given entirely at random, so healthy risk-taking has its own rewards!
I would love to chat with you as you journey through this process, so if you have any questions about the challenge, are having trouble getting started, need help bringing an idea to life, or want technical advice, please leave a comment below or send me a Cookie Connection private message.

 Christine Donnelly began her professional baking career at 16, when she was hired on the spot at her local bakery to work the counter and decorate cakes. After detours to college and law school, she worked as a trial lawyer in Chicago for many years, ultimately leaving that career to become a stay-at-home mother to her two children. In her “retirement,” she continued to bake at home, at last finding her preferred artistic medium in decorated cookies. In February 2013, Bakerloo Station was born with a presence on both Facebook and Instagram. Christine makes cookies to balance her left brain, to inspire and share creative ideas, and to feed those needs that only art can satisfy.
Photo credit: Christine Donnelly
Note: Practice Bakes Perfect is a bimonthly Cookie Connection blog feature written by Christine Donnelly that poses inspiration or challenges to get you to stretch as a cookie artist - for practice, for prizes, and for fun! Its content expresses the views of the author and not necessarily those of this site, its owners, its administrators, or its employees. Catch up on all of Christine's past Cookie Connection posts here.



Comments (26)