[EDITOR'S NOTE: So, I've been pouring over your input - here - about what you'd like to see on Cookie Connection in its second year. And I'm happy to report that "more tutorials" is the most popular request so far - by a long shot.
"Happy?", you ask! Yes, "happy", because, you see, we're already taking steps to bring you exactly what you want! Just call us clairvoyant, if you please! ![]() In addition to our monthly and bimonthly tutorials written by Kari Arroyo and Lucy Samuels, I'm overjoyed to announce a new member of our "tutorial" team, Melissa Joy Lacasse of Melissa Joy Fanciful Cookies.
In addition to our monthly and bimonthly tutorials written by Kari Arroyo and Lucy Samuels, I'm overjoyed to announce a new member of our "tutorial" team, Melissa Joy Lacasse of Melissa Joy Fanciful Cookies.
Starting with this very post, Melissa will be picking up Karen Anderson's How Did YOU Do That? column, but giving it her own special spin. Though Melissa's posts won't be tutorials in the classic step-by-step sense, she will be exploring the how-tos of other cookiers' work through in-depth interviews. If you've ever been puzzled by a wonderful cookie on this site, just let Melissa know. Provided the topic seems right for her column, she'll reach out to the cookier, pepper him/her with questions, and work hard to demystify the creation for all of us.
Both an accomplished decorator and cookie writer (Melissa writes her own blog and most recently contributed to Bake It Up A Notch), Melissa is perfectly suited to host this column. We are extremely lucky to have her. Please join me in welcoming Melissa to our contributors team! ![]() ~JMU]
~JMU]

Hello, Cookie Connection friends! I am THRILLED to be the newest contributor to this site and aim to bring you informative content regarding the amazing cookie work out there! My goal is to highlight an artist's creation and break down his or her process. I am hoping to find "ah ha!" moments, whether it be though deconstructing an elaborate design or simply discovering a new-to-you technique. I feel that regardless of decorating experience, we can all learn a thing or two from each other!
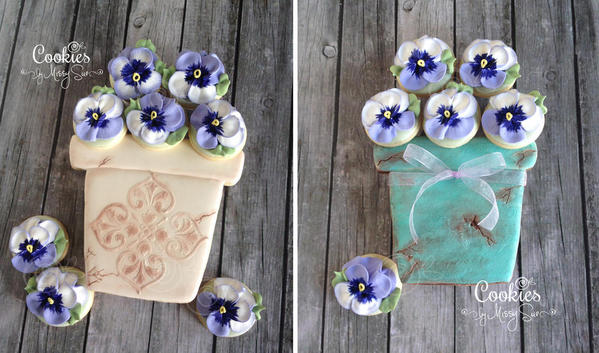
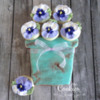
So without further ado, I bring you my first interview with Melissa O'Regan from Cookies by Missy Sue. Melissa created a wonderful set of cookie pansies and flower pots that I just had to find out more about!
MJL: Hello, Melissa! Or can I call you Missy Sue so no one gets confused during this interview?! ![]() I have to tell you that I adore this whole cookie set. What a wonderful way to welcome the warm weather with a sweet pot of pansies . . . in cookie form! How did you come up with this idea, and did you design them for something in particular?
I have to tell you that I adore this whole cookie set. What a wonderful way to welcome the warm weather with a sweet pot of pansies . . . in cookie form! How did you come up with this idea, and did you design them for something in particular?
MO: Thank you so much for having me, Melissa! I am a huge fan of your cookies, so this is quite the treat to be interviewed by you on Cookie Connection! And yes, you can call me Missy Sue. ![]() I created these cookies to welcome spring and with Mothers' Day in mind as well. This sweet set, a flower pot surrounded by over 50 pansies, was shared with my MOPS (Mothers of Preschoolers) group. Like most cookie ideas, these pansies have a little story behind them.
I created these cookies to welcome spring and with Mothers' Day in mind as well. This sweet set, a flower pot surrounded by over 50 pansies, was shared with my MOPS (Mothers of Preschoolers) group. Like most cookie ideas, these pansies have a little story behind them.
My journey in decorating actually started with ice cream cakes while working at Baskin Robbins many years ago. Mmmmm . . . how I LOVE ice cream! One of the flowers that I made quite often while decorating cakes was this beautiful pansy, and it has always been one of my favorites. When my passion for decorating met royal icing and cookies, I knew I would have to make these pretty purple pansies into cookies one day! Spring was the perfect opportunity to do just that.
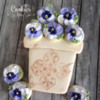
I really love how these pansies just pop with color, and they are such a friendly flower too! As for the pots, I knew I wanted to present the pansies in a flower pot, but I really had a hard time settling on just one . . . so I decided to make two. ![]()
MJL: You used a lot of great techniques to create the entire set, but let’s start with the flower pot. I am curious to know if you hand-cut your dough, or did you use a cookie cutter?
MO: For this cookie, I did hand-cut the dough. Since I only made two of them, it was fairly simple. But, I would love to get this flower pot in a cookie cutter as I can see using it a lot more. It holds so many possibilities!
MJL: My personal favorite is the teal pot! Can you tell us how you went about creating that textured look? Was there a base coat first, and then another color over it?
MO: I really wanted the teal flower pot to resemble an old painted clay pot - the imperfect, but well loved one that your son or daughter might bring home from preschool that you still have when they are grown and go off to college. I think I currently have three of them in my house. ![]() To achieve this look, I started by flooding my cookie with a base coat of ivory royal icing and added some cracks. (We’ll get to that part in a moment.) Once that icing was completely dry, I used some much thinner, watered-down teal royal icing to paint over the base coat with a paint brush. Since I was hoping my cookie would look similar to a real painted pot, I was pleased that the icing ended up somewhat porous to give the pot a slightly rough texture. It was just what I was going for . . . I love when that happens!
To achieve this look, I started by flooding my cookie with a base coat of ivory royal icing and added some cracks. (We’ll get to that part in a moment.) Once that icing was completely dry, I used some much thinner, watered-down teal royal icing to paint over the base coat with a paint brush. Since I was hoping my cookie would look similar to a real painted pot, I was pleased that the icing ended up somewhat porous to give the pot a slightly rough texture. It was just what I was going for . . . I love when that happens!
MJL: The cracks in the pots were such a great detail! How did you go about making them?
MO: When the base coat on my cookie was mostly dry, I used my scribe tool to etch out the cracks. By having the top layer of icing dry, but not completely dry underneath, I was able to get slightly deeper cracks to really give them some depth. After creating the cracks and adding the coat of teal icing, I allowed the icing to dry completely. I then brushed some bronze sterling pearl dust into the cracks with a dry paint brush, so they would stand out and appear to be the color of a clay pot underneath the teal icing. The cracks were inspired by a tutorial from one of my personal favorite cookie artists, SweetAmbs, using her “cracked glaze” technique. However, I skipped the glaze to leave the pots with a rustic clay look rather than giving them a gloss. You can view her tutorial here.
MJL: Anything you’d like to share with us about the stenciling detail?
MO: The stencil on the ivory pot is one of my favorites, and it was actually a last-minute detail that I decided to add. Most of my cookies end up a little different than I originally plan, but I like to be flexible as I’m going. I also used the bronze sterling pearl dust on the stencil so it would really stand out.
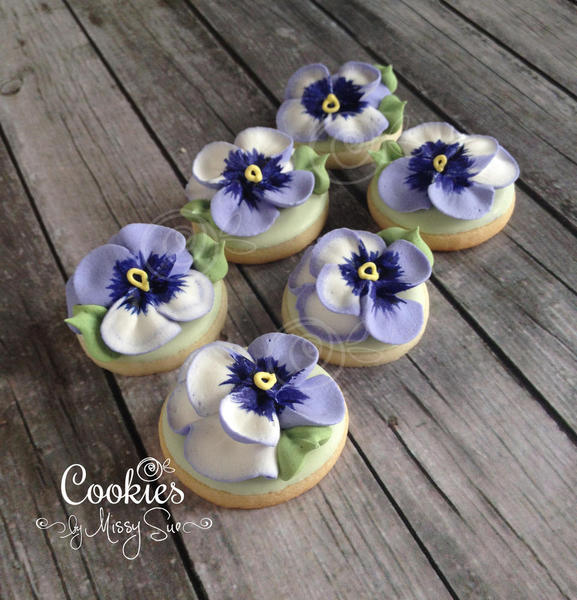
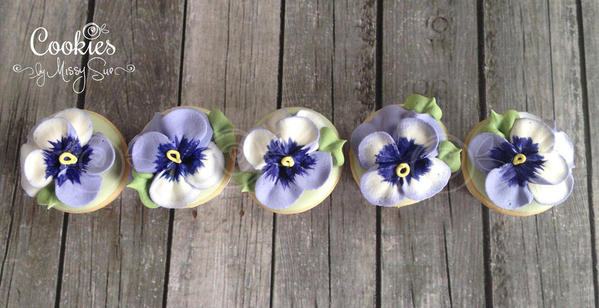
MJL: The pansies you created are the just sweetest! I get so stuck in a rut when it comes to making flower cookies. On the other hand, I can also get overwhelmed with all of the possibilities when designing one! This 3-D effect was a great take. Is the entire pansy a transfer, or did you pipe it directly onto the cookie?
MO: I chose to pipe the pansy directly onto the cookie for this set. The round cookie was easy to rotate in my hand as I was piping on the petals. But, it can just as easily be done as a royal icing transfer using a flower nail and parchment paper. The multiple layers of petals really did give these pansies a wonderful 3-D effect and made the whole pot of flowers come to life . . . in cookie form, of course.
MJL: What tip did you use to make the petals and how did you achieve their purple and white two-tone look?
MO: I used a Wilton tip #104 to make the petals on the pansies, but any size rose petal tip would work. A smaller tip would make a smaller flower. The two-tone purple and white is a technique that is pretty easy actually. When preparing my piping bags, I use the plastic wrap “trick”. For those who don’t know what that is, Sugarbelle has a great visual here. To get the two-tone color, I put a thin strip of purple icing alongside the white icing on my plastic wrap. Once my icing is in my piping bag, I just position my tip so that the purple icing is aligned with the narrow end of the petal tip. This will result in a slight purple color on the edge of the white petal. Beautiful and simple!
MJL: I can’t wait to try this technique! Did you paint the dark centers of the pansy, and if so, what did you use to do so?
MO: Yes, I did paint the centers of the pansies. I used AmeriColor soft gel paste thinned with just a few drops of water. Once the paint was dry, I piped the tiny yellow center with icing for the finishing touch.
MJL: One last question for you, and one that I would like to ask all of my interviewees . . . what is your can’t-live-without baking or decorating tool?
MO: Great question! My hands-down favorite is my scribe tool! I even have two extra on hand . . . just in case I (or one of my sweet kids) misplace one. ![]()
MJL: Well, Melissa of Cookies by Missy Sue, thank you so much for sharing your secrets with us for achieving this lovely set of pansies and flower pots! I am sure the information you have given us will inspire other cookie artists to try these techniques in their future work. I know that I, for one, will be purchasing a #104 tip and looking for a project on which to use that cracked effect!
MO: It was my pleasure! And thank you again for having me! One of the things that I admire most about cookie artists is their willingness to share and teach each other. I am so excited for this opportunity to inspire others with my cookies on Cookie Connection!
If you’d like to see more of Melissa’s work, you can follow her Facebook page, Cookies by Missy Sue, or check out her profile here on Cookie Connection.
Photo credits: Melissa O’Regan

 Melissa Joy Lacasse has always had a passion for baking just about anything, but something clicked once she received a cookie decorating kit years ago. This pastime that started as holiday cookies for family and friends eventually turned into Melissa Joy Fanciful Cookies, a Facebook page, and most recently, the blog melissajoycookies.com. While Melissa enjoys the creative outlet that cookie decorating brings, she finds that sharing with others, whether via bakery box or virtually, is always the most rewarding part of her cookie journey.
Photo credit: Melissa Lacasse
Note: How DID You Do That? is a regular Cookie Connection blog feature, written by Melissa Lacasse, which reveals through in-depth interviews the inside scoop behind cookiers' unique designs and technique innovations. Its content expresses the views of the author and interviewee, and not necessarily those of this site, its owners, its administrators, or its employees. To catch up on all of Melissa's past posts, click here.







Comments (13)