 It’s the end of November, which means that it's time to share a Christmas tree-themed tutorial! [EDITOR'S NOTE: Apologies to @Manu biscotti decorati for my delayed posting - it's now early December! However, there's still plenty of time to enjoy this tutorial, and even make this fabulous project! ~ JMU] To kick off, I am posting pictures of the Christmas cookie tutorials that I have shared over the past several years here on Cookie Connection.
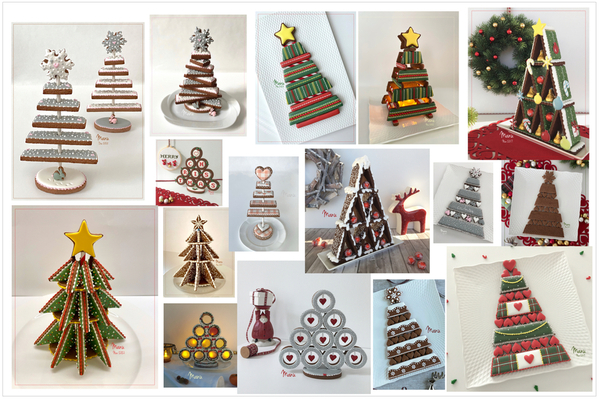
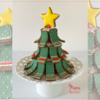
Yes, you might say I have a thing for 3-D Christmas tree cookies ![]() , and this year is no different - except for my tree construction! For this project, I started by stacking a number of circle cookies of different sizes and securing them with a paper straw inserted through the middle. I then glued some contoured cookies around this central structure to make my 2022 tree! It's a fun and relatively straightforward project, and I hope you enjoy it!
, and this year is no different - except for my tree construction! For this project, I started by stacking a number of circle cookies of different sizes and securing them with a paper straw inserted through the middle. I then glued some contoured cookies around this central structure to make my 2022 tree! It's a fun and relatively straightforward project, and I hope you enjoy it!
- Rolling pin with guides
- Cookie dough of your choice
- Perforated baking mats (like this one, or equivalent, for baking cookies)
- Parchment paper (optional, for cookie-cutting surface)
- Various circle and star cookie cutters (sizes indicated in Step 1)
- Paper straws (one for cutting holes in circle cookies and another for assembling tree)
- 1 bamboo skewer or lollipop stick with pointed end
- Ruler
- Paring knife
- 2 (2 x 2-in/5 x 5-cm, D x H) round stainless steel cake rings (typically used to mold or plate food, or to bake cakes; similar to this one)
- Royal icing:
- Green medium-consistency
- White piping-consistency, in pastry bag with PME #1 tip (or equivalent)
- Red piping-consistency, in pastry bags with PME #1 and #42 (star) tips (or equivalents)
- Yellow piping-consistency, in pastry bag with PME #1 tip (or equivalent)
- Yellow flood-consistency, in tipless pastry bag with opening equivalent to Wilton #2 tip
- Brown very thick-consistency (@Julia M Usher calls it “glue”; see her video for reference), in parchment paper pastry cone
- Offset spatula or knife (to spread icing)
- Dragées or sprinkles of your choice
- Scissors (to trim straw and skewer or lollipop stick)
Step1: Cut and bake cookies
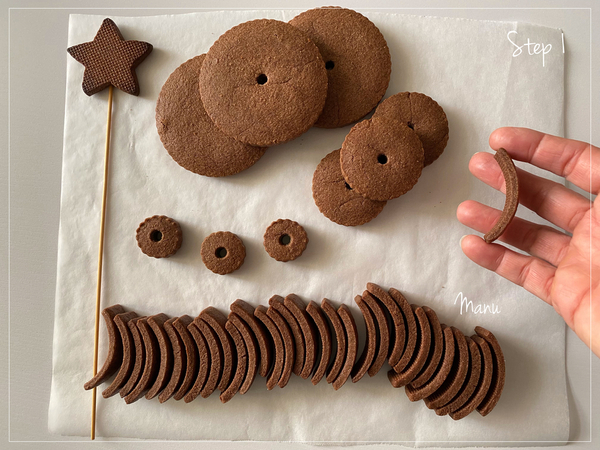
For this project, you will need to cut a total of 35 cookies, in the following quantities and shapes (I will explain more in Steps 1a to 1g):
- 9 circle cookies, 3 each in 3 different sizes (from largest to smallest: 7.5 cm/ 3 in; 5 cm/2 in; and 2.5 cm/1 in)
- 1 (5-cm/2-in) star cookie
- 25 (5 x 2-cm/2 x 3/4-in) rectangular cookies, for the contoured tree branches (I actually baked more than 25, just in case . . .)
I rolled the circle and star cookies to a 1-cm/3/8-in thickness and the rectangles to a 0.3-cm/1/8-in thickness.
Here’s a visual summary:
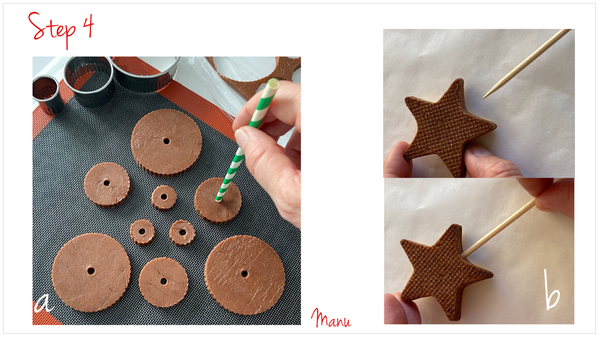
a. Using a rolling pin with guides, roll your dough to a thickness of 1 centimeter (3/8 inch) on your baking mat. Cut out nine circles, but, before baking them, use a paper straw to make a hole in the center of each one. It is important to plunge the straw perpendicularly into each cookie and to rotate it; otherwise, if the cut is made at some other angle, the final tree may lean. Bake the cookies according to your recipe. If the cookie dough has visibly spread, then reinsert the straw into each of the holes, while the dough is still warm, to make sure it can still pass through them.
b. Cut out the (5-cm/2-in) star. Bake the cookie according to your recipe. While the cookie is still warm from the oven, insert the pointed end of a skewer (or a lollipop stick) into its side (in the corner between two points) to create a lollipop.
Before getting into the contoured cookies, I would like to give a huge shout-out to @Julia M. Usher for being a constant inspiration. I learned to contour cookies a few years back by watching her YouTube videos. Her recent feature in our first Watch-Learn-Create challenge, where she shared everything about contoured cookies in a two-hour video demo (a true master class), inspired me to use my perforated mat and two tall cake rings in a useful and creative way. (Note: Changing the size of the cake rings will change the curve of the contoured cookies.)
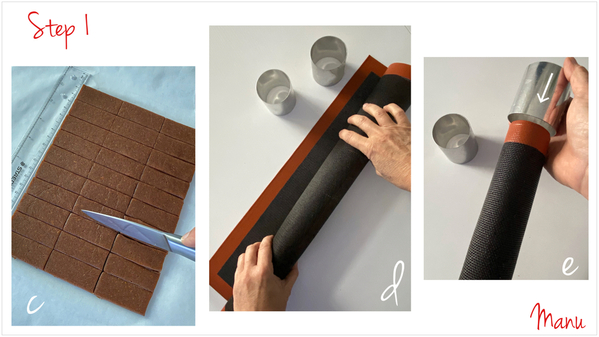
c. Roll the dough to a thickness of 0.3 centimeters (1/8 inch) on parchment paper (or a baking mat), and use a ruler and a paring knife to hand-cut 25 (5 x 2-cm/2 x 3/4-in) rectangles. I cut and baked more than 25 because I wasn’t sure how many I would need since I was making this project for first time. Having more spare cookies is always good when creating a project tutorial!
d. Roll a(nother) baking mat crosswise.
e. Insert one end of the rolled mat into the opening of a (5-cm/2-in) cake ring.
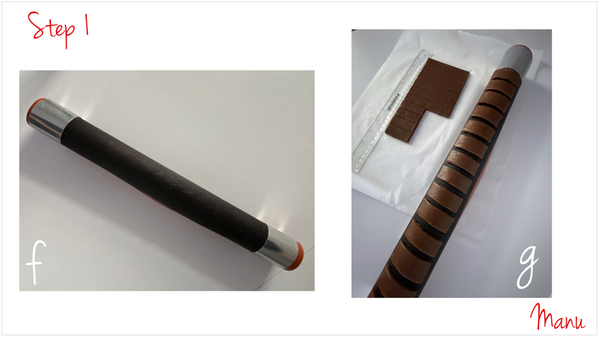
f. Insert the other end of the rolled mat into another cake ring of the same size. The two rings will hold the mat in position, making it a perfect cylindrical tool to contour a large number of cookies.
g. Place the cut rectangles crosswise on top of the rolled mat. The cookies will bake very evenly, as hot air goes through the perforated mat. They also won’t slide, as the perforated mat provides some grip. Put the rolled mat (or more than one) in the oven, and bake the cookies according to your recipe. Once the cookies are out of the oven, let them cool. Squeeze the mat between your fingers, and the cookies will easily pop off.
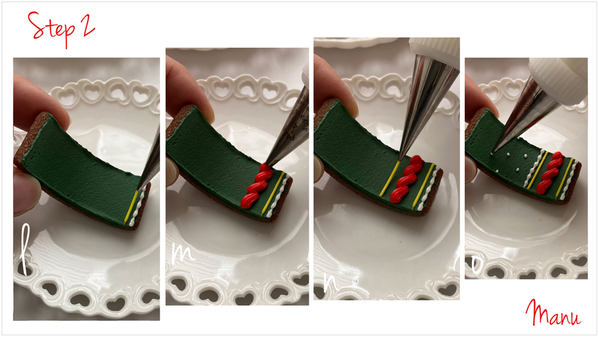
Step 2: Decorate contoured cookies
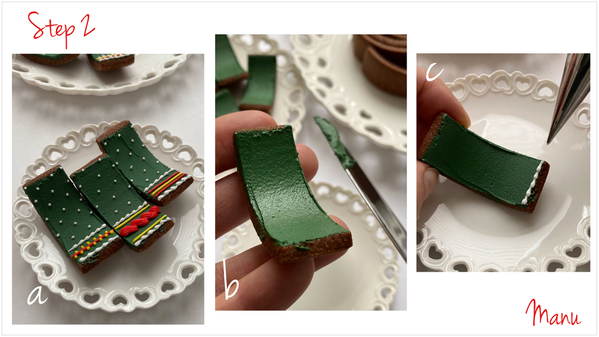
a. We are going to decorate the contoured cookies in three different but similar ways using white, red, and yellow piping-consistency royal icing in pastry bags with #1 tips. (From hereafter, I'll just refer to the colors used in each step, not the tip.) A unique design will be on each of the tiers of the Christmas tree, but all cookies in that tier will be decorated the same way.
b. Since there are 25 mini cookies to decorate, and they are contoured, I tried to keep things simple by spreading each one to start with a veil of green medium-consistency royal icing. Spreading is a much easier way to cover contoured cookies than is outlining/flooding or dipping.
c. Pipe a white trailing bead border on one short edge of each of the 25 cookies. Start by piping a bead, and release pressure to create a tail on the bead. Move the tip slightly back to cover some of the tail just piped, and pipe another bead and tail. Keep piping in this fashion to completely fill the space along the edge.
Set aside 12 of the contoured cookies just piped, and follow Steps 2d to 2g to decorate all of them the same way. These cookies will form the bottom tier of the tree.
d. Pipe a red line parallel to the beaded border at a distance of about 0.2 centimeter (1/16 inch).
e. Pipe two more close parallel lines, one yellow and one red.
f. Rotate the cookie, and pipe another white beaded border parallel to the red line you just piped. By rotating the cookie, the beaded border will be piped in the opposite direction of the other one piped in Step 2c.
g. On the remaining section of the cookie, pipe tiny staggered white dots, taking care to evenly space them.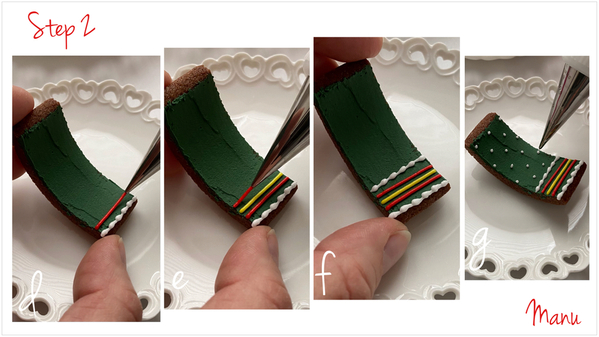
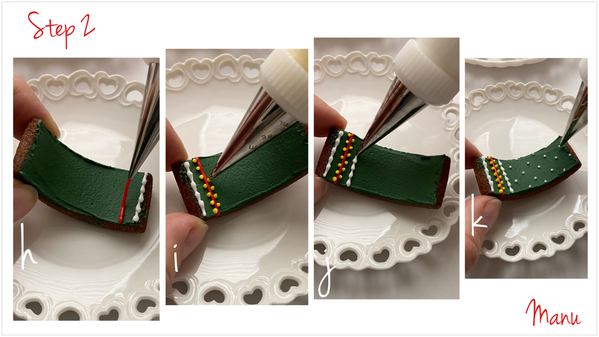
Now set aside five of the remaining cookies last decorated in Step 2c, and follow Steps 2h to 2k to decorate all of them the same way. These cookies will form the top tier of the tree.
h. Pipe a red line parallel to the beaded border at a distance of about 0.2 centimeter (1/16 inch).
i. Pipe a sequence of little yellow dots on each side of the red line.
j. Rotate the cookie, and again pipe a white beaded border.
k. On the remaining section of the cookie, pipe tiny staggered white dots, taking care to evenly space them.
Finally, take the remaining eight cookies last decorated in Step 2c, and follow Steps 2l to 2o to decorate all of them the same way. These cookies will form the middle tier of the tree.
l. Pipe a yellow line parallel to the beaded border at a distance of about 0.2 centimeter (1/16 inch).
m. Change the #1 tip in the pastry bag with the red icing to a small star tip (#42). Pipe a rope border at a distance of about 0.3 centimeter (1/8 inch) from the yellow line. Start by piping a sort of fat, rounded letter “N”. Then anchor the tip at the top middle of the downstroke of the “N” just piped. From here, pipe the next “N”, and keep going until you reach the edge of the cookie.
n. Pipe one more yellow line above the red rope.
o. Rotate the cookie, and pipe a white beaded border; then cover the remaining section of the cookie with tiny piped dots as done in previous steps.
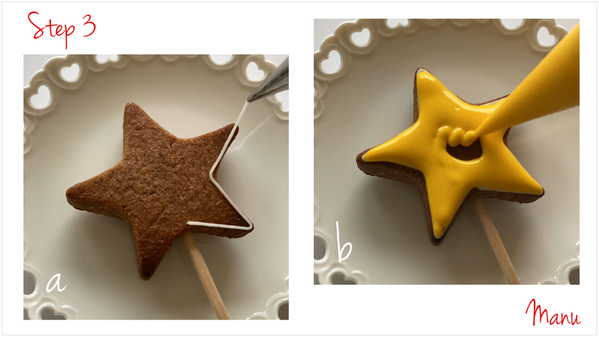
Step 3: Decorate star cookie
a. Outline the star cookie using white piping-consistency royal icing and a PME #1 tip (or equivalent).
b. Flood the star cookie using yellow flood-consistency royal icing and a Wilton #2 tip (or equivalent). Once the icing is dry, flip over the cookie, and outline and flood the other side too.
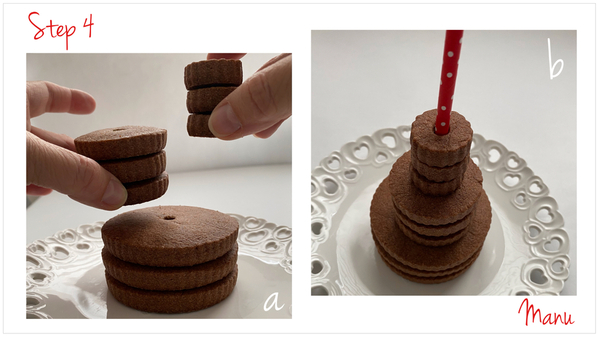
Step 4: Assemble cookies into tree
a. Stack the three sets of circle cookies, and then stack these sets on top of one another, starting with the biggest stack sitting directly on a plate.
b. Thread the paper straw through the central holes. This tall threaded stack will be the central structure of the tree.
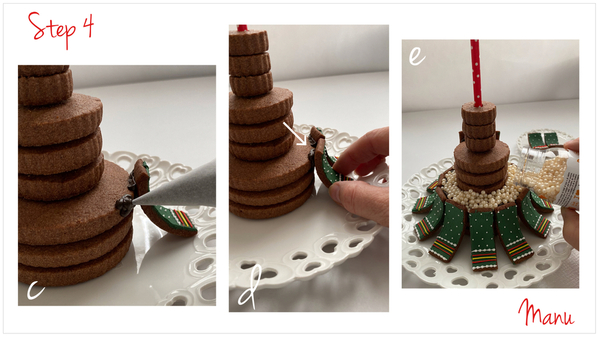
c. Pipe brown thick-consistency royal icing onto the upper edge of the cookie at the top of the largest stack.
d. Now start gluing, one by one, the 12 contoured cookies decorated in Steps 2d to 2g all around the largest stack. The edge of each cookie should stick out above the top of the stack about 3/8 inch (1 centimeter). When all 12 cookies have been glued in place, they will form a rim that supports the next round of contoured cookies. They will also serve as a dam to contain the dragées added in the next step.
e. Pour dragées (or other sprinkles of your choice) around the top of the largest stack of circle cookies, keeping them contained within the ring of contoured cookies that were glued to it in the previous step. (Note: I decided to add white dragées because, when I started to glue the cookies in the middle section, I realized that the top of the stack underneath was too visible and the overall outcome was too dark. Also, the glue on the contoured cookies was visible from above, and the dragées concealed it quite well. Next time, I will try some colorful M&Ms to give the feeling of baubles or ornaments.)
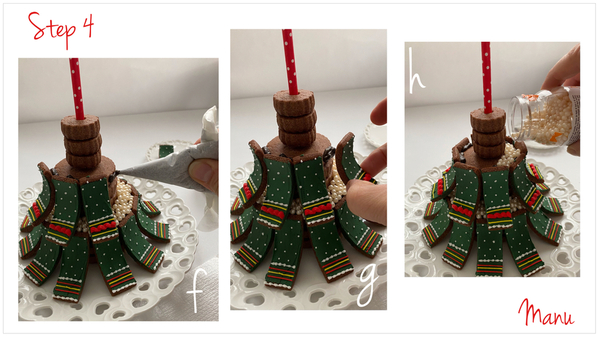
f. to h. For the middle stack in the tree, follow the same gluing procedure as used on the bottom stack. However, this time, glue the eight contoured cookies decorated in Steps 2l to 2o around the stack. Then, as before, pour dragées all around the top.
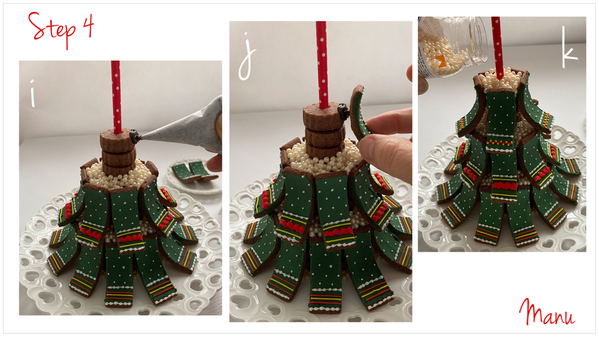
i. to k. And last, the top section of the tree! Glue the five contoured cookies decorated in Steps 2h to 2k all around the small stack, and then pour some dragées around the top.
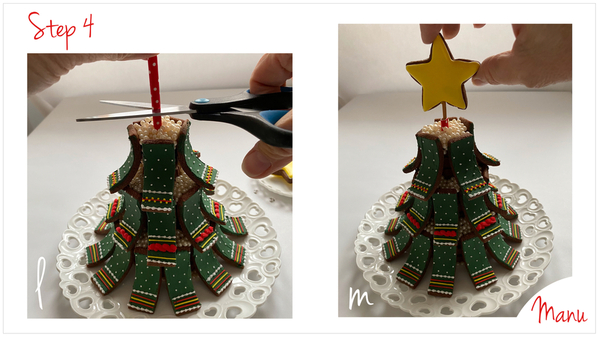
l. Trim the paper straw protruding from the top so it just barely shows above the top of the dragées.
m. Trim the lollipop stick, as needed, so the bottom of the star meets the top of the paper straw. Thread the lollipop stick into the paper straw to top off the tree.
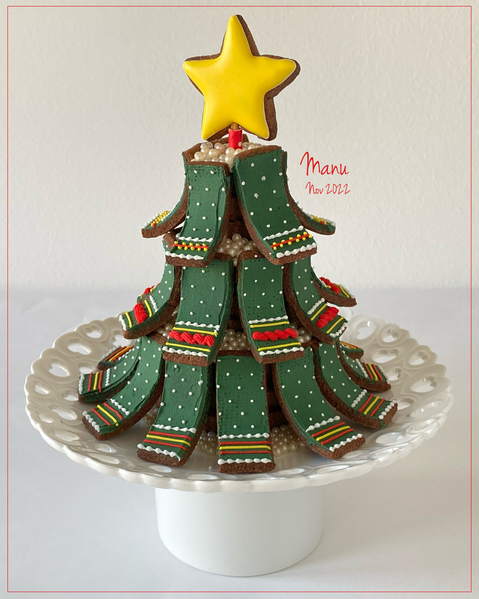
And here’s the finished 3-D Christmas tree cookie! As always, the possibilities for decorating this Christmas tree are endless, so I encourage you to get creative with it. And, if you decide to give this tutorial a go, please post your work here on Cookie Connection and also in the comments under this blog post. I would absolutely love to see what you make. [EDITOR'S NOTE: I echo that remark! There's little I enjoy more than seeing people's unique takes on Cookie Connection tutorials! ~JMU]
Happy holiday baking!
Ciao, Manu 🌲❤️⭐️

Manuela Pezzopane, affectionately called Manu by her friends and family, is the author of the blog feature Made by Manu, where each month she shares the method behind a magical cookie of her own making. In March 2022, Manu also assumed the role of host of our rebranded and reformatted Cookie Connection Challenges: Watch-Learn-Create Series, which debuted in a virtual video format in July 2022. A fan of everything handmade, Manu professes to have tried every possible hobby. However, it wasn’t until the end of 2014, when an American friend invited her to a Christmas cookie exchange, that she first discovered decorated cookies. In 2015, after watching Julia M. Usher's videos and signing up on Cookie Connection, Manu finally attempted her own designs. Since then, cookie decorating has become Manu’s passion, and her mesmerizing video shorts have earned her a large and loyal following throughout the global cookie community. Manu harks from Rome, Italy, where she currently resides. You can email Manu at manubiscottidecorati@gmail.com, follow her on Facebook and Instagram, or explore her past challenges and large library of Made by Manu tutorials here on Cookie Connection.
Photo credit: Manuela Pezzopane
Note: Made by Manu is a Cookie Connection blog feature written by Manuela Pezzopane, where each month she shares the method behind a magical cookie of her own making. This article expresses the views of the author, and not necessarily those of this site, its owners, its administrators, or its employees. To read all of Manuela's past Made by Manu tutorials, click here. And to see all of Cookie Connection's tutorials, click here.



Comments (19)