
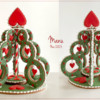
It’s almost December, and after so many years of sharing tutorials on @Julia M. Usher's Cookie Connection, I declare my November/December 3-D Christmas tree cookie tutorial a tradition. This year's tree tutorial has some elements from my past 3-D tree tutorials (paper straws, hanging hearts, and round window cookies), but I think it's sufficiently changed up to give you brand-new cookie inspiration! ![]()
I rated this project as "advanced", but please don’t get intimidated. If you'd like to give it a try but want something a bit simpler, try using solid cookie parts without any cutouts or dangling hearts.
- Your favorite cookie dough
- Rolling pin with guides
- 1 (18.0-cm/7-in) round cookie cutter (or circle template around which to hand-cut)
- Nested round cookie cutters (I used this set of 14, with diameters ranging from 2.0 cm/3/4 in to 8.8 cm/3 1/2 in.)
- 1 or 2 paper straws
- Tree part template (See "Attachments" under "Files" at the end of this post.)
- 1 (5.5-cm/2 1/4-in) heart cookie cutter
- 1 (4.5-cm/1 3/4-in) star cookie cutter
- 1 bamboo skewer
- 7.0-cm/2 3/4-in silicone hemisphere mold
- Thin (~0.5-cm/1/4-in-wide) wafer paper strips, plus ruler and scissors to cut them
- Royal icing:
- White piping-consistency, in pastry bag with coupler and PME #1 tip (or equivalent)
- Green flood-consistency, in tipless pastry bag with opening equivalent to PME #3 tip
- Red medium-consistency in tipless pastry bag with opening equivalent to PME #2 tip
- White stiff-consistency, in pastry bag with coupler and PME #42 star tip (or equivalent)
- Scribe tool
- Pentagon cookie cutter of any size
- Small craft paint brush
- Small props (I used espresso cups.)
- 35 small (2.0-cm/3/4-in) royal icing heart transfers (Again, for heart templates, see "Attachments" under "Files" at the end of this post.)
- 5 large (4.5-cm/1 3/4-in) royal icing heart transfers
Step 1: Cut and bake cookies
For this project, you will need to cut a total of 10 cookies, in the following quantities and shapes*:
- 3 circle cookies (for tree base): 1 large (18.0 cm/7 in), 1 medium (7.5 cm/3 in), and 1 small (6.5 cm/2 1/2 in)
- 5 franken-cookies* (for tree parts): Each part is made by franken-cookieing three ring cookies before baking them to form a hollow snowman-like silhouette. Use my template and the following round cookie cutters to cut out the circles (extra large, large, and medium) and the rounds inside each circle (medium, small, extra small):
- 1 extra large (7.3 cm/2 7/8 in)
- 1 large (6.0 cm/2 3/8 in)
- 1 medium (4.5 cm/1 3/4 in)
- 1 small (3.7 cm/1 1/2 in)
- 1 extra small (2.5 cm/1 in)
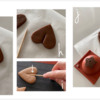
- 1 (5.5-cm/2 1/4-in) upside down heart (for tree topper): Note: Ignore the upright heart and star shown in the photo below; they were not used. I baked them only because, at the time of the photo, I wasn't yet sure which shape would make the best tree topper.
- 1 small (4.5-cm/1 7/8-in) contoured mini star cookie (for base under tree topper)
*Additional Notes: (1) I will explain cutting in greater detail in Steps 1a to 1j; some pieces will have additional alterations made to them. (2) Franken-cookies are new cookie shapes formed from standard ones by either adding or taking away cookie dough, or both.
Here’s a visual summary:
a. Using a rolling pin with guides, roll your dough to a 0.3-centimeter (1/8-inch) thickness on your baking mat. Cut out the three different sizes of circles for the tree base, but, before baking them, use a paper straw to make a hole in the center of each one. It is important to plunge the straw into the exact center of each cookie, as the cookies will be stacked and threaded on the straw. Otherwise, you will have difficulty assembling the tree and it won’t look symmetrical. Bake the cookies according to your recipe.
b. If the cookie dough has visibly spread, then reinsert the straw into each of the holes, while the dough is still warm, to make sure it can still pass through them.
Now use the attached template (again, see "Attachments" under "Files" at the end of this post) and the round cutters listed under the second point above to create the five franken-cookied tree parts.
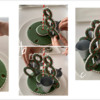
c. Cut out an extra large circle. Use the large round cookie cutter to cut a shallow indentation into the top of the extra large circle.
d. Now, cut a large circle, and set it in the indentation just cut, as shown in the photo.
e. Use the medium round cookie cutter to cut a shallow indentation into the top of the large circle. Then, cut a medium circle, and set it inside the indentation just cut. You will end up with a solid snowman-like silhouette.
f. Now cut a round inside each of the snowman's circles using the medium, small, and extra small cutters indicated above. You will be left with three rings stacked one on top of the other, as pictured here. The three rings will fuse together while baking to create one continuous piece. Tips: Do the cutting and piecing together directly on parchment paper or a silicone baking mat, so you can easily lift the paper or mat directly onto the cookie sheet for baking. Otherwise, your careful piecework will be difficult to move without falling apart. I also don't recommend cutting the three rings first and then piecing them together, as the rings will very likely misshape during the piecing process.
Repeat Steps 1c to 1f to make a total of five of these tree parts.
Here’s a video recap of the tree part cookie cutting and baking process:
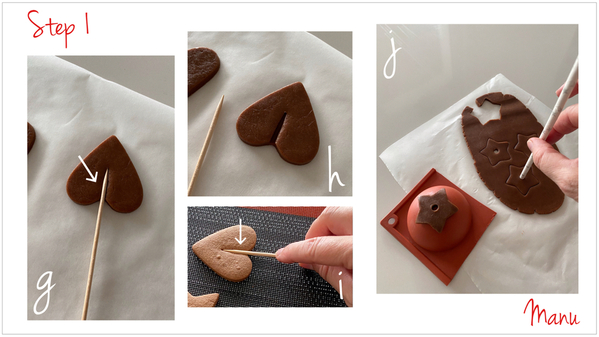
g. To complete the tree topper, use a bamboo skewer to make an indentation in the upside down heart cookie. It should start between the heart lobes and end about midway up the heart.
h. Remove the skewer before baking the cookie.
i. Once the cookie is out of the oven and still warm, place the skewer in the indentation. If the cookie has visibly spread, this step will ensure that the skewer still fits into the indentation.
j. Last, let's make the base for under the tree topper. Cut out a star cookie using the cutter indicated above, and plunge a straw perpendicularly into the center as you did in Step1a for the round cookies. Lift the star, and place it over the top of the silicone hemisphere mold to give it a slight contour. Bake as directed in your recipe, and then cool on the mold until the star is just cool enough to remove without misshaping. (Tip: For more detailed instructions about how to contour cookies, refer to Julia's Watch-Learn-Create Challenge videos. Julia shares her extensive expertise on the technique and thoroughly explains each step of the process.)
Step 2: Decorate tree part cookies
Before flooding the tree part cookies, attach the wafer paper strips. The strips should be about 0.5 centimeter/1/4 inch in width and long enough to fit inside each ring. And once the tree is standing, they should be perpendicular to the large round base cookie. I will explain how to make sure they're oriented properly below. We will later trim the strips and attach two heart transfers to each one.
a. Now you have to trust the process and tilt the cookie so that the distance between the paper straw (oriented vertically) and the bottom of the large ring measures 7 centimeters/2 3/4 inches. Use the skewer to visually divide the large ring in two parts, and mark a point with white piping-consistency royal icing at the top of that ring. Attach a strip of wafer paper to that spot, and trim its length to fit inside the ring if needed.
b. and c. Repeat Step 2a for the two other rings, making the measurement adjustments that follow. The distance between the straw and the top of the middle ring should be about 4.5 centimeters/1 7/8 inches, and the distance between the straw and the top of the smallest ring should measure 2 centimeters/3/4 inch. Mark these spots with icing.
d. Now attach a strip of wafer paper to each dot of icing, just as you did in Step 2a.
e. Outline the cookie using white piping-consistency royal icing and a PME #1 tip (or equivalent).
f. Flood the cookie using green flood-consistency royal icing and a PME #3 tip (or equivalent), and let the icing dry completely.
g. Repeat Steps 2a to 2f for the other four tree part cookies. Once all five cookies are completely dry, flip them over, and repeat Steps 2a to 2f on their back sides, making sure to align the wafer paper strips with those already attached to the front side. Let the icing dry completely.
h. Now, pipe six little hearts on each ring, using red medium-consistency royal icing and PME tip #2 (or equivalent). As a reference, pipe the heart on the top of each ring at the point where you attached the wafer paper strip. Turn the cookie, and pipe another heart on the opposite side. Then pipe the four remaining hearts in between these two hearts, two on each side of the ring. Let them dry.
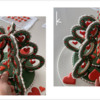
i. Use a scribe tool to lift the top wafer paper strip in one of the rings, and pipe a line of white piping-consistency royal icing on the strip beneath it.
j. Lift the cookie, and press the strips between your fingers to glue them firmly together.
Repeat Steps 2i and 2j for the other two pairs of wafer paper strips on the cookie.
k. Use the same icing to pipe a dot in between each heart on the cookie.
Repeat Steps 2h to 2k for the other four tree cookie parts. Once the decorations are completely dry, flip over the cookies, and repeat the heart and dot decorations on the back sides.
Step 3: Decorate round base cookies
The base of this 3-D tree cookie is constructed with the large round cookie on the bottom, the small round cookie in the middle, and the medium round cookie on top. All three are kept together by threading the straw through their central holes. The small cookie serves as a hidden riser, and will not be seen in the final construction, so it will not be iced.
a. Place the medium round cookie on top of the large round cookie. Insert the paper straw through their holes and, using a scribe tool, score a circle on the large round cookie using the medium round cookie as your scoring guide.
b. This scored line will serve as a piping guide for outlining a ring on the large base.
c. and d. Place a pentagon cookie cutter of any size in the exact center of the large round cookie. Using the scribe tool and the paper straw as a scoring guide, mark five lines into the cookie that extend from the corners of the cutter to the edge of the cookie. You should end up with five equal parts if the cutter was properly centered.
e. Place one of the tree part cookies on one of the lines just scored, and use the scribe tool to mark the position where the bottom ring will be glued to the base. Again, this point should be about 7 centimeters/2 3/4 inches from the straw if Steps 2a through 2c were properly followed. Just be sure the tree part cookie is oriented such that the wafer paper strips are perpendicular to the base. Do the same for the other four tree parts on the other four scored lines, making a mental note of which tree part is associated with which line.
f. Using white piping-consistency royal icing and a PME #1 tip (or equivalent), outline the large base cookie, and pipe an oval around each of the marks you just scored. These ovals should be about about 2 centimeters/3/4 inch long and 1 centimeter/3/8 inch wide (roughly the thickness of the cookie plus two iced surfaces).
g. Flood the cookie using green flooding-consistency royal icing and a PME #3 tip (or equivalent), but leave the ovals and center circle un-iced.
h. Using white stiff-consistency royal icing and a PME #42 star tip (or equivalent), pipe a trailing star border (aka shell border) all around the cookie. Start by piping a bead, and release pressure to create a tail on the bead. Move the tip slightly back to cover some of the tail just piped, and pipe another bead and tail. Keep piping in this fashion to completely fill the space along the edge.
i. Outline and flood the medium round cookie using the same icings and tips used on the large cookie for these tasks.
j. Pipe a shell border around the medium round cookie, again using the same icing and tip used in Step 3h.
k. Also with the same icing and tip, pipe a shell border around half of each tree part cookie.
Step 4: Decorate heart tree topper and contoured star cookies
a. Pipe white stiff-consistency royal icing into the indentation in the upside down heart cookie.
b. Press the skewer into the indentation.
c. Use a small craft paint brush to spread the excess icing over the skewer.
d., e., and f. Using red medium-consistency royal icing and a PME #2 tip (or equivalent), outline and flood the heart cookie. Let the icing dry completely, and then also outline and flood the back side of the cookie in the same fashion. Once the icing is dry, pipe a shell border around each of the two sides. Use the same white icing and #42 tip that were used for the other borders.
g. Outline the convex side of the contoured star cookie using white piping-consistency royal and a PME #1 tip (or equivalent); then flood it using green flood-consistency royal icing and a PME tip #3 tip (or equivalent). Let the icing dry.
h. Use red medium-consistency royal icing and a PME tip #2 (or equivalent) to pipe a tiny red heart on each point of the star cookie. Again, let the icing dry.
i. Insert the paper straw into the cookie, and pinch it between your fingers just beneath and above the cookie to keep the cookie from sliding off the straw. This cookie is tiny, so this trick allows for easier handling.
j. Pipe a shell border along the edge of the cookie, using once again the same white icing and star tip from earlier steps. Spin the cookie as you pipe to get easy access to all sides without handling the cookie.
Step 5: Assemble cookies into 3-D tree, and attach royal icing heart transfers
I found it easiest to assemble the cookie first without any icing "glue" and then to secure each tree part cookie, one at a time, with icing.
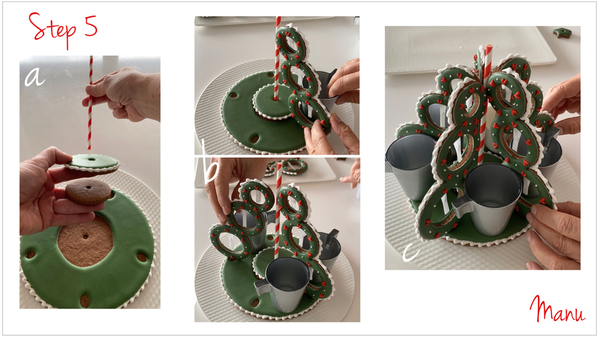
a. Stack the three round cookies (large, small, and medium, in this order), and thread the paper straw through the holes in the center of each cookie.
b. Place one of the tree part cookies in its designated un-iced oval on the large round base, facing the shell border out, and lean the small ring on top against the paper straw. Prop the cookie using two espresso cups or any other small props you have handy.
c. Add another tree part cookie on the opposite side, and prop it.
d. Keep adding the remaining tree part pieces, propping them as you go.
d. Remove one tree part cookie, and pipe white stiff-consistency royal icing into the un-iced oval.
e. Pipe a small dollop of royal icing on the point where the tree part will make contact with the straw.
f. Place the cookie back in its original place, and gently press it into the icing on the base and straw. Make sure the cookie is perpendicular to the base and not leaning to the left or right. Prop it with cups or other small props.
Repeat Steps 5d to 5f for the other four tree part cookies, again propping them as you go. Let the icing dry completely, and avoid moving the assembled 3-D tree for a few hours. The longer the drying time, the better.
g. After a few hours, all of the props can be removed. Now, trim the wafer paper strips to the center of each ring. Have the two sizes of royal icing heart transfers nearby. Again, you should have 35 small and five large ones.
h. Pipe a bit of white stiff-consistency royal icing on the backs of two small royal icing heart transfers.
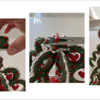
i. "Sandwich" the wafer paper strip between the two hearts, and gently pinch the two heart transfers together to secure them to one another.
Repeat Steps 5h and 5i to hang small hearts in all 15 rings in all five tree parts. You’ll need six small heart transfers for each of the five tree part cookies, for a total of 30 transfers.
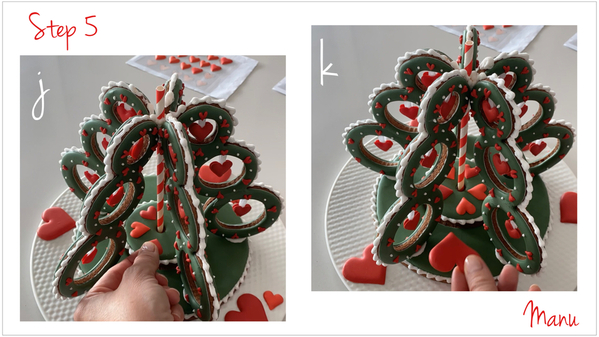
j. Place the five remaining small heart transfers on the medium round cookie, arranging them in a circle. I just placed them without any icing "glue", but you can also ice them in place (especially if you plan to move your finished tree more than once ![]() ).
).
k. Place or glue the five large heart transfers on the large round cookie, one in between each pair of tree parts.
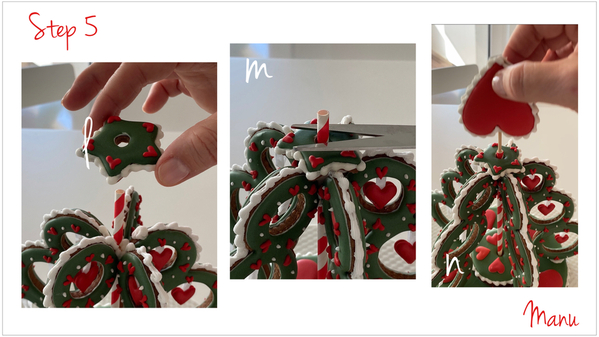
l. Thread the contoured star cookie onto the paper straw, iced (convex) side facing up.
m. Trim the paper straw so it is flush with the cookie at the top.
n. Thread the skewer on the tree topper cookie into the paper straw.
Here's a quick video to show you the final assembly steps:
Ta da! Now you have a 3-D Christmas tree cookie for this year too! Below, I've shared two different photo views.
And last but not least, my final video demonstrating the full 360-degree view:
[EDITOR'S NOTE: Thanks for the video view, Manu! As I like to say, a 3-D cookie should look great from all angles, and yours certainly does! And, of course, thanks so very much for this epic tutorial that continues Cookie Connection's best Christmas tradition! Well done, as always! ~JMU]
Ciao, Manu 🌲❤️⭐️

Manuela Pezzopane, affectionately called Manu by her friends and family, is the author of the blog feature Made by Manu, where each month she shares the method behind a magical cookie of her own making. In March 2022, Manu also assumed the role of host of our rebranded and reformatted Cookie Connection Challenges: Watch-Learn-Create Series, which debuted in a virtual video format in July 2022. A fan of everything handmade, Manu professes to have tried every possible hobby. However, it wasn’t until the end of 2014, when an American friend invited her to a Christmas cookie exchange, that she first discovered decorated cookies. In 2015, after watching Julia M. Usher's videos and signing up on Cookie Connection, Manu finally attempted her own designs. Since then, cookie decorating has become Manu’s passion, and her mesmerizing video shorts have earned her a large and loyal following throughout the global cookie community. Manu harks from Rome, Italy, where she currently resides. You can email Manu at manubiscottidecorati@gmail.com, follow her on Facebook and Instagram, or explore her past challenges and large library of Made by Manu tutorials here on Cookie Connection.
Photo credit: Manuela Pezzopane
Note: Made by Manu is a Cookie Connection blog feature written by Manuela Pezzopane, where each month she shares the method behind a magical cookie of her own making. This article expresses the views of the author, and not necessarily those of this site, its owners, its administrators, or its employees. To read all of Manuela's past Made by Manu tutorials, click here. And to see all of Cookie Connection's tutorials, click here.



Comments (14)