
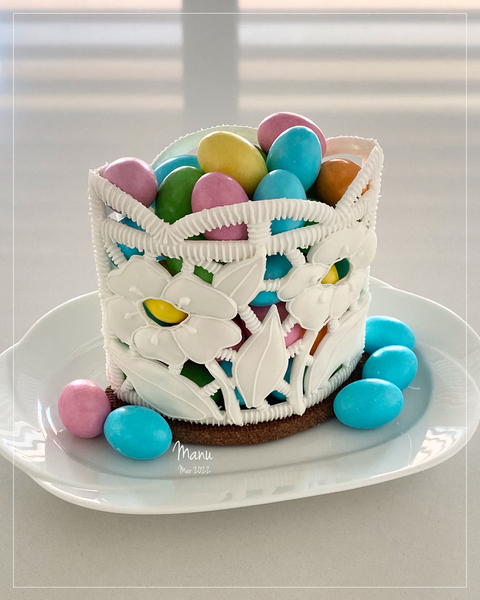
Even after I finished the cutwork lace cookies showcased in my previous tutorial, that embroidery technique kept developing in my mind. In fact, it developed to the point of this project - one that involves mostly royal icing and one naked (undecorated) cookie. Well, there is decoration, but it's not the usual outlining and flooding; it consists solely of two big contoured royal icing transfers joined together and placed on top of the cookie. This project can be used as a lantern, if you were to stick a bulb or candle inside, or as a treat box, which can be eaten or held onto as a keepsake.
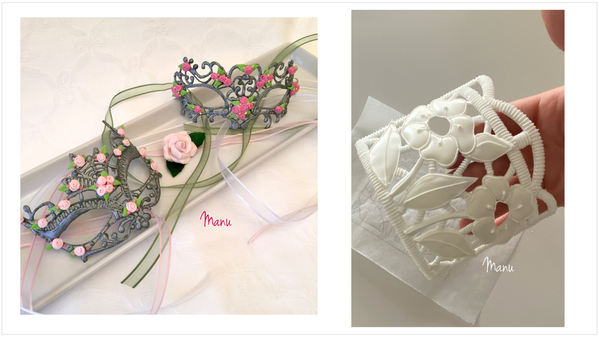
I classified this tutorial as “intermediate”, but don’t let this classification intimidate you. As an absolute beginner, I was able to create the contoured royal icing lace masks that you see in the picture below (left). Those transfers were super fragile too, making that project trickier than this one. The transfers in this project (below right) are a lot sturdier, so you should have less trouble with breakage. Plus, this project is just a fun way to practice piping with royal icing. And we can all use practice from time to time!
- My (12.7 x 10-cm/5 x 4-in) lantern design template (See "Attachments" under "Files" at the end of this post.)
- Parchment paper
- Tape
- Pencil
- 1 or 2 clear cylindrical vase(s) or any cylindrical object (I used a vase about 12 D x 17.8 H centimeters, or 4 3/4 D x 7 H inches, where "D" means "diameter".)
- Sponge or other soft props
- Royal icing:
- White piping-consistency, in pastry bag with PME #1 tip (or equivalent)
- White flood-consistency, on thicker side, in tipless pastry bag with opening equivalent to PME #2 tip
- White thick-consistency (@Julia M Usher calls it “glue”; see her video for reference), in parchment cone or tipless pastry bag
- Small fan heater, to reduce royal icing drying time (optional)
- Paint brush
- Cookie dough of choice
- Sharp paring or sugarcraft knife
- 2 LED tea lights
- Chocolate eggs or any treat of choice
Step 1: Create contoured transfer
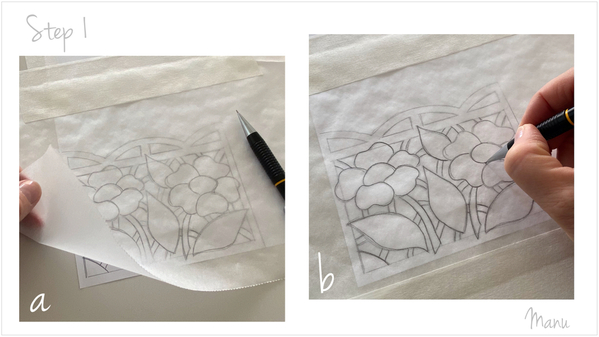
a. Download my lantern design template, and place it under a piece of parchment paper. (Again, you can find it in "Files" under "Attachments" at the end of this post.) Tape the template to your work surface, and the parchment paper to the template, so that the pieces won't move when you're piping on them. (I chose parchment paper rather than acetate for a couple of reasons. Drying time will always be a little faster on parchment paper because it is more permeable than plastic. But, more importantly, this big transfer will release far more easily from parchment paper.)
b. Trace the design on the parchment paper using a pencil.
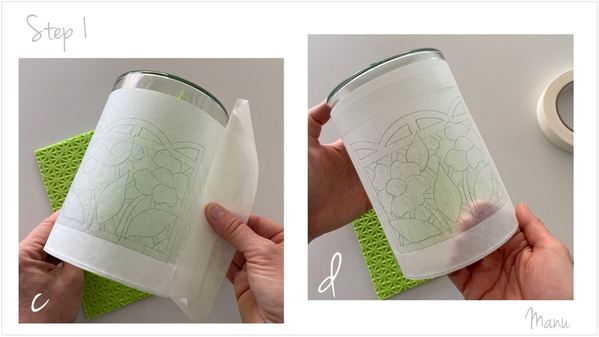
c. Flip over the parchment paper, and tape it crosswise over the vase. (The paper should be flipped so that the pencil marks won't make contact with the icing that will be piped on top.) Place a sponge (or other soft props) under the vase to keep it from rolling over while you work. Tip: A clear vase is preferred to one that is opaque, because it will be easier to later confirm that the icing is fully dry if you can see through the vase.
d. Make sure the parchment paper is pulled tight and conforms perfectly to the vase sides.
This project is comprised of two transfers, so, if you have two vases of the same size, prep the second one now. That way, you can start piping the second transfer while the first one is drying.
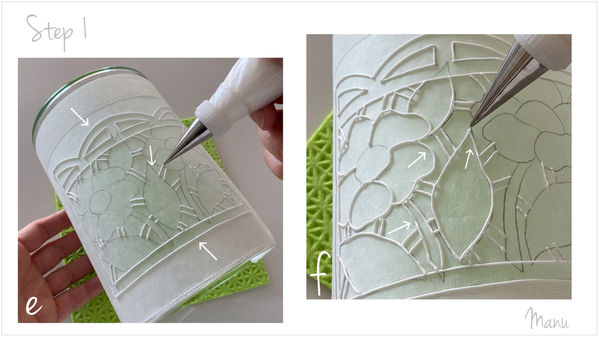
e. As you can see, the design is comprised of a couple of flowers and some leaves connected by "thread bars", with a frame around everything. Use white piping-consistency royal icing and a PME #1 tip (or equivalent) to outline the frame and all of the thread bars.
f. Continue to outline the stems, petals, and leaves. Some elements intersect the frame, such as the leaf in the upper part of the right photo. Don't pipe those parts just yet; they will be piped later in Step 1l.
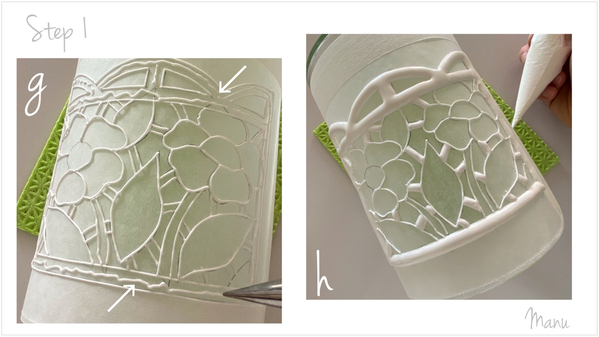
g. Using the same piping-consistency icing, pipe a squiggle inside the frame. The squiggle will help to keep the flood-consistency icing from cratering, or sinking, as it likes to do in narrow areas. It will also serve as a "grip" for the flood-consistency icing. Because the piping surface is curved, even a thicker flood-consistency icing will tend to run down the sides, leaving thicker areas or blobs in lower areas. But, by gripping the icing, the squiggle will minimize these blobs.
h. Now, using white thick flood-consistency royal icing and a PME #2 tip (or equivalent), flood the frame and thread bars. Let the icing partially dry. Note: You can accelerate drying time by placing the vase in front of a small fan heater. About 5 to 7 minutes should be enough to crust the icing, which is all that's needed at this point.
But before you dry the icing, peek inside the vase, and make a mental note as to what wet royal icing looks like on parchment paper. Better yet, take a reference photo. It will be useful to have the latter for Step 3a when you must determine if the icing is dry enough to remove from the vase.
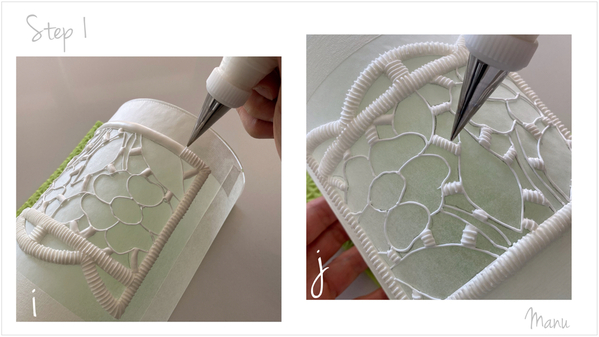
i. Now, back to the piping-consistency icing with a PME #1 tip (or equivalent)! Pipe parallel lines crosswise all around the frame. Heads-up: This step and the next one are the most time-consuming parts of this project, but, at the end, the contrast between these lines and the plain icing on the rest of the design will add interest. Plus, piping all of these lines is great practice, and they will hide small imperfections in the frame.
j. Also pipe parallel lines crosswise on each thread bar.
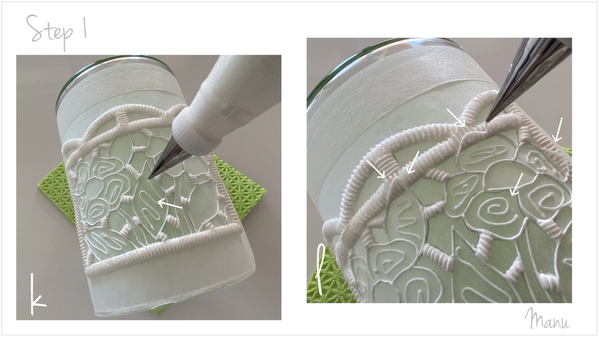
k. Pipe some squiggles in the leaves, stems, and petals for the same reasons explained in Step 1g.
l. Now outline the parts of the leaves and petals that overlap the frame.
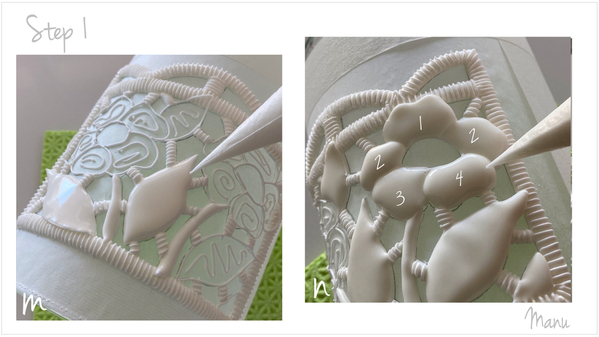
m. Switch again to white thick flood-consistency royal icing and a PME #2 tip (or equivalent). Flood the stems and leaves; then place the vase in front of a fan heater, if you have one, until the icing has crusted.
n. Flood the petals starting from the one at the top (the number 1 position in the photo), and let the icing crust, again in front of a fan heater if you have one. Then flood the two petals on either side of the petal you just flooded (2), and let the icing crust again. Flood the last two petals (3 and 4) in this order, allowing crusting time between them. I flooded the petals in this order to give the flower more dimension and perspective.
Repeat this step for the other flower. Then let the icing dry to the point that you can easily pipe on top without damaging the underlying icing.
Step 2: Pipe more details on top
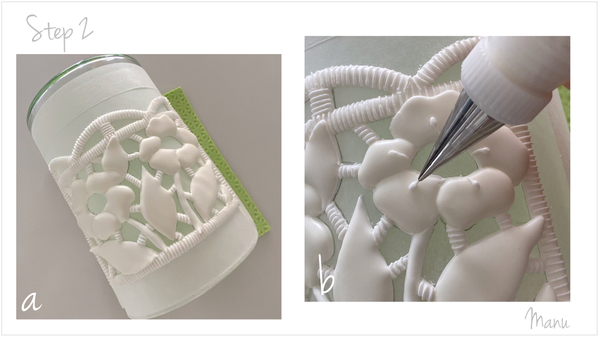
a. Once the icing is sufficiently dry, it's time to add more details. These details won't be as time-intensive as the lines piped on the frame and thread bars in Steps 1i and 1j, but they will definitely lend additional interest and dimension.
b. Again, using white piping-consistency royal icing and a PME #1 tip (or equivalent), pipe some beads with a tail in the center of each petal. Start by piping a bead in the middle of the petal and then, while moving toward the center of the flower, release pressure to create a tail on the bead.
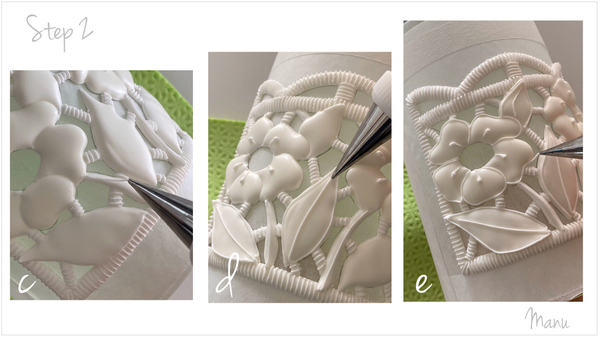
c. Pipe a line along each stem with the same icing and tip (which will also be used in Steps 2d and 2e).
d. Outline each leaf and then pipe a vein through the middle.
e. Last, outline each petal of both flowers.
If you have two cylindrical vases of the same size, repeat Steps 1 and 2 to make another contoured transfer. This way, you won't have to wait for the first one to fully dry. Otherwise, proceed to Step 3 to remove the first transfer, and then reuse that vase for the second one.
Step 3: Remove transfer(s) from vase(s)
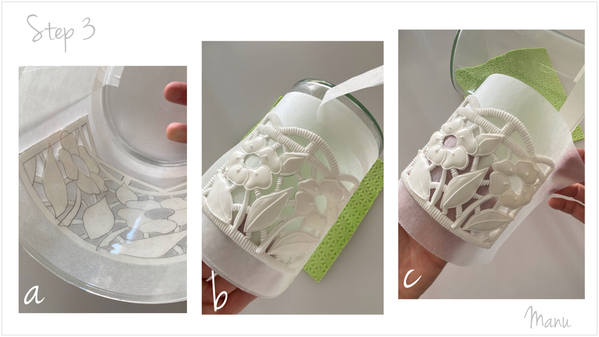
a. Look inside the vase to check if the icing is completely dry. When the icing is dry, it will look lighter than it did when wet, and the parchment paper will also look completely dry. (Don't forget to check the reference photo you took in Step 1h so you can make an objective comparison.)
This step is very important because, if the icing is not completely dry, the transfer will break as you attempt to remove it from the vase or peel away the parchment paper. After so much work, any breakage will be very frustrating! (That's the absolute beginner who made the masks speaking from experience. Trust her! ![]() ) So be patient, and don't worry about leaving the piece in front of the fan heater for too long. Note that overall drying time will vary considerably with ambient humidity, how loose/thick your icing was to start, and whether you use a fan or dehydrator to speed up the process. That being said, always look for visual cues, rather than an exact time, to test for doneness. And always err on the side of waiting longer than you think you might need.
) So be patient, and don't worry about leaving the piece in front of the fan heater for too long. Note that overall drying time will vary considerably with ambient humidity, how loose/thick your icing was to start, and whether you use a fan or dehydrator to speed up the process. That being said, always look for visual cues, rather than an exact time, to test for doneness. And always err on the side of waiting longer than you think you might need.
b. Gently remove the tape from the parchment paper. Watch out - abrupt pulling can break the transfer!
c. Now, carefully slide the transfer, still on the parchment paper, off the vase.
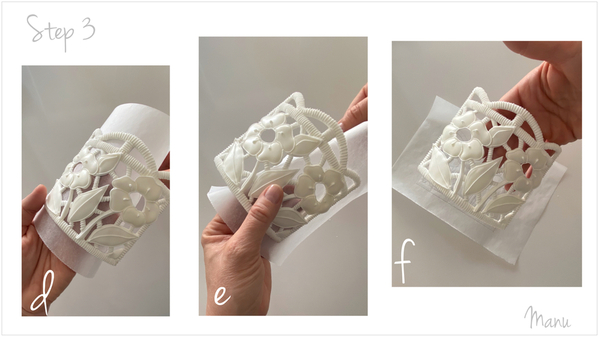
d. While holding the transfer in your hand, carefully peel away one edge of the parchment paper. If the icing is completely dry, the parchment paper should easily pop from the transfer. If it doesn't, allow the transfer to dry longer.
e. Now, start peeling the parchment paper away from the other side of the transfer.
f. Again, this royal icing transfer is pretty sturdy, but make sure you handle it with care!
Repeat Step 3 to remove the second transfer from its vase.
Step 4: Join transfers together, bake cookie base, and assemble
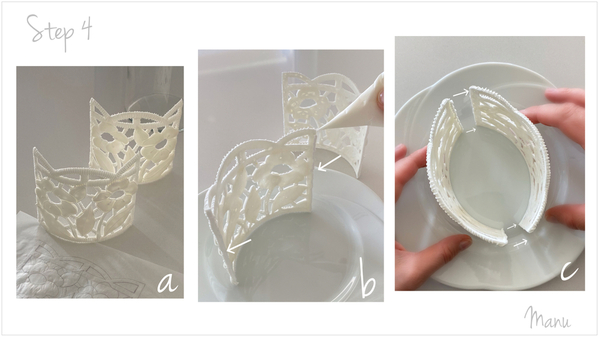
a. Now that you have prepared both transfers . . .
b. Use white thick-consistency royal icing to glue them together. Pipe the icing along the short vertical edges of one of the transfers.
c. Then slide the two contoured transfers together so that the "glue" fills the seams between the two transfers.
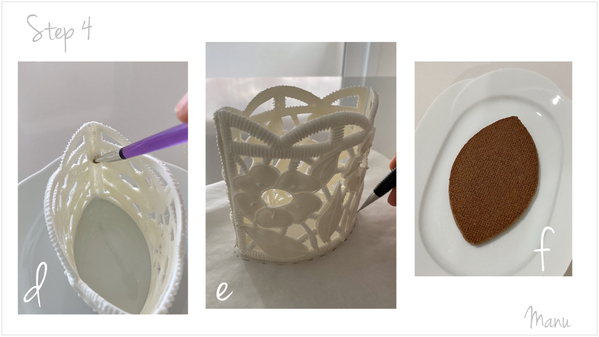
d. Use a damp paint brush to smooth the icing along the seams, and let the icing dry completely.
e. It's now time to create a template for the cookie base for the lantern/box. Place the joined transfers over a piece of parchment paper, and use a pencil to trace the shape of the base.
f. Cut the shape out of the parchment paper, roll out your cookie dough, and use the parchment paper shape as a template to hand-cut the dough. Bake the cookie according to your recipe's specifications. The finished cookie should measure about 12 x 7.5 centimeters (4 3/4 x 2 7/8 inches).
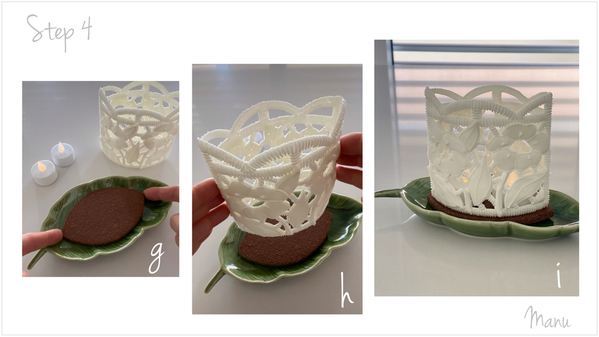
g. Place the cookie on a plate.
h. Carefully place the contoured royal icing decoration on the cookie. There's no need to attach it to the cookie with royal icing unless you want it to be more secure.
i. Place two LED tealights inside the contoured decoration, and you've got yourself a royal icing lantern! (Note: Very carefully insert the LEDs, or you risk breaking the royal icing. In fact, you may find it easier to place the LED lights in the center of the cookie before placing the icing decoration around them.)
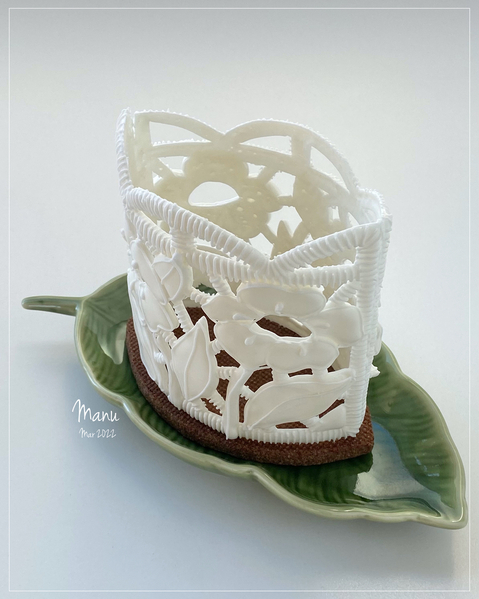
Here's a close-up view without the LEDs:
Alternatively, fill the icing decoration with chocolate eggs to create a beautiful royal icing Easter treat box. Use tweezers to place each egg inside rather than pouring the treats, as, again, you may break the transfer.
I leave you with a short video where I show how I assembled both the lantern and the treat box; it also gives you a better idea of the project's scale. Enjoy!
And that’s all for this month!
Ciao, Manu 🌸

Manuela Pezzopane, affectionately called Manu by her friends and family, is a fan of everything handmade, and professes to have tried every possible hobby. However, it wasn’t until the end of 2014, when an American friend invited her to a Christmas cookie exchange, that she first discovered decorated cookies. In 2015, after watching Julia M. Usher's videos and signing up on Cookie Connection, Manu finally attempted her own. Since then, cookie decorating has become Manu’s passion. You can follow Manu on Facebook and Instagram, or email her at manubiscottidecorati@gmail.com.
Photo and cookie credits: Manuela Pezzopane
Note: Made by Manu is a Cookie Connection blog feature written by Manuela Pezzopane, where each month she shares the method behind a magical cookie of her own making. This article expresses the views of the author, and not necessarily those of this site, its owners, its administrators, or its employees. To read all of Manuela's past Made by Manu tutorials, click here. And to see all of Cookie Connection's tutorials, click here.



Comments (9)