
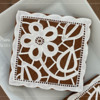
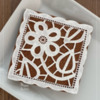
Since it will soon be spring (wishful thinking maybe? ![]() ), I tried to imagine a delicate and dainty cookie with decorations featuring a flower, leaves, and lace. I got inspiration from many different embroidery techniques like cutwork and hemstitch; then I put them together into this one piece. I avoided adding too many details in order to keep decorating time to a minimum. After all, it is a cookie, and it is hopefully going to be eaten!
), I tried to imagine a delicate and dainty cookie with decorations featuring a flower, leaves, and lace. I got inspiration from many different embroidery techniques like cutwork and hemstitch; then I put them together into this one piece. I avoided adding too many details in order to keep decorating time to a minimum. After all, it is a cookie, and it is hopefully going to be eaten!
- Cookie dough of your choice
- 2 (9.4-cm and 7.8-cm/3 11/16-in and 3 1/16-in) square cookie cutters (I used the extra large and large cutters from this six-piece nested set.)
- 1 (5-cm/2-in) five-petal flower cookie cutter (I used the extra large one from this set.)
- Scribe tool
- 1 (3.5 x 2.6-cm/1 3/8 x 1-in) leaf cutter (Alternatively, use a teardrop-shaped cutter.)
- Royal icing:
- White piping-consistency, in pastry bag with coupler and PME #1 and #2 tips (or equivalents)
- Very thin white flood-consistency, in tipless pastry bag
- Saucer
- Liner paint brush
Step 1: Cut and bake cookie
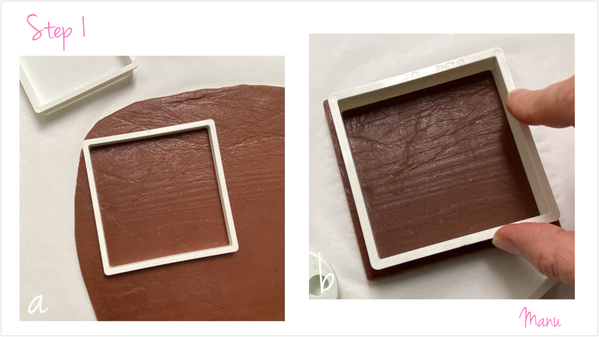
a. Roll your favorite cookie dough to your desired thickness. I rolled mine to a thickness of 0.6 centimeter (1/4 inch), but exact thickness isn't important here. Cut out a square using the extra large square cookie cutter with dimensions noted above. My cookie dough is dark, as it has cocoa in it. If you use a light cookie dough, there will surely be less contrast between the dough and the icing, but the end result will be even more delicate.
b. Remove the excess dough from around the cookie, and use the large square cookie cutter (with the smaller dimensions noted above) to lightly emboss (or imprint) a square within the larger cookie. This impression will serve as a piping guide in Step 2e when outlining the square to create a border.
Bake the cookie as directed in your recipe, and let it cool completely.
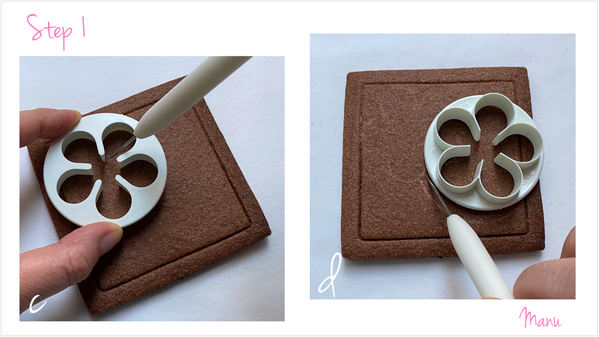
c. Use the five-petal flower cutter and the scribe tool to score a flower outline in the top left corner of the cookie. (That is, trace around the inside of cutter with the scribe tool to lightly scratch the outline into the cookie surface; the scratch marks need to be sufficiently visible to serve as a piping guide.) Note: After imprinting the square in the previous step, I discovered that the imprinted area was too deep, as my piped outlines sank into it. So for the rest of the design, I decided to lightly score patterns into the baked dough (rather than imprint them into raw dough).
d. Now, flip over the cookie cutter, and use the scribe tool to trace around the outside of the cutter. (Alternatively, use a round cutter if you do not have this particular flower cutter with the round edge.) Score two parallel curved lines about 0.4 centimeter (a bit more than 1/8 inch) apart next to the flower to demarcate its stem. Again, these scored marks will serve as piping guides in Step 2b when outlining the stem.
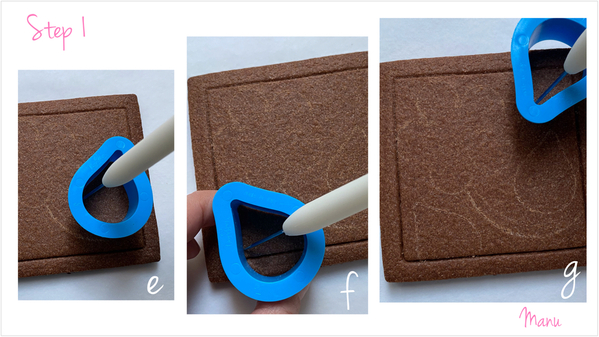
e. f. g. Use the leaf (or a teardrop) cutter to score three leaves (or portions of leaves) that fill in the remaining space on the cookie.
Note: This design is but one of endless possibilities that can be created with cutters you might already have at home. Get creative with your cookie cutter stash!
a. With the design now completely scored . . .
b. . . . it's time to outline the flower, stem, and leaves using white piping-consistency royal icing and a PME #1 tip (or equivalent).
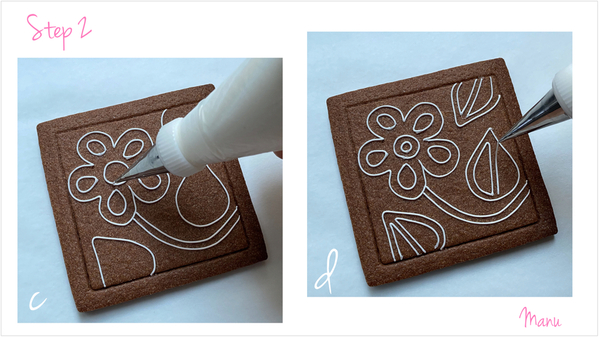
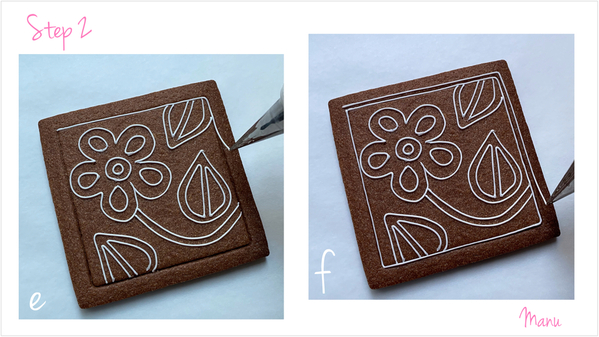
c. Pipe an oval inside each petal, and pipe two concentric circles in the center of the flower.
d. Pipe details inside each leaf. I piped two half-leaves that look like garlic cloves!
e. Outline the square you imprinted in Step 1b.
f. Pipe another square outside the one you just outlined, at a distance of about 0.3 centimeter (1/8 inch).
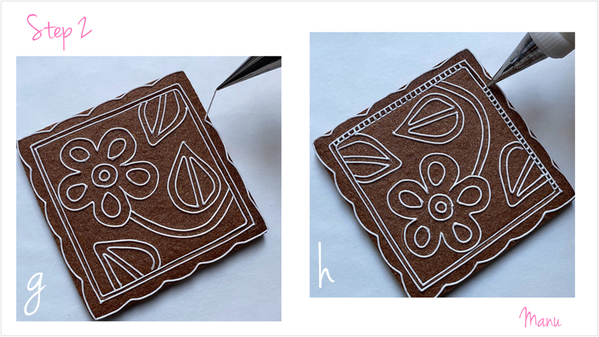
g. While the two squares you just outlined in Steps 2e and 2f are drying, pipe a scalloped edge all around the cookie. I piped five evenly divided scallops on each side, but you could pipe more or fewer.
h. Once the square outlines are completely dry, pipe tiny lines, parallel to one another, that run perpendicular to the outlines and connect them. Pipe them all around the cookie to resemble a hemstitch alongside a hem. To make these tiny stitches as clean as possible, without blobs at the start and finish, gently press the pastry bag to reveal a bit of icing and anchor it to the side of the inner square. But don't press too much before you start moving your bag, or you will get an icing blob at the beginning of the line. Guide the icing over to the outer square, and, when the icing meets the outline, stop pressing the bag and gently clean the pastry tip on the side of the outer square. (That’s why the square outlines should be dry. But don't press too hard against them, or they may break.)
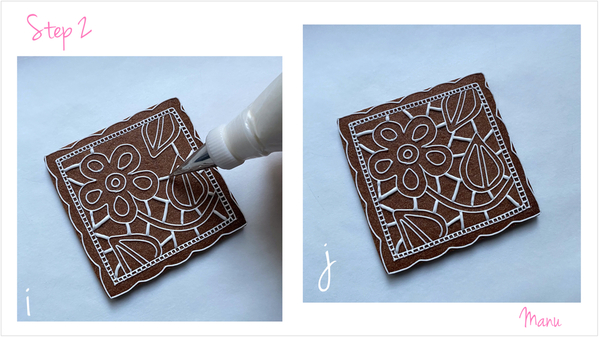
i. Now change the tip from a PME #1 to a PME #2 (or equivalent), and pipe little segments that connect the flower and leaves to each other and to any neighboring hemstitch or stem. The idea here is to mimic typical cutwork embroidery connecting threads called "thread bars".
j. And here’s the cookie after all of the outlines have been piped. It already looks nice, but let’s move to Step 3 and fill some of the outlined areas to make the flower and leaves stand out.
Step 3: Fill outlined areas with icing
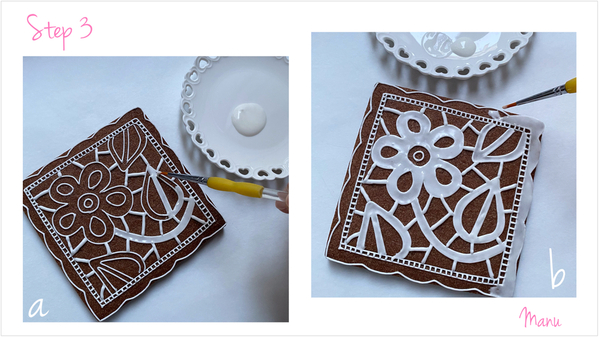
a. Pipe a dollop of very thin white flood-consistency royal icing on a saucer, and use a liner paint brush to fill the flower, stem, and leaf areas. By "fill", I mean to carefully paint the icing into a smooth, thin layer between the outlines. The idea here is for these areas to look like sheer fabric, which is why very thin royal icing needs to be used. Pipe small quantities of royal icing on the saucer as you go so that it doesn’t crust.
b. Using the same painting technique, fill in the scalloped border around the perimeter of the cookie.
At this point, I could have added more details, such as outlining the flower and leaves again to make them stand out and better resemble real cutwork embroidery. However, for the sake of expediency, I decided to limit the details to some hemstitches in the flower center.

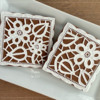
Of course, I always love to create variations ![]() , so here's another cookie with a slightly different design!
, so here's another cookie with a slightly different design!
Time now for a coffee and to taste these cookies! See you next month!
Ciao, Manu

Manuela Pezzopane, affectionately called Manu by her friends and family, is a fan of everything handmade, and professes to have tried every possible hobby. However, it wasn’t until the end of 2014, when an American friend invited her to a Christmas cookie exchange, that she first discovered decorated cookies. In 2015, after watching Julia M. Usher's videos and signing up on Cookie Connection, Manu finally attempted her own. Since then, cookie decorating has become Manu’s passion. You can follow Manu on Facebook and Instagram, or email her at manubiscottidecorati@gmail.com.
Photo and cookie credits: Manuela Pezzopane
Note: Made by Manu is a Cookie Connection blog feature written by Manuela Pezzopane, where each month she shares the method behind a magical cookie of her own making. This article expresses the views of the author, and not necessarily those of this site, its owners, its administrators, or its employees. To read all of Manuela's past Made by Manu tutorials, click here. And to see all of Cookie Connection's tutorials, click here.





Comments (12)