 I am celebrating winter with a 3-D winter wonderland tree cookie, and I hope you'll come celebrate with me! This 3-D project doesn’t require any icing "glue" to stand, so it's more like a 3-D cookie platter. The concept behind its construction is similar to that of mug-hugger cookies, which are cookies that "hug" the rim of a mug, thanks to notches cut into the side of them. For this dimensional tree, I designed and hand-cut six notched half-tree cookies that "hug" the top of a contoured cookie "tree trunk". This composition looks suitably magical as it is, but it also easily transforms into a lantern with the addition of a tealight.
- Non-spreading cookie dough*
- Half-Tree Template (See "Attachments" under "Files" at the end of this post.)
- Paring knife
- 1 (1/4 x 2-in/0.6 x 5.1-cm, W x H) mug-hugger cutter (to cut notches in half-tree cookies)
- Perforated baking mats for bread
- 1 (2 1/2-in/6.5-cm) stainless steel cake ring or round cookie cutter
- Perforated baguette pan (optional; used for propping in Step 1f)
- Aluminum foil or other ovenproof props (in lieu of baguette pan)
- Ruler
- Zester or Microplane tool
- Royal icing:
- Brown (or the same color as your dough) very thick-consistency (@Julia M Usher calls it “glue”; see her video for reference), in parchment paper pastry cone
- White piping-consistency, in pastry bag with PME #1 tip (or equivalent)
- Light grey flood-consistency, in tipless pastry bag with opening equivalent to PME #3 tip
- Plate or tray large enough to fit 7 1/8 x 7 1/2-in/18.0 x 19.0-cm (W x H) assembled tree
* Note: To ensure proper fit of all pieces and that the contoured cookies do not spread and crack during baking - which is more likely when dough is rolled thick - I suggest using a recipe with no leavening and a dry ingredient-to-fat ratio of at least 2.1 (my recipe ratio, by weight). "Dry ingredient" includes flour and any cocoa powder, but not sugar. However, it's important to note that every recipe is different (i.e., may have more or less of other ingredients) so my ratio is just a starting guide. You may need to adapt yours, particularly for the contoured pieces.
Step1: Cut and bake cookies
For this project, you will need to hand-cut a total of eight cookies in the following shapes and quantities (see more details in Steps 1a to 1i):
- 6 (3 1/4 x 7 1/2-in/8.2 x 19.0-cm, W x H) half-tree cookies with notches in their bases
- 2 (1 x 4-in/2.5 x 10.0-cm, W x L) rectangular cookies (to be contoured and formed into the cylindrical tree trunk)
Once again, allow me to give a huge shout-out to @Julia M. Usher for being a constant inspiration. I learned to contour cookies a few years back by watching her YouTube videos. Her recent feature in our first Watch-Learn-Create challenge, where she shared everything about contoured cookies in a two-hour video demo, inspired me to use my perforated mat and two tall cake rings in a useful and creative way in my November 2022 tutorial. In this month's tutorial, I take a similar approach with the rectangular cookies, but add another tool, a baguette pan, as a prop to keep the rolled perforated mat from moving. (You can also bake contoured cookies directly on baguette or other pans, though I don't do that here.)
In Steps 1e through 1i, I share photos and briefly explain how I contoured and assembled the two rectangular cookies into a cylinder using the tools just described, but please refer to Julia’s videos to learn the fundamentals of this shaping technique. Her most important tip is to use a non-spreading dough (as I described in the note above) so the half-cylinders don't spread and crack, especially when rolled to the 1/4-inch (0.6-centimeter) thickness called for in this tutorial. A non-spreading dough also increases the odds that the cylinder will fit snugly inside the notches in the half-trees. With any amount of spreading, it may not, and the notches may need to be pared back before decorating the half-trees. (See the end of Step 1 for more details.)
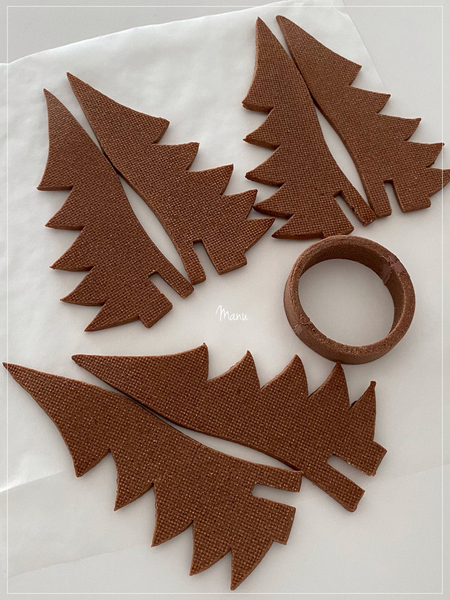
Here’s a photo recap of the baked cookies. In the picture, the two rectangular cookies have been contoured and attached together to form the cylindrical tree trunk.
Let’s start with my design process:
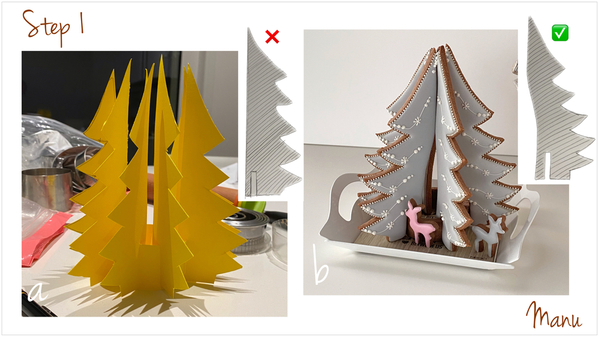
a. In the picture below (left), my initial half-tree prototype is shown in yellow cardboard. I first drew a tree, and then cut it in half to get the template of each "mug-hugger" cookie. But as you can see, the flat sides of the tree halves didn’t touch each other in the center, and, as a result, the overall look was more like a bonfire rather than a tree.
b. So I went back to the drawing board and sketched a half-tree that was angled inward at the top. This way, when all of the halves hugged the rim of the cylinder, the top inner edges came closer to one another, and the construction looked like a tree! Again, you'll find my final angled template in "Attachments" at the end of this post.
Now, on to baking!
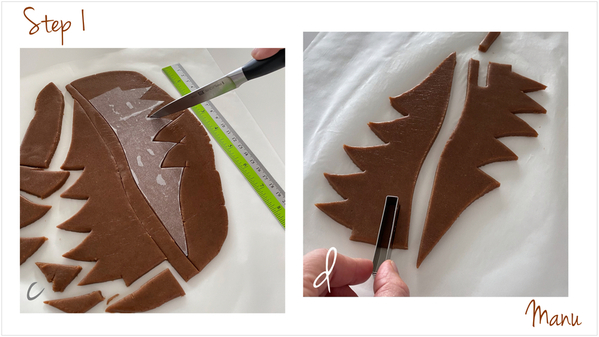
c. Roll your cookie dough to a thickness of 1/4 inch (0.6 centimeter), place my half-tree template on the dough, and use a paring knife to cut out six tree halves.
d. Use the mug-hugger cutter to cut a small (1/4 x 1-in/0.6 x 2.5-cm, W x H) notch at the base of each half-tree at a distance of about 3/8 inch (1 centimeter) from its curved side.
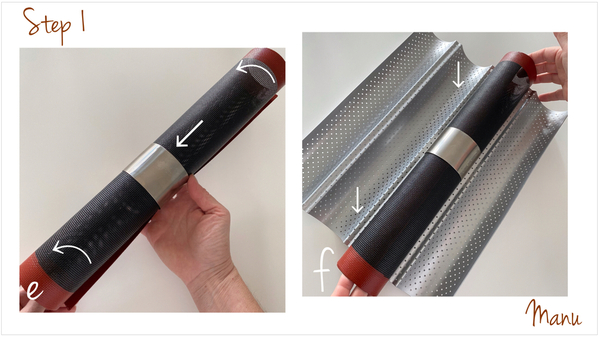
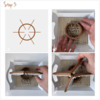
e. Roll up a perforated baking mat, and insert it into the opening of a (2 1/2-in/6.5-cm) cake ring or round cookie cutter.
f. Place the rolled baking mat on top of the opening of the baguette pan so that the mat won’t roll over. (Alternatively, place the mat on a baking sheet, and prop it with crumpled aluminum foil or other ovenproof objects.)
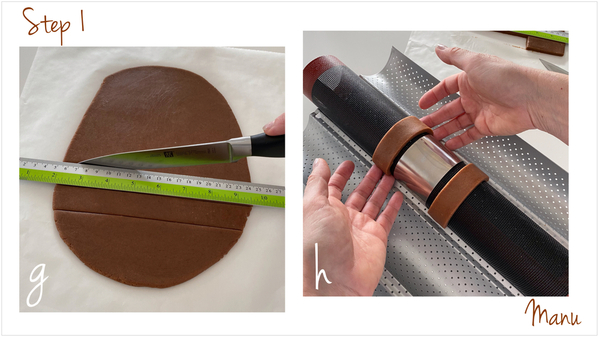
g. Again, roll your cookie dough to a thickness of 1/4 inch (0.6 centimeter), or slightly less. (The dough needs to be thin enough to fit inside the notches cut in the half-trees, but not so thin that the half-trees won't fit snugly on top of the cylinder. Again, using a non-spreading dough is the best way to ensure proper fit.) Use a ruler and a paring knife to hand-cut two (1 x 4-in/2.5 x 10-cm, W/H x L) rectangles.
h. Place the two rectangles crosswise on top of the rolled mat, as shown below (right). The cookies will bake very evenly, as hot air goes through the perforated mat. They also won’t slide if the dough is non-spreading, as the perforated mat provides some grip.
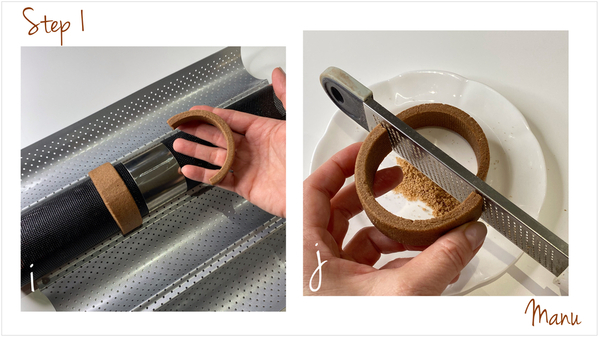
i. Bake according to your recipe, and once the cookies are out of the oven and cooled down, squeeze the mat between your fingers, and the cookies will easily pop off.
j. As necessary, use a zester or Microplane tool to file the edges of each half-cylinder to get two halves of the same size that fit tightly together along their short edges.
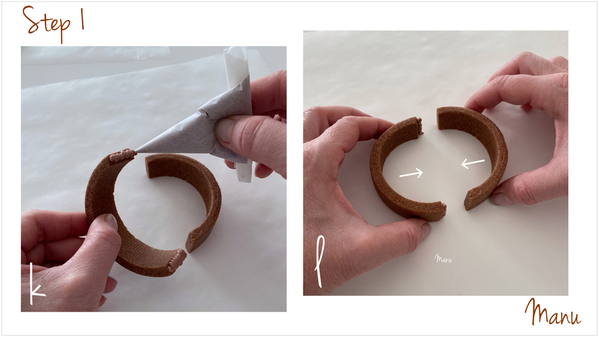
k. Pipe some brown royal icing “glue” along the short edges of one of the two cookies. (If your dough is not brown, use a "glue" color that matches it.)
l. Gently press the half-cylinders together to get a cylinder. Let the icing dry completely.
Note: Before proceeding to Step 2, it's wise to test the fit of your half-trees on a half-cylinder. If the notches have closed too much during baking to fit snugly over the half-cylinder, then use a sharp paring knife to very gradually shave off dough in the notch interiors. Be careful of taking off too much dough, or the half-trees may lean in the final assembly.
Step 2: Decorate cookies
Only the six half-trees will be decorated; the cylinder cookie will remain bare. Please note that you need to decorate the cookies in three pairs, as shown in the next several steps. Heads-up: The decoration is time-consuming, but a good way to practice pressure piping!
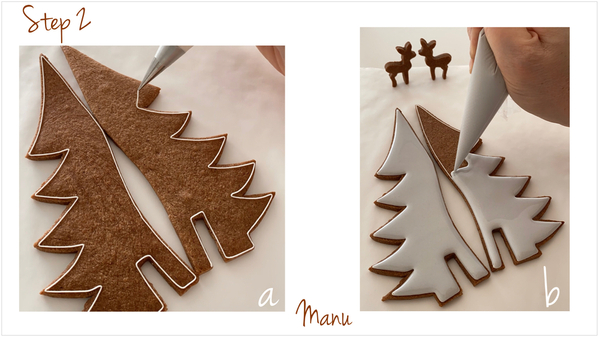
a. Place two half-tree cookies on your table (positioned as mirror images of one another), and outline them using white piping-consistency royal icing and a PME #1 tip (or equivalent). Make sure you leave 2 millimeters (between 1/16 and 1/8 inch) bare along the jagged side of each cookie, as that space will be filled with piped dots in a later step.
b. Now, using a PME #3 tip (or equivalent), flood the cookies with grey flood-consistency royal icing. Let the icing dry completely.
For Steps 2c through 2g, again use the white piping-consistency royal icing and a PME #1 tip (or equivalent).
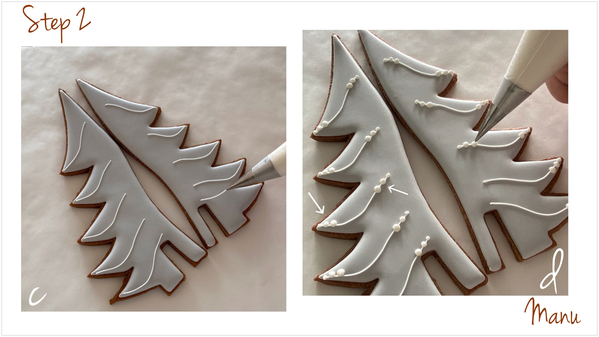
c. Starting at each point on the jagged side of each cookie, pipe a sort of slanted/curved line that stops about 3/8 inch (1 centimeter) away from the opposite side.
d. At both ends of each line, pipe three large dots less than 1/16 inch (1 millimeter) apart from one other. Pipe larger (and larger) dots as you move away from the end of each line.
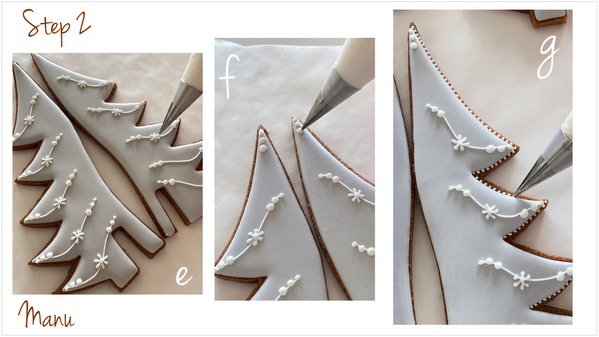
e. Pipe a tiny snowflake right in the middle of each line by piping six "tailed" beads whose tails intersect at the snowflake center.
f. At the top point of each half-tree cookie, pipe three large dots less than 1/16 inch (1 millimeter) apart from one other. Pipe larger (and larger) dots as you move away from the point.
g. And last, pipe little dots along the jagged edge of each cookie.
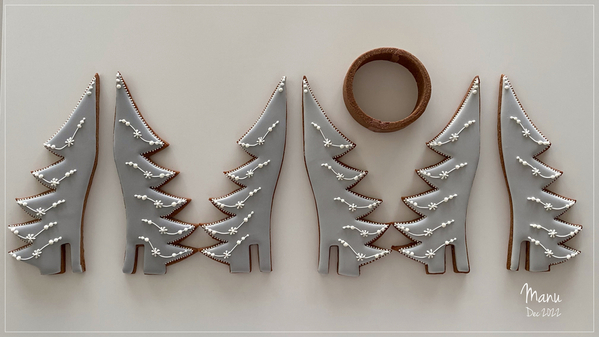
Repeat Steps 2a to 2g for the remaining two cookie pairs. Let the icing dry completely.
Step 3: Assemble cookies
a. If you properly test-fit your cookies at the end of Step 1, assembling the cookies is very easy, as they just need to be hung and spaced evenly on the rim of the cylinder cookie.
b. Place the cylinder cookie in the center of a plate/tray that will be big enough to accommodate the assembled (7 1/8 x 7 1/2-in/18.0 x 19.0-cm, W x H) tree.
c. Place the first pair of half-tree cookies on the cylinder so that their iced surfaces face you.
d. Place the second pair of half-tree cookies on the cylinder, again so that their iced surfaces face you.
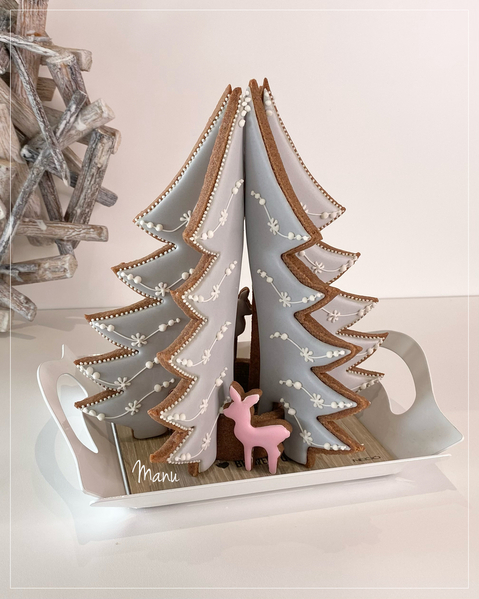
And, once again, hang the last two half-trees on the cylinder so that their iced sides face you. (Note: With all of the iced sides facing forward, the tree will have a small area in the back without icing. Of course, you could ice both sides of the half-tree cookies so the tree shows an iced surface from every angle. However, I opted not to, as I felt the icing-to-cookie ratio was better for eating this way.)
At last, this 3-D winter wonderland tree is ready to be served and enjoyed over a cup of tea or coffee with friends! I added a couple of pink fawns for a Valentine's Day twist!
And if you add an LED tealight in the center, you have a cute lantern.
Here’s a video recap with a better view of the finished project from all angles.
Happy winter! Manu

Manuela Pezzopane, affectionately called Manu by her friends and family, is the author of the blog feature Made by Manu, where each month she shares the method behind a magical cookie of her own making. In March 2022, Manu also assumed the role of host of our rebranded and reformatted Cookie Connection Challenges: Watch-Learn-Create Series, which debuted in a virtual video format in July 2022. A fan of everything handmade, Manu professes to have tried every possible hobby. However, it wasn’t until the end of 2014, when an American friend invited her to a Christmas cookie exchange, that she first discovered decorated cookies. In 2015, after watching Julia M. Usher's videos and signing up on Cookie Connection, Manu finally attempted her own designs. Since then, cookie decorating has become Manu’s passion, and her mesmerizing video shorts have earned her a large and loyal following throughout the global cookie community. Manu harks from Rome, Italy, where she currently resides. You can email Manu at manubiscottidecorati@gmail.com, follow her on Facebook and Instagram, or explore her past challenges and large library of Made by Manu tutorials here on Cookie Connection.
Photo credit: Manuela Pezzopane
Note: Made by Manu is a Cookie Connection blog feature written by Manuela Pezzopane, where each month she shares the method behind a magical cookie of her own making. This article expresses the views of the author, and not necessarily those of this site, its owners, its administrators, or its employees. To read all of Manuela's past Made by Manu tutorials, click here. And to see all of Cookie Connection's tutorials, click here.






Comments (23)