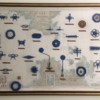
 Many years ago (almost thirty), a friend of mine and his girlfriend found a way to make some money by selling framed sailing knots. The knots, each labelled with its name, were glued onto a nautical chart together with other embellishments like mini anchors and ship wheels. My friend's sister was my best friend, and we had fun making knots out of the book that her brother used for knot-making directions. In the non-internet era, books were the only way to learn! I was particularly drawn to the decorative knots and their interwoven patterns.
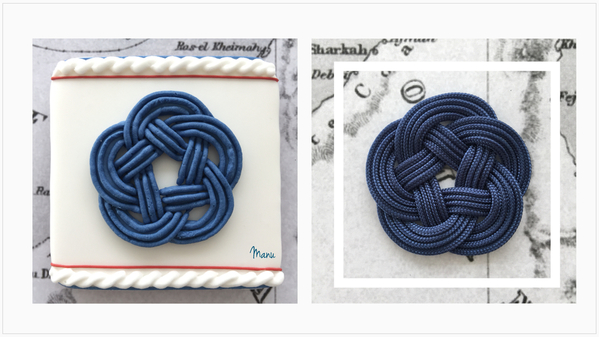
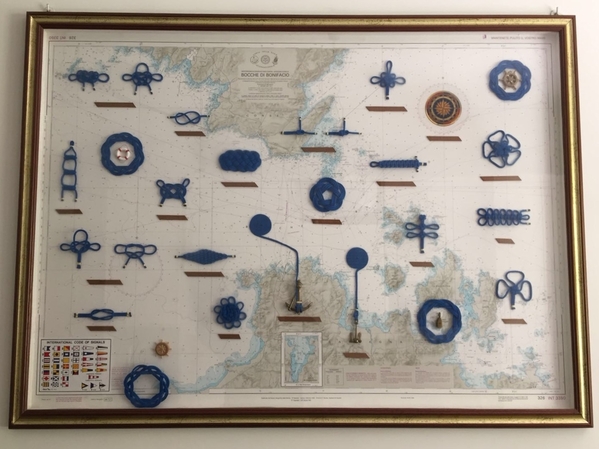 Manu's Inspiration (used here with permission from Manu's friends)
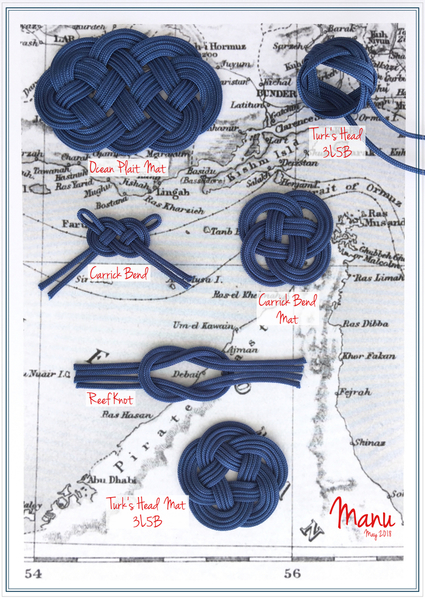
And so that's how royal icing sailing knots became the theme of this tutorial! I am not an expert of anything nautical (as you can easily tell from how I decorated the boat sails in my tutorial from last year), but I like the decorative aspect of this theme. Thanks to the many tutorials available nowadays on the web, I made some knots with a thin cord before making any attempt with royal icing. I selected a cord that mimicked a line of royal icing piped with a Wilton #2 tip, and used the following tutorials to guide me with each knot: Ocean Plait Mat, Turk’s Head 3L5B, Carrick Bend, Carrick Bend Mat, and Turk's Head Mat 3L5B. The Reef Knot is an easy one, so I didn't use a tutorial for that! ![]()
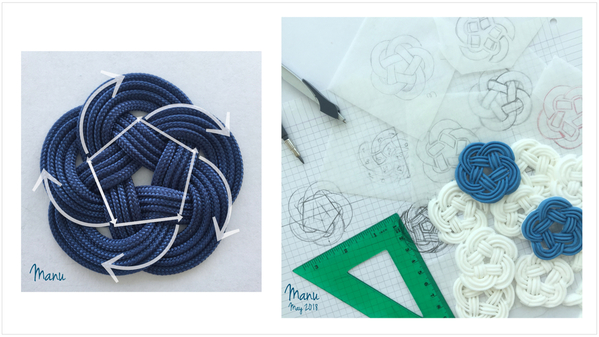
I thought tying real knots would be the best way to “decode” them and to find an easy way to turn at least one of them into a royal icing knot for this tutorial. The Turk's Head Mat 3L5B is basically a circular braid, but I also see a central pentagon surrounded by five arches. (BTW, 5B means five bights, the number of curved sides on the outside edge of the knot.) So I figured out my template and after some (quite many!) trials and errors, I found the right shape needed to pipe a satisfying knot. I have a large number of templates and royal icing knots left over, but eventually I got the hang of it! (And BTW, 3L refers to the number of leads, or strands, that comprise the primary braid, which is not to be confused with the number of cords in each lead. Both my real and royal icing knots have three leads, but each lead in the real knot is comprised of four cords. For the royal icing version, I only piped three cords in each lead, because it was easier for me to keep the lines parallel that way. But enough on nautical knots. I know you didn't come here for them! Onto icing! ![]() )
)
- 1 (7.5-cm/3-in) square cookie, flooded with white royal icing and completely dry
- Knot template, attached
- Parchment paper or acetate
- Blue piping-consistency royal icing, in pastry bag fitted with coupler, along with PME #1 and Wilton #2 tips (or equivalents)
- Blue flooding-consistency royal icing, in tip-less pastry bag (or parchment cone) with opening equivalent to Wilton #2 tip
- Scribe tool or toothpick
- Fine liner paint brush
- White piping-consistency royal icing, in pastry bag with Wilton #3 tip (or equivalent)
- Red piping-consistency royal icing, in pastry bag with PME #1 tip (or equivalent)
Step 1: Cut, bake, and flood square cookie
Cut out a square cookie; then bake, cool, and flood it with white royal icing. Set the cookie aside to allow the icing to dry completely. We'll return to this cookie in Step 3 when we add borders and other details.
Step 2: Pipe royal icing transfer of Turk's Head Mat 3L5B
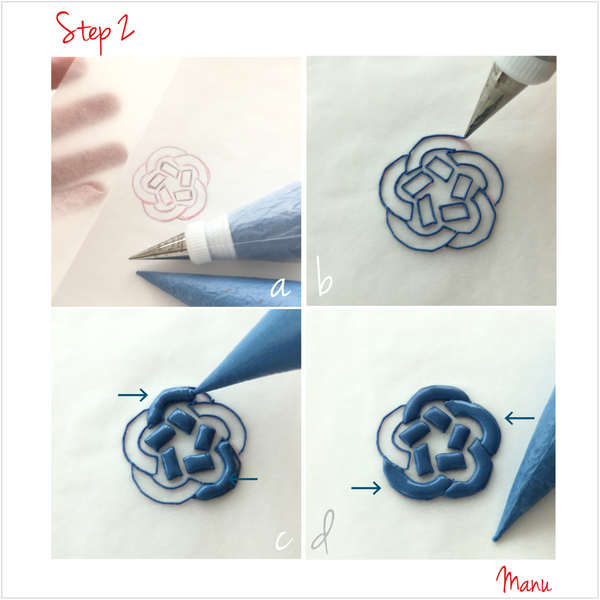
Because the Turk's Head Mat 3L5B requires some rather fancy piping, we'll pipe it off the cookie, on parchment paper or acetate, for more piping control and to avoid messing up the cookie! Then, once it's dry, we'll transfer it to the cookie. (In other words, we're going to make it as a royal icing transfer!) You will find the template in the attachments. First, we'll outline and fill the template with royal icing, and then pipe three ropes on each section. The layer of royal icing underneath the ropes will give dimension to the knot.
a. Place the template under a piece of parchment paper (or acetate).
b. Using blue piping-consistency royal icing and a PME #1 tip (or equivalent), outline the template.
c. Using the equivalent of a Wilton #2 tip, fill all five sections of the central pentagon with blue flooding-consistency royal icing. You may want to use a scribe tool to work the icing into the tiny corners. Also fill two of the non-adjacent arches of the knot's outer edge (see blue arrows in photo). Let the icing crust, ideally in front of a fan, before moving on to the neighboring arches. Filling non-adjacent sections and allowing some drying time in between keeps each section distinct and dimensional.
d. Fill two more non-adjacent arches (see blue arrows), and let the icing crust again before filling the last arch. Once again, let the icing dry; otherwise, you risk smashing it with the icing tip in the next step.
Now, we are going to cover each section of the pentagon with three thick royal icing lines that resemble ropes. Grab the bag of blue piping-consistency royal icing used in Step 2b, and swap in a Wilton #2 tip (or equivalent).
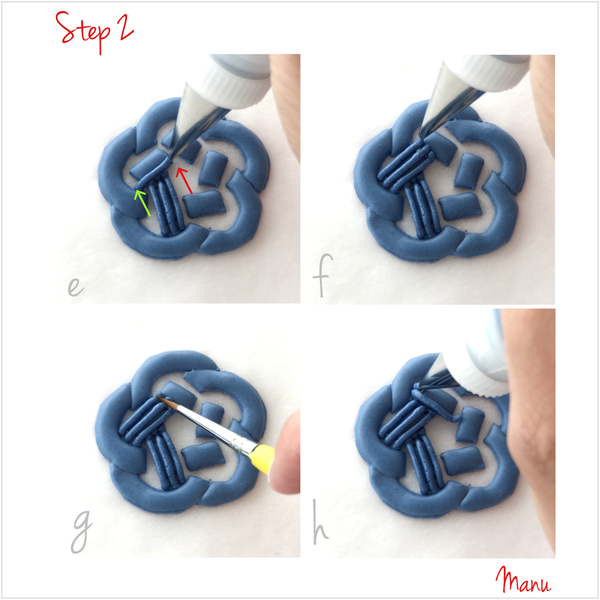
e. Insert the tip in the space between one of the arches and an adjacent pentagon section (see green arrow in photo). Start piping a line along the bottom length of the pentagon section, stopping at the side of the next pentagon section (see red arrow in photo).
f. Repeat Step 2e two more times. In other words, pipe two more lines parallel to the first and touching each other. As you can see in the picture, I piped three lines on another section to help you visualize where we're headed.
g. Use a fine liner paint brush to push down the ends of the icing. The goal is to "tuck" the three ropes into the space between the two pentagon sections.
h. Repeat Steps 2e to 2g for the remaining pentagon sections. Take care to cover the ends of the lines on the previous section with the innermost line on the next section.
Now that the pentagon is complete, let’s move to the external part of the knot and decorate the arches.
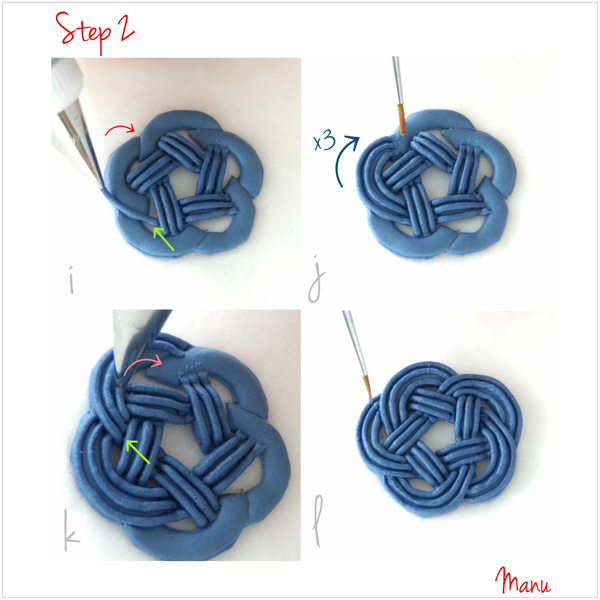
i. Use blue piping-consistency royal icing and a Wilton #2 tip (or equivalent), just as in Steps 2e through 2h. Start piping a curved line in the space next to the edge of one of the arches (see green arrow in photo). Continue piping the line, ending it where the arch intersects the adjacent arch (see red arrow in photo).
j. Pipe two more parallel curved lines (a sort of monocromatic rainbow) next to the first line. Use a liner paint brush to press down the ends of the three lines where they intersect the next arch.
k. Moving clockwise, insert the tip in the space between the next arch and its adjacent pentagon section (see green arrow), and repeat Steps 2i and 2j. In other words, pipe three more parallel curved lines that end at the next arch intersection (see red arrow), taking care to cover the ends on the previous arch when you lay down the first (outermost) line. Push down the ends of the three lines with a liner paint brush, as before.
l. Keep moving clockwise in this fashion until you have decorated all of the arches. With the help of a liner paint brush, tuck the last rope ends under the outermost curved lined of the first arch decorated in Step 2i.
Step 3: Add borders to cookie
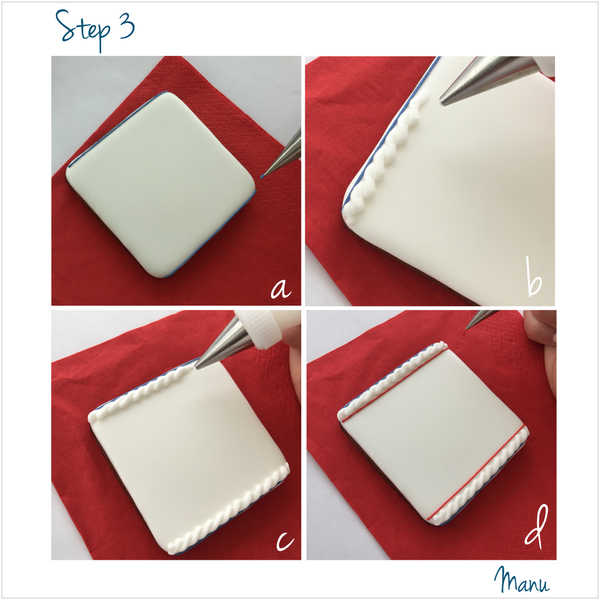
a. Using blue piping-consistency royal icing and a PME #1 tip, pipe a line along the upper and lower edges of the cookie that was flooded in Step 1.
b. Pipe a rope border on the upper edge of the cookie, using the blue line that you just piped as a guide to keep the rope straight. Use white piping-consistency royal icing and a Wilton #3 tip (or equivalent) for the rope. For more information about piping rope borders, check out @SweetAmbs' tutorial here.
c. Rotate the cookie and pipe another rope border along the other blue line.
d. Using red piping-consistency royal icing and a PME #1 tip, pipe a line along the innermost edge of each rope border.
Of course, you could decorate the edges of this cookie in any other manner; what I've shown here is only one of myriad possibilities. Just remember to keep the cookie interior clear enough to receive the knot in the next step!
Step 4: Glue transfer on cookie
a. Once the knot transfer is completely dry, carefully remove it from the parchment paper (or acetate). Actually, when I turned over the paper to check if the underside of the knot was dry, the knot popped right off and into my hand! But, this may not happen if your icing isn't completely dry. You may need to gently peel the paper (or acetate) away from the transfer. Just be careful not to tug on the transfer, or it may break. And, if the paper does not peel off easily, then allow more drying time.
b. Using a Wilton #3 tip (or equivalent), pipe dabs of white piping-consistency royal icing on the back side of each section.
c. Carefully affix the transfer, icing side down, to the cookie prepared in Steps 1 and 3.
Our cookie decorated with a knot is ready!
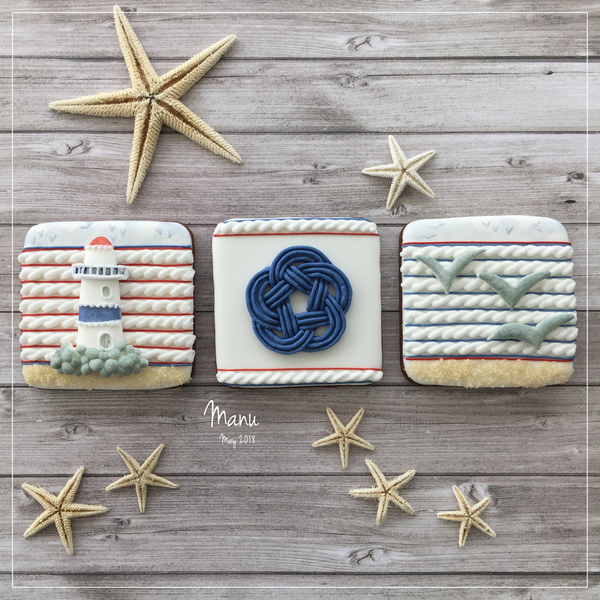
At first, I wanted to add a wafer paper label and to handwrite the name of the knot with a red food marker, but since I don’t have nice handwriting, I thought I’d use the cookie as an element of a nautical set.
I leave you with a short video . . . the starfish and sounds of the sea are from Dubai JBR, UAE. Enjoy!
'Til next time, Manu


Photo and cookie credits: Manuela Pezzopane
Note: Made by Manu is a Cookie Connection blog feature written by Manuela Pezzopane, where each month she shares the method behind a magical cookie of her own making. This article expresses the views of the author, and not necessarily those of this site, its owners, its administrators, or its employees. To read all of Manuela's past Made by Manu tutorials, click here. And to see all of Cookie Connection's tutorials, click here.






Comments (47)