 A felt letter board is the inspiration for this short and easy tutorial. From humble beginnings as vintage signs, letter boards with quotes have become very popular elements of home décor and Instagram content (here’s a nice article about how this trend took off a few years ago.) A letter board typically consists of a framed series of parallel dowels covered with felt fabric. Letters with tabs on the back side can be stuck in the grooves between the felt dowels to form a quote, convey a personal message, or say just about anything. I have always liked the idea of customizing cookie sets with messages related to the event or occasion, and the possibilities for doing so with a letter board cookie are truly endless. Further, if you've got creative block, a "centerpiece" letter board cookie with an inspirational quote might just be all you need to jumpstart the rest of a set!
 ![]()
- 1 large (8 x 11-cm/3 x 4 3/8-in) rectangular cookie, ideally baked on a perforated silicone mat
- Royal icing and pastry tips:
- White piping-consistency in pastry bag with PME #1 tip (or equivalent, to pipe lines) and PME #2 tip (or equivalent, to pipe letters)
- Grey thick flooding-consistency in pastry bag with PME #3 tip (or equivalent; I used a tip-less bag)
- Yellow thick flooding-consistency in pastry bag with PME #2 tip (or equivalent; I used a tip-less bag)
- Paint brush, to create texture
- Acetate, to practice piping letters (optional)
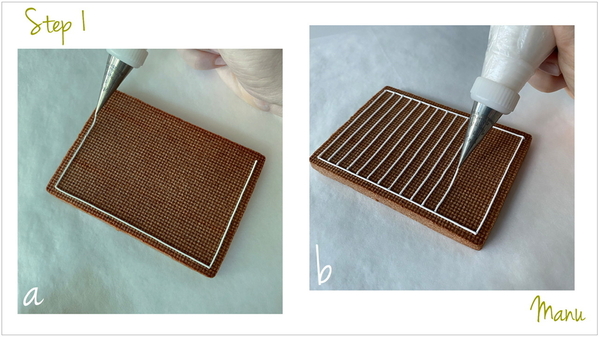
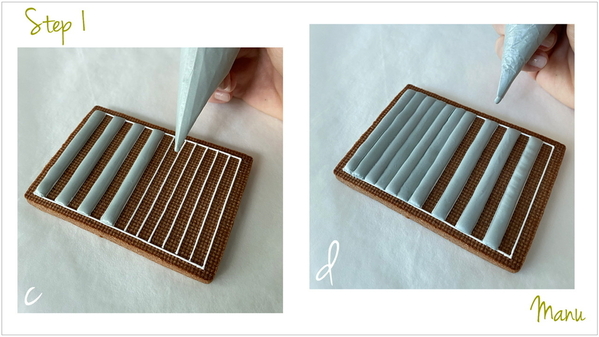
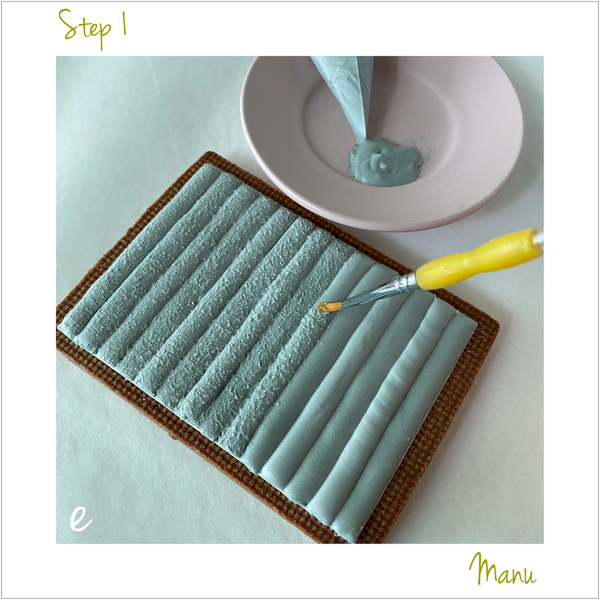
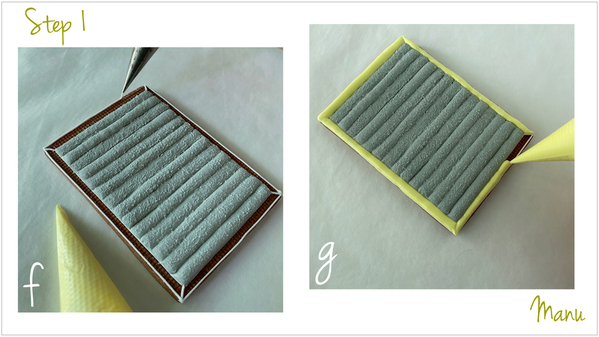
Step 1: Outline and flood cookie
a. Outline the rectangular cookie about 0.5 centimeters (3/8 inch) from the edge. Use white piping-consistency royal icing and a PME #1 tip (or equivalent).
b. Within the outline just piped, pipe a series of lines running parallel to the short side of the cookie. I piped the lines about 0.6 centimeters (1/4 inch) apart. Tip: Bake your cookie on a perforated silicone mat with a grid texture, and pipe on the back side of the cookie. This way, you can use the grid imprint as a piping guide.
c. Flood non-adjacent strips using grey thick flooding-consistency royal icing and a PME #3 tip (or equivalent). Let the icing set before flooding the remaining strips so that the icing in each strip remains distinct.
d. Now, flood the remaining strips just as in the previous step, and let the icing dry completely before moving to Step e.
e. Pipe a small amount of the same grey icing on a saucer. Use a paint brush to apply the icing randomly along each strip with up-and-down motions of the brush. This technique is call stippling. While you stipple, the icing will start to dry, and you will be left with a felt-like texture on the cookie.
f. To create a frame around the strips, outline the edge of the cookie using white piping-consistency royal icing and a PME #1 tip (or equivalent).
g. Flood the frame using yellow thick flooding-consistency royal icing and a PME #2 tip (or equivalent), and let the icing dry completely.
Step 2: Pipe letters
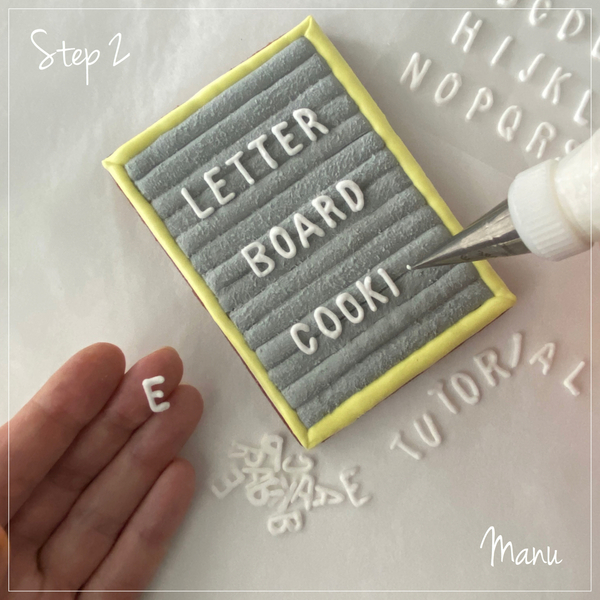
Now that the icing on the frame is dry, it's time to pipe a message or a quote, or whatever you like. Practice your letter-piping on a piece of acetate before piping on the cookie. Use white piping-consistency royal icing and a PME #2 tip (or equivalent). The letters on actual letter boards are usually as tall as each strip of the board, or multiples of each strip, so the tabs on the letters can lodge in the crevices between the strips. However, for readability, I kept my letters a little bit taller than a strip (about 1 centimeter or 7/8 inch). I practiced piping so many letters, intending to also use them in my photo staging, that I eventually ended up gluing the letters onto the cookie (i.e., using them as royal icing transfers). I didn’t pipe directly on the cookie at all! A dot of white piping-consistency royal icing is all that's needed to glue a letter in place. It's less time-consuming to pipe just once directly on the cookie, but it's often safer to pipe many letters as transfers. That way, you can choose the very best to display on your cookie!
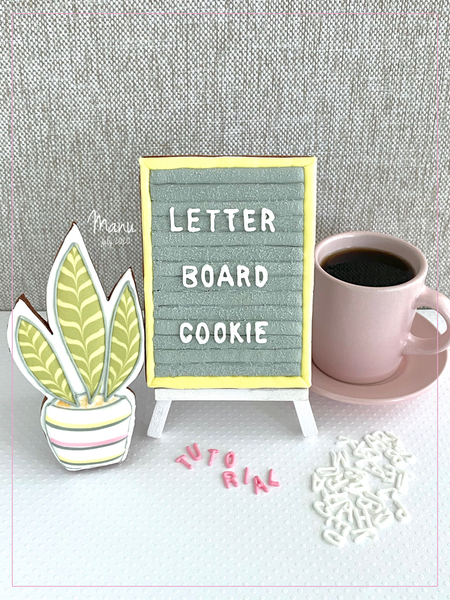
The letter board cookie is ready! I obviously didn’t venture into piping a quote. Instead, I used my letter board cookie as a caption for the title image of this tutorial! Below, I've propped the cookie vertically and added a simple marbled plant cookie, along with more pink letter transfers that spell “TUTORIAL” and complete my caption.
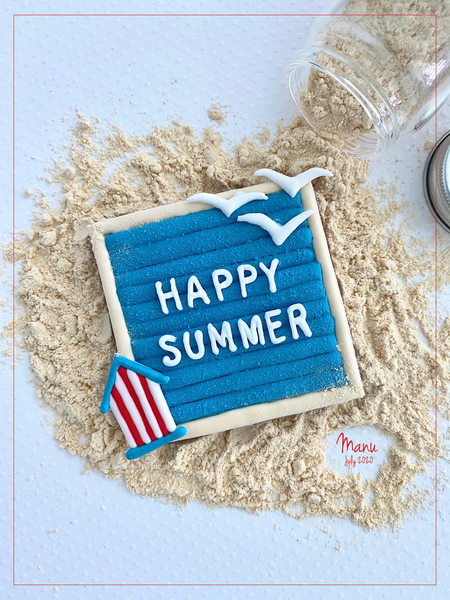
And that’s all for this month! Wishing you a happy summer . . . with a letter board cookie, of course!
Manu

Photo and cookie credits: Manuela Pezzopane
Note: Made by Manu is a Cookie Connection blog feature written by Manuela Pezzopane, where each month she shares the method behind a magical cookie of her own making. This article expresses the views of the author, and not necessarily those of this site, its owners, its administrators, or its employees. To read all of Manuela's past Made by Manu tutorials, click here. And to see all of Cookie Connection's tutorials, click here.




Comments (33)