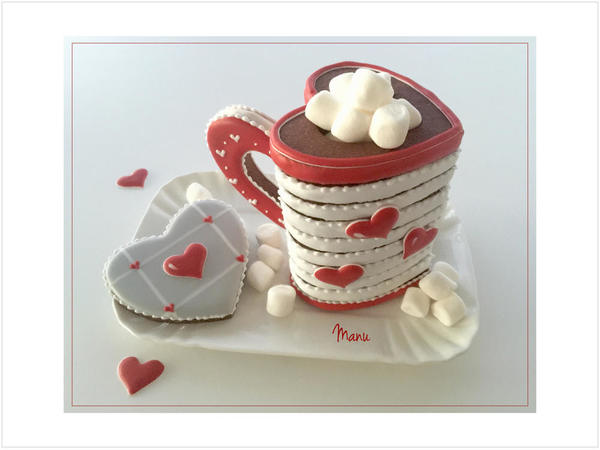
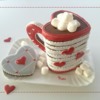
 This project is halfway between a cookie platter and a 3-D cookie project. It is once again intended to be a treat to share with friends, with the 3-D mug offering a new and different way to arrange and serve cookies. (To allow for easy serving, the cookies are just stacked to into a mug shape, but aren't glued to one another.)
The inspiration for this project came from a couple of heart-shaped mugs that my mom bought more than 30 years ago. They were white with "Happy Valentine’s Day" written on one side in red. The handle was on the other side of the heart, which made it quite difficult to sip from the point or the lobes of the heart. But they were cute and my favorite mugs to use when I wanted to have a hot chocolate, just for the pleasure of setting them out. Even though nobody will drink from this edible mug, I moved the handle between the two lobes! ![]()
- Chocolate or other dark cookie dough of your choice
- 2 heart-shaped cookie cutters from this Wilton set of nested cookie cutters (I'll refer to these cutters with numbers, ranging from #1 to #6, where #1 is the smallest cutter in the set. For this project, I used cutters #2 and #4, which are about 4.5 cm/1 3/4 in and 8.2 cm/3 1/4 in wide, respectively. For more precise dimensions, see Step 1, below.)
- Small paint brush
- Red medium-consistency royal icing, in cup
- White medium-consistency royal icing, in cup
- 2 mugs (or other props) and chopstick, for drying rack
- White piping-consistency royal icing, in pastry bag fitted with PME #1 tip or equivalent
- Red, grey, and white flooding-consistency royal icing, in tip-less pastry bags with openings equivalent to PME #2 tip
- Red piping-consistency royal icing, in tip-less pastry bag with opening equivalent to PME #1 tip
- 4 small (2 cm/3/4 in) heart royal icing transfers (For more information about how to make royal icing transfers, see Step 4 of my recent Christmas tree tutorial.)
- White very thick-consistency royal icing (Julia calls it "glue" in her video.)
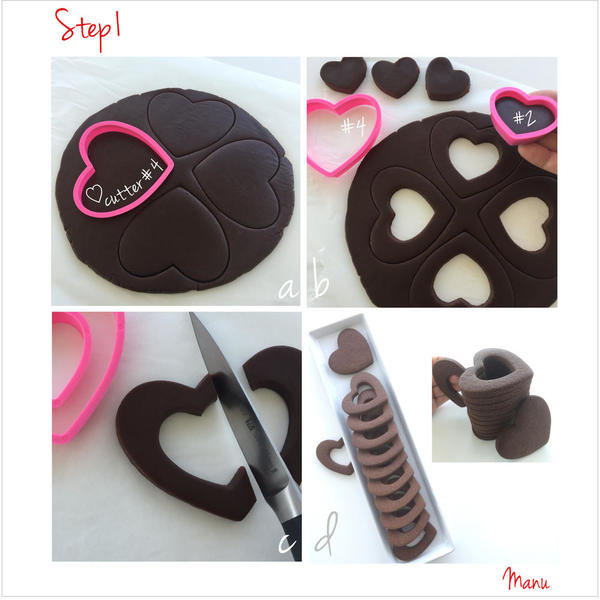
Step 1: Roll, cut, and bake cookies
Dough notes:
Use chocolate dough or another dark-colored dough to mimic hot chocolate in the mug. Roll the dough relatively thick, about 1 cm (3/8 in), because we need ample surface area in order to coat the curved sides/edges of each cookie. The edges will form the sides of the mug, and will be visible in the final construction.
Cookie cutter notes and dimensions:
I chose to use two cutters from this Wilton set because the hearts are quite large and perfect for recreating an actual full-scale mug, or at least the one I had in mind. This set is also widely available online, all over the world. The specific dimensions of the two cutters I used are:
Heart #2: 4.5 W x 3.5 T cm (1 3/4 W x 1 3/8 T in)
Heart #4: 8.2 W x 6.3 T cm (3 1/4 W x 2 1/2 T in)
a. Use the large heart-shaped cutter #4 to cut out 12 hearts.
b. Create 11 heart "frames" by using the smaller heart-shaped cutter #2 to cut out a small heart from the center of 11 of the 12 heart shapes that you just cut. To avoid misshaping cut pieces, work with cold dough, and put the dough in the fridge before removing the excess dough. (We don’t need the smaller heart cutouts for the project, but I left them in the picture to show you the thickness of the dough.)
c. Take one of the heart frames that you cut in the previous step, and cut away less than half of it to make the handle of the mug. (The handle will be the bigger "half".)
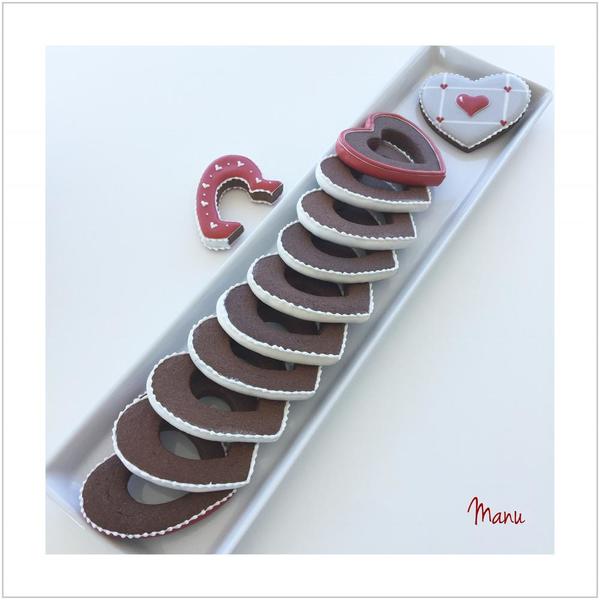
d. Bake the cookies as directed in your recipe. As a recap, this picture shows all of the cookies that should be baked: 1 solid heart (for the lid of the mug); 10 heart-shaped frames (for the body of the mug); and 1 "half"-frame (for the handle).
Once the cookies are cool, move to the next step.
Step 2: Top-coat edges of heart frames
Work on one half of each heart frame at a time.
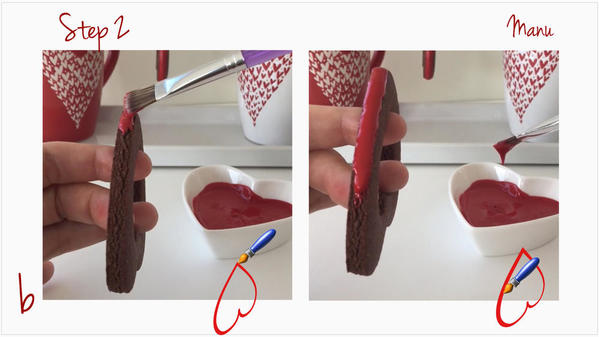
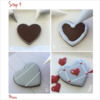
a. Turn the first heart frame perpendicular to the table with the point of the heart facing up. Dip the paint brush in the red medium-consistency royal icing. (For icing consistency tips, see the note and video after Step 2g, below.)
b. Using short and fast movements, start dabbing small amounts of icing next to the point of the heart; then carefully move down along one edge toward the lobe. Remember to work on one side of the heart at a time. Try not to go back over the icing. If there is an imperfection, it will naturally smooth as the icing sets. If it doesn't, just shake the cookie to even out the icing.
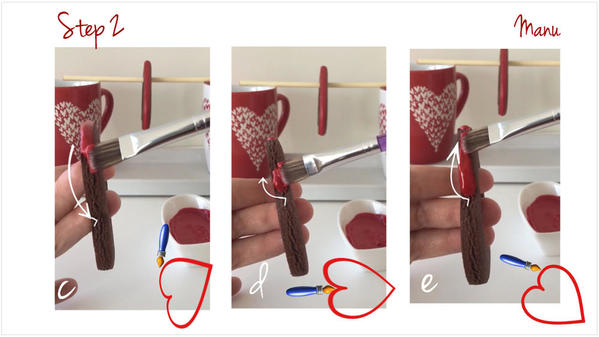
c. Once you have almost reached the top of the lobe on one side, stop painting royal icing. This step, along with Steps 2d and 2e, will help control the amount of icing on the lobe tops. Note: The sketch at the bottom of each picture shows the point along the edge to which the icing should be painted, and the white arrow near the actual cookie shows the direction in which to paint.
d. Go to the apex of the heart (where the two lobes meet). From the apex, start dabbing the icing in the other direction, now toward the point of the heart.
e. Keep dabbing in this direction until the icing meets and merges with the icing you stopped dabbing in Step 2c, close to the top of the lobe. Be sure that the top of the lobe is covered with just a thin layer of icing. (Later, the heart will be hung upside down to dry. Because the icing on the point has a tendency to drip or drain toward the lobes when the cookie is in this position, having a thin layer on the lobes will prevent an excess of icing from accumulating on them as the icing dries.)
When you are done top-coating one half of the cookie, repeat Steps 2a through 2e on the other side of the heart.
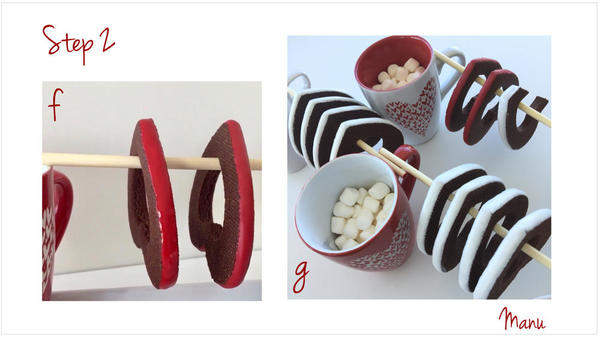
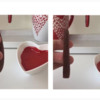
f. Slip the fully top-coated cookie on the end of a chopstick, hanging it from its point, and set the chopstick on two mugs (or other props) to elevate the cookie. Let the cookie dry in this position, ideally in front of a fan to set the icing as quickly as possible.
Repeat Steps 2a through 2f with another heart frame, as you need two frames decorated in red - one for the top of the mug and one for the very bottom.
g. Now, using white medium-consistency royal icing, repeat Steps 2a through 2f on the 8 remaining heart frames and the handle.
Note: It is important to get the consistency of the icing just right when painting a curved surface. If it is too thin, it will drip off. And if it is too thick, brush strokes will remain. I made a video to help you better visualize the icing consistency and process. Disclaimer: The video turned out quite boring even though at double-speed for the first minute and further time-lapsed for the last 30 seconds, but I thought it would give you the idea.
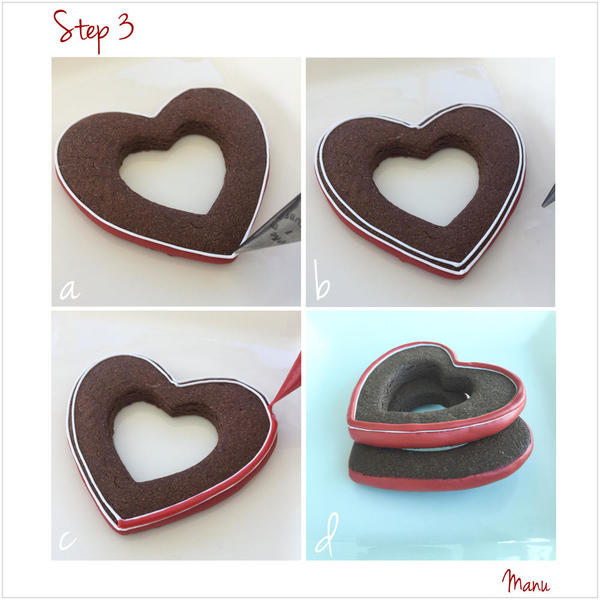
Step 3: Add border to top of mug
a. Using white piping-consistency royal icing and a PME #1 tip (or equivalent), outline one of the two red heart frames (the one that will sit on top of the mug). The aim is to create a border that mimics the top edge of a real mug. This border should also have some depth to give the appearance of it rising above the "hot chocolate" (the exposed dark cookie surface).
b. Pipe another outline inside the one you just piped, about 0.6 cm (1/4 in) away.
c. Using red flooding-consistency icing and a PME #2 tip (or equivalent), flood the space between the lines.
d. Let the icing dry.
Step 4: Decorate lid
I am not sure if hot chocolate mugs have lids, but I wanted to add one anyway as a decoration. ![]()
a. Using white piping-consistency royal icing and a PME #1 tip (or equivalent), outline the cookie lid (the solid heart).
b. Now, using grey flooding-consistency royal icing and a PME #2 tip (or equivalent), flood the interior of the heart.
c. While the grey icing is still wet, immediately pipe perpendicular white lines on top to create a grid. Use white flooding-consistency icing and a PME #2 tip (or equivalent). To help pipe straight lines, a grid can be drawn on paper and placed underneath the cookie, as pictured below. Let the icing dry about eight hours, or until completely set.
d. Using red piping-consistency icing and a PME #1 tip (or equivalent), pipe tiny red hearts where the lines intersect. Also pipe a dot in the center of the heart, and apply a heart-shaped royal icing transfer on top.
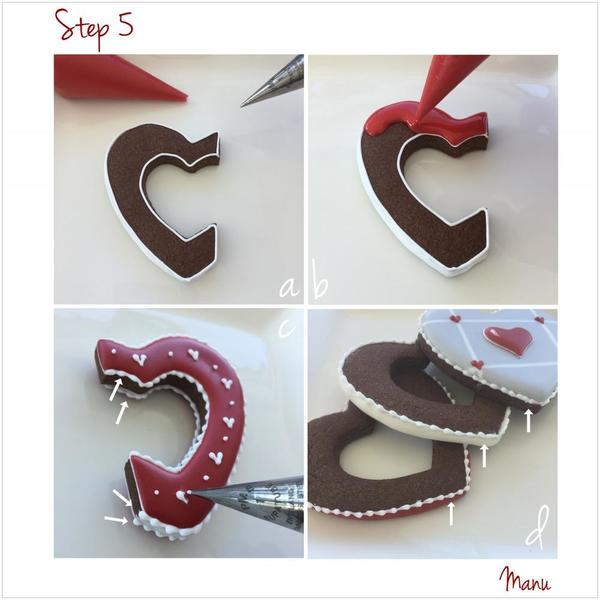
Step 5: Decorate handle
a. Using white piping-consistency royal icing and a PME #1 tip (or equivalent), outline one side of the cookie handle.
b. Using red flooding-consistency icing and a PME #2 tip (or equivalent), flood the interior of the handle. Let the icing dry about 8 hours, or until completely set. Flip the cookie over, and repeat Steps 5a and 5b on the other side, allowing the icing on this side to dry about 8 hours as well.
c. Now, turn to white piping-consistency royal icing in a bag with a PME #1 tip (or equivalent). Pipe tiny white hearts alternately with dots along the handle on one side. Also pipe a border along the internal and external edges of that side. Allow the white icing to set, turn the handle over, and then repeat this step on the other side.
d. Pipe the same white border used on the handle along the top edge of all of the white heart frames, the remaining red heart frame, and the lid. But do not pipe it on the red heart frame, detailed in Step 3, that forms the top of the mug.
Step 6: Stack cookies and glue on handle
Now that we have decorated all the cookies . . .
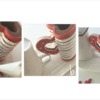
. . . stack them on the plate on which they will be served, so they will not have to be moved. As I noted at the start, the heart frames that form the mug are not glued to one another, so that they can be easily separated for eating. The only part that is glued is the handle, using “Julia’s glue”, aka very thick royal icing (a). Prop the handle until dry (b), and, as desired, glue additional royal icing heart transfers on the sides of the cookie mug (c). Again, use small amounts of thick royal icing to stick the transfers in place.
Our cookie mug is now ready! After filling it with mini marshmallows, it can be eaten, cookie by cookie, while sipping real hot chocolate with friends!
Love,
Manu
P. S. Please take a look at “Love Seat”, a tutorial I wrote last year that shows how to make another 3-D cookie using various heart cutters.


Photo and cookie credits: Manuela Pezzopane
Note: Made by Manu is a Cookie Connection blog feature written by Manuela Pezzopane, where each month she shares the method behind a magical cookie of her own making. This article expresses the views of the author, and not necessarily those of this site, its owners, its administrators, or its employees. To read all of Manuela's past Made by Manu tutorials, click here. And to see all of Cookie Connection's tutorials, click here.











Comments (43)