[EDITOR'S NOTE: Woo hoo! We've got a great guest tutorial by Samantha Yacovetta of @Aproned Artist! Lucky us!]
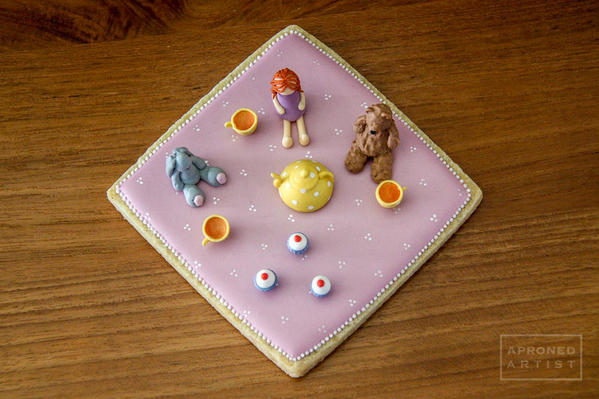
 I always try to take advantage of the times when I’m in between cookie orders, either by playing with new (to me) techniques or designs that are too time-intensive to sell. This tea party cookie satisfies both of those criteria. It is definitely a project, but it’s also a perfect way to use up spare bits of old icing, experiment with your collection of pastry tips, and have a ton of fun. I promise, it will have you feeling nostalgic for your dollhouse days.
- 1 (4-inch) square cookie
- Icing:
- Flooding-consistency pink (Wilton Aster Mauve)
- Stiff white
- Stiff skin tone (AmeriColor Ivory plus a touch of Wilton Creamy Peach)
- Stiff lavender (equal parts AmeriColor Violet and Electric Purple)
- Stiff reddish-orange (six parts AmeriColor Tulip Red, four parts Electric Orange, and one part Chocolate Brown)
- Stiff yellow (Wilton Buttercup Yellow)
- Stiff gray
- Stiff brown (AmeriColor Warm Brown)
- Stiff black
- Stiff blue (Wilton Delphinium Blue)
- Stiff red (AmeriColor Super Red)
- Tips*:
- PME #1, 2, and 0 (or equivalents)
- Wilton #3, 12, 8, 2A, 10, 7, 5, 44, 4, 363, and 6 (or equivalents)
- Other colorings:
- AmeriColor Pearl Sheen airbrush food coloring
- AmeriColor Bright White food coloring
- Wilton Copper food coloring
- Fine-tipped black food coloring marker
- Paint brushes:
- Tiny round brush (two sizes)
- Flat angled brush
- Other tools:
- Acetate or parchment paper
- Alcohol, for extending food coloring into paint
- Scribe tool
*Note: I experimented with the tips I have on hand, however, don’t be dismayed if you don’t have some of them. Many of the basic techniques will still apply with tips of different sizes and shapes.
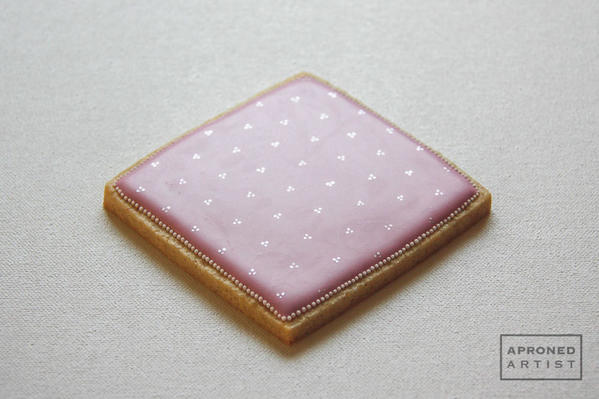
- Flood your square cookie with pink icing, leaving room for a border around the edge. Let the icing dry completely.
- Using stiff white icing and a PME tip #1, pipe small dots along the edge of the blanket.
- If desired, paint a decorative pattern on the blanket using AmeriColor Pearl Sheen airbrush food coloring and a tiny round brush.
- On a piece of acetate (or parchment paper), use stiff skin tone icing and a Wilton tip #3 to pipe two lines for legs, ending each line in a mini chocolate chip shape for the foot (pointing up or down, depending on your preference). Use a damp, flat paint brush to flatten the tips on the feet.
- Using stiff lavender icing and a Wilton tip #12, pipe a chocolate chip shape on top of the (non-foot) ends of the legs, pulling up gently to stretch the shape taller to resemble a dress. Flatten the top with a damp paint brush. Let the icing dry.
- Using stiff skin tone icing again and a PME tip #2, pipe arms along the sides of the dress, beginning at the hands and ending at the neck.
- Using stiff skin tone icing and a Wilton tip #8, pipe the head separately on the acetate. Try to make it as spherical as possible. (Mine came out more gumdrop-shaped!) Shape with a damp paint brush, if necessary. Let the icing dry.
- Attach the head to the top of the dress with a small dab of the skin tone icing. To better approximate a face, I tilted my head downward a little.
- Using stiff reddish-orange icing and a PME tip #0, pipe strands of hair around the head, beginning at the part in the middle and ending at the neck. Then pipe pigtails using a circular motion with your wrist.
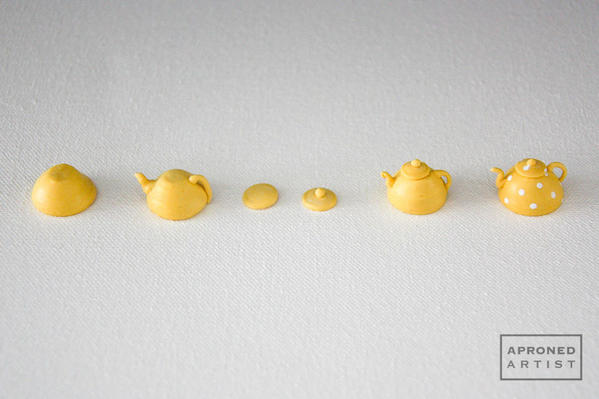
- Using stiff yellow icing and a Wilton tip #2A, pipe a bulbous chocolate chip shape onto a piece of acetate. Flatten the top with a damp, flat paint brush. Let the icing dry. This will be the body of the teapot.
- (1) Once the body is dry, use a PME tip #2 to pipe the handle. Attach the icing toward the top of the teapot, and gently pull up while applying minimal pressure. Stop applying pressure, and continue to pull up until the icing breaks free of the tip. The loose end should fall down in an arc, creating the handle shape. With a damp paint brush, gently attach the loose end of the icing toward the bottom of the teapot. (If the icing breaks too soon, use your paintbrush to remove the wet icing, and try again.) (2) Use the same technique for the spout. Attach the icing to the middle of the teapot. Apply a little more pressure at the base. Pull up until the icing breaks. Gently reposition the icing with your paint brush, as needed. (If the icing will not stay upright, thicken it with powdered sugar.)
- Using a Wilton tip #12, pipe a circle in an empty area of the acetate. This circle will become the teapot lid, and, therefore, should be slightly smaller than the top of your teapot. Again, use a damp paint brush to flatten any tip on the icing. Let the icing dry.
- Once the lid is dry, use a PME tip #2 to pipe a dot in the center of the circle for the handle of the lid.
- Attach the lid to the flattened top of the teapot body with a dab of icing.
- Paint polka dots on the teapot, using a tiny round brush and AmeriColor Bright White food coloring.
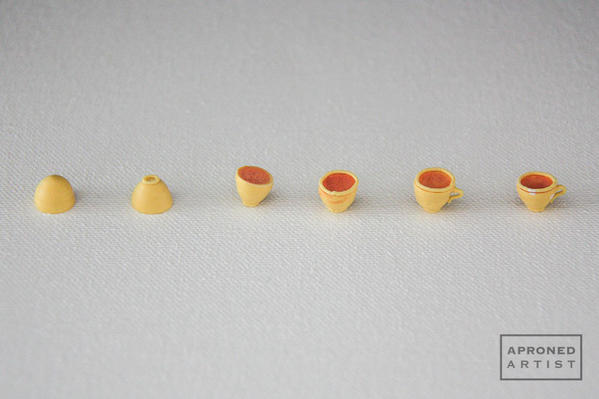
- Using stiff yellow icing again and a Wilton tip #10, pipe a chocolate chip shape onto a piece of acetate. Flatten the top with a damp, flat paint brush. Let the icing dry. This piece will become the body of the teacup.
- Using a PME tip #0, pipe a small rim around the top of the shape piped in Step (a) to form the foot of the teacup. Let the icing dry.
- Gently remove the dried shape from the acetate. Flip it over, and paint the top (originally the bottom) with Wilton Copper food coloring diluted with alcohol.
- Using a PME tip #0, pipe a rim around the top of the cup.
- Using a PME tip #1, pipe the handle. Attach the icing toward the top of the cup. Lift gently up and away from the cup, while applying minimal pressure. Attach icing toward the base.
- Paint polka dots using a tiny round brush and AmeriColor Bright White food coloring.
Repeat Steps (a) through (f) to create three teacups, one for each tea party-goer.
- On a piece of acetate, use stiff gray icing and a Wilton tip #7 to pipe two lines for legs, ending each line in a chocolate chip shape for the foot. Use a damp, flat paint brush to flatten the tips on the feet.
- Using the same tip, pipe a chocolate chip shape on top of the (non-foot) ends of the legs, pulling up gently to stretch it taller to form the bunny's body. Let the icing dry.
- Using a Wilton tip #5, pipe long, teardrop-shaped arms along the sides of the body. Let the icing dry.
- Using a Wilton tip #7, pipe a sphere on top of the body for the head. Let the icing dry.
- Using a Wilton tip #44, pipe the ears. Attach the icing to the upper back left of the head. Lift up gently while applying pressure. When the desired length is reached, stop applying pressure, hold the icing bag in one hand (with the icing dangling precariously), and use the other hand to cut the icing from the tip with a scribe tool. The ear should flop over when you cut the icing. Use your paint brush to shape the bottom edge of the ear, and to narrow the top "seam" where the ear attaches to the head. Repeat on the back right of the head to create the other ear.
- Using leftover pink icing and a PME tip #1, pipe an oval on the bottom of each foot.
- Lastly, using the black food coloring marker, draw a small “V” on the face for a nose.
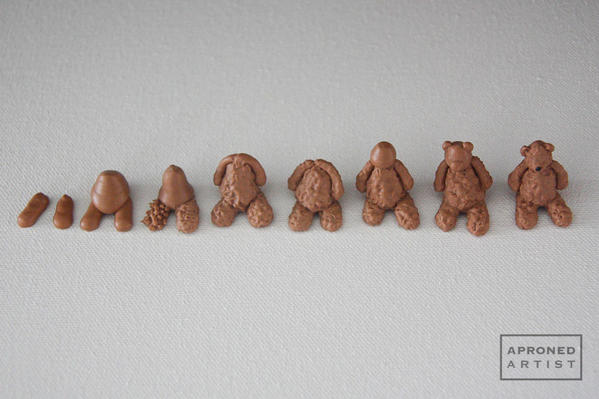
- On a piece of acetate, use stiff brown icing and a Wilton tip #8 to pipe two lines for the legs.
- Using a Wilton tip #12, pipe a bulbous chocolate chip shape on top of the ends of the legs. Flatten the top with a damp, flat paint brush. Let the icing dry.
- Texture the legs and torso using a PME tip #2. Pipe small dots or squiggles over these pieces. (See the left leg of the third step in the image below). Then dab the dots with a damp, small round brush to create the final texture. (See the right leg of the third step.) Let the icing dry.
- Using a Wilton tip #5, pipe arms along the sides of the body, beginning at the paws and ending at the neck. Let the icing dry.
- Texture the arms using the same method described in Step (c).
- Using a Wilton tip #10, pipe a sphere on top of the body for the head. Let the icing dry.
- Using a Wilton tip #4, pipe an oval for the bear's muzzle on the lower half of the face. Pipe two semicircles on top of the head for ears. Shape with a damp paint brush, as needed. Let the icing dry.
- Add texture to the head, as done in Step (c). Let the icing dry. Using stiff black icing and a PME tip #1, pipe a small nose on the muzzle, shaping it with your scribe tool.
- Use stiff blue icing and a Wilton tip #363 to pipe a variegated chocolate chip shape on a piece of acetate. This piece will become the cupcake wrapper. Flatten the top with a damp, flat paint brush. Let the icing dry.
- Flip over the dried cupcake wrapper, and secure it to the acetate with a small dab of blue icing. (This step will keep the cupcake wrapper from moving around as you complete its decoration.) Using white icing and a Wilton tip #6, pipe a mound of frosting on top of the wrapper.
- Using stiff red icing and a PME tip #2, immediately pipe a small cherry on top of the mound of frosting.
Repeat Steps (a) through (c) to create three cupcakes.
Now, for the best part! Arrange all of the pieces to your liking on the square cookie, and attach with a small amount of icing. (Or leave the bits unattached so your inner five-year-old can play tea party again and again.)
[EDITOR'S NOTE: Thank you to @Aproned Artist for such a wonderful tutorial! I sure hope she has more in the works!]
Note: This article expresses the views of the author, and not necessarily those of this site, its owners, its administrators, or its employees. To read more Cookie Connection tutorials, click here.












Comments (12)