
I'm definitely detecting a hint of end-of-summer in the air. Sunny days, but cool air; morning mists that quickly clear; and greens in the garden that are starting to glow brightly, with just a few delicate edges of burnt orange and dark red. I've been harvesting apples and mulberries from my garden and experimenting with pies and crumbles, all of which make my thoughts turn to autumn, a season that makes my husband miserable and me exhilarated. I look forward to cosy afternoons tucked up indoors on the sofa. (Okay, I don't really need to use the weather as an excuse for that!)
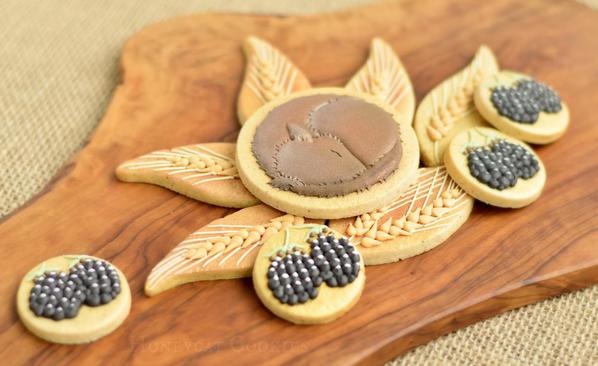
And so I found myself completely changing the tutorial I had planned for you. At the last minute of plotting and sketching for something very different, an image popped into my head of this tiny harvest mouse, curled up asleep, with his little store of berries and wheat. So I came up with these three cookie designs. They work so well together, and yet each one could be useful in entirely different sets.
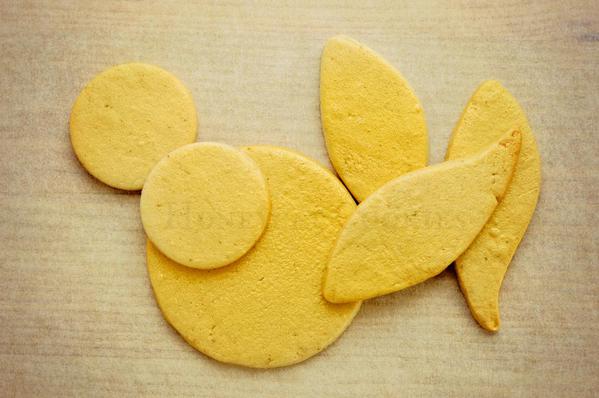
- A selection of baked cookies: large (3-inch) and small (1 1/2-inch) circles, and narrow (3-inch-long) leaves (I squished my usual leaf cutter to make them narrow), sprayed with . . .
- Edible gold spray (I used Dr. Oetker spray, but airbrush colors, or even dry brushed gold dust will work.)
- Thick flood icing in "mouse", "blackberry", and white (See below for colour information.)
- Piping icing in "wheat", cream, and green (Again, see below for colour information.)
- Pastry bags fitted with various tips (i.e., PME no. 2, 1.5, 3, and 1, in this order)
- Scribe tool (or toothpick)
- Edible ink pen
- Black edible paint and fine food-use-only brush (optional)
- Bronze, cream, and brown lustre dust (I used Sugarflair Bronze and Champagne, and Rainbow Dust Mocha.)
A Note on Colours:
The nice thing about this project is that there is a lot of leeway in the colours. Almost any brown will do, as will a variety of shades of beige for the wheat, and anything from red to black or purple for the berries. But the following is how I created the colours used here:
"Mouse": Sugarflair Dark Brown and Chestnut
"Wheat": Sugarflair Primrose and Chestnut
Cream: "Wheat" icing mixed with white
"Blackberry": "Mouse" icing mixed with AmeriColor Black, Sugarflair Grape Purple, and AmeriColor Violet. I was aiming for a warm purply black. A simpler option would be to go for just black!
White: Because this colour is to be used as wet-on-wet highlights in the black, I added AmeriColor White to get a very strong white.
Green: "Wheat" icing mixed with Sugarflair Spruce Green
The Mouse:
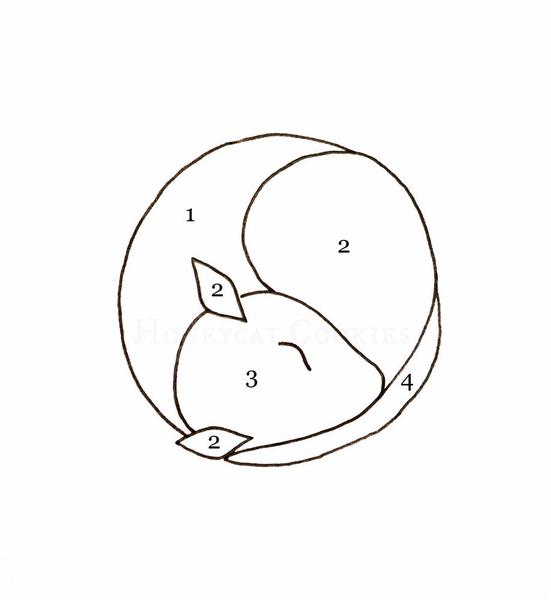
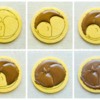
I created this sleeping mouse to fit in a circle. I then worked out the order in which to pipe the sections so that each edge of fur would overlay the previous in the right order. The sections are therefore numbered in order of piping. The ears and back leg can be piped at the same stage, as they don't overlap, hence the same assigned number. Download this picture from the attachments at the end of this post and transfer it onto your cookie using your preferred method.
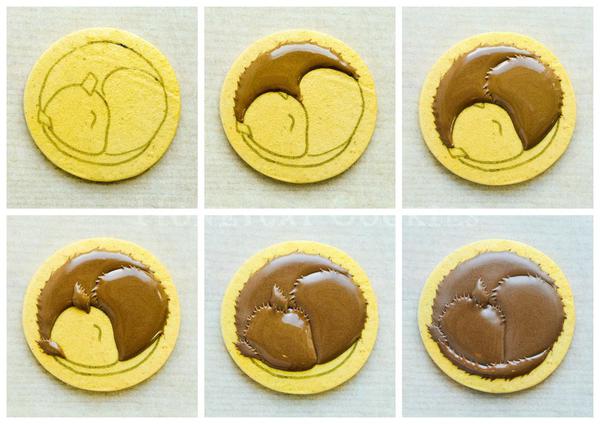
Allow each section of icing to crust thoroughly before piping the next. I popped my mouse into the dehydrator for ten minutes between each section, which was just enough if I was very gentle with the next part. I used a PME no. 2 tip for the outlines and immediately filled in using a tipless bag.
Section 1: Pipe this section using your thick "mouse" flooding icing. Using a scribe tool, pull out tiny points of fur across the top. Allow this section to crust.
Section 2: Pipe the back leg and pull out points of fur over Section 1. Pipe each ear and pull out points of fur over Section 1. Allow this icing to crust.
Section 3: Pipe the head, and pull out points of fur over the base of the ears and over Section 1, and a few from the cheek over the back leg.
Section 4: Pipe the tail and pull out points of fur all along its length.
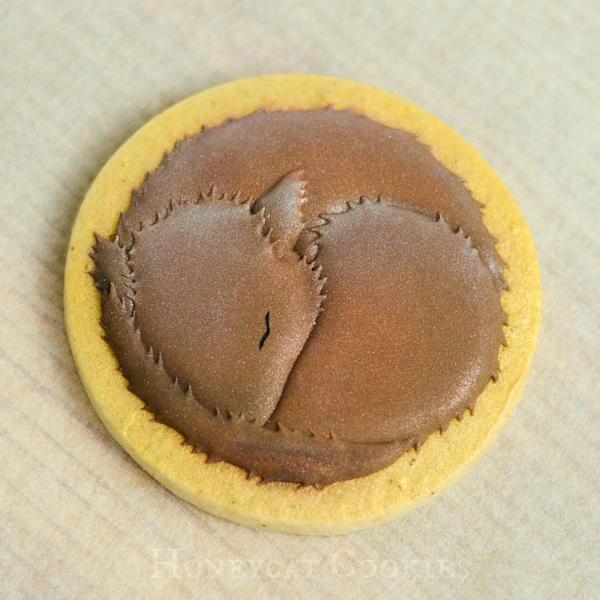
Either draw the eye or paint it on once the head is fully dry.
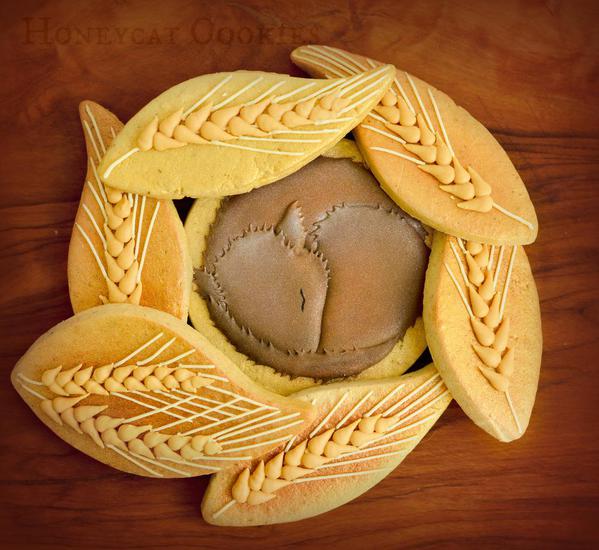
Now, I was initially intending to leave the mouse just as he was at this stage, as he is in the picture at the very top of this post. But I really couldn't help myself - my hands were simply twitching to add a little lustre dust shading to his coat. What finally made up my mind to give it a go was the patch of butter bleed. (Can you see it on the right-hand side in that first picture?) This was because one of my cats had realised there was a mouse in my dehydrator and actually managed to start pulling out the drawer before I caught her! So I put the cover on the front, which kept the cookie safe but allows the dehydrator to warm up slightly, hence the butter bleed. At least my cat didn't catch the mouse! I used lighter colours over the mouse's back, and darker colours toward the base of each section.
What do you think? With or without lustre dust? [EDITOR'S NOTE: I vote for the lustre dust, which I am sure will make Lucy, the most lustre-happy cookier I know, quite pleased!]
The Wheat:
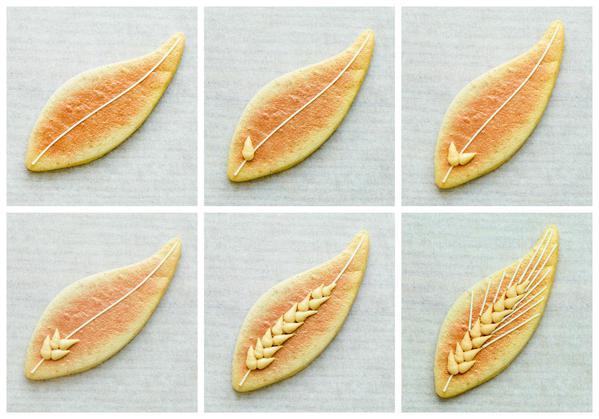
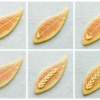
This is a lovely and easy technique. I used a little bronze dust over the gold of each leaf after realising the stalks of wheat didn't show up well against the background of the cookie. [EDITOR'S NOTE: What did I tell you about Lucy being luster-happy?! Naturally, more is more! ![]() ]
]
Pipe a single line of cream (I used a PME no. 1.5 tip) as if it were the central vein of a leaf. Using the "wheat" colour, with a PME no. 3 tip, pipe a fat bead, pulling it out to a long point, starting a little way up the line. Pipe the next bead on the opposite side, just a little further up. Keep going with alternating beads, until you have filled about two-thirds of the line. The top of the line forms a hair, and now you can pipe the rest of the hairs in cream, radiating out from the grains.
The Berries:
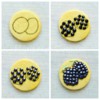
To make the berries, draw two overlapping ovals by eye on each small circle cookie. Taking the "berry" icing and a PME tip no. 1.5, pipe fat beads all over the surface, being careful that they do not quite touch. Immediately pipe tiny white dots, using a PME tip no. 1, where the light is reflected on each bead. Once these beads have crusted, pipe the remaining beads in between, adding more white dots. Leave the lower beads dark. Pipe a row of small brown dots over the top of the berries, and the green leaves and stalks above.
And that's the three cookies in this set! I can think of plenty of variations, with just a tweak here and there - little open eyes on the mouse, green ears of wheat for summer, other colours of berry, the mouse with a huge fluffy tail and the colours of a squirrel for a woodland set . . . But for now, it's time for a nap.

 Lucy Samuels is the owner of UK-based Honeycat Cookies. Originally with an art-based career in mind, Lucy attended art college for a year after school but switched to nursing where she spent twenty years specializing in cardiology. After becoming a stay-at-home mom to her daughter Jess, Lucy experimented with a range of crafts, alighting upon decorative cookies almost by accident. In late 2011, she was persuaded to start her business Honeycat Cookies following several requests to place orders. She set about learning the craft from books, the internet, and trial and error. Lucy has a YouTube channel as well as a blog, Honeycat Cookies, that document some of her wider adventures in confectionery.
Photo credit: Lucy Samuels
Note: What's New, Honeycat? is a bimonthly Cookie Connection blog feature written by Lucy Samuels, which pushes the cookie envelope every other month with innovative cookie design ideas and tutorials. Its content expresses the views of the author and not necessarily those of this site, its owners, its administrators, or its employees. To catch up on all of Lucy's past posts, click here.







Comments (17)