
I love hot air balloons, but I really don't love heights! So my experience of them will always be from the ground, looking up and imagining how serene and beautiful it must be - that is, if you're not up there screaming and dribbling in terror and clutching the bottom of the basket, having lost every last ounce of dignity . . .
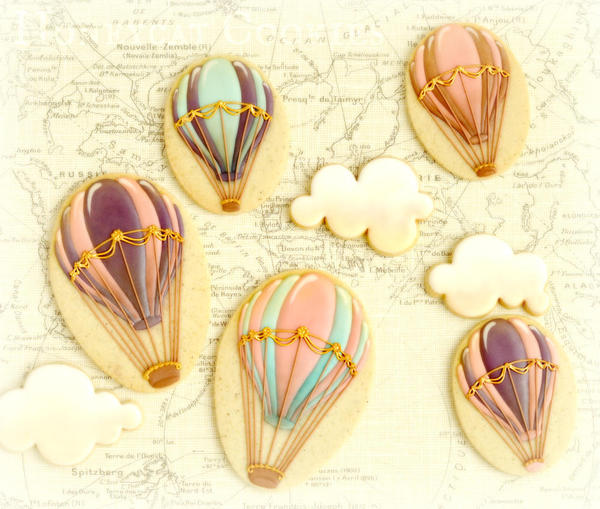
. . . and so for these cookies I wanted to create some of that feeling of serenity, whilst gazing up at balloons from below. Safely on the ground. What I really like to achieve in this sort of cookie is a sense of three dimensions using a little perspective in the design and shading with lustre or petal dust.
I couldn't find any available drawings to use, so I decided to create one. There's no need to get a readymade balloon cutter if you don't have one. I just used the egg/oval shapes already in my collection. To create the design, I drew around the cutter; then sketched in pencil until I had a symmetrical shape I was happy with that showed the balloon from a low perspective. I then carefully traced over in black pen, and erased the pencil from the drawing before photographing it. You can download my image either as a photograph or as a pdf that has the image at the same size used on my five-inch cutter. (To download, see the attachments at the end of this post.)
To make these cookies you will need:
- Blank oval cookies
- Printable balloon image
- Edible ink pen
- Royal icing (RI) in thick (about 20-second) flood consistency, in your choice of balloon colours, plus white for highlights
- Brown RI in both flood and piping consistencies for the basket and ropes
- Petal or lustre dust in brown and gold
- Fine and fat food-use-only paint brushes
- Golden beige RI in piping consistency
- Pastry bags fitted with PME tips no. 1.5 (or equivalent tip)
- Alcohol or alcohol-based essence to mix gold lustre
A quick note on the colours and dusts: I used Sugarflair Grape and Claret gel colours to create the purple icing; Pink and Chestnut to create the pink icing; and Ice Blue and Party Green to create the turquoise. I used a strong Chestnut for the brown icing, and a lighter Chestnut with a little Melon to create the golden beige. I used Rainbow Dust Mocha Shimmer and Squires Kitchen Gold dust, plus a little Sugarflair Shimmer Pink dust for the clouds.
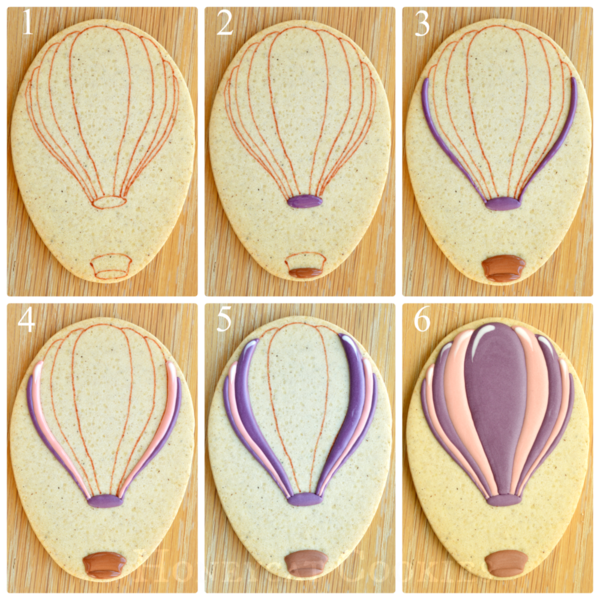
- Adjust the image to the size of your cookie, and transfer onto your cookie with an edible ink pen, using whichever method suits you (e.g., Kopykake, tissue paper method, Camera Lucida iPad app, or Pico Projector).
- Taking the darkest of your two balloon colours, pipe the oval base, and use the brown to pipe the base of the basket. Remember to place the cookie immediately in front of a fan or in a dehydrator between each section to prevent craters.
- Taking your first colour, pipe the outside stripes. As opposed to piping alternate sections, which can be more time-efficient, I prefer to pipe consecutive sections from outside to inside, ending in the center, because this approach enhances the roundness of the balloon. Pipe the rest of the basket.
- With your second colour, pipe the next two stripes, adding a small highlight in white.
- Continue to pipe the stripes until complete, adding white highlights and dehydrating in between.
- Complete the final section, piping liberally so that the section is as full as possible. Allow the cookie to dry completely.
- Taking your brown petal or lustre dust and a soft large brush, dust the base of the balloon, creating a shaded area.
- Using the gold lustre powder, dust the top of the balloon. I've shown the balloon here in paler colours, as the effect was easier to photograph.
- Using your image and transfer method again, mark the circle around the balloon.
- With the golden beige piping icing and a PME tip no. 1.5, pipe dots over the marks on each stripe, making them smaller as they recede from the central stripe.
- Link each dot with the golden beige icing. Using the brown piping icing with a tip no. 1.5, pipe the ropes down to the basket.
- Add decorative elements to the dots and basket, and pipe the swag. Once dry, paint the beige icing with a mixture of gold lustre dust and alcohol.
I left my balloons as they are, but of course you can carry on adding decoration in the forms of swags, bunting, designs in the fabric - why not try wet-on-wet patterns, or adding a few figures to the basket?
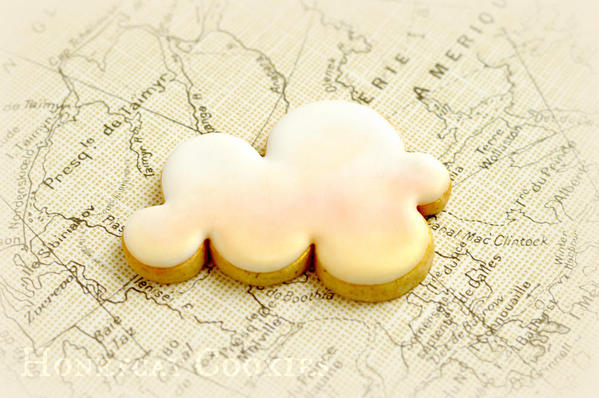
Just briefly: I created the clouds simply by hand-cutting the shapes by eye with a scalpel, flooding with white, and then dusting the lower half with a mixture of gold and pink lustre dusts to create that sunset effect. I can't think of anything lovelier than sailing in a balloon at sunset, as the pink and gold clouds float by. Except sitting firmly on the sofa eating a hot air balloon cookie with no intention of going any higher than up the stairs. . .
Cookie and photo credits: Lucy Samuels


Photo credit: Lucy Samuels
Note: What's New, Honeycat? is a bimonthly Cookie Connection blog feature written by Lucy Samuels, which pushes the cookie envelope every other month with innovative cookie design ideas and tutorials. Its content expresses the views of the author and not necessarily those of this site, its owners, its administrators, or its employees. To catch up on all of Lucy's past posts, click here.








Comments (29)