Hi, everyone! I’m back with our second (and last) installment of Cookier Close-ups featuring our 2017 Cookiers’ Choice Awards winners. A couple of months ago, we spoke with Cookiers of the Year Ginny and Doug Levack of @Creative Cookier (here), and now we’re chatting with none other than @iSugarfy (aka swissophie) (aka Sonja Galmad), our 2017 Cookie Artist of the Year!
While widely known for her signature piped knit work and elaborate isomalt and other designs, Sonja didn't venture into cookie decorating until December 2015, a month after her mother urged her to give gingerbread houses a try! Since then, she's dazzled our community and others with her intricate and innovative creations. For now, Sonja enjoys decorating cookies as a hobby, and likes to challenge herself by trying to develop new techniques, but who knows what the future will bring. We can only imagine! Below is Sonja's "Mr. Badger", a project that universally amazed everyone on this site when it posted, and which showcases knitting, her trademark technique.

Today, we’re going to talk cookie technique, as always, but we’re also going to go beyond it to get to know Sonja on a more personal level. Onward, shall we?!
![]()
JMU: Hi, Sonja! Congrats again on your Cookie Connection award from earlier this year. It’s great to have you here with us today. I must confess, you’re a bit of an enigma to me. Apart from being able to recognize your distinctive work a mile away, I don’t know much about you. So we’re going to start with some basic ice-breakers, if that’s okay?!
While setting up this interview, you mentioned to me that you were in the middle of a big household move. First, thanks for taking this interview so close on the heels of it! And, second, can you tell us a bit more about where you’ve lived? Where did you grow up? Where did you move in this last move, and from where? What precipitated your recent move?
SG: Hi, Julia! It’s wonderful to be here! I can't tell you how happy I am to have received this award. I want to thank you again for having made it possible, and everyone who thought my work was worthy of it!
Stumbling across some of your videos and then, of course, finding Cookie Connection at the beginning of 2016 have been quite the life changers for me. I'll never be able to thank you enough for the incredible work you put into your site, so that we cookiers have a place to share our common passion!
If I’m a bit of an enigma to you, it is probably because I prefer to have the light shed on my work and not the maker. I’m a spiritual person; faces and life stories are not as important to me as the expression of mind and soul.
But for you, of course, I will make an exception today, and give you a little glimpse of my life story. I grew up in central Switzerland, and emigrated with my late first husband to Florida in 1992, where we raised and home-schooled four kids on a tree farm. Six years ago, I remarried to one of the most caring persons on the globe, and moved back to Switzerland.
There are a few reasons for our recent move, which was not too far (within the same canton, aka county; Switzerland is small!). The most important one is that we wanted to be closer to my mom. She had a few bike accidents in the past, and recently had to have yet another surgery. (At 83, she's still riding her bike up to 60 kilometers a day, whenever the weather permits!) Hubby absolutely adores her, and not being able to check in on her on a whim almost drove him mad (grin)! Plus, we needed a bigger place anyway, as my youngest came from the States to live with us to finish her education here. Also, it's an advantage to be closer to the beautiful city of Zürich.
![]()
JMU: Thank you so much for all of that background! Enigma no more! ![]() But that doesn't mean I don't have more questions for you!
But that doesn't mean I don't have more questions for you! ![]()
Before you started to decorate cookies in 2015, what did you do? Do you currently work full- or part-time in another profession, and, if so, what is it? Does this profession help (or hinder) your cookie decorating hobby in any way? Please explain.
SG: I've been helping my husband with his IT business, and still do. Back in the US, I had a couple of businesses of my own (computer book publishing and antiquarian bookstore), and thus helping him with his work was a matter of course. I do mostly administrative stuff, but some months it’s more of a full-time job than others.
I must admit that I am a cookie decoration addict, and suffer severe withdrawal symptoms when I can't squeeze a bag! So, yes, most things that take time away from decorating cookies are a hindrance!
![]()
JMU: Would you ever give up your day job and turn your cookie decorating hobby into a part- or full-time profession? Why or why not? If so, what form would your cookie business likely take, i.e., selling cookies, teaching classes, designing cookie decorating products, etc.? And why would this be your preferred direction?
SG: Yes, I would give it up in a heartbeat, and maybe can do so in the not too far future; not necessarily to turn it into a profession, though, but just to be able to spend more time with it.
I've been asked many times to give courses, but I don't have any teaching experience. Plus, I'm quite shy, and a bit of a hermit. I do visit this thought more often, though, as I'd love to share my passion, and it would give me a good excuse to indulge my addiction! Maybe I’ll just make more videos and other tutorials . . .
Designing cookie decorating products came to mind a few times as well, when I've made makeshift tools and materials to help me with my special decorating needs. But it's too complex an idea for where I am at the moment, not to mention that I have no idea about the market for such products.
![]()
JMU: Interesting. We'd certainly love to see you decorating cookies as often as possible! What prompted your mom to urge you to give gingerbread houses a try in 2015? Did you have past sweets decorating experience of some kind? Did you ever make any gingerbread houses at that time? Can you share some pictures of your favorites from that era?
SG: My mom has always been an excellent home baker. She would bake tons of different kinds of cookies before Christmas, which she then would wrap beautifully and gift to family, friends, and neighbors. Usually, there was a room kept especially cold, where she would store them. The Swiss know the secret of letting butter cookies mature - they only develop their most intense and delicious flavor after a few weeks!
Her passion for baked goods rubbed off on me. Around October 2015, when I mentioned my plan to her to bake gingerbread cookies with three young kids I'd been asked to babysit, she thought it would be much more fun for them to make a gingerbread house. I took it as a great idea, but had never made one before. She had, of course, told me how she went about it, and urged me to give it a try before I attempted one with the kids. Obviously, I complied willingly! The picture below is of my second house. The first one was a monster! Even this smaller one, when I look at it now, was pretty crude, but I had a blast making it!
![]()
JMU: I'm sure the kids loved this idea too! And why did you deviate from your mom’s suggestion of gingerbread houses into cookies? What was it about cookies that attracted you to them over gingerbread houses and/or sweets of other kinds, like cakes, cupcakes, candies, chocolate, etc.?
SG: I wanted to make at least one more gingerbread house that Christmas season, without having to depend on sugar decorations that were available to me in stores. I set out to look for ways to make my own, and found your videos, dear Julia. ![]() I was in awe, and had to try myself! Once I got the hang of royal icing, I never even thought of decorating anything else than cookies and houses. I was fascinated by this medium, and what one was able to accomplish with it. And the fact that cookies are fairly compact, and can be kept for a much longer time than cupcakes and cakes, is a big plus as well.
I was in awe, and had to try myself! Once I got the hang of royal icing, I never even thought of decorating anything else than cookies and houses. I was fascinated by this medium, and what one was able to accomplish with it. And the fact that cookies are fairly compact, and can be kept for a much longer time than cupcakes and cakes, is a big plus as well.
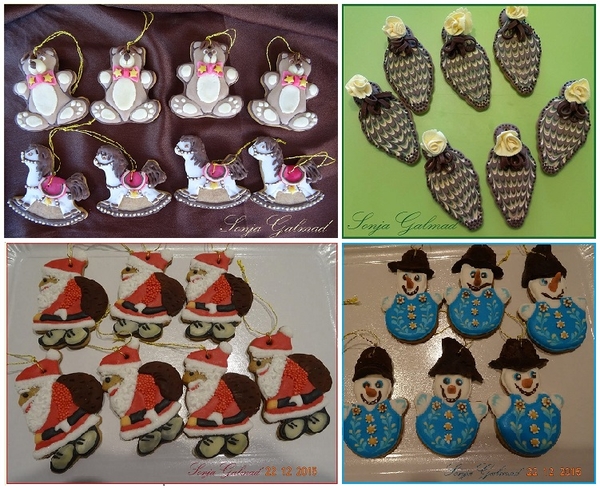
I never got to make another house for that Christmas, but I made a bunch of cookies instead that could be used as tree ornaments. Below are some of the first cookies I made after watching your videos. Most of them contain some modeling chocolate accents learned from your tutorials as well.
![]()
JMU: Wow! I am thrilled to know I played some small role in turning you onto cookies. I never realized this . . . maybe I'll keep making videos, if only to spur on more great decorators! ![]() Let’s turn to techniques for a bit – you’ve mastered many (everything from intricate piping and painting to isomalt work) in a relatively short period of time. How did you go about acquiring and developing your decorating skills? Apart from seeing my videos, did you rely on other books, blogs, video tutorials, or something else?
Let’s turn to techniques for a bit – you’ve mastered many (everything from intricate piping and painting to isomalt work) in a relatively short period of time. How did you go about acquiring and developing your decorating skills? Apart from seeing my videos, did you rely on other books, blogs, video tutorials, or something else?
SG: In the beginning, I did watch quite a bit of videos, mainly because it was so enjoyable to see all this creativity in action! But I learn best by jumping in and trying myself, i.e., playing around with a medium/technique until I get the hang of it. Almost every free minute was used for practicing.
![]()
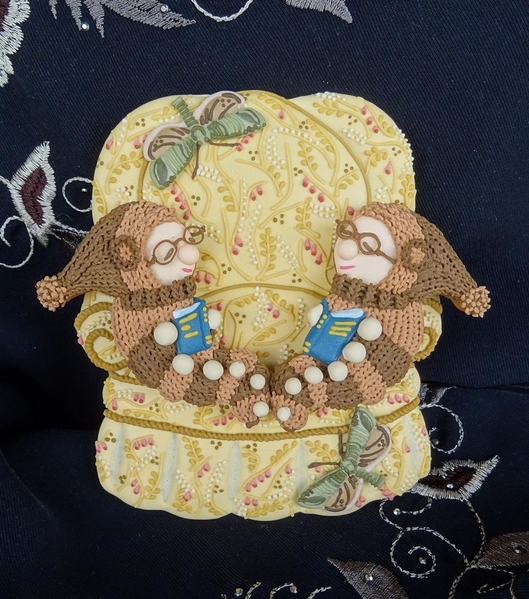
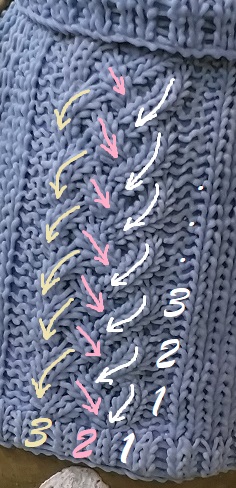
JMU: Your intricate knit work, such as in the sweater on Mr. Badger, has become one of your signature techniques. I believe I saw it on your bookworms (pictured above) - the very first cookies of yours that I remember on Cookie Connection. Can you briefly describe how you did the knit work on Mr. Badger? That is, take a look at the crop of his sweater (pictured below), and please tell us how you piped it. What consistency of icing did you use? What tip? What was the basic piping progression, i.e., which lines or areas got piped first, and which, if any, came in later layers or steps? Did you pipe all parts of it continuously, or did you stop and allow drying time between certain sections to keep the pattern distinct?
SG: I started with the cable knit pattern, as it was the most complicated to pipe. There are three main vertical columns to it: the outer two (marked with white and yellow arrows) consisting of curved segments, and the middle one (marked with pink arrows) consisting of shorter straight segments. The columns were piped from bottom to top, and from right to left. However, the individual segments within each column were piped from top to bottom, as indicated by the direction of the arrows. In other words, I started at the bottom right and piped one segment at a time, in this order (referring to the numbers above): 1-1 (row-column), 1-2, 1-3, 2-1, 2-2, 2-3, 3-1, 3-2, 3-3, and so on, all the way to the top. I did it this way, so that each segment would overlap the segment beneath it.
I used stiff-consistency icing, so that the stitches remained as distinct as possible, and worked with parchment paper cones, as metal tips would be too rigid for this work. I measured a somewhat consistent opening by sticking my scribe tool through the cut hole from the inside of each cone, and making sure each time that about 2 mm (0.08 inch) of the scribe needle protruded.
For more information about how to pipe the stitches themselves, please take a look at my video below.
And, yes, I had to stop many times to allow for drying, especially because I was piping with Mr. Badger laying down on a cushioned turntable. (I only stood him up to allow him to dry and to take progress photos). I’m in awe of cake decorators who can pipe vertically!
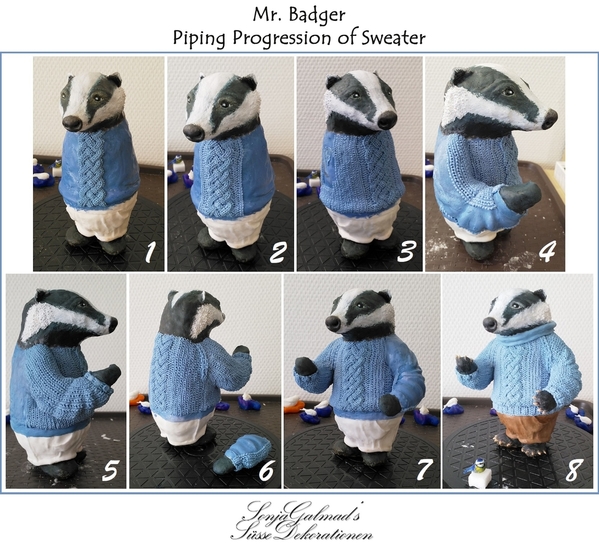
The piping and assembly progression for the whole sweater was as follows (see photo below):
- Cable knit in the front of the sweater;
- Left and right of cable knit;
- Underneath the arms on the body;
- The under part of the arms themselves, before they were glued to the body;
- Upper and outer sides of the arms once they were attached and sculpted to the body (right arm attached first);
- Back, same as the front, i.e., starting with the cable knit part;
- Left arm attached next, and piped as before; and
- Lastly, the bottom border and collar.
![]()
JMU: Fantastic! Thanks again for all the rich detail! You seem to have recently changed focus from knitted designs to stained glass designs, where isomalt is a fundamental part of the cookie. Am I accurate in this characterization of your work’s evolution? If so, what is it about isomalt that draws you to it as a decorating medium? Its taste, its texture, how it looks, or something else? Had you worked with isomalt before applying it to cookies, and, if no, how did you go about quickly getting up to speed on this medium?
SG: Isomalt is just another (awesome!) medium/technique with which I’m trying to broaden my cookie decoration horizon a bit. I will return to royal icing and knitting in time, as I want to make at least one more figurine. Mr. Badger has been the most enjoyable cookie decoration project for me so far!
I was looking for an alternative medium for windows in my gingerbread houses, something a bit sturdier and longer lasting than the gelatin sheets I had used before. But isomalt was a challenge, as I had never worked with it. After getting the hang of it better (again, by just playing around with it), it proved to be the right choice.
I can't say it was love at first sight, though, as it caused a couple of nasty third-degree burns on my palm. But after working with it for a while, I was hooked! I fell in love with its glass-like look, and how its shiny, transparent beads would roll off my scribe tool. I learned how I could get really tiny beads with very thin needles, or larger ones by quickly adding another bead to a still warm one.
Manipulating isomalt in different ways has been great fun! I was able to pull it into a trunk and branches for the tree that I made for my mushroom house; flatten it for small rose petals on another house, and just use it for accents (like on my dragonfly Easter egg and blue mandala, pictured at the top of this post). Isomalt lends itself to a vast variety of projects. My mind went into overdrive, trying to figure out how to make the many ideas I was flooded with. This overdrive sometimes felt like a curse, as it kept me awake many a night!
![]()
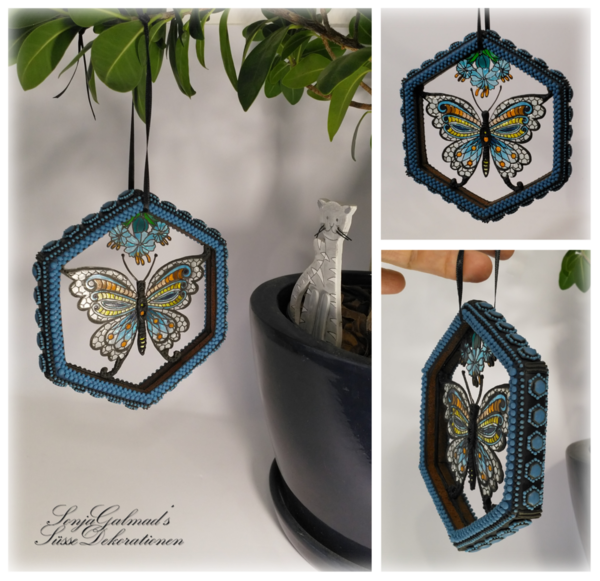
JMU: Let’s talk more about one of your recent stained glass cookies, and the techniques used to make it. I’m thinking of your butterfly suncatcher (pictured above). How big is the average opening in it that contains isomalt? The openings seem tiny from here, which is why I ask! How do you get isomalt into such small openings without it crossing boundaries into other areas of the cookie? Do you pipe the boundaries first or after the isomalt is laid? Do you start with isomalt granules or pre-cooked isomalt nibs, and why? How and when do you add coloring? In short, please briefly explain the key process steps!
SG: The hexagons in the outer parts of the wings are 4 mm (about 0.2 inch) wide.
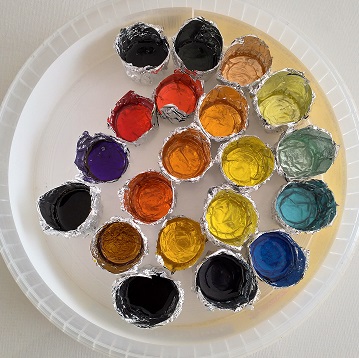
Here’s the process: The outlines are piped first. They are the "containers" for the isomalt; otherwise, the different colors would just flow into each other. I then cook isomalt granules, pour the syrup onto cookie sheets in thin layers, break it in small pieces after it's cooled, and store these uncolored shards in airtight jars. Granules work well for me, so I haven’t even looked into nibs at all. I then melt the amount I need (really small, so I made my own little containers with aluminum foil, pictured below). I color it with gel colorings, during or after melting, which works just fine. Isomalt can be re-melted several times until it turns a yellowish hue, or changes color if it was previously colored (i.e., blue will turn greenish).
To get the isomalt into tiny openings, I pick up tiny droplets with my scribe tool or a needle, and let them roll off the tip into the spaces where they are needed. The thinner the needle, the tinier the droplets I can pick up. For example, with a thin sewing needle, I can fill 1-mm (0.04-inch) openings. For this to work, the isomalt has to be kept at just the right temperature - too hot, and one will not be able to pick up a drop; too cold, and the isomalt will pull strings.
For this butterfly, I chose to make it as thin as I could get it by piping with a very small opening in my cone, and only one layer. But I’ve doubled the outlines for other designs to make the "containers" taller. Taller edges make filling the spaces much easier, with less danger of a big drop spilling over into an adjacent opening.
![]()
JMU: You mentioned in your bio that you like to challenge yourself by trying to develop new techniques. How do you go about deciding on a technique you’d like to develop, and then how do you go about developing that technique? I assume some testing is involved, but could you provide us with a specific example and elaborate on your creative process?
SG: The desire/need to develop a new technique is always tied to new forms/looks I want to achieve, i.e., first an idea for a project pops up, and then begins the brainstorming on whether and how it could be done, what existing techniques I could build upon, and/or what wheels I would have to (re)invent.
In the case of Mr. Badger, I was looking at a fondant figure at one time, and thought it would be great to get a knit sweater on it. I can't remember anymore what figure it was, but the idea of doing a 3-D sweater stayed with me until I had time to give it serious thought. I wanted to do it in cookie form of course, not fondant, and decorate it with royal icing, my favorite medium. Thus, I had to develop a way to give the cookie the desired shape.
As you know, gingerbread lends itself better to 3-D work than any other cookie dough. Leave out most of the leavening agent (baking soda), and one can bring it even better into a certain form. I wanted the cookie to be hollow though, otherwise it probably couldn't be eaten, and couldn’t really be counted as a cookie.
I had already played around with stiff royal icing quite a bit to know I could use it for additional detailing. It is similar to fondant, except that it's not as flexible and dries faster. So the cookie only had to have some basic shapes: body and head. I would form the arms like bent sausages with the hands and shoulders flattened, and then attach them to the body later. The feet were just a heart-shaped cookie.
To make the body mould, there were a few options. Actually, any material that could survive 140°C (about 285°F) wrapped in foil in the oven for up to an hour could be considered. I was thinking of tin, rocks, wood/sticks/roots, and root vegetables, like carrots or potatoes, but ended up just crumbling aluminum foil itself into the desired shape. A homemade silicone form would have been another option, but for just this one form, aluminum would do.
The problem then was how to bake the gingerbread on it, without it doing a number on me by expanding irregularly, sliding off, and messing up my shape. I would need two halves that fit together well, without having to chisel and sand them too much. I came up with just sculpting the dough around the shape, and then wrapping the dough again with aluminum foil to keep it in place.
But this meant that I had to bake it quite a bit longer than expected, around an hour all together, I think. After about 30 to 45 minutes, I removed the outer aluminum foil. The cookie was still quite soft then, and I was able to cut it lengthwise into two halves, which then could be baked separately to a finish by just resting them on the form.
And, yes, there’s usually some sort of testing involved. With the above technique, I made a test run to see how long I had to bake it, and whether the cookie would still be edible, which it was. It was a bit hard (which was intentional, since it had to bear the weight of the royal icing), but still chewable and yummy.
In other cases, like the butterfly suncatcher, most testing was already done in the form of prior playing around. I already knew how isomalt would behave, so there were just the finer details to work out.
I had made simpler butterflies before, just with black outlines and clear isomalt. There was no need then to care about spillover of colors. With the suncatcher butterfly, it was different. The placing of the different colored droplets needed to be exact, and the speed and sequence of movements had to be just right, so that the droplets would remain on the needle just long enough to place them where I wanted. There were many other considerations, like the heat requirements for the different steps and work surface, but they would be too much to go into here. This answer is already quite lengthy, and I apologize for that. I’m hoping to make a tutorial someday.
![]()
JMU: No apologies necessary! I love all the detail, as I am sure others will too. Are you at work on any new techniques now, and, if so, can you give us a sneak peek into any of them? Pretty please! ![]()
SG: I haven't had much time in the past months, but I definitely want to try a 3-D isomalt cookie. A fish tank and house with stained glass windows came to mind, but more challenging ideas, that would need development of a new technique, include something like a Tiffany lamp shade, umbrella, or a dome. I'd need to find a way to go from flat to curved surfaces first.
![]()
JMU: Sounds exciting! Let’s turn briefly to cookie decorating in your neck of the woods. Is the market for selling/buying decorated cookies in Switzerland growing or shrinking or staying steady? Why do you think this is? What about the market for teaching cookie decorating? Same question.
SG: I only know of a handful of people who are decorating cookies in the German part of the country. The majority of people here detest too much sugar in their diet; at least my generation does. But cookie decorating might be a bit more popular in the French and Italian parts. Cake decorating, on the other hand, is quite common, and maybe cookies will follow suit someday.
As for teaching cookie decorating, I could imagine, that if it was done for art, as a creative outlet, a market could be developed here. And maybe in time, cookie decorating could gain a foothold, much like cake decorating, as the younger generation is more influenced by American food habits.
![]()
JMU: Are there any cookie traditions unique to Switzerland that you think Cookie Connection readers should know about? Your favorite cookie, for instance? And what makes this tradition or cookie so special in your eyes?
SG: We have many cookies that are typically Swiss, especially Christmas varieties, like the famous Mailänderli (a butter cookie painted with egg yolk), cinnamon stars, and many other nut cookies made with mainly ground hazelnuts and almonds.
My mom always made her cookies very small, just a mouthful. That way, one could taste a greater variety without gaining too much waste (grin). And they always looked so perfect, a bit like pralines.
My absolute favorites are Bricelets. They are exquisite butter cookies made in a special cookie iron, much like a waffle iron, but with finer ornaments pressed into the dough. The cookies are very thin, almost melting on the tongue. Again, they are left to age in tin cans, and develop their most intense flavor only after a few weeks. They are very pretty to look at as well - they are presented as circles, sometimes rolled into tubes or cones, and served with desserts, mostly ice cream. I have fond memories of making them with an aunt while I was on vacation with her. It was a group effort, where my cousins and I made the small dough balls, and my aunt operated the iron that baked four cookies at a time.
Also, most cantons have their own cookie tradition for everyday cookies as well, and some of them, like Basler Läckerli (made with honey gingerbread, candied fruit, and nuts), have made it into all Swiss stores and are being sold throughout the year.
I guess these cookies are special to me just because I grew up with them, much like chocolate chip cookies are special to Americans.
![]()
JMU: You've got my mouth watering. We'll have to wrap up this interview fast so I can satisfy my cravings in the kitchen! ![]() But first, a couple of philosophical and forward-looking questions! Can you encapsulate your cookie decorating philosophy in a couple of sentences? In other words, please explain why you decorate cookies, what makes cookie decorating important to you, and/or how you weave it into the fabric of your everyday (or not-so-everyday) life.
But first, a couple of philosophical and forward-looking questions! Can you encapsulate your cookie decorating philosophy in a couple of sentences? In other words, please explain why you decorate cookies, what makes cookie decorating important to you, and/or how you weave it into the fabric of your everyday (or not-so-everyday) life.
SG: Decorating cookies has been a life changer for me. I use it as a creative outlet with meditative, balancing qualities, whenever I have some free time. It’s so much fun, too. Stretching my imagination and finding new ways to make and decorate cookies can be very exciting. It's something I hope to be able to do for a long time to come.
![]()
JMU: And, lastly . . . Now that you’ve won Cookie Connection’s ultimate award for cookie artistry, what’s next for you? What are your cookie goals, dreams, and aspirations over the next few years?
SG: You know, I really never set out or expected to win anything. Decorating cookies was and still is just a very wonderful hobby that brings lots of pleasure and peace. I’m not attached to any outcome, and will take whatever the future holds, but I would love to infect people with my addiction, just because I think others could/would/should feel the same happiness I do. ![]()
Thanks so much for having me here, Julia, and for all you do and made possible for me!
![]()
JMU: You are so very welcome, Sonja! It's been a joy and a privilege to get to know you better! Thank you as well for all the time you so clearly put into your answers. Your mini tutorials (I think you gave us at least three!) were stupendous!
To learn more about Sonja, please check out her Cookie Connection portfolio and Facebook page.
All cookie photo credits: Sonja Galmad

Cookier Close-ups is the place on Cookie Connection where we celebrate the change-makers of the cookie decorating world. Whether forging new enterprises, inventing novel decorating techniques, or consistently charming us with their cookie decorating prowess, each of our featured thought leaders has redefined in his/her distinctive way how we interact, create, or otherwise do business here in cookie space!
If there are other cookiers you'd really like to get to know, please post requests in this forum. We'll do our best to round them up for an upcoming Cookier Close-up! Thanks!




Comments (24)