 November has finally come! The days are shorter, and sometimes cloudy, and the air is colder . . . but the trees put themselves to bed for the long sleep of winter, delighting us with their gorgeous, vibrant leaves. Fall has the power to turn the world into a bright and enchanting canvas - a beautiful painting that you can enjoy while drinking hot cocoa beside a cozy fireplace.
Fall is one of the most inspiring seasons. Even philosophers have written about it. You might know this famous Albert Camus quote: "Autumn is a second spring when every leaf is a flower." No one could better express the beauty of this season!
Yes, you've found me out! I love fall! I’m guilty!
Would you like to celebrate a delicious autumn? If so, stay here and follow along with me!
- 1 rectangular cookie, undecorated
- Flat piping tip, for decorating cookie (I used a Wilton #47 tip.)
- White medium-stiff royal icing, for window shutters and details
- Plastic scraper (Mine is from Pavoni.)
- Assorted round paint brushes, for cleaning cookie edges, smoothing icing irregularities, and dusting fall leaves
- Round piping tip, for window details and knob (I used a Wilton #2 tip.)
- Wafer paper, for smoothing royal icing
- Wafer paper printed with sheet music pattern (I only used a small bit.)
- Eucalyptus medium-stiff royal icing, for stems and leaves (See "Colors", below.)
- Round piping tip, for stems and wheat (I used a PME #1 tip.)
- Burgundy and brown stiff royal icing, for roses (I made them with a Wilton #101 tip.)
- White and brown gumpaste, for fall leaves (I used Renshaw gumpaste.)
- Silicone fall leaf mould (Mine is from Alphabet Moulds.)
- Clear edible glaze spray (I used one from PME.)
- Leaf piping tip, for green leaves (I used a PME #ST50 tip.)
- Red nonpareils
- Dusky Pink medium-stiff royal icing, for wheat (See "Colors", below.)
- AmeriColor: Burgundy and Warm Brown gels (for royal icing for roses)
- Sugarflair: Burgundy and Terracotta edible powders (for coloring fall leaves and "aging" window); Eucalyptus paste (for royal icing for leaves); Dusky Pink paste (for royal icing for wheat)
- Fratello: Melón, Lilac, and Leaf Green edible powders (for dusting leaves); Sepia edible powder (for dusting wheat)
Are you ready to have a great time? ![]()
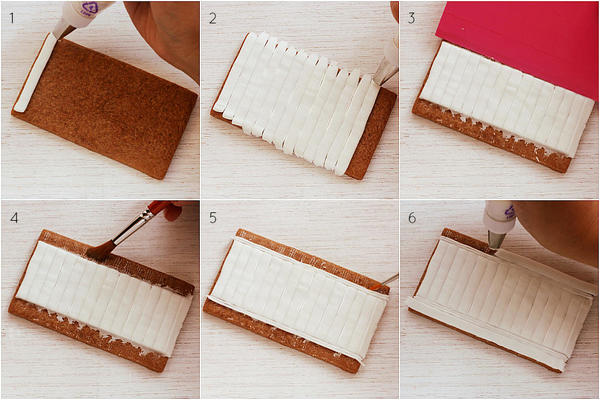
Steps 1 to 6:
1. Start at the upper edge of the cookie, and pipe a "ribbon" using the white medium-stiff royal icing and flat (Wilton #47 or equivalent) piping tip. Our goal is to create horizontal window shutters, so this will be the first one.
2. Continue piping successive “ribbons” until the cookie is filled.
3. While the icing is still wet, remove some of it (about 1/2 inch) from each side of the cookie using the plastic scraper.
4. Using a round paint brush, clean off any excess icing on the scraped areas. Don’t worry if you can't remove it all; you will be able to hide it in the next step.
5. Now, pipe two vertical lines on each side of the shutters using a small (Wilton #2 or equivalent) round tip, and smooth any icing irregularities with a small round brush.
6. Then, pipe two vertical window “frames” (one on each edge) in exactly the same way you piped the shutters in Step 1 with the flat tip.
Steps 7 to 12:
7. Before letting the icing dry, place a piece of wafer paper over the icing, and press gently. This step helps to smooth and level the entire icing surface.
8. Now, pipe the window knob on the right side of the cookie, again using the round tip and medium-stiff icing used in Step 5. Let the cookie dry completely (about 8 hours at room temperature or 1 hour in a food dehydrator).
9. Glue a little piece of decorated wafer paper, shaped like a ribbon, in the center of the cookie. For the "glue", you can use thinned leftover white royal icing, piping gel, or corn syrup - your choice! In this case, I used wafer paper printed with a sheet music pattern and tore the edges for a distressed, vintage effect.
10. Now, glue tiny royal icing rose transfers over one end of the wafer paper ribbon. [EDITOR'S NOTE: For instructions about how to pipe rose transfers, check out some of the tutorials mentioned in Practice Bakes Perfect Challenge #16.]
11. Pipe some green stems, using the Eucalyptus medium-stiff icing and a small (PME #1 or equivalent) round tip.
12. Then, glue on some gumpaste leaves, just above the roses, and let the "glue" dry completely.
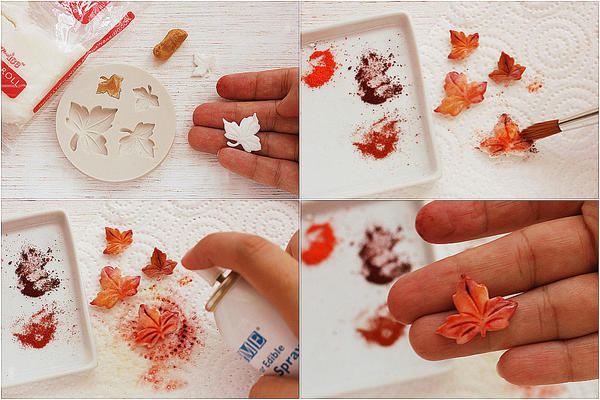
As you can see in image 12, I made gumpaste leaves in different sizes and colors. Would you like to know how? It’s super easy! Just press small pieces of brown and white gumpaste into silicone moulds shaped like fall leaves, and remove them from the moulds. Once the leaves have dried, dust them with small amounts of edible powder in different colors (see "Colors", above) using a large round paint brush. Then, spray over the dust with clear edible glaze.
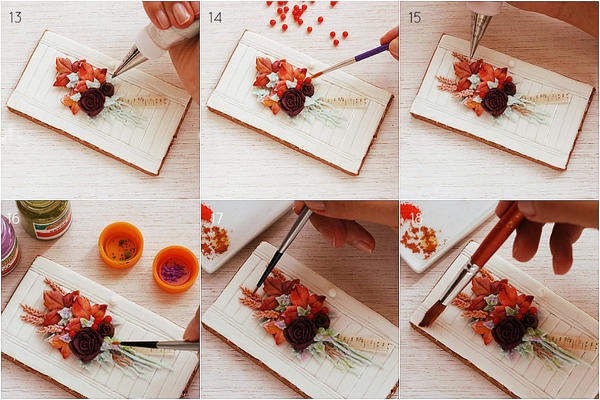
Steps 13 to 18:
13. Now, pipe some smaller green leaves using the medium-stiff Eucalyptus royal icing and a leaf (PME #ST50 or equivalent) tip.
14. Glue on red nonpareils for berries. If you prefer, you can pipe them with red royal icing.
15. Then, add wheat straws using the Dusky Pink royal icing and a round (PME #1 or equivalent) tip. Let the entire fall bouquet dry.
16. Once the bouquet is completely dry, add some color highlights to the leaves by dusting them (with a dry brush) with the dry Melón, Lilac, and Leaf Green edible powders, without extending them with vodka or extract.
17. Similarly, dust the wheat with some of the Sepia powder.
18. And, lastly, "age" the window edges by dusting with the Terracotta edible powder.
Voilà! Our welcoming fall window is done! ![]()
Now, it’s time to open it, and enjoy what autumn brings. You won’t want to miss the season's delights! 
Cookie and photo credits: Aixa Zunino

 Aixa Zunino is the soul of Dolce Sentire, a virtual corner of sweetness and creativity dedicated to cookie decorating. On her site, this garden engineer, self-taught decorator, and lover of flowers and animals lets her imagination fly, sharing everything she has learned since discovering the world of cookies in early 2012. She combines this activity with courses around Spain (her current home) where she teaches all the secrets to getting dreamy cookies. Meet her on Facebook or her website, and email her your cookie decorating questions or concerns at dolcesentiredolci@gmail.com.
Photo credit: Aixa Zunino
Note: Get Inspired with Dolce Sentire is a monthly Cookie Connection blog feature written by Aixa Zunino, where, through in-depth tutorials, she proves that if you can dream it, you can cookie it! This article expresses the views of the author, and not necessarily those of this site, its owners, its administrators, or its employees. To read all of Aixa's past Get Inspired tutorials, click here. And to see all of Cookie Connection's tutorials, click here.







Comments (21)