 The initial idea for this project came while sketching Christmas trees on paper. The triangular shapes soon became a pyramid, which reminded me of the playing card towers I used to build as a child. From there, I developed the idea, deciding to use individual cookies, decorated with ornaments, as the cards. I then devised a safe stacking method for building these cards into a 3-D Christmas tree. Card towers, like cookies, are ephemeral, but I have tried to make this tree tower sturdier!
- Chocolate cookie dough of your choice
- Fluted rectangular (7.5 x 5 cm/3 x 2 in) cookie cutter
- Sharp knife
- Zester or Microplane tool, to file/miter edges
- White piping-consistency royal icing, in pastry bag fitted with PME #1 tip or equivalent
- Dark green, light green, and white flooding-consistency royal icing, in tip-less pastry bags with openings equivalent to PME #2 tip, for cookies
- Christmas-themed royal icing transfers of your choice (Alternatively, you can use the transfer template attached at the end of this post.)
- White, red, yellow, and sky blue flooding-consistency royal icing, in tip-less pastry bags with openings equivalent to Wilton #2 tip, for various transfers
- Scribe tool
- Brown and white very thick-consistency royal icing, in parchment pastry cones (Julia M. Usher calls this icing "glue". See her video for reference, and also her video about how to make cones.)
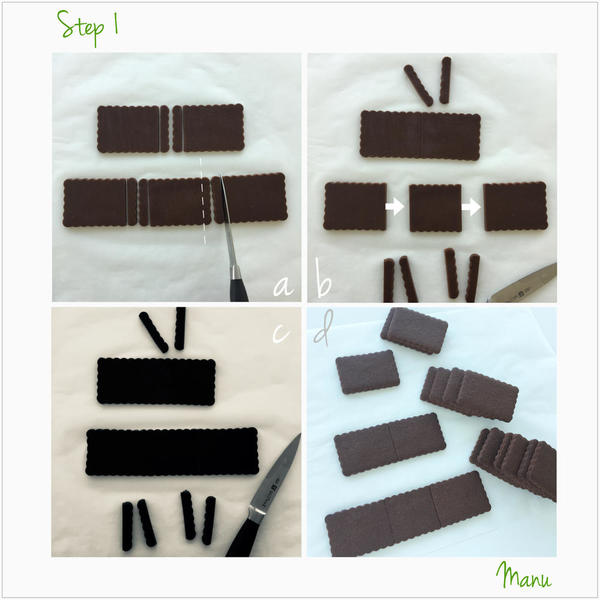
Step 1: Roll, cut, and frankencookie* dough
- 12 cookies that will be leaned together to make up the upside down Vs (or /\s) of each of the three stories (3 /\s for the first story, 2 /\s the for second story, and 1 /\ for the top story);
- 1 cookie (the “top floor” that will lay horizontally under the top /\), to be baked right after being cut out; and
- 5 cookies that will lay horizontally under the remaining two lower stories, to be frankencookied* before baking to make two longer rectangles.
*Frankencookie is a term coined by someone in the cookie world to refer to creating new and different cookie shapes by joining other cookie shapes together.
Here's how to frankencookie the floors for the two lower stories:
a. First, roll out your cookie dough (to roughly a 0.5 cm/3/16 in thickness) on parchment paper, and cut out five (7.5 x 5 cm/3 x 2 in) fluted rectangles, leaving the cookies on the parchment paper. The base of the first story is made up of three rectangular cookies. Trim the fluted edges of the central cookie and the internal fluted edges of the two outermost cookies according to the guideline shown in the picture below. The base of the second story is made up of just two cookies; therefore, you only need to trim the fluted internal edges.
b. Remove the excess dough, and move the cookies close together.
c. Again, do the cutting and piecing together directly on parchment paper (or a silicone mat). This way, when you are done, you can lift the paper (or mat) onto the baking sheet without misshaping the cookies. Bake according to your recipe. The cookies will fuse together while baking.
d. The seams between the rectangles in the new longer rectangles will be fragile, so try not to move them until you flood them and that icing has dried. Thanks to the icing, each long rectangle will become one sturdier piece. But before you ice, let the cookies cool completely and complete Step 2, below.
Step 2: File and miter cookie edges
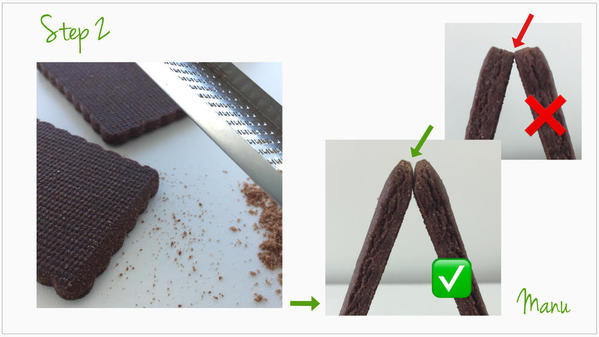
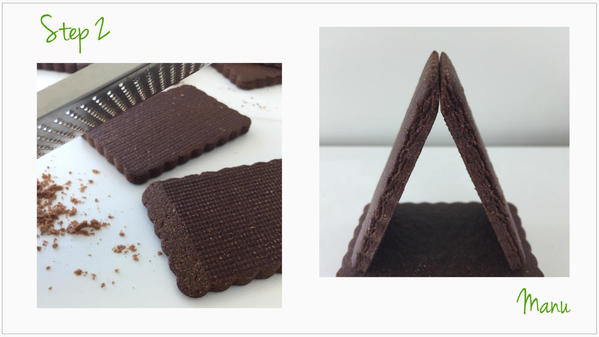
Next, lightly file the top edges of the 10 cookies that stand vertically in the lower two stories of the structure - the five /\s. Work on one /\ at a time, filing each of the top edges, so they make better, more complete contact at the top, where they will later be glued with icing. Repeat this step for the remaining 4 /\s.
For the /\ at the very top, miter the two edges more fully, so that the cookies fit seamlessly together. The top of this /\, unlike the other five that were just filed, will be exposed in the final construction, so it's best to have as tight a seam as possible. This way, the treetop will look quite clean and won’t need to be covered with any decoration.
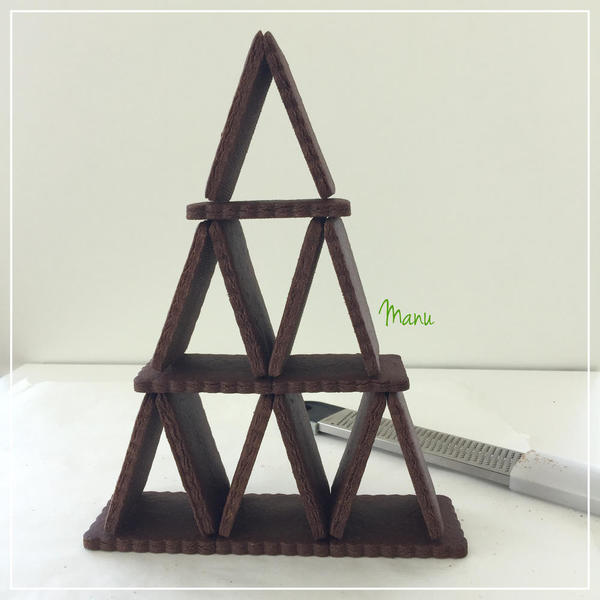
Before moving onto the next step, here's a photo recap of all the cookie cards, frankencookied, filed, and ready to be decorated, to show you where we’re headed. I know, I know, I just told you not to move the frankencookied floors before flooding them . . . but I wanted to make the cookie card tower! ![]()
Step 3: Outline, flood, and decorate cookies
This step is essentially the same for all of the cookies in this project, and they all need about the same time to dry. However, there are some small differences in the decorations from piece to piece, so I organized the instructions into three groups.
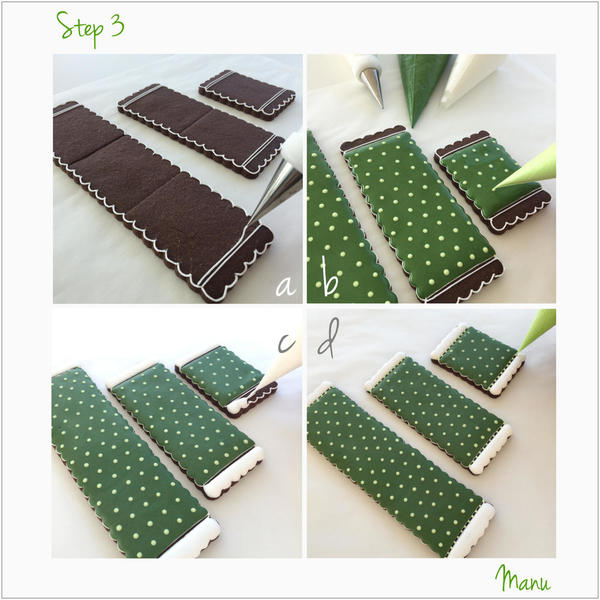
Three floors
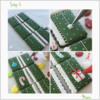
a. Using the white piping-consistency royal icing in a pastry bag fitted with a PME #1 tip (or equivalent), outline each of the three floors, tracing along their fluted edges. Then pipe two parallel lines close to each of the short sides. These lines are decorative, but they will also allow you to flood different sections of the cookie without the icing colors merging together and bleeding.
b. Using the dark green flooding-consistency icing and a tip-less pastry bag with an opening equivalent to a PME #2 tip, flood the center of each cookie. While the dark green icing is still wet, immediately pipe dots on top with the light green flooding-consistency royal icing (using the same size tip or opening in your bag).
c. To make the borders, fill the outlined areas closest to the fluted edges with white flooding-consistency royal icing.
d. Once the white and green icing have crusted, pipe little dots, with the light green icing, in between the parallel lines you piped in Step a. Let the icing dry completely, about 8 hours or overnight.
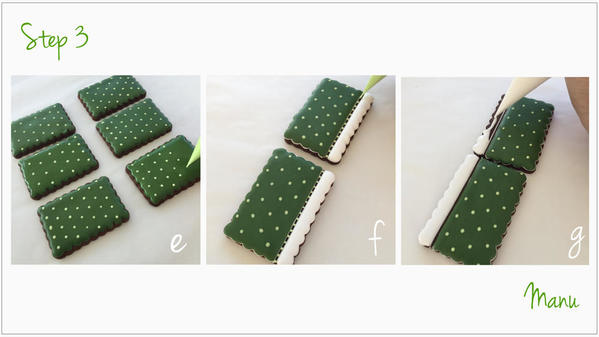
10 cookies that form /\s of bottom two stories (i.e., the cookies that were lightly filed in Step 2)
e. Flood six of the 10 cookies with dark green royal icing, using the same consistency icing and tips as in the previous steps. While the dark green icing is still wet, immediately pipe dots on top with the same light green royal icing. These cookies will be positioned in the middle of the structure, so they don’t get any white border.
f. Decorate two cookies following Steps a to d, above. However, keep the filed edge of the cookie to the top, and pipe the white border only on the right side of each cookie. These cookies will be positioned on the left side of the Christmas tree on the first and second stories, so that the white border will face forward.
g. Repeat Step f for the remaining two cookies, but, this time, pipe the white border only on the left side. These cookies will be positioned on the right side of the Christmas tree on the first and second stories, so that, once again, the white border will face forward.
Let the icing dry completely, about 8 hours or overnight.
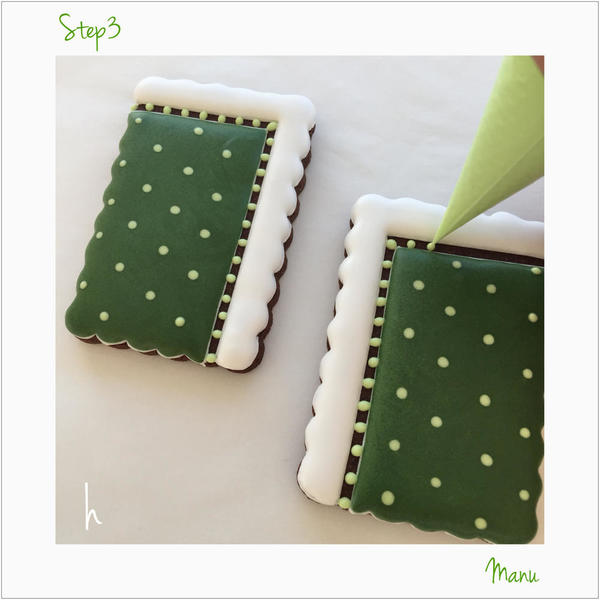
Two cookies that make up treetop (i.e., the ones with the fully mitered edges)
h. Again using the white piping-consistency icing and a PME #1 tip (or equivalent), outline these cookies. Next, pipe two parallel lines along two adjacent sides of each cookie in order to make a border around one corner. Remember to keep the mitered edges at the top. Pipe the border on the top short sides of both cookies, but, on one cookie, continue the border on the longer side to the left, and, on the other cookie, continue it along the right side. Complete the flooding and dot work as done on the other cookies in previous steps, and let the cookies dry completely, again about 8 hours or overnight.
Step 4: Pipe royal icing transfers
Use the attached templates to make different kinds of royal icing transfers (ornaments, stars, gift boxes, candy canes, etc.) to be glued to the sides and front of the Christmas tree. (Hint: To save time, you could glue hard candies, gummy bears, or chocolate bits to the tree instead.) As always, pipe the transfers onto parchment paper or acetate to ensure easy removal later. To learn more about royal icing transfers and how to pipe them, please read Step 5 (points b to e) in my previous tutorial here. For this project, I would like to add:
a. I outlined each template with white piping-consistency royal icing and flooded each template with different colors of flooding-consistency royal icing, because I like to see the white outlines. But you could choose another color for the outlining icing, as you prefer.
b. To make a "reflection" on the ornaments, I piped a dot of white royal icing onto the underlying wet icing.
c. Then, I immediately used a scribe tool to "draw" that white dot into a teardrop shape.
d. I also used the scribe tool to help "tease" the icing into every corner of the stars.
Let the transfers dry completely, ideally overnight or until they easily pop off the parchment paper (or acetate).
Step 5: Glue transfers to cookie cards
a. Using white piping-consistency royal icing and a PME #1 tip (or equivalent), pipe a thin line or "string" on each of the six cookies (that form the /\s) that have a white border. Start at the top edge of the green area and pipe halfway down that section. Make sure to keep the filed edges oriented toward the top.
b. Then, working on one cookie at a time, pipe a drop of white royal icing at the end of each "string" and immediately place one of your dried royal icing transfers, made in Step 4, on top.
c. Repeat Step b, directly above, for the remaining five cookies.
d. For any gift box transfers, stiffen leftover icing to piping consistency and, using a PME #1 tip (or equivalent), pipe on a bow.
Let all icing dry completely before proceeding to final assembly in the next step.
Step 6: Assemble Christmas tree
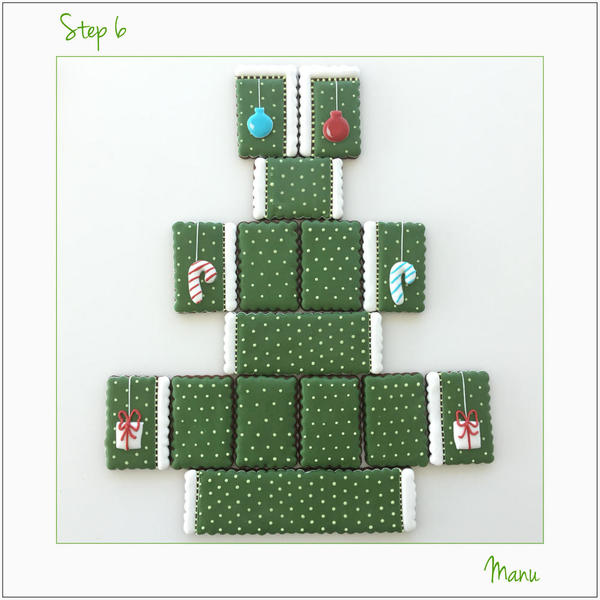
Now that all of the cookie cards are ready, let’s build our Christmas tree! Again, here's a visual recap of the layout:
I recommend building the structure on a silicone mat. Not only will there be less chance of breaking any cookie that may drop, but the cookies will also be less likely to slide around as you build. Let's proceed now with the building, starting with the lowest story and moving to the top.
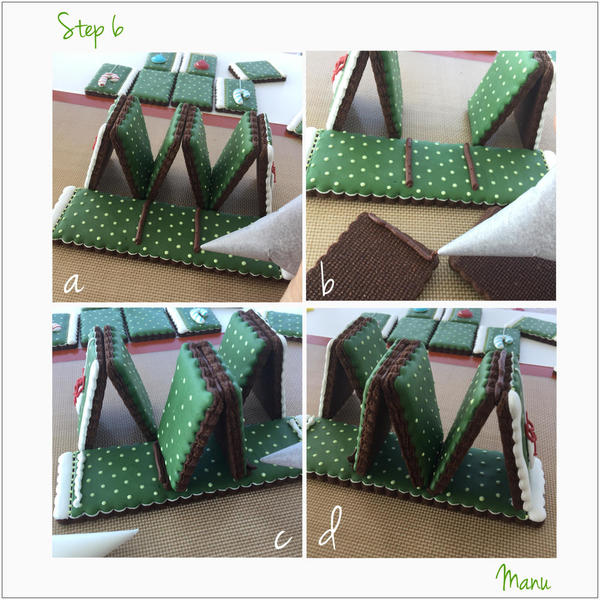
a. First, position the cookies that make up the /\s behind the lowest (i.e., largest) floor to gauge how wide each /\ must be in order to fit within the green area on the floor. Remember, three /\s will be used on top of this floor. The little dots that you piped could serve as placement guides - if you piped them uniformly, that is! ![]() Pipe two lines of brown icing "glue" on the floor where you've determined the bottom of the center /\ will be placed.
Pipe two lines of brown icing "glue" on the floor where you've determined the bottom of the center /\ will be placed.
b. Pipe brown "glue" along the filed edge of one of the central /\ cookies.
c. Then stick the other half of that /\ into the glue to secure the two cookies together at the top. Immediately place the /\ on the floor, on the brown "glue" that you piped in Step b. Then, pipe a line of brown "glue" along the outer bottom edges of this /\, and a line of white "glue" along the edges of the green area, where the bases of the outermost /\s will be located. (Note: I change to white "glue" at the outermost edges, because if any "glue" should squeeze out, it can more easily be cleaned off the white border.)
d. Glue together the two cookies that form the rightmost /\ along their top edge, as you just did for the center /\ in Steps b and c. Then immediately place this /\ on the "glue" you just piped, making sure the white border faces forward. Don't wait too long to place the /\s, as thick "glue" dries out rather quickly.
e. Repeat Step d for the remaining two cookies that form the leftmost /\. While the "glue" is still somewhat wet, use your scribe tool to clean up any icing that may be peeking out from underneath the cookies. This way, the end result will look as clean as possible.
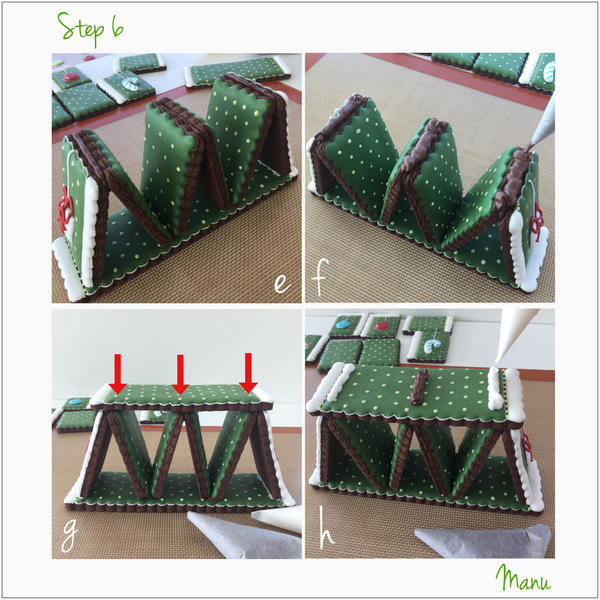
f. Pipe brown "glue" along the top corners of the three /\s to anchor the next floor.
g. Now, center the middle floor over the tops of the three /\s, and, once centered, rest it directly on top of the "glue". Apply a little pressure, evenly along the floor, to be sure the cookie makes contact with the "glue" everywhere, and sits flat. Note: If the structure should feel unsteady at any point in the assembly process, just wait a little bit before proceeding to the next step to allow the "glue" to more firmly set.
h. Pipe one line of brown "glue" in the middle of the second floor and two lines of white "glue" at the edges.
i. Assemble two /\s along their top edges, as done before, and immediately anchor each /\ to the "glue" on the floor. Your second story is now complete. Again, clean up any stray icing "glue" with your scribe tool.
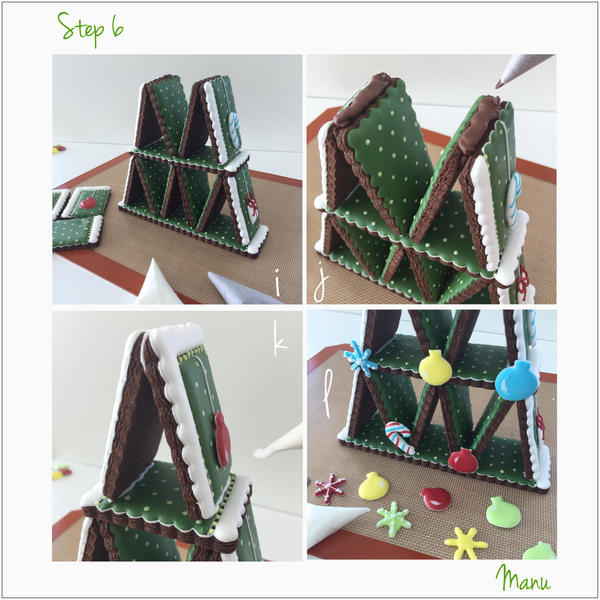
j. Pipe brown "glue" along the top corners of the two /\s to anchor the top floor.
k. Following the directions in Step g, above, adhere the top floor to the two /\s beneath it. Then, as before, stick the remaining two pieces (with the fully mitered edges) together to form the last /\, or treetop. Stick this /\ onto the floor, with white borders facing forward, using two lines of white royal icing "glue" positioned close to the white border. Once again, clean up any stray icing with your scribe tool.
l. Lastly, stick some royal icing transfers onto the front face, or facade, of the tree.
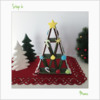
And, finally, after adding a star on the treetop, your Christmas card tree is ready!
And here's another view . . . [EDITOR'S NOTE: So clever and festive! Thank you! ![]() ]
]
Ciao, Manu

Manuela Pezzopane, affectionately called Manu by her friends and family, is a fan of everything handmade, and professes to have tried every possible hobby. However, it wasn’t until the end of 2014, when an American friend invited her to a Christmas cookie exchange, that she first discovered decorated cookies. In 2015, after watching Julia M. Usher's videos and signing up on Cookie Connection, Manu finally attempted her own. Since then, cookie decorating has become Manu’s passion – one that she continues to develop by actively participating in the challenges hosted by fellow Cookie Connection contributor Bakerloo Station. You can follow Manu on Facebook and Instagram, or email her at manubiscottidecorati@gmail.com.
Photo and cookie credits: Manuela Pezzopane
Note: Made by Manu is a Cookie Connection blog feature written by Manuela Pezzopane, where each month she shares the method behind a magical cookie of her own making. This article expresses the views of the author, and not necessarily those of this site, its owners, its administrators, or its employees. To read all of Manuela's past Made by Manu tutorials, click here. And to see all of Cookie Connection's tutorials, click here.










Comments (41)