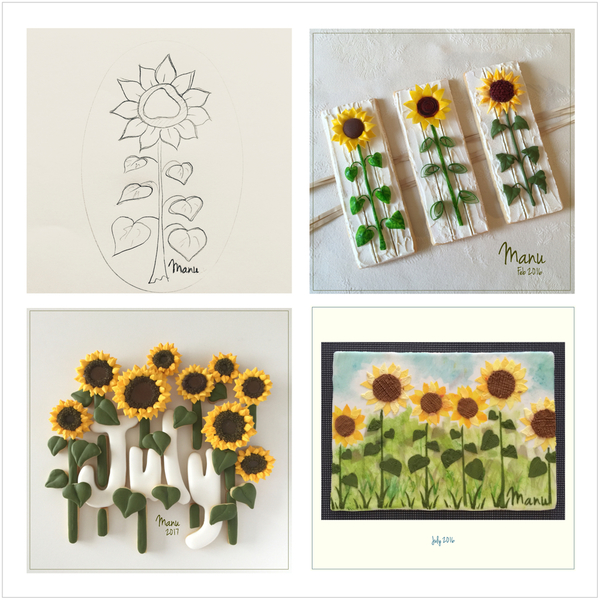
 I like sunflowers. I remember, as a little kid, asking my parents to "kidnap" a huge sunflower that I had seen for a while towering strong, wild, and lonely along a road near a sunflower field. They finally said "yes", so we transplanted the sunflower in a large vase to our terrace, and I took care of it. We had a sunflower growing every year for some years. It was the kind of sunflower that I now like to draw - with a long stalk, chubby petals, a big center, and heart-shaped leaves. And that same design keeps coming, no matter the medium (fondant, wafer paper, royal icing) or technique (stenciling) that I use.
For some reason, I've never tried to make sunflowers with the wet-on-wet technique (wet icing applied directly to wet icing) - at least not until now! This technique is ideal for recreating a sunflower in a few steps. I also live in a very humid environment - the perfect condition to work wet on wet, because the icing doesn’t set quickly. Humidity poses other challenges with this technique, however; but we'll get to those in a bit. First, let's review the tools for this project and some wet-on-wet tips.
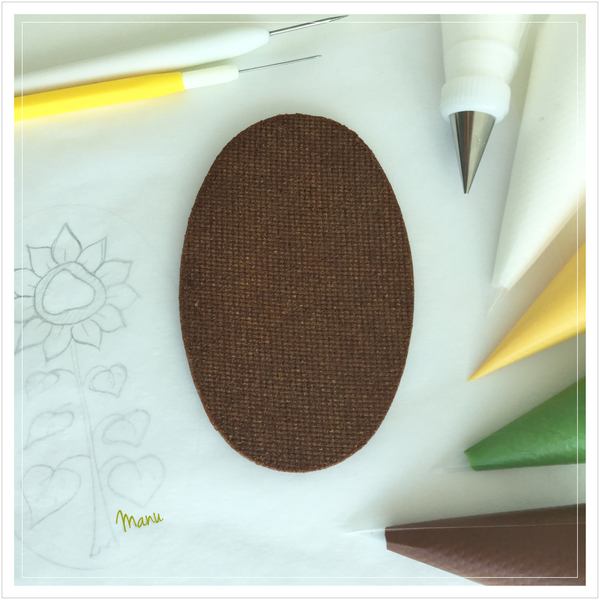
- 1 (8 x 12.5-cm/3 1/8 x 5-in) oval cookie (I used the fourth largest cookie cutter in this nesting set of six cutters.)
- Royal icing:
- Piping-consistency white, in pastry bag with Wilton #1 tip (or equivalent)
- Thick flooding-consistency white, in tip-less pastry bag with opening equivalent to Wilton #3 tip
- Thick flooding-consistency green, in tip-less pastry bag with opening equivalent to PME #1 tip
- Thick flooding-consistency brown, in tip-less pastry bag with opening equivalent to PME #2 tip
- Thick flooding-consistency yellow, in tip-less pastry bag with opening equivalent to PME #2 tip
- Sunflower template (See "Files" in the "Attachments" at the end of this post.)
- Scribe tool
[EDITOR'S NOTE: Here in Missouri, I sometimes experience very humid conditions like Manu, and, at other times, very dry ones. I've discovered - the hard way - that humidity can be both friend and foe of this technique. That being said, I have compiled three tips below to help guide you in your unique work environment. ~ JMU]
Important wet-on-wet tips:
(1) Work speed. The key to nice, smooth wet-on-wet effects is to work quickly, especially under dry conditions, without stopping between steps. All icings must be wet and easily "worked" throughout the entire decorating process. If you work too slowly, the icing can crust, and, when you drag your scribe tool through it to create marbled effects, you can leave behind "tracks" or cracks. It's wise to bag all of your icings before you start any wet-on-wet project, so you won't have to interrupt your work flow midstream.
(2) Icing consistency. All icings should be at roughly the same thick flooding-consistency. If icings are at different consistencies, two things may happen. Either they won't settle into each other smoothly or you'll end up with "ragged" marbled effects.
The icing thickness is also critical for reasons related to humidity. As Manu noted earlier, a humid environment will give you more working time before icings set, but it will also prolong the drying time when you are done. And the longer the icing takes to dry, the greater the risk of colors bleeding into one another while drying . . . yikes! The good news is you can minimize or avoid bleeding with thicker icing, because it dries more quickly. I always try to push the icing to the thickest possible consistency for this task. It should have some body, but still settle smoothly into other icings and not leave anything but faint tracks (that eventually close) when a scribe tool is drawn through it.
(3) Drying method. Again, the faster the icing dries (once you're done), the less chance you'll have of any bleeding. For final drying, set the cookie in front of a fan or in a dehydrator (set at about 90°F to 95°F) to accelerate the process. But not too long in the dehydrator - icing can sometimes expand and crack if it gets too hot. Colors can also get blotchy.
[EDITOR'S NOTE: Back to Manu! Sorry for what turned out to be a lengthy intrusion. ![]() ~ JMU]
~ JMU]
Now, let's get started!
Step 1: Outline and flood cookie
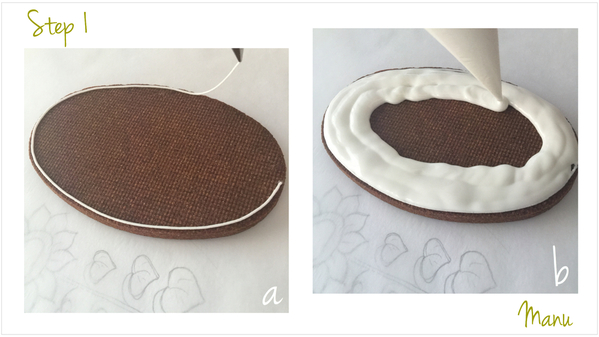
a. Using white piping-consistency royal icing and the equivalent of a Wilton #1 tip, outline the oval cookie about 2 millimeters (slightly less than 1/8 inch) from the edge. We need to "build a dam" to prevent the icing from overflowing once we flood the cookie and add more wet-on-wet icing in Steps 2 to 4. Let the outline dry.
b. Flood the cookie with white flooding-consistency royal icing, using the equivalent of a Wilton #3 tip. Immediately move onto the next step; do not allow the white flooding icing to dry or even crust.
Step 2: Pipe wet-on-wet stalks and leaves
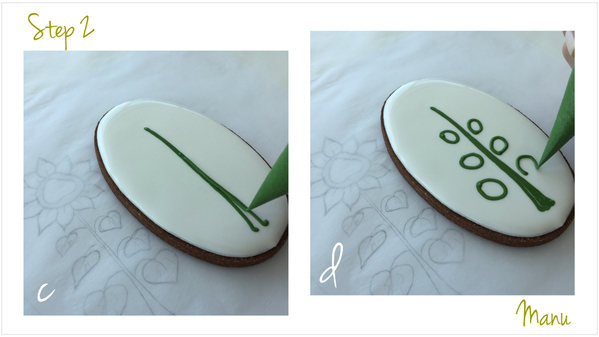
c. Using green thick flooding-consistency royal icing and the equivalent of a PME #1 tip, pipe a long line (the stalk) along the middle of the cookie. Since I cut a very small hole in my tip-less pastry bag, I piped three lines to make a thick stalk. Keep my sunflower template close to the cookie as a piping reference and to gauge proportions. (Again, you'll find the template under "Attachments".)
d. Pipe six ovals (the leaves), three on each side of the stalk. Pipe larger ovals as you move toward the base of the stalk.
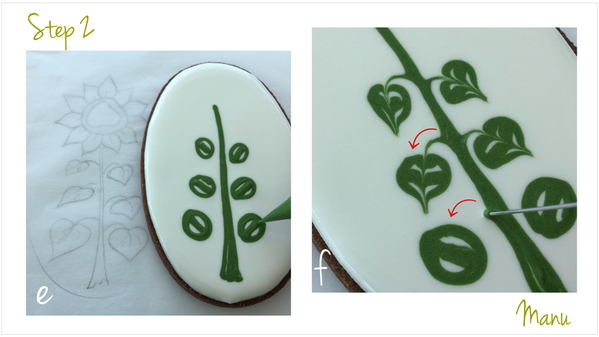
e. Immediately pipe a thick line in the center of each oval (sort of like this prohibition sign: 🚫). This pattern will add details to the leaves once we drag the scribe tool through it in Steps 2f to 2h.
f. Now, working on one oval at a time (but still working quickly), dip the point of the scribe tool in the green stalk icing next to the oval, and drag the icing until you meet the top part of the oval. (Follow the direction indicated by the red arrow.) The goal is to draw a stem that connects the stalk to the oval (leaf).
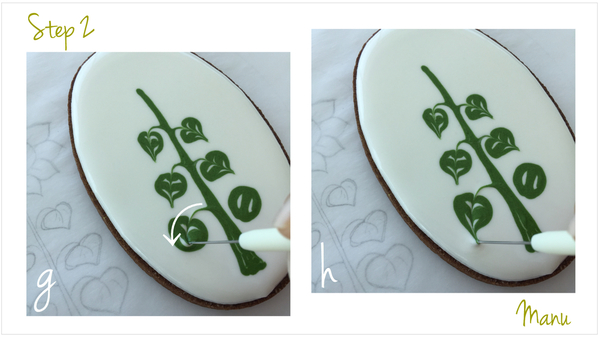
g. Once you have reached the top of the oval, don’t stop! Keep dragging the scribe tool across the oval, perpendicular to the line piped in the middle, as indicated by the white arrow.
h. Keep dragging it all the way across the oval through the opposite side to finish with a point in the white area of the cookie. You should end up with a heart-shaped leaf.
Repeat Steps 2f to 2h for all the ovals.
Step 3: Pipe sunflower center and petals
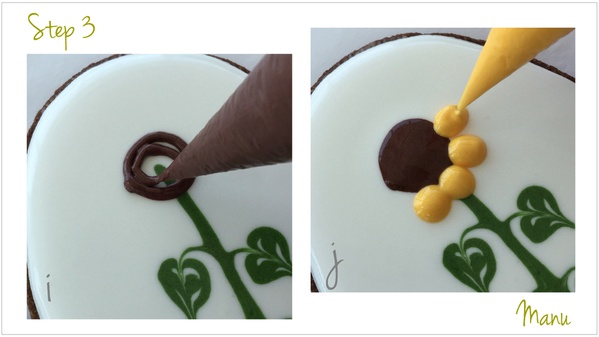
i. Again, move quickly! You don't want your white icing to set! Using brown thick flooding-consistency royal icing and the equivalent of a PME #2 tip, pipe the sunflower center at the top of the stalk. Start piping an outline of a circle and then fill it up. It doesn’t have to be a perfect circle.
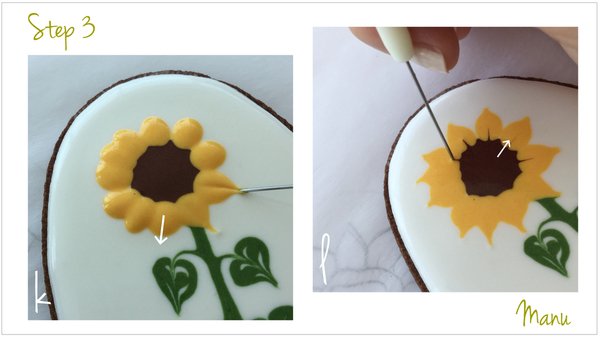
j. Now, using yellow thick flooding-consistency royal icing and the equivalent of a PME #2 tip, pipe several beads (the petals) all the way around the brown center.
k. Using the scribe tool, drag the icing from the middle of each yellow bead into the white area of the cookie to give each bead a pointed petal shape. (Again, follow the direction of the white arrow.) By the time you complete the circle, the yellow beads should have sunk into the white icing.
l. Next, use the scribe tool to drag a thin line of brown icing from the flower center into the middle of each petal. To get a thin line, drag the very tip of the scribe tool along the surface of the icing; avoid plunging it into the icing.
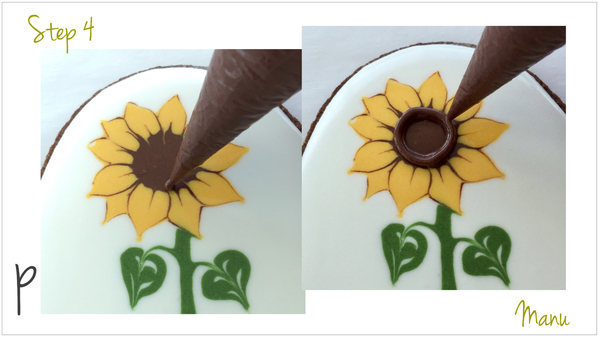
Step 4: Add more details to petals
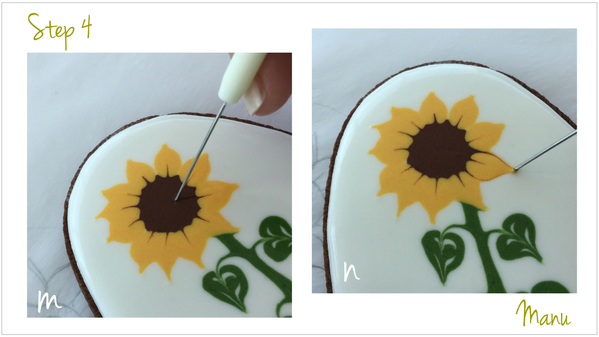
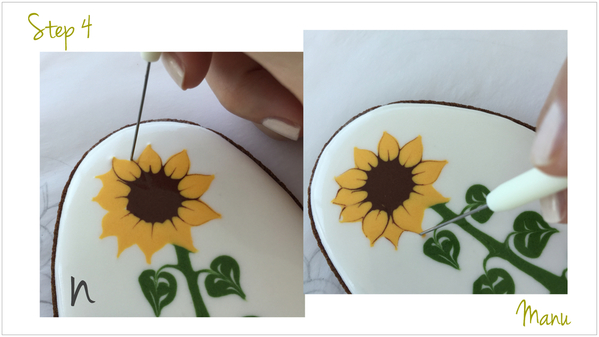
m. Now, dip the scribe tool in the flower center, and drag it to “draw” an outline along the edge of a petal.
n. Again, to create a delicate line, use the tip of the scribe tool and draw near the surface of the icing.
Continue in this fashion until you have outlined both sides of each petal. Wipe off the tip of the scribe tool after each stroke to avoid "contaminating" the brown center with white or yellow icing.
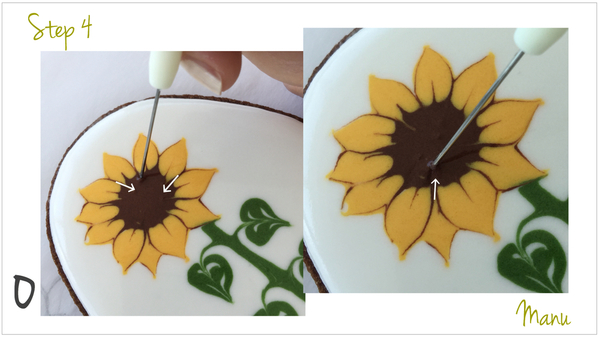
o. After all the dragging through the flower center in previous steps, you may find that the flower center has lost its shape or become too big. If this should happen, simply drag the icing in between the petals toward the flower center to fix its shape.
p. Let the icing set just a couple of minutes in front of fan. (This step isn't truly a wet-on-wet one!) Then, using brown thick flooding-consistency royal icing and the equivalent of a PME #2 tip, outline the center of the sunflower. Because the underlying icing has dried a bit, the outline shouldn't settle all the way into the center.
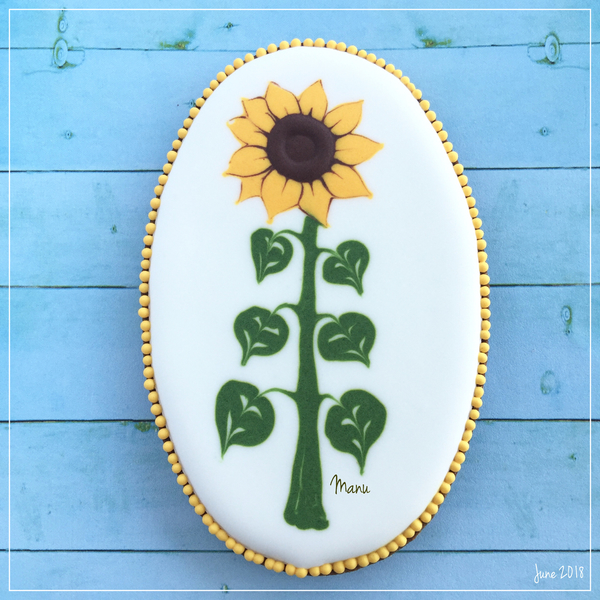
Now, it's time to turn on the air conditioner and to let the cookie dry completely in front of a fan or in a dehydrator. (Again, speed-drying will reduce the risk of colors bleeding.) As you can see in the picture below, the outline applied in Step 4p didn’t sink completely into the flower center! Instead it added a little dimension!
Once the cookie is dry, add a border of your choice to finish it. I thought I’d add a bead border, as the consistency of my yellow icing looked to be on point, but actually it was a little bit too loose. But you can learn everything about beadwork, @Julia M. Usher's signature border, by reading her blog post here.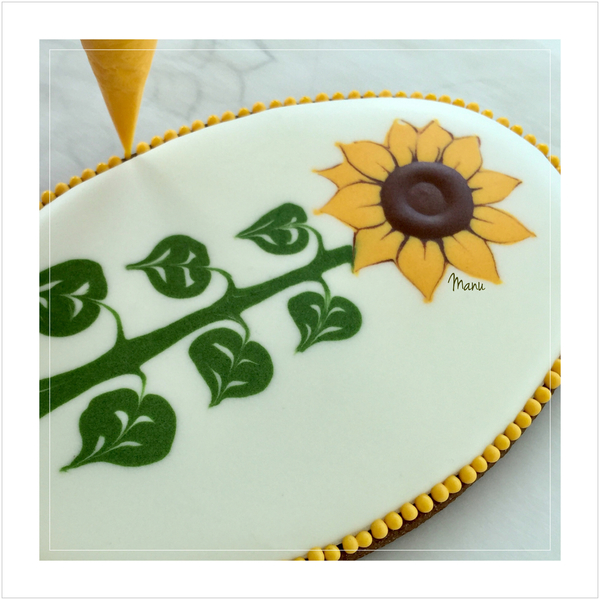
And here it is, at last: a wet-on-wet sunflower on a cookie!
And . . . a video. I edited it slow enough to show each step, yet fast enough to avoid boring you! It is faster than my actual cookie decorating pace. For the record, I completed the wet-on-wet portion of this cookie in about 10 minutes. You may need to work faster if working under drier conditions.
Enjoy, and happy summer!
Manu🌻

Manuela Pezzopane, affectionately called Manu by her friends and family, is a fan of everything handmade, and professes to have tried every possible hobby. However, it wasn’t until the end of 2014, when an American friend invited her to a Christmas cookie exchange, that she first discovered decorated cookies. In 2015, after watching Julia M. Usher's videos and signing up on Cookie Connection, Manu finally attempted her own. Since then, cookie decorating has become Manu’s passion. You can follow Manu on Facebook and Instagram, or email her at manubiscottidecorati@gmail.com.
Photo, video and cookie credits: Manuela Pezzopane
Note: Made by Manu is a Cookie Connection blog feature written by Manuela Pezzopane, where each month she shares the method behind a magical cookie of her own making. This article expresses the views of the author, and not necessarily those of this site, its owners, its administrators, or its employees. To read all of Manuela's past Made by Manu tutorials, click here. And to see all of Cookie Connection's tutorials, click here.




Comments (34)