 Creating dimensional royal icing designs on my cookies is one of my favourite techniques. I especially love the more complex designs that make cookies a thrilling challenge.
Of course, dimensional piping takes some planning, a little bit of practice, and (tons of) patience, but, girls, we all know cookiers have plenty of that, right? ![]()
Recently, I explained how I used the dimensional royal icing technique in this tutorial. In that case, the dimensional part (a sunflower) was quite small and simple, and easy to execute.
While I was in Asturias the last few days, surrounded by beautiful scenery, I decided to draw on nature's inspiration for this post, and to take a deeper look at this technique with a more elaborate rose design.
It's not as difficult as it looks, I promise! ![]()
- 1 large cookie, flooded in white or a pale color, and completely dried (I used my Violeta plaque cutter, which you can find here.)
- Nontoxic pencil or edible marker
- Decorating bags and couplers
- Small piping tip (I used a PME #1 tip.)
- White royal icing, medium-stiff consistency, for piping rose (I used this ready-to-use royal icing from Renshaw.)
- Scribe tool or toothpick
- Round paint brush, for handpainting rose (I used one from the Italian brand Cerart.)
- Alcohol-based extract or vodka
This time, I used colors from three different Petal Crafts sets of compressed edible dust (used straight from the tray by adding a few drops of vodka).
- Set A: Sepia, Bridal Pink, Chartreuse, Hunter Green, Lilac, Terracotta, Moss Green, Wright White, and Coral.
- Set B: Old Rose, Cedar Green, and Aubergine
- Dazzler Set: Chocolate and White Sparkle
Okay, so we have everything we need to start. Lets go for it! ![]()
Step 1: Begin by tracing a rose illustration on the flooded cookie, using the paper transfer technique, which you can review here.
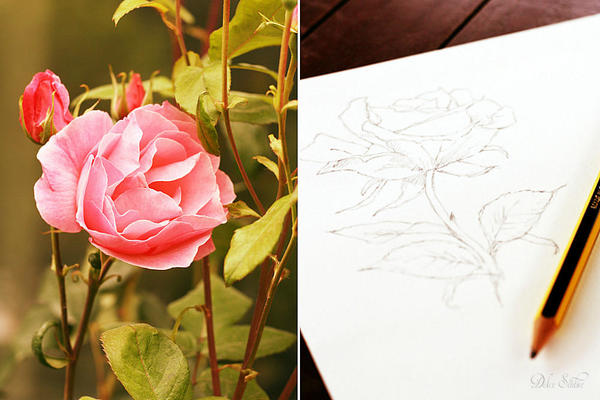
You can also draw a rose freehand, from memory, directly on the cookie. Or take a picture of a rose, use it as a reference to draw a new one on a piece of paper, and then trace that drawing on the cookie. I used the last method with my iced cookie.
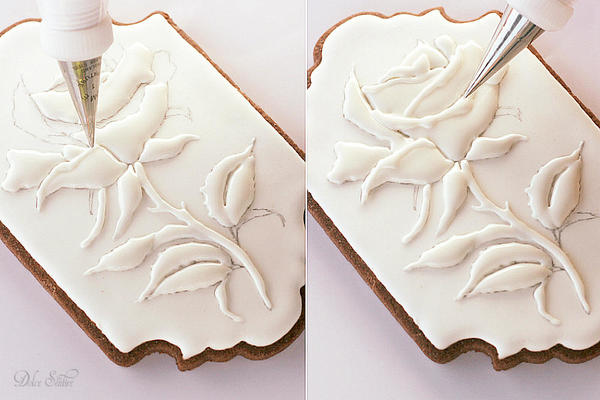
Step 2: Once your rose has been traced on the cookie, start piping it with white icing (medium-stiff consistency). Every single part of the design (petals, sepals, leaves, and stem) will eventually need to be piped.
Of course, you can start piping wherever you want, but, in this case, I recommend starting with a little sepal for practice. Fill its entire outlined area with icing and try to cover up the pencil marks. Use a scribe tool or toothpick to "tease" the icing into tight corners and spaces.
Step 3: Then, continue piping every other (meaning nonadjacent) outlined area. For instance, I next piped a petal, one petal removed from the sepal, rather than the stem directly adjacent to the sepal. Piping in this manner allows the area that was just piped some necessary drying time. If you were to pipe right next to a just-piped area, the icings in each area would merge together, and you'd lose the clear demarcation between areas that is the hallmark of this technique.
Continue, in the fashion described above, to pipe the remaining sepals, petals, leaves, and stem.
A note on the leaves: You can pipe them in two different ways. One option is to fill the entire outlined area with royal icing. The second option, which is what I did, is to first pipe a half-leaf (upper left image), let it dry a bit (about 5 minutes) while you are piping another area, and then pipe the other half. Again, the second approach will result in a clear demarcation between the halves of each leaf.
When you have finished piping the entire rose, let it dry about half an hour at room temperature (or 10 minutes in a food dehydrator), long enough to let a crust form on all of the petals. This way, you'll be less likely to break any petals when you pipe on top of them in the next step.
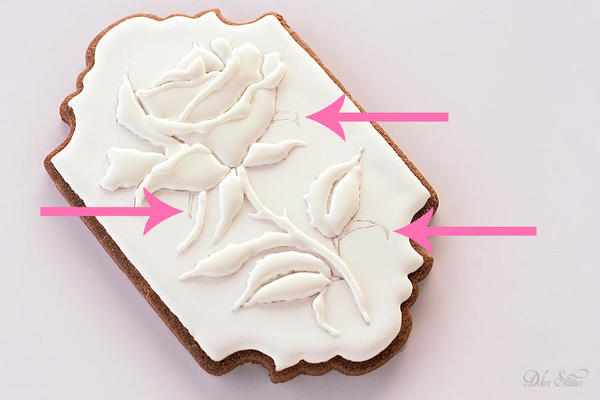
Step 4: Finally, pipe icing along the edges of the crusted petals to give the sense of an opening rose.
Note that I have left some areas free of icing, namely those that are at the back of the rose. (See the big pink arrows below!) I will paint these areas later, but leaving these "back" areas empty of icing will add greater depth and dimension to the finished piece.
Now, let the royal icing rose dry completely, about 8 hours at room temperature (or 30 minutes in a food dehydrator).
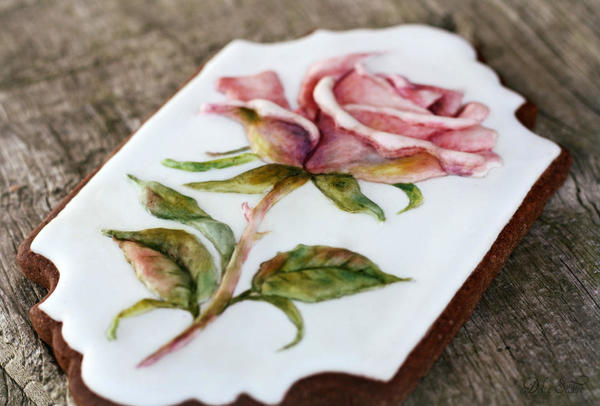
Step 5: Yay! It's time to paint! Using a photo or an illustration of a rose as a color guide, handpaint both the raised and unraised areas with edible colors mixed with a few drops of vodka. Wondering how I used all 14 colors from the Petal Crafts palette on this one rose?! ![]() It might seem like a lot of colors, but here are a few quick tips to get you started:
It might seem like a lot of colors, but here are a few quick tips to get you started:
- I began by "washing" the rose with light/bright colors using a small round brush. (See image below.) My goal was to make these parts almost "glow", to heighten contrast with the darker colors that I added in Step 2, below. On the petals, I used the palest pink and blush shades (Sepia and Bridal Pink). For the stems and leaves, I used bright green colors (Chartreuse and Cedar Green), but only very lightly.
- When those colors were dry, I added the next layer of color to all parts by introducing medium-dark shades. For the petals, I used darker shades of pink (Old Rose and Coral) and added some violet (Lilac) to highlight some areas. I also worked with Aubergine and a pinch of Chartreuse (again) on the base of the flower to create texture, depth, and contrast. For the stems and leaves, I applied darker greens (Hunter Green and Moss Green) in much the same manner.
- Finally, I put some white color (Wright White and White Sparkle) on the petal edges, and Chocolate and Terracotta on some of the leaves to create warm shadows. I painted the leaf veins with a combination of dark green colors, using the same round brush I used for painting broader areas.
Of course, you can change colors and create different shades and shadows by using the techniques explained in my earlier tutorial.
And if you want to simplify the painting process, the good news is: you can! If 14 colors is too much, here are the five colors that I'd recommend you use to get a similar effect: Sepia and Chartreuse for the first "glowing" layer; Old Rose and Moss Green for the medium-dark shades; and Wright White or White Sparkle to highlight some spots on the rose.
One last, but useful tip: In case you make a mistake with color placement, don’t worry! You can correct it by applying additional layers of white color on top. Let them dry completely before painting over with the correct color.
Finished! Our lovely rose in all its glory . . . and with all of its dimension!
I hope this tutorial encourages you to practice the dimensional piping technique! I’m sure you will really love it!
See you soon! 
Cookie and photo credits: Aixa Zunino

 Aixa Zunino is the soul of Dolce Sentire, a virtual corner of sweetness and creativity dedicated to cookie decorating. On her site, this garden engineer, self-taught decorator, and lover of flowers and animals lets her imagination fly, sharing everything she has learned since discovering the world of cookies in early 2012. She combines this activity with courses around Spain (her current home) where she teaches all the secrets to getting dreamy cookies. Meet her on Facebook or her website, and email her your cookie decorating questions or concerns at dolcesentiredolci@gmail.com.
Photo credit: Aixa Zunino
Note: Get Inspired with Dolce Sentire is a monthly Cookie Connection blog feature written by Aixa Zunino, where, through in-depth tutorials, she proves that if you can dream it, you can cookie it! This article expresses the views of the author, and not necessarily those of this site, its owners, its administrators, or its employees. To read all of Aixa's past Get Inspired tutorials, click here. And to see all of Cookie Connection's tutorials, click here.









Comments (29)