At long last, we’re picking up where we left off in our June 27 (!) chat with Cookie Connection challenge host @Sweet Prodigy, aka Christine Dutcher! In addition to organizing and recapping our bimonthly Practice Bakes Perfect challenges, Christine is a precision-piper extraordinaire, best known for her mesmerizing, Spirograph-like geometric designs, which invariably leave one wondering, “How the heck did she do that?” The good news is: we’ll have to wonder no more, as a large part of this interview will be spent exploring Christine’s creative process and decorating techniques. I know you’re as excited as I am for her to share her insider tips, so let’s jump right into questions, shall we?!
![]()
JMU: Hi, Christine! First, thanks so much for agreeing to a follow-up Close-up interview. Our challenges keep you pretty darn busy, so I’m very appreciative of the extra time you’re taking with us! I know you started cookie decorating in 2013, and that, in 2016, you ramped up by challenging yourself with increasingly complex designs like some of your signature geometrics pictured below. Can you tell us a bit about that ramping up process? How did you decide on the types of designs you wanted to tackle? What resources, if any, did you draw on to help gain the skills needed to execute those designs? And how much time each day did you spend honing your craft?
![]()
CD: Hi, Julia! Thank you again for featuring me in the live chat and also in this Cookier Close-up.
The ramping up actually started with my needlepoint cookies. In December 2015, I thought I would give needlepoint a try. (Up until that point, I had been creating mostly "regular" cookies that were mediocre at best.) I loved how precise and orderly this technique was, but I felt that my work was not quite up to par with where I wanted it to be. Two months later, I decided that I would hone my skills by taking the time to focus on my technique, and by learning as much as I could, one cookie at a time. With this in mind, I redid my needlepoint set. These photos show my first attempt and the redo set.
It was around this same time that I began experimenting with piping intersecting lines, a technique that I saw in a Sweetopia blog post. My early designs were really just experiments based on what I had seen. Once I felt confident with those designs, I began to explore other geometric patterns. Each subsequent design thereafter was chosen because it allowed me to further challenge myself, and advance my skills and understanding of this technique.
There is no specific amount of time in any given day (or week or month, for that matter) that I spend on cookies. There are times when I am able to work for hours or for days on end, and then there are times when I may go several months without so much as piping a single line. Ideally, I would love to be able to decorate full time.
![]()
JMU: Fast forward to 2019 when you were the first-ever cookier recognized as an “Honorary PME Five Star Sugar Artist” by PME. Congrats! Can you tell us how this designation came about? Did PME discover you, and, if so, how? What hoops, if any, did you have to jump through to earn the designation? Are there any responsibilities or obligations that come with this title?
![]()
CD: It was certainly an honor to have been recognized this way. I use PME tips for all of my stringwork and needlepoint cookies, and happened to mention them in one of my Instagram posts. PME took notice and started following me. In early 2019, they contacted me to let me know that they were putting together a course book for their new PME Five Star Sugar Artist program, which is a follow-on from their Professional Diploma course, and aimed at challenging students to think outside the box, stretch their imaginations, and push their skills to new levels. (So, no hoops for me to jump through, really.) Each star of the “five stars” represents a different sugar craft skill. My work was selected to represent the skills for decorated cookies for the "Royal Icing Star", and to be part of an overall collection of inspirational pictures that accompany each star. I would say that, having received this medal, the most important thing for me is to ensure that I continually challenge myself to grow and develop in all aspects of my work.
![]()
JMU: So, here we are in 2020, and so much has changed (at least for me) because of the COVID-19 pandemic. How, if at all, has your cookie decorating life changed because of it? Please describe your typical pre-COVID-19 cookie life – i.e., how much time you spent doing cookie-related things in a typical week, and what types of things (selling, practicing, teaching, etc.). Then compare/contrast that typical to your typical cookie life now.
![]()
CD: For me, cookie life (and life, in general) has not changed much since the pandemic. The exception, of course, is having the kids at home learning, and not being able to socialize as much. I still practice and work on cookies as often as I am able, which can vary from week to week. Overall, the biggest change has come from my kids getting older and becoming more independent, which is allowing me more free time to focus on cookies.
![]()
JMU: Well, more time to decorate and focus on what you like is certainly a silver lining of this pandemic! Now, let’s get into piping techniques and your distinctive stringwork designs. I’ll be treading on some ground that we lightly touched on in your earlier chat, but I believe it’s worth repeating. First, for some context, how big are your typical stringwork cookies? What tip size do you usually use, and why? And how long do they take from start to finish?
![]()
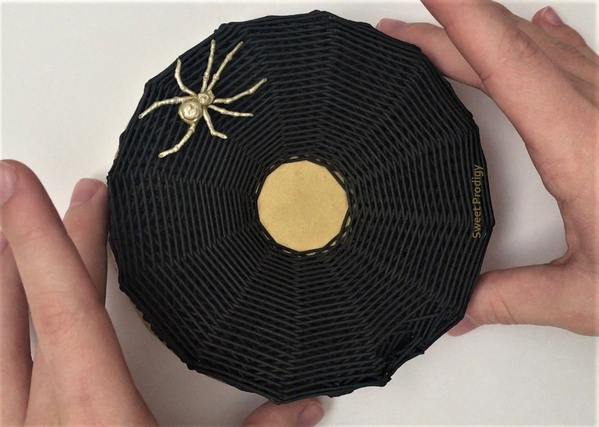
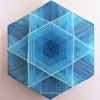
CD: Basic designs, such as the teal and white cookies above, can take about 30 to 60 minutes to pipe, while my three-dimensional designs can take anywhere from a few hours to an entire day to pipe. My favorite tip to use is a PME #1 tip. I find that it produces the perfect line thickness. Most of my stringwork cookies are about 5 inches (13 centimeters) in diameter. This spider web photo from an upcoming video will help give you an idea of my typical cookie size.
![]()
JMU: Second, how do you prep your icing to ensure that it pipes flawlessly with no air bubbles or breaks, which is critical to beautifully executed stringwork? Do you use a special royal icing recipe? Do you add anything (like corn syrup or glycerin) to enhance elasticity? Do you “spatula” or spread the icing in advance to remove air bubbles, in the way royal icing guru Eddie Spence describes?
![]()
CD: I was not aware of the "spatula" technique until recently, but I have always done a similar technique using a large spoon. I also want to add that I still get air bubbles. For my royal icing recipe, I use confectioner's sugar, meringue powder, and water. I do not use corn syrup or glycerin since, in my opinion, beautifully executed stringwork has more to do with proper technique and the right icing consistency rather than elasticity. I have used corn syrup in the past and have found it to be more detrimental than beneficial. But, again, this is just my opinion; others may find it helps with their stringwork. I also always work with fresh icing.
![]()
JMU: It’s hard to tell where most of your stringwork designs start and end. Can you take one of your favorites and give us a mini tutorial on how you laid down the lines, i.e., starting with which one/color and progressing in what order?
![]()
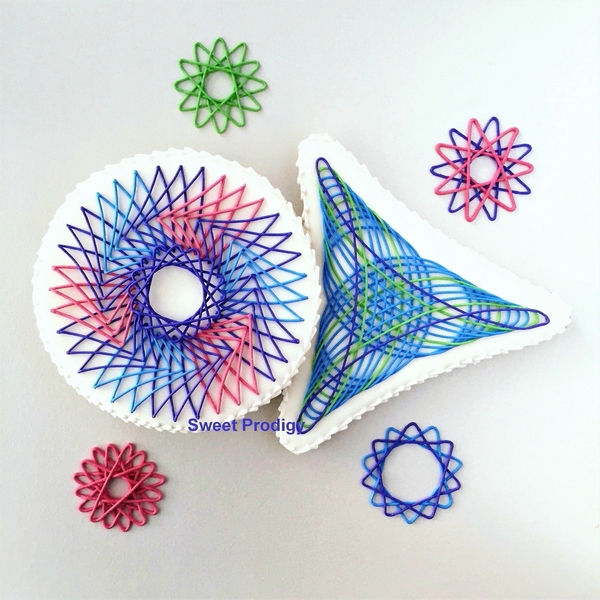
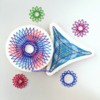
CD: The Spirograph set below is one of my favorites. The cookie on the left is a very easy design to start with since there are only two steps involved. (The purple piece in the center is a royal icing transfer that is added at the end.) This pattern consists of two parts: a sequence of slightly curved lines, and a sequence of V-shaped lines. To create the design, simply pipe all of the curved lines first. Then pipe all of the V-shaped lines second.
The cookie on the right is a bit more complex. It consists of several loops, which are layered one on top of the other. Each loop crosses itself three times. The purple loop is the top layer, and is a good example of what each loop looks like. The loop below it is green, followed by three blue loops, another green loop, and, finally, three more blue loops. To create this design, pipe the loops in the reverse order that they were mentioned. It is this layering and crossing of each loop that creates the illusion that all of the lines are intertwined.
![]()
JMU: What do you do if you break a line or mislay a line midstream? What are the best ways to make mid-course corrections, or do you just toss the cookie and start all over again?
![]()
CD: If a line breaks midstream, it can easily be removed with a scribe tool. Oftentimes, if a line has broken a few layers down, it can be carefully removed and piped again. Likewise, if there is a partial break in a line due to an air bubble, it too can be repaired with a bit of icing. However, for mistakes that cannot be corrected, it is best to remove the stringwork altogether and start over. The design can then be redone using the same cookie.
![]()
JMU: Your line starts and stops are always so perfectly flawless without any unsightly blobs! What’s your trick for achieving these results? Do you alter your piping pressure at the start or finish of a line? How do you break the icing flow without breaking delicate icing that might be surrounding it? What do you do if you DO get a blob? Any cleanup tips?
![]()
CD: When it comes to piping my lines, I apply a constant pressure from start to finish. For blobs, the best advice I can give is to take steps to avoid them altogether. For me this means using a piping tip and a thicker consistency icing. For cleanup of blobs or other mistakes, I like to let the icing dry just enough to form a solid piece that can carefully be removed with my scribe tool. This way there is less chance of smearing and creating a bigger mess.
![]()
JMU: Perhaps I should have asked this question first, but how do you come up with these patterns? Do you study Spirograph or other designs, and attempt to replicate them? Do you draw the patterns in advance? Or does the design process evolve more organically for you?
![]()
CD: It is definitely an organic process. Most of my designs are based on common geometric shapes like stars and hexagons. Once I have a basic shape to work with, I will then create a “sketch” using white royal icing to get an idea of what the overall pattern will look like. Next, I will try to determine which colors will work best to complement the overall design. Sometimes this process can involve a lot of experimentation because different colors piped in different sequences can produce completely different outcomes. There can be many hours of work, and a lot of trial and error behind a finished design that I post.
![]()
JMU: Oh, I never doubted for even a second that there wasn’t – all of your cookies look incredibly complex and labor-intensive to me! Thanks for that insider reveal of your creative process! Are you challenging yourself with any new out-of-the-box designs right now? Can you give us a sneak peek of any of them? Would you ever consider more curvaceous designs? Why or why not?
![]()
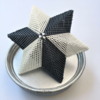
CD: Funny you should ask. I have actually been thinking about tackling some curvaceous designs lately. That would definitely be a fun challenge. Right now, I am obsessed with three-dimensional stringwork. Below is my latest design. It’s meant to look like merged, back-to-back triangular pyramids that sit on a silver cookie tray. It’s a fairly straightforward design, so I would like to try something a bit more complicated in the future. I would also like to try my hand at creating larger structural pieces.
![]()
JMU: I certainly look forward to seeing more structural creations like this last one. Knowing you, they’re bound to shine as bright as this star! Let’s turn to our challenges for a bit. I had my fingers crossed when I asked you to take over their hosting – you were the perfect fit, but I didn’t know if you’d have the time or interest. What made you want to take on the challenge of doing these challenges? What is your primary goal or objective as Cookie Connection’s challenge host?
![]()
CD: I was incredibly honoured when you asked me to host the challenges. Christine, aka @Bakerloo Station, had created many fantastic challenges, so I knew I had some pretty big shoes to fill. But I was excited to take on the role because these challenges provide a wonderful opportunity for growth and learning, and for sharing of ideas. My aim is to create challenges that are fun and that motivate people to participate. I also want the challenges to inspire people to be creative and explore different techniques, so that they can improve their skills and reach their full potential as cookie artists.
![]()
JMU: What, if anything, would you like to say to those members who might be reluctant to participate in our challenges?
![]()
CD: I think we are all reluctant to try things from time to time, and for many different reasons. Our challenges are meant to be a fun way for participants to challenge themselves, and to improve upon their skills and abilities. For help with different techniques and media, our challenges include links to many informative tutorials and videos, which guide participants along, and there are inspirational images to help with the creative aspect as well. It is also wonderful to see people with a wide variety of skill levels participating in the challenges. From seasoned pros to brand new cookiers - we are all learning together.
![]()
JMU: Great goals - though you are already knocking the challenges out of the park! Onto some questions that I like to ask everyone. What do you like most about being part of the broader cookie community, and why?
![]()
CD: I like that there are so many cookiers who are so supportive of each other, and quick to offer advice or a kind word. I also like how the cookie world has grown tremendously in recent years, offering many opportunities for enterprising cookiers to flourish.
![]()
JMU: Now for the corollary of the last question . . . what do you like least about the broader cookie community, or what would you most like to change about it, and why?
![]()
CD: I think that there are too many cookiers who do not charge enough for their cookies. Sometimes, I will see such intricately decorated cookies, and think to myself that they can’t be earning more than a few dollars an hour for their work, especially after ALL of the time and costs are considered. It would be nice if all cookiers would charge what they are worth.
![]()
JMU: Agreed! To date, you’ve primarily participated in the cookie community as a creator/technician. Do you have any aspirations to try your hand at other cookie-related things – i.e., teaching, selling cookies, developing products? If so, what, and why would you like to head that way? Where do you see yourself in the cookie world three years from now?
![]()
CD: Teaching would be wonderful. But for now, I will continue to work on developing my skills to the highest level of my abilities.
![]()
JMU: And I trust that, as you continue to develop your skills, you will continue to leave us awed and inspired! Thank you again for all that you do to support Cookie Connection and its members, and for taking the time for this incredibly informative interview!
To learn more about Christine and her work, please visit her Cookie Connection portfolio and her Instagram page.
Cookie and photo credits: Sweet Prodigy

Cookier Close-ups is the place on Cookie Connection where we celebrate the change-makers of the cookie decorating world. Whether forging new enterprises, inventing novel decorating techniques, or consistently charming us with their cookie decorating prowess, each of our featured thought leaders has redefined in his/her distinctive way how we interact, create, or otherwise do business here in cookie space!
If there are other cookiers you'd really like to get to know, please post requests in this forum. We'll do our best to round them up for an upcoming Cookier Close-up! Thanks!






Comments (23)