Get Inspired with Laegwen: Gumpaste Lace and Rose Wedding Cookie


[EDITOR'S NOTE: WOO HOO! I'm thrilled to announce that Laegwen, aka Leoni Eckart, has officially joined our Cookie Connection contributors team as of this post. After she submitted two outstanding decorating tutorials to the site two months in a row, completely unprompted and out of the goodness of her own heart, I decided to see if she wanted to get a formal Cookie Connection title in exchange for all of her hard work. Fortunately for me (and us), she said "yes"! Expect to see cookie decorating tutorials from Leoni under the Get Inspired category of the blog every other month! Her posts will be focused on her personal experiments with gumpaste, royal icing, and other cookie decorating materials and methods. Enjoy!]

Summertime is wedding time! I am simply ignoring the fact that it is not summer, but has recently snowed here, and that I don’t know anyone who’s getting married this year. Once I’ve set my mind on something, I don’t allow a little reality to interfere. So I just pretend that it is summer and that someone I know is getting married, and that’s why I absolutely need to make some wedding cookies!

How about you? Suffering from reality-loss like me, or are you actually in need of an idea for cookies to give to a special couple on their special day? In either case, think lace, and roses, and pearls, and get your tools ready.

Here’s what you will need:
  • 6 (2 1/2-inch) cookies, iced in your favorite light blue (I used Wilton Color Right), thoroughly dried
  • Celboard or any other nonstick surface for rolling out gumpaste
  • White gumpaste
  • Small rolling pin
  • Magic Decor Pavoni Lace Mat (or other means to imprint a lacy pattern on gumpaste)
  • Soft sponge pad (or kitchen sponge)
  • Kitchen knife
  • Edible glue
  • Brush, for applying edible glue
  • Red gumpaste (I used Sugarflair Poppy Red)
  • Small piping tip (backside used as cutter)
  • Green royal icing, stiff consistency, with #1.5 tip and small leaf tip like Wilton #349 (I used equal parts Wilton Kelly Green and Moss Green)
  • White icing, piping consistency, with #0 tip
  • Light grey icing, bead consistency
  • Metallic silver paint (I used Rainbow Dust Metallic Light Silver mixed with vodka)
  • Small brush, for applying silver paint

 Tools

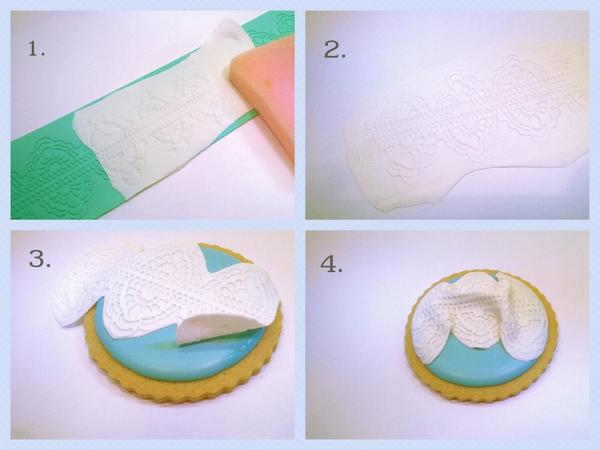
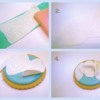
On your celboard, roll out a piece of white gumpaste as thin as possible; not quite but almost see-through. Place it on top of the lace mat, and use the sponge pad to press it into the crevices until you can clearly see the design (1). If you don’t have a lace mat, you could also use an imprinted rolling pin, real lace (as long as it is lint-free), or even slightly crinkled tin foil. Carefully peel off the gumpaste, and flip it over (2). Roughly cut out the design with your kitchen knife, and immediately place the gumpaste on your cookie, applying small dabs of edible glue with a brush where necessary and shaping folds as you go (3). Remove the excess gumpaste with your knife to get a clean cookie edge (4).

Making and Applying Lace

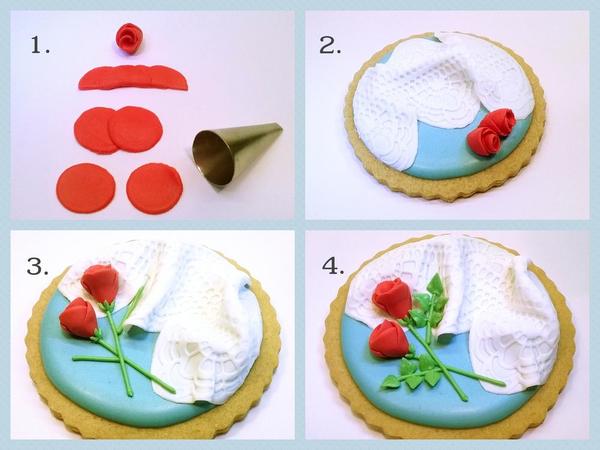
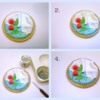
For the roses, roll out some red gumpaste as thin as the lace, and cut out small circles with the back of a piping tip. Each rose consists of two circles. If you work fast and only cut out a few pieces at a time, you can leave them in the open. If you want to cut out all of the pieces at once, you will need to store them inside some plastic wrap. Overlap the two circles, and press on the seam to secure them together. Then cut them in half. Place one half on top of the other, so the halves overlap slightly and their cut sides are aligned. Press the cut edges together, and roll up the piece to get a simple rose (1). Attach two roses toward one edge of the cookie with edible glue (2). On each rose, pipe a stem, side stem, and calyx with stiff green royal icing (3); then switch to the leaf tip to add leaves to each side stem (4).

Roses

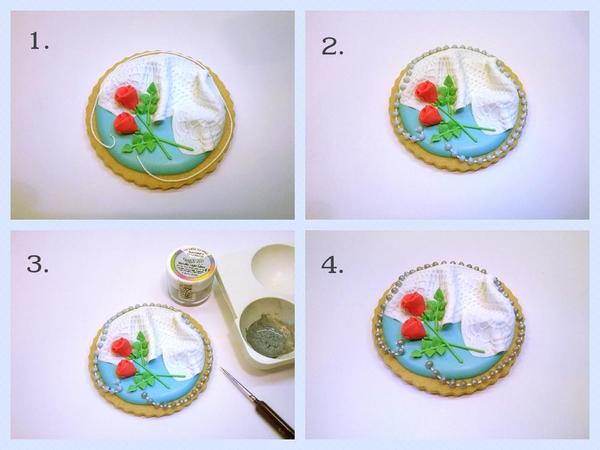
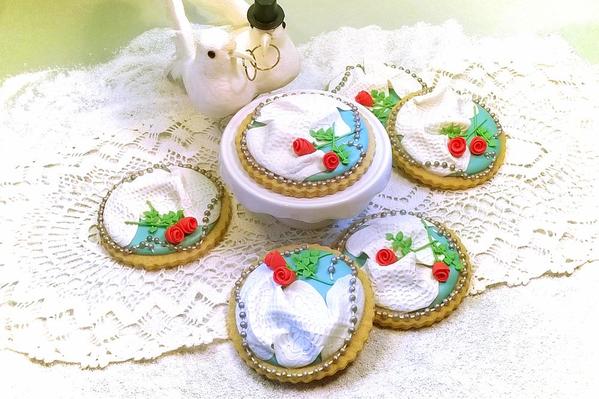
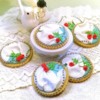
Pipe a line of white royal icing unevenly around the cookie to form the thread of the necklace (1). Let it dry somewhat before you pipe pearls in light grey icing on top (2). The pearls need to be completely dry before you can paint them. Mix silver luster dust with clear alcohol (or alcohol-based extract), and apply with a small brush (3). Your lacy, rosy, pearly wedding cookie is ready (4)!

Making Necklace

Tip: If you'd rather have a gold necklace, use light brown icing instead of light grey, and paint with gold luster dust.

Wedding Cookies - All Done!

Cookie and photo credits: Leoni Eckart

Leoni Eckart, aka Laegwen, started her baking career way before her own memory sets in, decorating Christmas cookies with her mother (at least that's what she's been told!), and has never entirely stopped puttering around in the kitchen since. Her first decorated cookies as an adult were her own wedding favors, and then, over Christmas 2014, her cookie fever went into overdrive! As of present, it shows no signs of cooling off. You can find Leoni on Facebook here, or you can reach her by email at laegwen@outlook.de.


Photo credit: Leoni Eckart

Note: Get Inspired with Laegwen is a bimonthly series of cookie decorating tutorials that follow Leoni Eckart's personal experiments with gumpaste, royal icing, and other cookie decorating materials and methods. This article expresses the views of the author, and not necessarily those of this site, its owners, its administrators, or its employees. To read all of Leoni's past Get Inspired tutorials, click here. And to catch all of our Cookie Connection tutorials, click here.

Attachments

Images (5)
  • Tools: Photo by Laegwen
  • Making and Applying the Lace: Cookie and Photo by Laegwen
  • Making the Roses: Cookie and Photos by Laegwen
  • Making the Necklace: Cookie and Photos by Laegwen
  • Wedding Cookies - All Done!: Cookies and Photos by Laegwen

Add Comment

Comments (33)

Newest · Oldest · Popular

so nice to know more tutorials are coming!

And I actually have a wedding coming up in a few months and slowly need to start thinking about cookies for it. You are an inspiration Leoni!

Congrats Leoni! I love all of your works. And I'm happy you have become officially a member of the Cookie Connection team. Thank you for your useful tutorials. ❤️❤️❤️❤️

Congratulations Leoni!!!! I've always enjoyed looking at your cookies and now to have tutorials, all I can say is WOO HOO!!!! Thank you so very much for sharing your knowledge.

Julia M. Usher posted:

So glad to have you on board! Love the clarity of this post!

Thanks, Julia! It was so much fun doing this tutorial, and I'm proud to be an official contributor now

Manu posted:

Congrats, Laegwen! Glad to hear that we will see more and more of your tutorials! I loved this one and actually is perfect as May is a wedding month in Italy.

Thanks, Manu!

I'm glad you like it, and May is also wedding time in Germany. Must be because the first true warm days just make people go crazy

Lucy (Honeycat Cookies) posted:

Lovely post - and beautiful cookies! I've nearly always shied away from gumpaste, but that delicate look is so pretty. I'm really looking forward to seeing what you do in the future!

Thanks, Lucy!

But I can hardly imagine you shying away from anything *lol*

Liesbet posted:

so nice to know more tutorials are coming!

And I actually have a wedding coming up in a few months and slowly need to start thinking about cookies for it. You are an inspiration Leoni!

Thanks, Liesbet! I kind of like the idea of being an inspiration - better than being a pain. Looking forwards to see what your wedding cookies will be like!

Magadiuz posted:

Congrats Leoni! I love all of your works. And I'm happy you have become officially a member of the Cookie Connection team. Thank you for your useful tutorials. ❤️❤️❤️❤️

Thanks so much. I am also happy and rather excited.

Glad you like the tutorial

Dolce Sentire posted:

Congratulations Laegwen! Happy to see you here�� Welcome to the team!

Awesome tutorial and beautiful cookies! Looking forward to see more! 

Thanks for your kind words and your warm welcome. I'm also looking forwards to your next tutorial!

Joanie posted:

Congratulations Leoni!!!! I've always enjoyed looking at your cookies and now to have tutorials, all I can say is WOO HOO!!!! Thank you so very much for sharing your knowledge.

Thanks, Joanie, that is so encouraging! I'll try not to disappoint

As to be expected, wonderful. 

You know, with snow still on the ground these cookies are also perfect for a winter wedding.  Crisp blue sky, beautiful patterns in the snow and winter roses. Works either way. Clever girl!

Pip

Cookies Fantastique by Carol posted:

I LOVE that you are doing tutorials Leoni!! Your work is beyond spectacular and an inspiration to all . Hugs....

Thanks, Carol! I really enjoy making tutorials and if I can inspire you in addition, that enhances the experience

pip posted:

As to be expected, wonderful. 

You know, with snow still on the ground these cookies are also perfect for a winter wedding.  Crisp blue sky, beautiful patterns in the snow and winter roses. Works either way. Clever girl!

Pip

Thanks a lot.

I guess you are right, they go well with winter, too. Maybe all that snow while making them had an influence after all

Congratulations Leoni on becoming an official contributor for Cookie Connection.  I am looking forward to your forthcoming tutorials. You do beautiful work and I am glad we were able to meet in Hamburg.  Good luck with your projects.

Gulnaz posted:

Congratulations Leoni on becoming an official contributor for Cookie Connection.  I am looking forward to your forthcoming tutorials. You do beautiful work and I am glad we were able to meet in Hamburg.  Good luck with your projects.

Thanks a lot, Gulnaz!

BTW, will you be coming to the Cake World in Hannover? I haven't made up my mind so far...

swissophie posted:

Well, never worked with gumpaste... looks similar to fondant? Does it taste as bad? The dimensional look of these cookies is spectacular!!!

It's not quite like fondant. It is more stable (you could never roll fondant that thin) and dries rockhard. It tastes quite the same, though. It is mainly fondant with CMC added (which is the sole ingridient of Colgate Haftpulver, by the way)

Laegwen posted:
swissophie posted:

Well, never worked with gumpaste... looks similar to fondant? Does it taste as bad? The dimensional look of these cookies is spectacular!!!

It's not quite like fondant. It is more stable (you could never roll fondant that thin) and dries rockhard. It tastes quite the same, though. It is mainly fondant with CMC added (which is the sole ingridient of Colgate Haftpulver, by the way)

Thanks so much for that, Leoni!

These are soooo pretty and the pearls are very clever.  I am just beginning to experiment with fondant and gum paste, so your tutorial was perfectly timed for me.  Thanks for sharing your imagination.  Best of luck with everything you do.

Jo Duffe posted:

These are soooo pretty and the pearls are very clever.  I am just beginning to experiment with fondant and gum paste, so your tutorial was perfectly timed for me.  Thanks for sharing your imagination.  Best of luck with everything you do.

Thanks a lot!

You can do neat things with gumpaste and fondant, though I'd advise to keep the quantity on each cookie low - the taste is a bit erks

Laegwen posted:
Gulnaz posted:

Congratulations Leoni on becoming an official contributor for Cookie Connection.  I am looking forward to your forthcoming tutorials. You do beautiful work and I am glad we were able to meet in Hamburg.  Good luck with your projects.

Thanks a lot, Gulnaz!

BTW, will you be coming to the Cake World in Hannover? I haven't made up my mind so far...

Hi Leoni. Good to hear from you. I don't know about Hannover. We are planning to go there, but lately we have been traveling a lot. I don't know if I have time to make somethings. Maybe we will see each other there.��

Post
×
×
×
×
Link copied to your clipboard.
×