
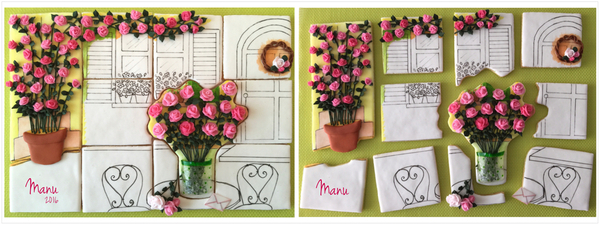
My tutorial for this month is focused on honing piping skills: basketweave, rose buds, and leaves, in particular. All of these things just require practice - and sometimes more practice! ![]() When I was only a beginner myself, I learned to pipe roses by participating in Cookie Connection's Practice Bakes Perfect Challenge #16 (A Dozen Roses) back in 2016. At that time, royal icing was truly a challenge for me, and I could barely flood a cookie. My entry, pictured below, is where I landed after having piped hundreds of roses just to get the 50 flowers on it.
When I was only a beginner myself, I learned to pipe roses by participating in Cookie Connection's Practice Bakes Perfect Challenge #16 (A Dozen Roses) back in 2016. At that time, royal icing was truly a challenge for me, and I could barely flood a cookie. My entry, pictured below, is where I landed after having piped hundreds of roses just to get the 50 flowers on it.
For any one rose in this cookie composition, I had at least five roses I didn't use! So if I could learn to pipe roses, you totally can too!
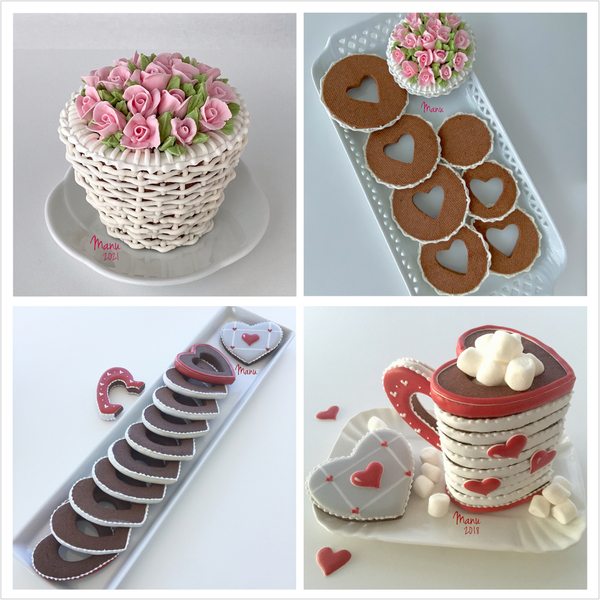
Also, this project may look like it uses contoured 3-D cookies, but it is actually comprised entirely of simple, stacked 2-D cookies with just their edges decorated, making it an ideal beginner project that looks quite advanced! This stacking method is one of my favorite ways to create dimensional projects, and to arrange and serve cookies. Because the cookies aren't glued together with icing, just stacked into a basket shape, they're super easy to separate and serve. This same stacking concept was the basis of my previous Valentine’s Cookie Mug tutorial in 2018, which is pictured below.
So without further ado, pick up that pastry bag, start practicing your piping, and surprise your Mom with this unique gift!
- Your favorite cookie dough
- 5 nested round cookie cutters (See dimensions in Step 1a, below.)
- 1 (3.5 x 3.5-cm/1 3/8 x 1 3/8-in) heart cookie cutter
- Sugarcraft knife
- Royal icing:
- White thick piping-consistency, in pastry bags with PME #1 tip or equivalent (for outlining) and Wilton #3 tip or equivalent (for basketweave and beaded border)
- White flood-consistency, in tip-less pastry bag with opening equivalent to PME #3 tip
- Pink thick-consistency, in pastry bag with Wilton #104 petal tip or equivalent. (I suggest you watch this video by @Julia M. Usher and practice piping roses beforehand.)
- Green stiff-consistency, in pastry bag with Wilton #352 leaf tip or equivalent
- Toothpicks (or rose nails)
Step 1: Cut, bake, and score cookies
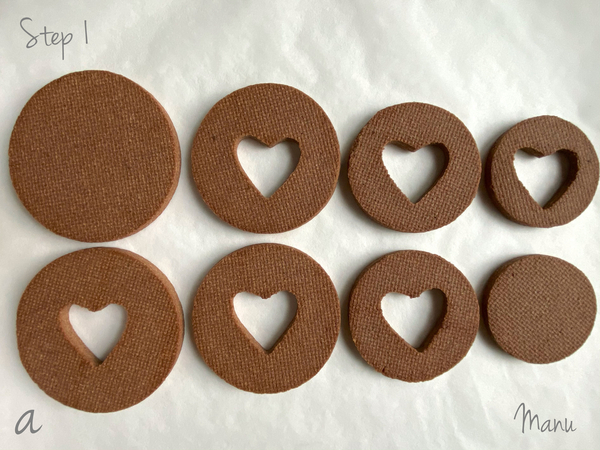
a. Roll your cookie dough to a thickness of 0.6 centimeter (1/4 inch), and cut out eight round cookies, two of each of the following dimensions:
- 2 (9-cm/3 1/2-in) rounds
- 2 (8-cm/3 1/8-in) rounds
- 2 (7-cm/2 3/4-in) rounds
- 2 (6-cm/2 3/8-in) rounds
Use the (3.5 x 3.5-cm/1 3/8 x 1 3/8-in) heart cookie cutter to cut out a heart from the center of each cookie except for one of the biggest rounds and one of the smallest rounds. The big heart-less round will become the basket top, and the small heart-less one will become the base. The hearts will be an added surprise when the cookies are disassembled. You can even fill the inner area they create with a message or other small goodies. Bake the cookies according to your recipe, and let them cool completely.
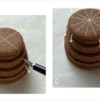
b. Stack the cooled cookies to form a sort of pyramid, and use a sugar craft knife to score lines along the edge of each cookie, all the way down the pyramid. Follow the imaginary perpendicular lines on the top cookie shown in Photo 1b. (I used a sugar craft knife because my cookie dough is dark. A food marker can be used with light cookie dough.)
c. Now score two more lines, equally spaced, in each of the four areas between the lines you scored in Step 1b. Again, these lines should run all the way down the pyramid and be equally spaced, as they will be used to guide the basketweave pattern that will be piped along each cookie side in the next step.

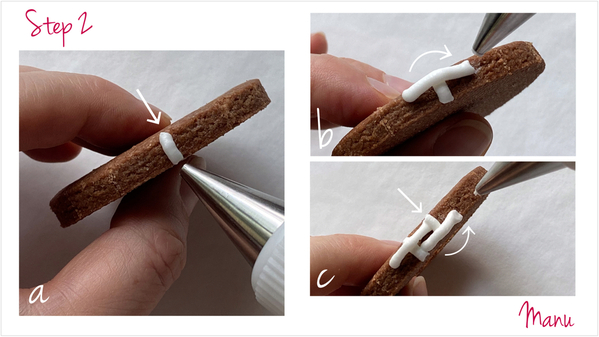
Step 2: Pipe basketweave pattern on cookie sides
a. Work on one cookie at a time. Using white piping-consistency icing and a Wilton #3 tip (or equivalent), pipe a vertical line over one of the lines you just scored in Step 1.
b. Now pipe a horizontal line over the line you just piped. The horizontal line should cover the top half of the cookie side, and also start and stop at the midpoint between the vertical piped line and the scored marks to either side.
c. Pipe a vertical line over the end of the horizontal line you just piped in Step 2b. Then pipe another horizontal line over this vertical line. It should cover the bottom half of the cookie side and span from the first vertical piped line to the midpoint between the second vertical piped line and the adjacent scored line.
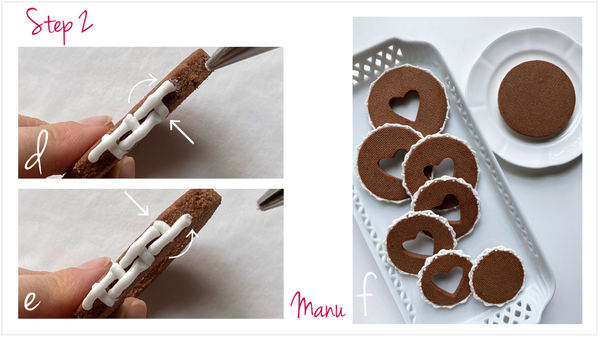
d and e. Continue in this fashion by piping another vertical line to cover the end of the horizontal line piped in Step 2c; then repeat Steps 2b and 2c until you have covered the entire cookie side with basketweave. Let the icing dry.
f. Repeat Steps 2a to 2e for all of the cookies except for the top basket cookie (the biggest round without the cutout heart), which will be decorated in the next step.
Step 3: Decorate top basket cookie
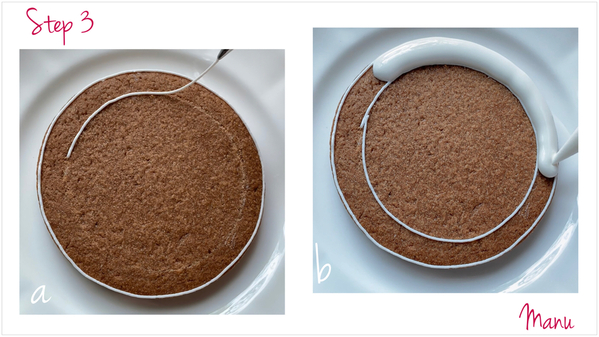
a. Using the same white piping-consistency icing now with a PME #1 tip (or equivalent), outline the top edge of the top basket cookie. Pipe another circle inside the first outline at a distance of about 1.5 centimeters (5/8 inch) from the edge. Tip: Use a (6-cm/2 3/8-in) round cookie cutter to score a tracing guide on the cookie surface.
b. Using flood-consistency icing and a PME #3 tip (or equivalent), flood the space between the two outlines to get a ring. Let the icing dry.
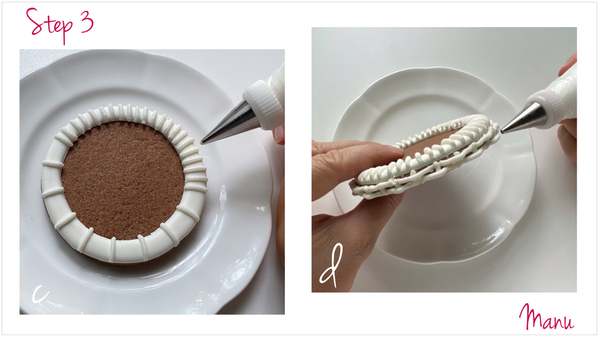
c. Change the tip on the pastry bag with white piping-consistency icing again, this time to a Wilton #3 tip (or equivalent). Pipe a series of lines that cover the ring surface, as depicted below. Let the icing dry.
d. Now, continuing with the same icing and tip, pipe a basketweave pattern around the side of the cookie, as was done in Step 2 on the other cookies.
e. Finish the gap between the basketweave and the top ring with a beaded border, again using the same icing and tip. Start by piping a bead, and then release pressure to create a tail on the bead. Move the tip slightly back to cover some of the tail just piped, and pipe another bead and tail. Keep piping in this fashion all around the cookie.
f. Using the same icing once again, now with a PME #1 tip (or equivalent), outline a circle in the center of the cookie at a distance of about 1.5 centimeters (5/8 inch) from the inner part of the ring; then flood it with white flood-consistency icing using a Wilton #3 tip (or equivalent). Let the icing dry. (Note: The added circle in the center will elevate the rose buds we set on top of it, making them sit a bit higher than the surrounding ones, and creating a more rounded, prettier bouquet shape.)
The ring and the circle don’t need to be perfectly round, as everything will be covered with the rose buds piped in the next step.
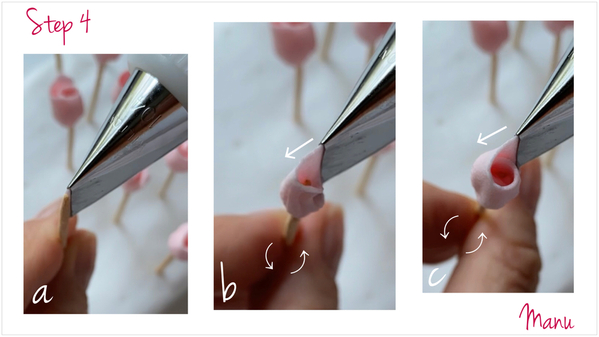
Step 4: Pipe rose buds on toothpicks
After you've watched Julia M. Usher’s video and practiced roses using a small tip (#101 or #102), it should be very easy to make rose buds using a toothpick and a bigger tip (Wilton #104) as I did here, as you should have developed some muscle memory. For this project, I used quite a large number of buds (about 17), even of this big size. Each bud is about 2 centimeters (3/4 inch) tall and 1.5 centimeters (5/8 inch) wide. Of course, you can use a smaller tip for more delicate flowers, but, in that case, you will need more than 17 buds to fully fill the top basket cookie.
a. Using pink stiff-consistency icing and Wilton #104 tip (or equivalent), place the tip vertically (narrow end up) against the side of the toothpick, and start piping a ribbon around the toothpick. The icing should stick to the toothpick.
b and c. Keep applying pressure to the pastry bag while spinning the toothpick between your fingers so that the icing ribbon curls around the toothpick in the shape of a bud. Continue in this fashion until you get a “fat” bud, somewhat smaller than the dimensions noted above (as more petals will be added to it in Steps 4d through 4f).
Repeat Steps 4a and 4b to make about 17 buds. Let the icing set with the toothpicks still inserted in each rose.
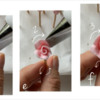
d, e, and f. Working on one bud at a time, pipe three additional petals around the bud. To pipe a petal, place the lower part of the tip (the fat end) against the lower part of the bud. Push the icing out of the pastry bag to start it flowing, and guide it into a small arch shape, making sure that the icing attaches to the bud sides. To pipe a petal (or flower) that is not open, keep the tip upright and parallel to the bud. Release pressure on the pastry bag when you reach the end of the arch; then rotate the toothpick before piping the next petal to make sure you have a clear line of sight. Repeat to pipe three petals on all 17 buds piped in Steps 4a and 4b.
Let the rose buds dry completely. Gently rotate the toothpicks to remove them from the flowers.
Step 5: Arrange rose buds on top basket cookie
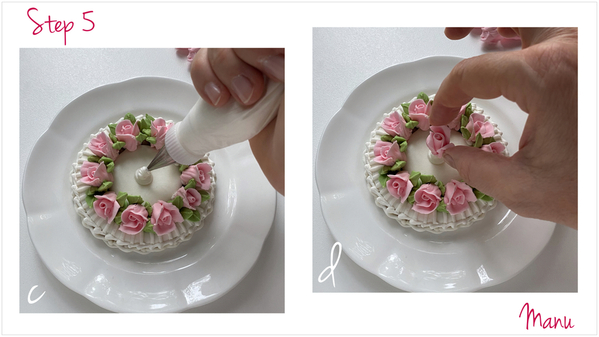
a. Pipe a dot of white piping-consistency icing (for "glue") in the un-iced area on the top basket cookie.
b. Place a rose bud on the white icing; then use green piping-consistency icing and a Wilton #352 leaf tip (or equivalent) to pipe one or more leaves next to the flower. Press the icing into the base of the bud to anchor it, and then release pressure as the leaf begins to take shape so that it tapers to a fine point at the end.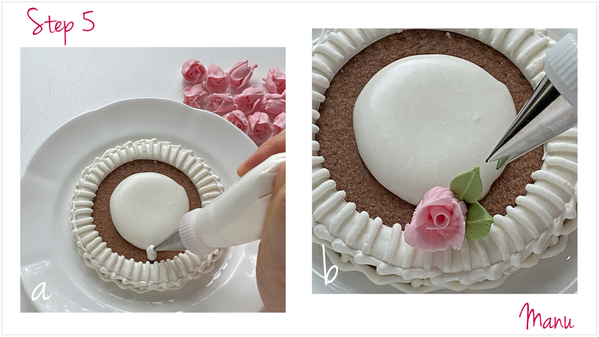
c. Continue gluing roses and piping leaves around them until you have covered the entire un-iced ring. Then pipe a dollop of icing in the center of the cookie . . .
d. And place a rose bud on that dollop.
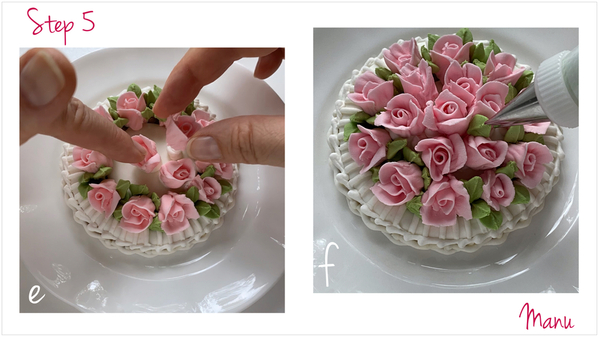
e. Fill the gap between the ring of rose buds and the central bud with another ring of buds. (In retrospect, I probably should have first glued the second ring of buds before attaching the central one, but I was able to easily move the buds while the icing glue was still wet.)
f. Randomly pipe leaves, as described in Step 5b, between the buds, once again using green piping-consistency icing and a Wilton #352 leaf tip (or equivalent). Make sure to fill big gaps between the buds and to balance the green leaves across the cookie top.
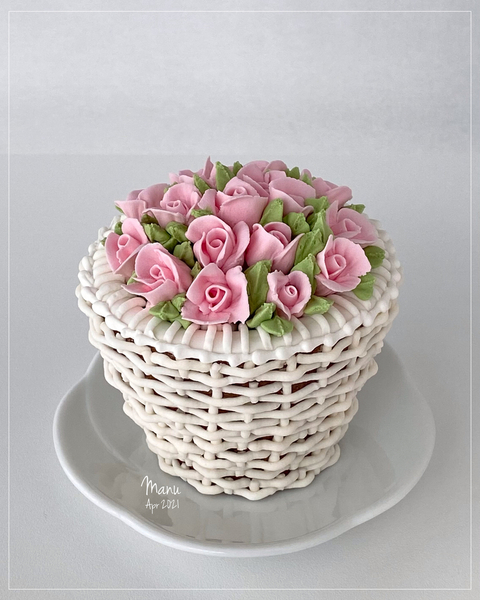
And now that all of the cookies are decorated . . .
. . . let’s stack them into a 3-D basket shape! Ta da!
I leave you with a quick video that shows how I stack the cookies. The key is to line up the vertical lines on each cookie as best as possible.
Ciao, Manu 🌸🍃

Manuela Pezzopane, affectionately called Manu by her friends and family, is a fan of everything handmade, and professes to have tried every possible hobby. However, it wasn’t until the end of 2014, when an American friend invited her to a Christmas cookie exchange, that she first discovered decorated cookies. In 2015, after watching Julia M. Usher's videos and signing up on Cookie Connection, Manu finally attempted her own. Since then, cookie decorating has become Manu’s passion. You can follow Manu on Facebook and Instagram, or email her at manubiscottidecorati@gmail.com.
Photo and cookie credits: Manuela Pezzopane
Note: Made by Manu is a Cookie Connection blog feature written by Manuela Pezzopane, where each month she shares the method behind a magical cookie of her own making. This article expresses the views of the author, and not necessarily those of this site, its owners, its administrators, or its employees. To read all of Manuela's past Made by Manu tutorials, click here. And to see all of Cookie Connection's tutorials, click here.










Comments (14)