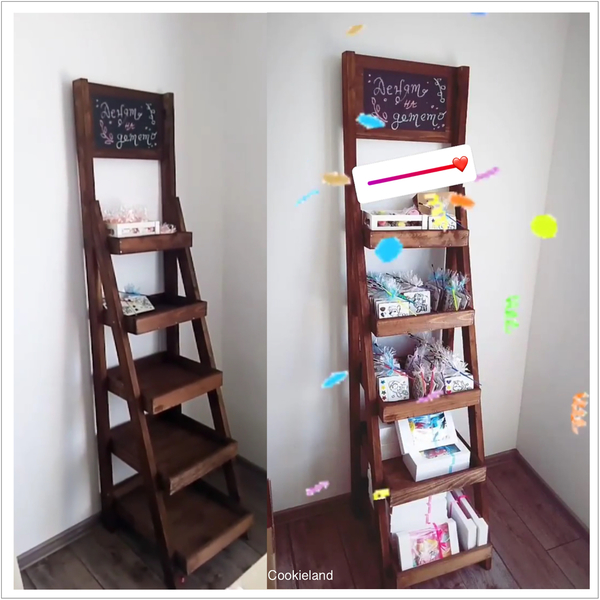
 The chalkboard shelf is a popular item among cookie decorators. It is used to display cookies at farmers' markets, during pop-up sales at home, during birthday parties, and so on. Here are a couple of pictures of a real display shelf with cookies, kindly shared with us by @Cookieland, aka Zornitsa Nikiforova, from Bulgaria. The message on the chalkboard says “Happy Children’s Day”. Now, guess what?! We're going to cookie something very similar!
This project is easy and perfect for practicing 3-D cookie skills! It can be used as a centerpiece, during coffee with friends, or as a cake topper. It can be customized to the event or festivity just by changing the cookies on the shelves and/or the message on the chalkboard. The piece measures roughly 10 x 20 centimeters (4 x 8 inches) - just the right dimensions to ensure a sturdy structure with enough space to display several mini cookies. However, it is a little chunky, so to make it more graceful, I trimmed the upper edges with a plaque cutter and gave the chalkboard sign a plaque shape.
- Cookie dough of your choice
- Rolling pin with guides, similar to this pin
- Templates and project dimensions (in "Attachments" under "Files" at the end of this post)
- Parchment paper
- Sugarcraft knife or equivalent
- Ruler
- Plaque cutter (I used one from this set.)
- Scissors
- 1 medium (9 x 8-cm/3 9/16 x 3 1/8-in) scalloped (or plain) rectangle cookie cutter
- 1 medium-large (10.5 x 8-cm/4 1/8 x 3 1/8-in) scalloped (or plain) rectangle cookie cutter
- Silicone baking mat
- Zester or Microplane tool
- Royal icing:
- Brown very thick-consistency (@Julia M. Usher calls it “glue”; see her video for reference), with parchment cone
- Dark grey thick flooding-consistency, in tip-less pastry bag with opening equivalent to PME #1 tip (for outlining) and PME #3 tip (for flooding)
- Paint brushes: flat and fine liner
- White gel food coloring
Step 1: Roll, bake, and cut cookies
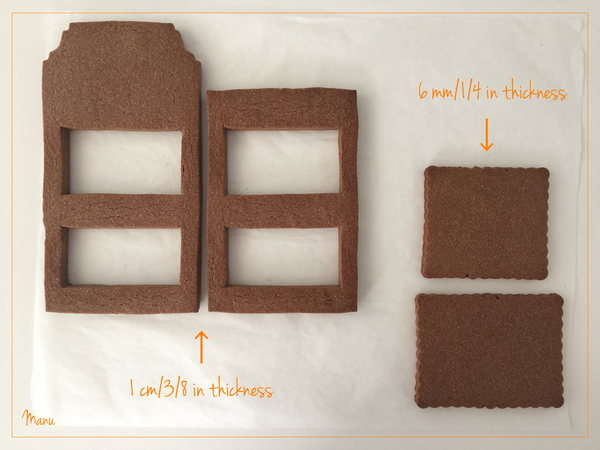
1-cm/3/8-in thick hand-cut cookies:
- 2 cookie frames (Again, see "Attachments" for the templates.)
- 1 medium (9 x 8-cm/3 9/16 x 3 1/8-in) scalloped (or plain) rectangle cookie
- 1 medium-large (10.5 x 8-cm/4 1/8 x 3 1/8-in) scalloped (or plain) rectangle cookie
I used scalloped cutters to add interest to the thinner shelves, but you could use plain, straight-edged cookie cutters just as well. It's the overall dimensions of these two cookies that's important to preserve in order to ensure best fit with the frames in the end.
Now, let’s talk about how to cut the two frames that make up the structure.
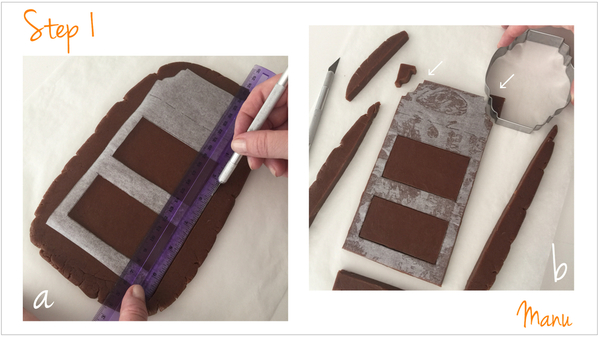
a. Print the frame template, and trace it on parchment paper. Lay the template on rolled, chilled cookie dough of the proper thickness (1 centimeter or 3/8 inch, in this case), and use a sugar craft knife to cut around the frame. A ruler will help to cut straight lines and to keep the parchment paper in place while you cut.
b. Use a plaque cutter to trim the two upper frame corners into more decorative shapes. Just be sure to trim so the corners end up symmetrical mirror images of one another. Also cut out the two "windows" in the middle of the frame, which will later hold the two shelf cookies.
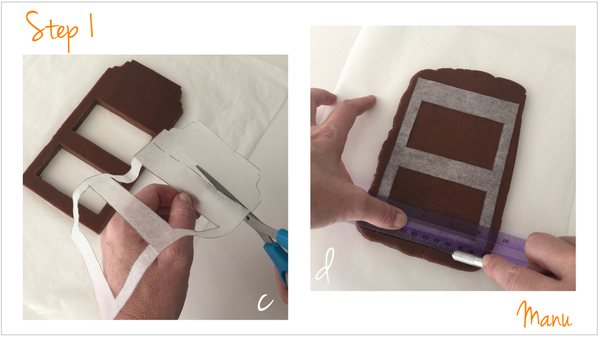
c. Remove all excess dough (though be sure to save it for another use). Now, remove the template from the cookie dough, and cut along the dotted line to get the template for the rear frame.
d. Lay the new template on another piece of rolled, chilled cookie dough of the same thickness. With a sugar craft knife and a ruler, cut out the rear frame including the two windows in the middle.
Now, roll out some dough, though this time to a thickness of 6 millimeters or 1/4 inch, and cut out two shelves of the dimensions indicated above.
Transfer the two frames and two shelves to a baking sheet, and bake according to your recipe's instructions. To minimize spreading, I usually chill the cut cookies once again before baking. I then transfer them directly on a silicone baking mat to the cookie sheet to prevent misshaping. Cool the baked cookies completely before proceeding to the next step.
Step 2: File rear frame and assemble structure
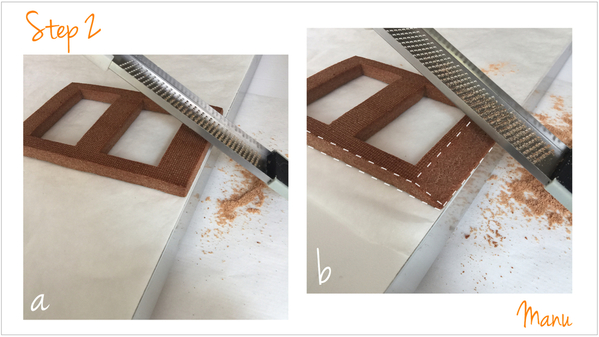
a. Before assembling the structure, file the top edge of the rear frame. Turn over the cookie, and lay it face down on a table. Push the cookie very close to the table edge.
b. Hold the cookie in place with one hand, and, with the other, hold your zester (or Microplane tool) at about a 30-degree angle to the tabletop. File the full length of the cookie edge. Mitering (filing at an angle) in this way will ensure that the top edges of the frame come together at an acute (very sharp) angle.
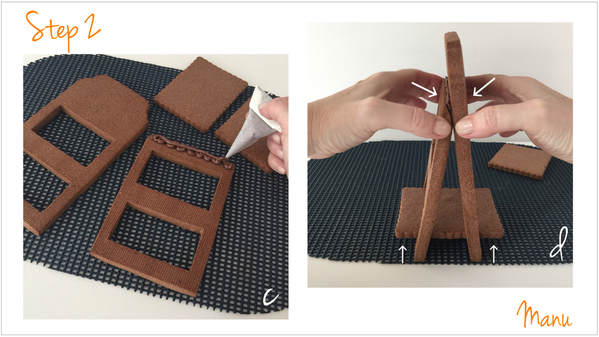
c. Place the cookies on a silicone mat so they do not slide during the assembly process. Generously pipe thick brown icing "glue" all along the edge you just filed.
d. Now, glue the two frames together so that they form a sharp angle at the top. Before the icing glue has a chance to set, insert the bigger shelf cookie through the lower windows cut into the front and rear frames. However, don't glue the shelf in place yet. Just check to be sure it sits parallel to the tabletop and sticks out about 2 centimeters (3/4 inch) from the frame edge on each side. It's important to have at least this much space in order to fit cookies on the shelf. And, of course, the shelf should be level so that it can hold cookies without them sliding off! If the spacing isn't quite enough or the shelf isn't exactly parallel, no worries. You still have some time before the icing dries to adjust the angle at the top, so that everything ends up looking just as it should.
e. Once you've got the frames positioned where you want them, use a flat paint brush (or clean fingertip) to gently push the icing glue into the seam between the frames.
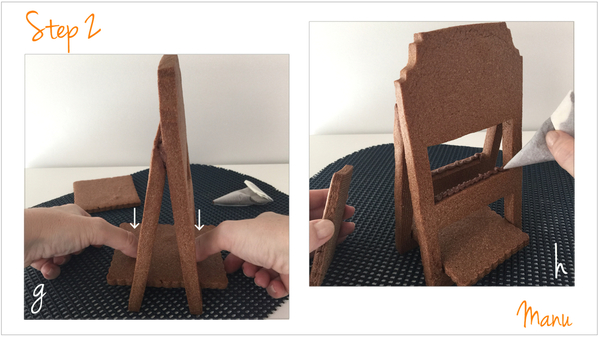
f. Remove the shelf cookie from the structure, and pipe some glue along the lower edge of each of the lower windows.
g. Once again insert the bigger shelf through the lower windows and center it within them; then set it lightly on top of the icing without yet pressing it into place. Make sure the shelf is still parallel to the tabletop, and that it sticks out beyond the frames as described in Step 2d. Adjust its placement as needed, and then gently press it into the glue underneath.
h. Pipe some more glue along the lower edges of the upper windows in each frame.
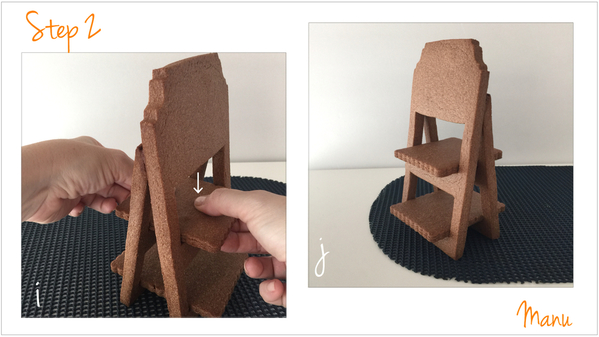
i. Insert the smaller cookie shelf just as you inserted the larger one, adjust its position as needed, and then gently push it into the glue. If the lower shelf is parallel to the tabletop, then this one should be parallel as well. Just check that it sticks out the same length on each side of the structure.
j. Your display shelf cookie is almost ready! Let the icing glue dry completely.
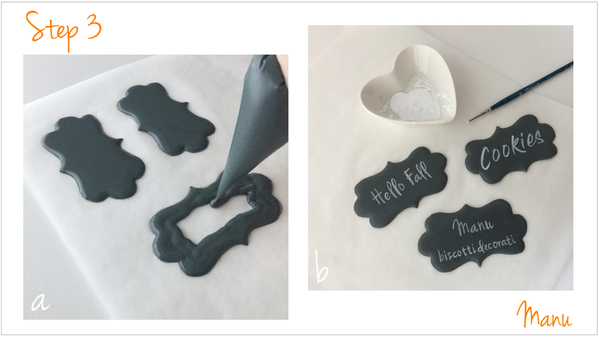
Step 3: Pipe and paint chalkboard royal icing transfers
I prefer to make the chalkboard signs as royal icing transfers (i.e., to pipe them on parchment paper and then attach them to the cookie once they are dry) rather than to pipe them directly on the cookie structure. This way, if I am undecided about what to write on the sign, or if I should make a mistake with the writing, I have more flexibility because the sign hasn't been committed to the cookie! So, let's talk about how I make these transfers. You'll only need one for this project, but I like to make a few for options - and just in case!
a. First, trace the chalkboard template on parchment paper, as many times as you want. (Again, the template is in "Attachments" at the end of this post.) Outline the shape(s) with dark grey thick flooding-consistency royal icing in a pastry bag with an opening equivalent to a PME #1 tip. Then cut a bigger opening, equivalent to a PME #3 tip, and flood the shape(s) using the same icing. Let the transfer(s) dry completely.
b. Use white gel food coloring and a fine liner paint brush to write any message you like on each chalkboard. Once the coloring dries, it will look more sheer, making the message look as if it was written with chalk. I diluted the food coloring with a drop of water to allow the paint brush to flow easily over the icing surface and to make the coloring even more sheer once dried. I used a projector to help paint my lettering, but nice handwriting doesn’t really matter - it is a chalkboard after all!
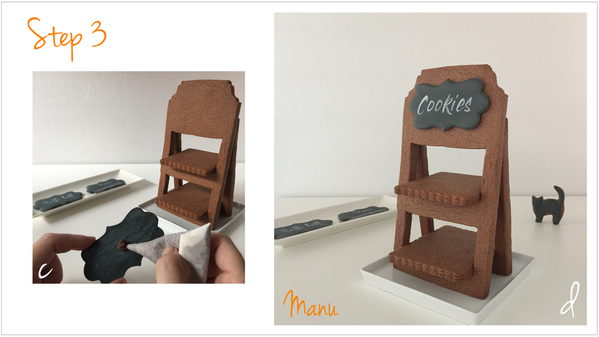
c. Pick the chalkboard sign with your favorite message, and pipe a dot of icing glue on the back.
d. Attach the sign to the top front of the cookie structure - and, ta da, you're done! If you want to see the black cat photobombing my picture, please watch the video at the end of the tutorial for some added fun.
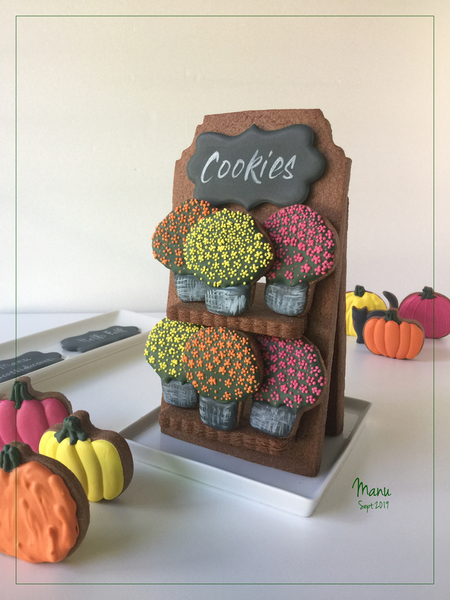
And now, let’s add the vibrant colors of autumn with some potted plants! You can read more about how to make my mini mum cookies in Step 2 of my Connection Connection Fall Cookie Platter tutorial from September 2017.
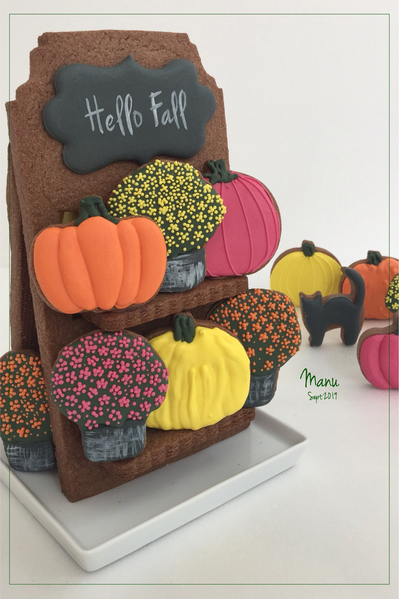
Unfortunately, I chipped the chalkboard sign with my name on it, but thanks to the signs being royal icing transfers, I had another option ("Hello Fall") to use . . .
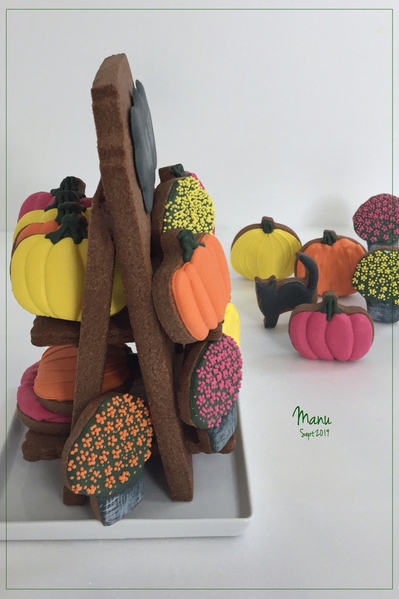
And, last, a picture of the side to show you how many mini cookies can be stored on the shelves. More than enough for coffee with friends!
I hope to have inspired you to try this project. If so, please show me what you make by sharing your creations in the "Clips" section of this site and also in the comments below!
After this just-for-fun video, that's all I have for this month! Enjoy, and be sure to stay tuned long enough to see the cat photobombing!
Ciao, Manu 🎃🍁🍃🍂


Photo and cookie credits: Manuela Pezzopane
Note: Made by Manu is a Cookie Connection blog feature written by Manuela Pezzopane, where each month she shares the method behind a magical cookie of her own making. This article expresses the views of the author, and not necessarily those of this site, its owners, its administrators, or its employees. To read all of Manuela's past Made by Manu tutorials, click here. And to see all of Cookie Connection's tutorials, click here.






Comments (25)