
This month’s tutorial is only about royal icing transfers. As a reminder, a royal icing transfer is a royal icing decoration that has been piped onto some substrate other than a cookie - usually acetate, parchment paper, or silicone. Once the icing has dried, the decoration is removed from the substrate and then transferred onto a cookie (which is where the "transfer" part comes from). However, in this tutorial, I'm not going to put the decoration(s) on a cookie. Instead, I'm going to assemble a few into a 3-D snowflake!
What's the purpose of making a 3-D royal icing snowflake, you ask? Good question! Fun and piping practice are my immediate answers. Of course, the snowflake is totally edible, so it can certainly be placed on a cookie and eaten, or even melted in a cup of hot cocoa. I can also imagine it on a table as a decoration or place card, or as an ornament hanging from a Christmas tree or other centerpiece.
As a beginning cookie decorator a few years back, I remember struggling with royal icing transfers. My flood icing was too thin, so my transfers not only cratered, but they also took forever to dry. I didn’t have the patience to wait until they were completely dry before removing them from the parchment paper, so the small details broke all too readily, and I found myself having to start all over on far too many occasions. Using a thick flood-consistency royal icing and a fan or dehydrator to accelerate the drying process will surely make you more successful with your transfers!
- Templates (See "Attachments" under "Files" at the end of this post.)
- Parchment paper or acetate
- Tape
- Royal icing:
- White piping-consistency, in pastry bag with coupler and PME #1 and #2 tips (or equivalents)
- White thick flood-consistency, in tipless pastry bag with opening equivalent to Wilton #2 tip
- Food-safe soft, flat surface (i.e., silicone mat or stack of paper towels)
- Standard-size pastry tips, for props
Step 1: Create royal icing snowflake transfers
For this project, you first need to create two snowflake transfers and four half-snowflake transfers that will later get assembled into a fully 3-D snowflake. Each snowflake transfer measures about 6.4 centimeters (2 1/2 inches) in diameter.
a. Download and print out my snowflake templates. (Again, see "Attachments" under "Files" at the end of this post.) Tape the template page to your work surface.
b. Place a piece of parchment paper (or acetate) over the template page, and tape it to your work surface as well.
c. Use white piping-consistency royal icing and a PME #1 tip (or equivalent) to outline the two snowflakes and the four half-snowflakes by tracing over the templates.
d. Flood the interior of each snowflake and half-snowflake using white thick flood-consistency royal icing and a Wilton #2 tip (or equivalent).
e. Let the icing dry completely before attempting to remove the transfers from the underlying parchment paper. Again, a fan or dehydrator will accelerate the drying process.
f. Once the icing is completely dry, the transfers should pop off the parchment paper quite easily. If they don't, be sure to peel the parchment paper away from the transfers; do not tug on the transfers, or you will likely break them. As another safeguard against breakage, I carefully removed the tape from the parchment paper and cut out each snowflake (while still on the parchment paper) so that I could remove one snowflake at a time.
g. These snowflake transfers are pretty sturdy, but make sure you handle them with care. And perhaps even make a few extra!
Step 2: Assemble transfers into two 3-D half-snowflakes
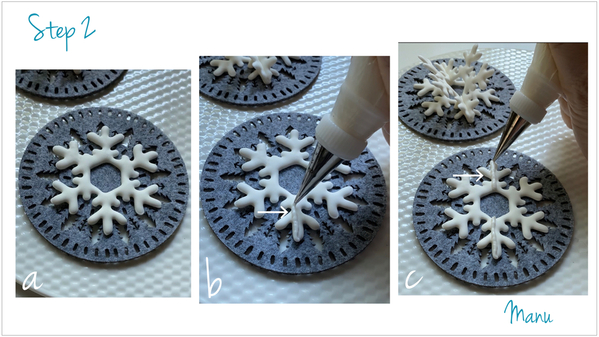
a. Place a snowflake transfer, right side up, on a soft surface, and ideally one that is food-safe if you plan to eat the snowflake later. I placed mine on a felt coaster, which is not food-safe per se. A silicone mat and a stack of paper towels are two food-safe alternatives that will work just fine.
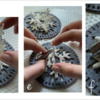
b. and c. Using white piping-consistency royal icing and a PME #2 tip (or equivalent), pipe two lines through the middle of the snowflake transfer. (The 3-D half-snowflake in the background is there to show you where we’re headed in this step.)
d. Place the straight edge of one of the two half-snowflakes on the fresh icing you just piped. (Again, the right side of the transfer should face up.) The fresh icing will be the "glue" that keeps the pieces together. Position the half-snowflake at roughly a 60-degree angle to the snowflake (or work surface).
e. Keep holding the half-snowflake with one hand. Imagine the snowflake as a clock, and place a pastry tip at the nine-o’clock position to prop the half-snowflake at the intended 60-degree angle.
f. Initially, I wasn't sure what to use as a prop, but this standard-size pastry tip turned out to be perfect! It not only keeps the half-snowflake in place, but it also allows for the half-snowflake to lean at just the right angle!
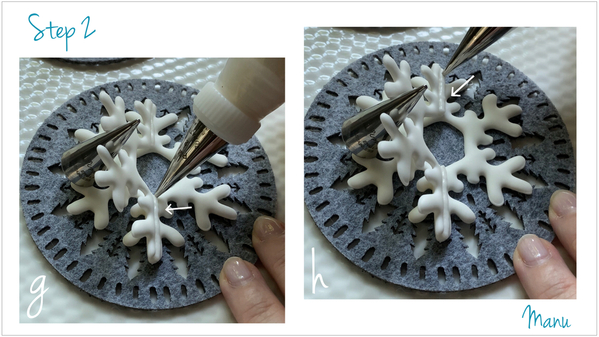
g. and h. Pipe two more lines through the middle of the same snowflake, again using white piping-consistency royal icing and a PME #2 tip (or equivalent).
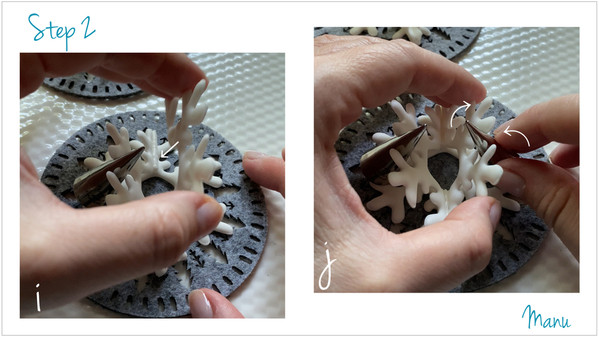
i. Set a second half-snowflake transfer on the fresh icing, just as before. Position it at a 60-degree angle to the other side of the snowflake by propping with a pastry tip at the three-o’clock position.
j. Before the icing dries, adjust the props as needed to ensure that the 3-D half-snowflake is symmetric (i.e., so that the half-snowflakes are at the exact same angle relative to the snowflake). Let the icing dry completely.
Repeat Steps 2a through 2j with the remaining snowflake and two half-snowflakes to create another 3-D half-snowflake.
Step 3: Assemble two 3-D half-snowflakes into one 3-D snowflake
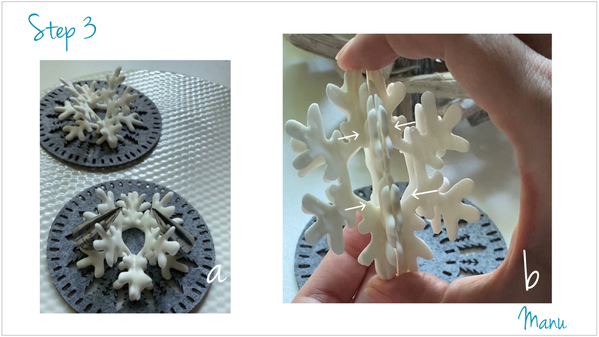
a. Once the icing is fully set, carefully remove the pastry tips from each 3-D half-snowflake.
b. Flip over one of the 3-D half-snowflakes, and while holding it upright, pipe some dots of white piping-consistency royal icing on its back side. (Unfortunately, I don’t have a picture.) Take the other 3-D half-snowflake, and gently press its back side into the icing glue just piped.
Carefully set the assembled 3-D snowflake back on a soft surface, and let the icing dry completely.
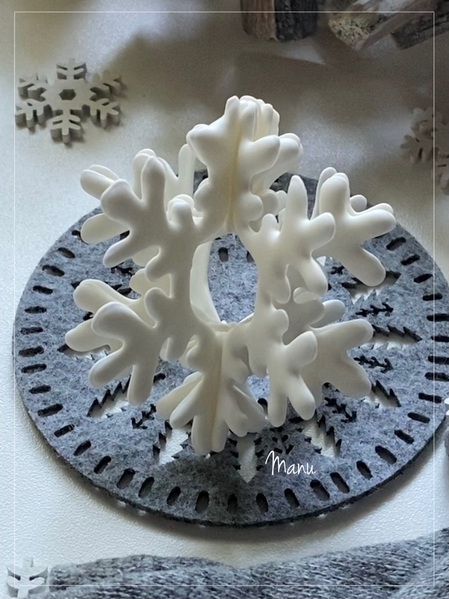
And here’s my 3-D royal icing snowflake decoration - all done! (I find that 3-D decorations and cookies are difficult to capture and look much better in person, but this photo should give you a decent idea of what to expect.)
In the next photo, I inserted a thread into the space between the two 3-D half-snowflakes in order to turn my decoration into a hanging ornament. I made a loop and secured it with a knot, and then luckily managed to fit the knot in the space. To make this step easier, I recommend gluing the loop to one of the 3-D half-snowflakes before gluing the two pieces together in Step 3b.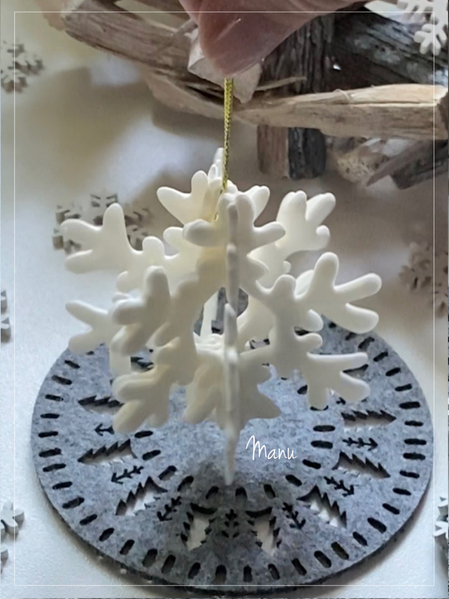
And last, a video recap!
Happy winter!
Ciao, Manu ❄️❄️❄️

Manuela Pezzopane, affectionately called Manu by her friends and family, is a fan of everything handmade, and professes to have tried every possible hobby. However, it wasn’t until the end of 2014, when an American friend invited her to a Christmas cookie exchange, that she first discovered decorated cookies. In 2015, after watching Julia M. Usher's videos and signing up on Cookie Connection, Manu finally attempted her own. Since then, cookie decorating has become Manu’s passion. You can follow Manu on Facebook and Instagram, or email her at manubiscottidecorati@gmail.com.
Photo and cookie credits: Manuela Pezzopane
Note: Made by Manu is a Cookie Connection blog feature written by Manuela Pezzopane, where each month she shares the method behind a magical cookie of her own making. This article expresses the views of the author, and not necessarily those of this site, its owners, its administrators, or its employees. To read all of Manuela's past Made by Manu tutorials, click here. And to see all of Cookie Connection's tutorials, click here.








Comments (9)