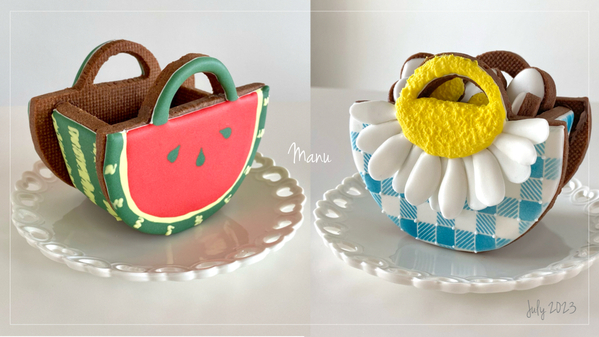
This month, I have a fun and super easy summer project that relies on basic wet-on-wet decorating (wet icing applied to wet icing) and 3-D cookie construction techniques. The end result will be a cute 3-D watermelon bag cookie - basically, a hollow watermelon "slice" with two handles, which can be filled with mini cookies or other treats. And it won’t look like a beginner cookie project when you're done with it!
After you've practiced this basic 3-D construction, you can play with different and/or more advanced cookie decorating techniques to produce variations like the 3-D daisy bag cookie pictured below. It consists of the same cookies, but it is airbrushed and stenciled, and then decorated with my signature royal icing petal transfers. For details of that project, take a look at my video at the end of this tutorial.
But, for now, let's discuss how to make my simpler watermelon bag.
- Cookie dough of your choice
- 1 (4-in/10.2-cm) round cookie cutter
- 1 (2-in/5.1-cm) square cookie cutter
- 1 (2 3/4-in/7.0-cm) oval cookie cutter (I used the smallest cookie cutter in this six-piece nested set.)
- Cookie bag template (See "Attachments" under "Files" at the end of this post.)
- Parchment paper
- Sharp knife or sugarcraft knife
- Paring knife
- Microplane tool or zester
- Royal icing:
- White piping-consistency, in pastry bag with PME #1 tip (or equivalent)
- Dark green flood-consistency, in tipless pastry bag with opening equivalent to PME #3 tip
- Light green flood-consistency, in tipless pastry bag with opening equivalent to PME #3 tip
- Red flood-consistency, in tipless pastry bag with opening equivalent to PME #3 tip
- Brown (or same color as your dough) very thick-consistency (@Julia M Usher calls it “glue”; see her video for reference.)
- Scribe tool
- Small round paint brush
- Cookie cutters or other objects for props
Step 1: Cut and bake cookies
Here's a visual summary of the shapes you should have after all 13 cookies in this project are baked:
I've separated the pieces that you will need into two categories.
Cookies cut with cookie cutters:
- 1 (4-in/10.2-cm) round cookie cut into eight slices (These cookies are for watermelon wedges to fill the bag, but they are optional; you can fill the bag with any treat.)
- 3 (2-in/5.1-cm) square cookies
Hand-cut cookies:
- 2 (4 x 3 1/8-in/10.2 x 7.9-cm) bag cookies, hand-cut using the round (4-in/10.2-cm) cookie cutter, the oval (2 3/4-in/7.0-cm) cookie cutter, and my template as cutting guides (Again, you’ll find my template in "Attachments" under "Files" at the end of this post.)
And now, let me show you how to hand-cut the bag cookies, as the other cookies should be self-explanatory.
a. Roll your cookie dough to a thickness of 1/8 inch (0.3 centimeter). All of the cookies in this project should be the same thickness. Download my template, trace it on a piece of parchment paper, and cut it out. Place the template over your cookie dough.
b. Align the circle cutter with the bottom of the template, and cut out a circle. Do not remove the dough surrounding the circle. Keeping it in place will prevent the cookie bag shape we're making from misshaping as we make further cuts.
c. Place the oval cookie cutter over the bag handle on the template, and use it as a guide to cut the inner part of the bag handle with a sugarcraft knife.
d. Turn the cookie cutter upside down, and use its wider rim as a guide to cut the outer part of the bag handle. Alternatively, if there is no rim on your cutter, leave the cutter right side up, shift it up about 1/4 inch (0.6 centimeter), and cut around it again. Either method should make a handle about 1/4 inch (0.6 centimeter) wide - provided the rim on your cutter is that wide.
e. Use a paring knife to cut along the top straight edge of the bag, but be careful not to cut off the handle!
f. Now that all of the cuts have been made, it's time to remove the excess cookie dough, as well as the template. Tip: Make sure your cookie dough is cold enough that you don’t misshape or tear the handle when removing the dough, as the handle is thin and fragile. If necessary, put the dough in the refrigerator to chill before removing the excess dough.
Repeat Steps 1a to 1f to make another bag cookie. Cut the remaining 11 cookies to the same thickness, and bake all 13 cookies according to your recipe. Let them cool completely before decorating.
Step 2 : Decorate cookies with royal icing
a. Stack the two bag cookies so they are perfectly lined up, and hold them firmly between your fingers. Use a Microplane tool (or equivalent) to lightly file and flatten the bases of the bags so the 3-D cookie won’t roll over once it’s assembled and standing.
b. Using white piping-consistency royal icing and a PME #1 tip (or equivalent), fully outline the bottom part of the cookie and the handle. Pipe two more curved lines along the bottom of the cookie to create sections to demarcate the skin, the rind, and the flesh of the watermelon. These lines will serve as piping guides, but once the areas are flooded, the icings in them will merge together, creating the appearance that the icings were piped wet next to wet icing. I piped the outer skin section about 3/8 to 1/2 inch (1.0 to 1.3 centimeters) wide and the inner rind a little less than 1/4 inch (0.6 centimeter) wide, though these measurements needn't be exact.
c. Use dark green flood-consistency royal icing and a PME #3 tip (or equivalent) to flood the outermost section (the skin).
d. Use light green flood-consistency royal icing and a PME #3 tip (or equivalent) to flood the middle section (the rind).
e. Next, use red flood-consistency royal icing and a PME #3 tip (or equivalent) to flood the large central section (the flesh). From here on, work fast, as all of the remaining icing (with the exception of that for the handle) will be applied using the wet-on-wet technique so that it settles into the underlying icing to create one smooth layer. If you take too long with the following steps, the underlying icing may dry, and the icing piped on top may never settle into the under-layer.
f. Now using the dark green flood-consistency royal icing and a PME #3 tip (or equivalent) once again, flood the handle.
g. Quickly pipe three dark green dots on the wet red icing. (In retrospect, it's probably better to pipe these dots prior to flooding the handle, just to be sure that the underlying red icing doesn't set up in the meantime.)
h. Then pipe evenly spaced light green squiggles (about nine of them) along the dark green skin.
i. Once the three dots have sunk into the red icing, insert a scribe tool in the middle of each dot, and drag the icing to create a teardrop shape that mimics a watermelon seed. The seed orientation will be determined by the direction in which you drag the scribe tool. I dragged mine toward the top of the bag, but at different angles. Tip: I ended up with sort of a sad face, which I hadn't seen until writing this post, so I recommend that you drag the scribe tool straight up for all three dots.
j. Now move to the light green icing squiggles in the skin section, piped in Step 2h, and draw a squiggle with the scribe tool through each one. There is no right or wrong way to do this step; the idea is just to give a little more interest and variation to the squiggles so they better represent real watermelon skin.
Repeat Steps 2b to 2j to decorate the other bag cookie, and let the icing on both cookies dry completely. (Optional: Repeat the same steps for the eight small slice cookies to create watermelon cookies to later fill the bag. Of course, you'll be able to fit fewer squiggles on those cookies, and they'll have no handles to flood!)
And now let’s decorate two of the square cookies to form the smaller sides of the bag.
k. Outline a square cookie using white piping-consistency royal icing and a PME #1 tip (or equivalent). Let the icing set.
l. Flood the cookie using dark green flood-consistency royal icing and a PME #3 tip (or equivalent) once again.
m. Using the same light green icing and tip used on the bag cookies, immediately pipe a squiggly line, about 3/8 inch (1.0 centimeter) long, in the middle of the cookie. Do the same also at the sides of the cookie. Again, this decoration is intended to mimic the variegated skin of the watermelon.
n. Once the light green icing has sunk into the dark green flooded surface, check to see if you are happy with the results. If not, use the scribe tool to drag the icing and create a more realistic effect.
Repeat Steps 2k to 2n to decorate a second square cookie. Leave one square without royal icing for the bottom of the bag.
Here’s a visual recap of all of the cookies once decorated and dry:
Step 3: Assemble cookies into 3-D watermelon bag
a. Place a cookie bag, iced side down, flat on your table. Place a napkin underneath it to protect the iced surface. Have all of the other cookies next to you.
b. Pipe brown very thick-consistency royal icing "glue" along an edge of the naked square cookie. (Alternatively, use an icing color that matches your cookie dough.)
c. Attach the square cookie to the bag cookie so they are perpendicular to one another and the square stands upright. The square cookie should be at a distance of about 3/8 inch (1.0 centimeter) from the flat, lower edge of the cookie bag and parallel to it. Apply a little pressure on top of the square cookie; some icing will squeeze out along the seam. Use a small round paint brush to spread excess icing evenly along and toward the inside seam. If necessary for added reinforcement, pipe more glue along the inside seam, and spread it using the paint brush.
d. As needed, prop the inside and outside of the square cookie with cookie cutters (or other objects) so it stays upright while the icing dries. (I used a cookie cutter and an espresso cup.) However, if your icing glue is at the right consistency, the square is small enough that it should stand on its own without props.
e. Now, in the same fashion, pipe icing glue along the bottom edge of one of the decorated square cookies, and attach it, iced side facing out, next to the naked square cookie on the side of the bag. Again, use a small paint brush to spread the icing along the internal seam. Since this cookie is iced on one side, it is heavier on that side than the other, and it will need to be propped or it will lean.
f. Repeat Step 3e to attach the remaining decorated square cookie to the other side of the bag.
g. Keeping the square cookies propped, pipe icing glue along the top edges of all three square cookies.
h. Hover the second bag cookie above the squares, taking care to align it with the bag cookie underneath before placing it directly on the icing glue. (It's important that the flat bottom edges are lined up, or the 3-D bag may lean once in an upright position.) If needed, carefully adjust the top cookie's position once on the squares to ensure that it is well aligned. Then apply a little pressure to fully attach it to the square cookies. With the 3-D bag cookie in this position, let the icing dry for a few hours.
Once the icing is completely dry, it is safe to lift the 3-D cookie and put it on a plate. Check the inside seams, and pipe more icing glue along them if necessary; then let it dry completely.
Ta-da! My 3-D watermelon bag cookie is ready to be filled with mini watermelon slice cookies or any treat you like!
Here’s a video recap of the entire process:
And, since I love making project variations, here’s another version of the cookie! I imagined the handle to be the center of a daisy, and I decorated it with royal icing petal transfers. I filled the bag with white flower petal cookies and round yellow "center" cookies. (Note: To learn how to make royal icing petal transfers, check out my past tutorial. If you'd rather use wafer paper, which is less fragile, then you'll find all of the details for making curved wafer paper petals in this other tutorial of mine.)
I leave you with a video of the process for this daisy variation. Enjoy!
Happy summer! 🍉🌼💙 Manu

Manuela Pezzopane, affectionately called Manu by her friends and family, is the author of the blog feature Made by Manu, where each month she shares the method behind a magical cookie of her own making. In March 2022, Manu also assumed the role of host of our rebranded and reformatted Cookie Connection Challenges: Watch-Learn-Create Series, which debuted in a virtual video format in July 2022. A fan of everything handmade, Manu professes to have tried every possible hobby. However, it wasn’t until the end of 2014, when an American friend invited her to a Christmas cookie exchange, that she first discovered decorated cookies. In 2015, after watching Julia M. Usher's videos and signing up on Cookie Connection, Manu finally attempted her own designs. Since then, cookie decorating has become Manu’s passion, and her mesmerizing video shorts have earned her a large and loyal following throughout the global cookie community. Manu harks from Rome, Italy, where she currently resides. You can email Manu at manubiscottidecorati@gmail.com, follow her on Facebook and Instagram, or explore her past challenges and large library of Made by Manu tutorials here on Cookie Connection.
Photo credit: Manuela Pezzopane
Note: Made by Manu is a Cookie Connection blog feature written by Manuela Pezzopane, where each month she shares the method behind a magical cookie of her own making. This article expresses the views of the author, and not necessarily those of this site, its owners, its administrators, or its employees. To read all of Manuela's past Made by Manu tutorials, click here. And to see all of Cookie Connection's tutorials, click here.


Comments (7)