 A few months ago, I made a water lily pond cookie set inspired by a couple of real ponds that I saw during a trip. One pond had pink flowers, and the other pond had white ones. That set was my Practice Bakes Perfect Challenge #27 entry (or, rather, "non-entry", since Cookie Connection contributors aren't eligible to win challenge prizes
 ![]() ).
).
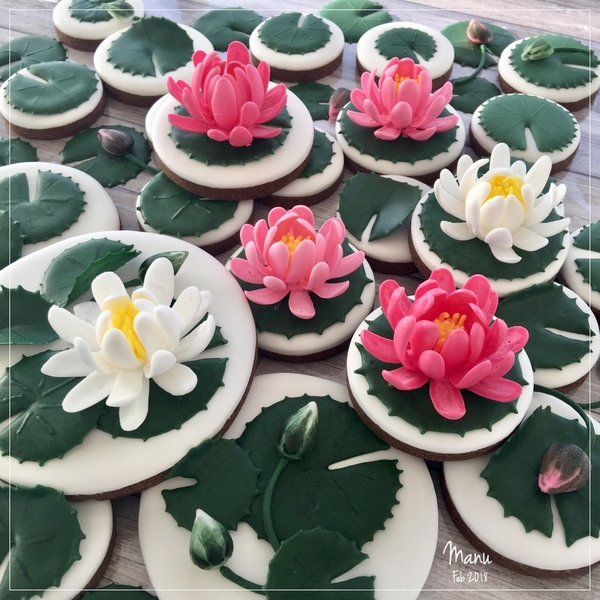
It was also a lucky combination of the two ponds, of @Bakerloo Station’s challenge requirements (circle cookies), and of a tutorial by @Aproned Artist where she explained the technique for making contoured royal icing leaf transfers. After decorating the cookies with curvy lily pads (thank you, Aproned Artist), and pink and white flowers (I couldn't decide which pond I liked best), I then arranged them en masse to mimic both overgrown ponds.
Recently, I took pictures of another lily pond. This one was elevated in a basin, so I could observe it at close range. I could even smell the flowers . . . their scent was incredible and unexpected! There were just two purple flowers at the opposite edges of the basin, with lily pads, stems, and buds emanating from the flowers toward the center of the pond.
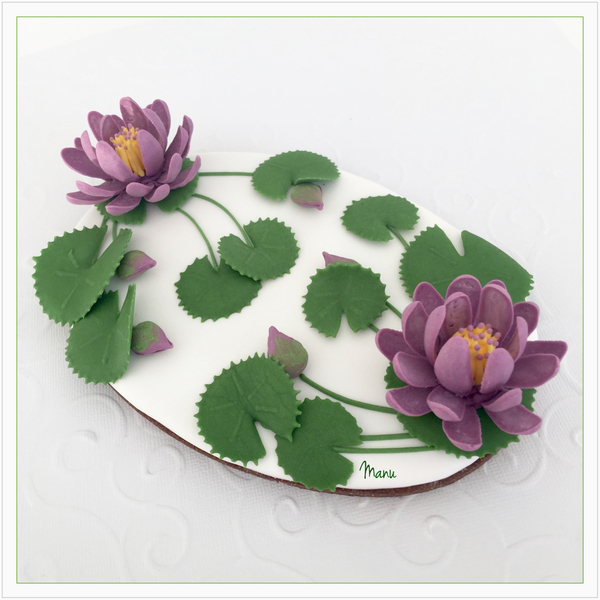
In this tutorial, I will share how to make royal icing water lily and lily pad transfers, just as I made them for the challenge, but I will arrange them in a more minimalist fashion on one oval cookie, similar to the picture above.
- Royal icing:
- Yellow thick piping-consistency royal icing, in pastry bags with Wilton #3 and #2 tips (or equivalents)
- Purple medium-consistency royal icing, in tip-less pastry bag with opening equivalent to Wilton #1 tip
- Green medium-consistency royal icing, in tip-less pastry bag with opening equivalent to Wilton #1 tip
- Purple piping-consistency royal icing, in tip-less pastry bag with opening equivalent to Wilton #3 tip
- Green piping-consistency royal icing, in tip-less pastry bag with opening equivalent to Wilton #2 tip
- Parchment paper and/or acetate
- Templates for petals, buds, and leaves (See "Files" in "Attachments" at the end of this post.)
- Pencil and tape
- Rolling pins, for shaping petals
- Small flat paint brush
- Scribe tool
- 1 large (16.5 x 11.0-cm/6 1/2 x 4 1/4-in) oval cookie, flooded with white royal icing and completely dry (I used the largest cutter in this 6-piece PME nested set.)
Step 1: Pipe lily center
a. Using yellow thick piping-consistency royal icing and a Wilton #3 tip (or equivalent), pipe a few blobs on a piece of parchment paper or acetate. (You will only need two blobs, but prepare a few extra so you can pick your best ones.) The blobs should be about 1 cm (3/8 in) tall with a small (1-cm/3/8-in) round base. Let them dry completely.
b. Now, switch the tip on the bag of yellow icing to a Wilton #2 tip (or equivalent). With the dried blobs still stuck to the parchment paper (or acetate), cover the very top of each blob with about four inverted teardrops (aka, beads with peaks). These beads will become the centermost lily stamens.
c. Now pipe vertical lines (more stamens) all around the blob, and encircling the centermost stamens. First, pipe a layer of lines from the base of the blob to its top, leaving some space between each line. Then pipe a second layer of lines in between the lines in the first layer.
d. Pipe a little dot on top of each stamen using purple medium-consistency royal icing and a Wilton #1 tip (or equivalent).
Step 2: Pipe petal and bud transfers
a. Place the petal templates under a piece of parchment paper, and trace them with a pencil. Avoid acetate for this step, not only because it can be tough to draw on, but also because it will make the underside of the petals (which face up in the assembled flowers) look glossy.
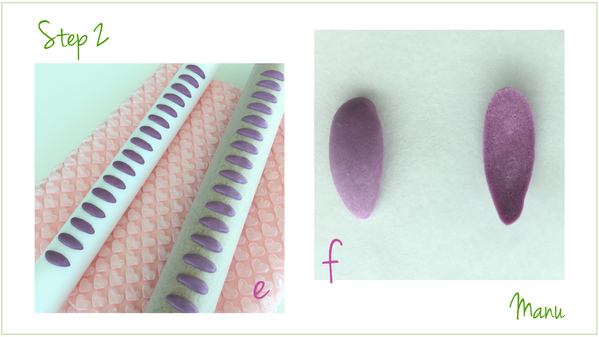
b. Cover a rolling pin with the traced parchment paper. Flip it over, so that the pencil markings face the rolling pin. (Otherwise, the pencil markings will transfer to the royal icing that we are going to pipe on top in Step 2d.) Have no fear - you should still be able to see your tracings with the paper turned over.
c. To keep the parchment paper from moving, turn the rolling pin over, and tape the edges of the parchment paper along the length of the rolling pin.
d. Using purple medium-consistency royal icing and a Wilton #1 tip (or equivalent), outline and flood one petal at a time along the length of the rolling pin. (I fit 16 petals on my pin.) I outlined and then immediately flooded with the same icing, so that the outline would merge into the rest of the petal and not be visible. Avoid using a scribe tool to work the icing. When I did, I seemed to end up with larger holes on the undersides of the transfers once they had dried. Tiny holes seem to be inevitable whether you use a scribe tool or not, however.
e. Repeat Steps 2a to 2d to create another two batches of petals, for a total of three batches. (You'll need 21 petals, give or take, for one water lily, and this cookie has two flowers.) Let the transfers dry completely. I placed the rolling pins on pluriball sheets so they wouldn’t roll and ruin the transfers. (Suggestion: You may want to pipe an extra batch of petals for spare parts. My petals didn’t break, but, as noted above, some had tiny holes on their undersides.)
f. The transfers will pop off the parchment paper quite easily once they are completely dry, so place something soft on your work table to catch them and prevent breakage. In the picture below, you'll see the top of a transfer to the left, and the underside of another one (which happened to be hole-free) to the right. The transfer tops will be more visible in the petals surrounding the flower center, whereas the undersides will be more visible in the outer layer of petals, which are more open. That being said, reserve the most hole-y petals for use around the flower center where the holes are less likely to show.
Also to note: The underside of colored transfers will always dry lighter than the top, except around the very edge. But don't worry - this color variation adds depth and dimension to the final flowers, and makes them look more lifelike!
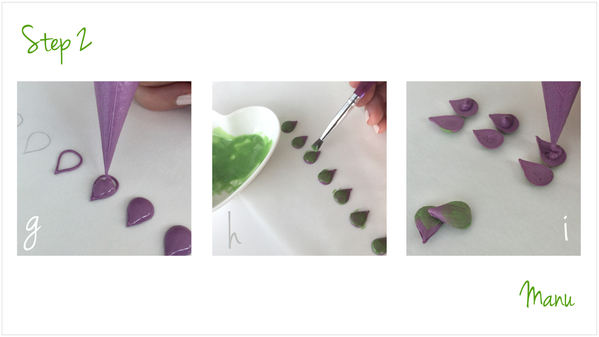
g. Now, trace the bud templates on a piece of parchment paper, and flip over the paper as before. Using purple medium-consistency royal icing and a Wilton #1 tip (or equivalent) again, outline and flood at least 10 buds (teardrops). Let them dry completely.
h. Using green medium-consistency royal icing and a small flat paint brush, paint a few strokes of green on each teardrop, starting at the base and moving toward the point. It's best to leave the teardrops stuck to the parchment paper when painting; otherwise, they will move around, and it will be difficult to control your paint strokes. Let the green icing dry completely.
i. Last, using purple piping-consistency royal icing and a Wilton #3 tip (or equivalent), glue two teardrops back to back to create a more dimensional bud. Repeat this step until you've used all of the teardrops piped in Step 2g.
Step 3: Assemble water lily
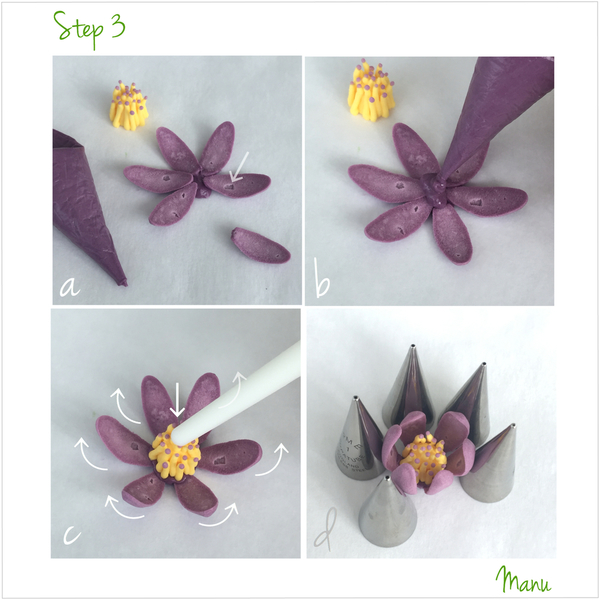
Each lily will consist of three layers of petals with 6 petals in the first layer, 7 in the second, and 7 (or 8) in the third, for a total of about 21 petals. But, feel free to use fewer or more petals in any layer to create flowers of different shapes and sizes.
a. Using purple piping-consistency royal icing and a Wilton #3 tip (or equivalent), pipe a small mound of icing on a piece of parchment paper. While the icing is still wet, arrange 6 petals in a circle around the mound, making sure one end of each petal makes contact with the mound. These petals will form the center of the flower, so, again, choose your hole-iest petals for this layer.
b. Pipe another blob of purple royal icing in the center of the 6 petals.
c. Gently push a yellow flower center (made in Step 1) into the blob. Avoid using too much pressure, as you don't want to break the center or any petals. As you press down on the center, the petals will naturally bend up, toward the center of the flower, and then stop.
d. At this point, you have some time to fine-tune the petal arrangement. Push them closer together, turn them, or even add more petals! Prop the petals as needed to keep them in position while the icing blobs dry. I used pastry tips for props, but almost any small objects will work. Let the icing dry completely.
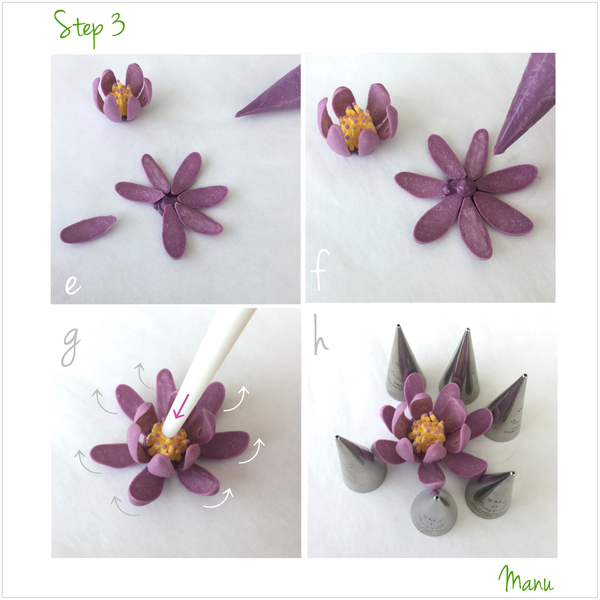
e. Working on parchment paper again, repeat Step 3a, but, this time, arrange 7 petals around the icing blob, and leave more open space in the center.
f. Pipe another blob of purple royal icing in the center of the 7 petals.
g. Lift the central part of the flower (made in Steps 3a to 3d) off the parchment paper and carefully push it into the icing blob. (Important: Push on the yellow center not on the petals!) Again, the circle of 7 petals will bend up.
h. As with the flower center, you have time to rearrange petals and/or to prop them if necessary before the icing blobs dry. Let the icing dry completely. Our flower is more than halfway done!
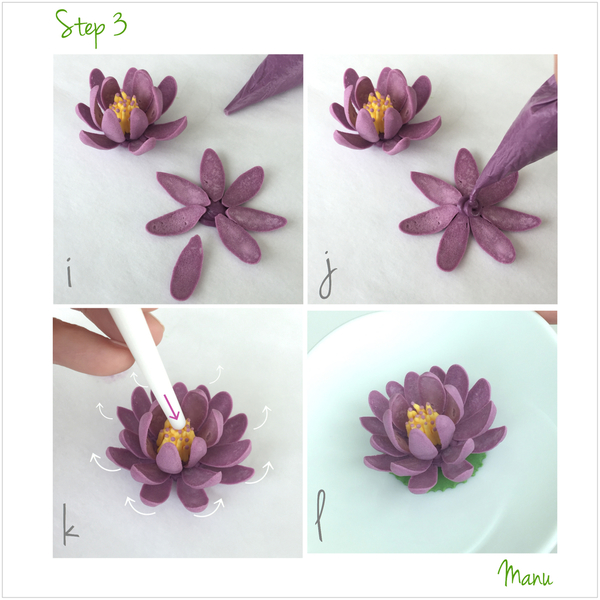
i. Repeat Step 3a one last time, for the last layer of petals. This time, arrange 7 to 8 petals around the icing blob, again leaving a small open area in the center. Remember: These petals should have the most hole-free undersides.
j. Pipe another blob of purple royal icing in the center of these petals.
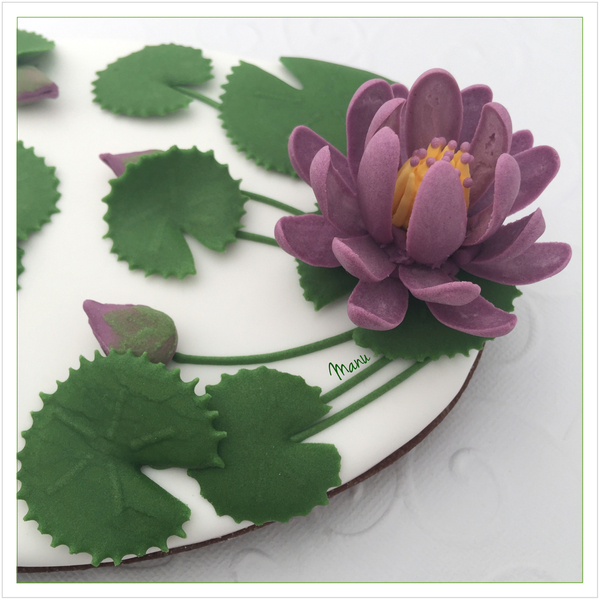
k. Lift the two-layer water lily (completed in Step 3h) off the parchment paper, and carefully push it into the icing blob. The outermost petals will lift as before, but, this time, they should stop at the perfect position and won't need to be propped. Let the icing dry completely.
l. Repeat Steps 3a to 3k to make one more water lily. Once both lilies are dry, I recommend "gluing" each to a small lily pad (see Step 4 for lily pad instructions). This way, they'll be easier to handle without breaking when they get assembled on the cookie in Step 5.
Step 4: Pipe lily pad transfers
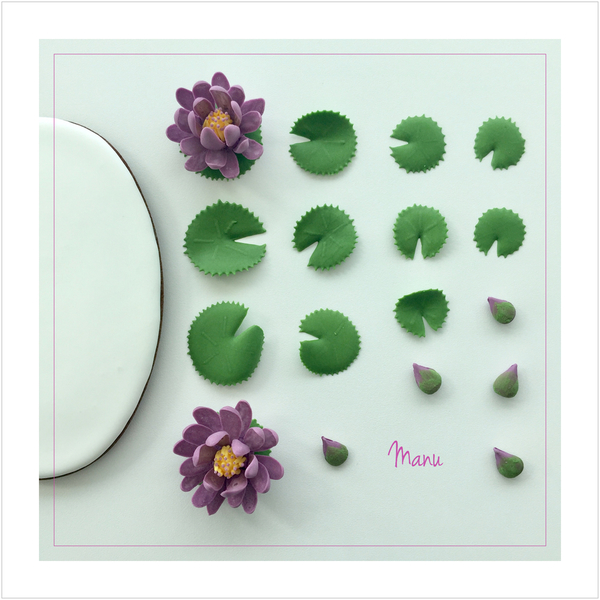
In the attachments, you'll find three sizes of lily pad templates, ranging from 2.5 cm (1 in) to 3.5 cm (1 3/8 in). I prepared 5 transfers in each size for a total of 15 lily pads, and contoured about half of them. You'll only need about 12 pads on the final cookie, but it's nice to have some extras so you can try out different arrangements on paper before gluing the pieces more permanently to the cookie.
a. Work on one lily pad at a time. Place a lily pad template under a piece of acetate, and outline the shape with green medium-consistency royal icing and a Wilton #1 tip (or equivalent). Note: I prefer acetate to parchment paper for these transfers, because they get shaped in a variety of ways. It's easier to get a sense of how each shape will look when dry since the acetate is transparent.
b. Immediately flood the outline created in Step 4a with the same royal icing. Again, I use the same icing so that the outline and inner part of the lily pad merge together.
c. While the icing is still wet, use a scribe tool to make little "teeth" all around the lily pad. With short and quick movements, drag the icing from just within the outline to about 1mm (less than 1/16 in) outside the outline. The dots in the photo below depict the approximate points at which you should start dragging your scribe tool.
d. Again, while the icing is still wet, use the same green medium-consistency royal icing to pipe 5 lines emanating from the center of the pad. These lines should settle a bit into the wet icing underneath, while still maintaining some textural detail on top.
e. Now, it's time to get creative with shaping the lily pad! Move quickly while the icing is still wet. Lean the acetate against a small object to give the edges of the pad some "lift". Or drape the pad over the side of a cookie sheet. Or tape down corners of the acetate to bend the pad even more . . . there are so many possibilities! Because transfers take a bit longer to dry on acetate (as compared to parchment paper), feel free to use a fan to speed up the process!
Repeat Steps 4a to 4e to create about 15 pads. Remember to shape the pads in different ways and to leave some flat.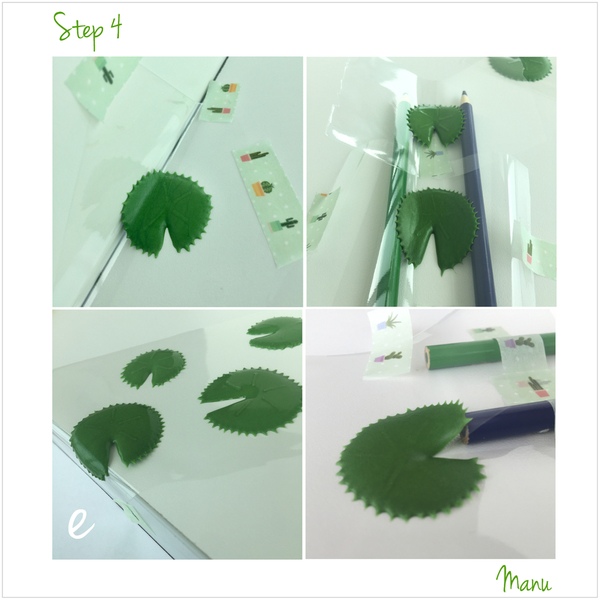
- 2 water lilies, each glued on a flat lily pad,
- 2 large contoured lily pads,
- 3 medium contoured lily pads,
- 3 small flat lily pads,
- 2 small contoured lily pads,
- 5 water lily buds, and, of course,
- 1 oval cookie flooded with white royal icing.
Step 5: Assemble cookie
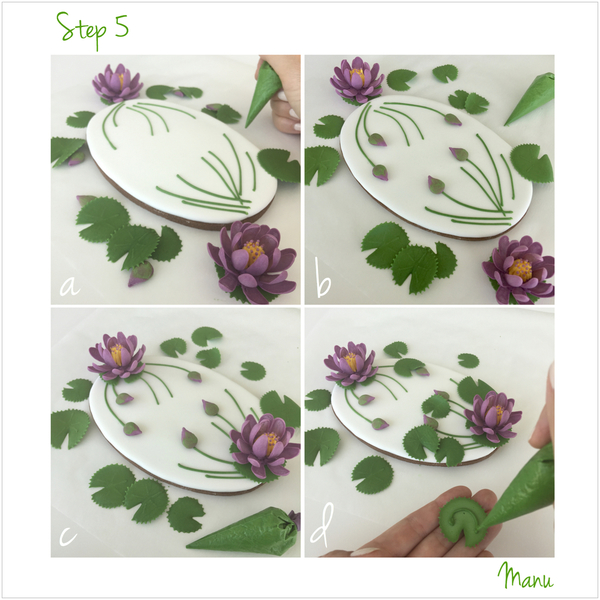
a. Using green piping-consistency royal icing and a Wilton #2 tip (or equivalent), pipe a set of 5 to 7 stems on each side of the cookie. Start the stems at roughly the same point near the cookie edge and pipe them so that they open toward the cookie center.
b. Using the same icing, glue buds to the ends of about half of the stems.
c. Glue a water lily to the end of each set of stems along the cookie edge. Important: From here, be very careful as you add the rest of the pieces. It's easy to accidentally hit a water lily and break petals!
d. Last, arrange the lily pads to cover the ends of the remaining stems and to "hide" some of the buds. Overlapping pads and mixing up sizes and orientations will lead to a more natural look. Once you are happy with your layout, glue the lily pads onto the cookie, using the same green icing again.
After so much reading, and piping, and waiting for the transfers to dry . . . our cookie "pond" is finally ready!
I leave you with the following picture - an experiment for a centerpiece, made truly for fun. After building up the sides of another cookie with royal icing, piping the stems, and attaching the buds, I poured isomalt into the cookie "reservoir" to resemble water. Once the isomalt set, I arranged water lilies and lily pads on top. The effect in person was great, and it looked like a real pond!
That’s all for now! Thanks for reading!
Ciao, Manu

Manuela Pezzopane, affectionately called Manu by her friends and family, is a fan of everything handmade, and professes to have tried every possible hobby. However, it wasn’t until the end of 2014, when an American friend invited her to a Christmas cookie exchange, that she first discovered decorated cookies. In 2015, after watching Julia M. Usher's videos and signing up on Cookie Connection, Manu finally attempted her own. Since then, cookie decorating has become Manu’s passion. You can follow Manu on Facebook and Instagram, or email her at manubiscottidecorati@gmail.com.
Photo and cookie credits: Manuela Pezzopane
Note: Made by Manu is a Cookie Connection blog feature written by Manuela Pezzopane, where each month she shares the method behind a magical cookie of her own making. This article expresses the views of the author, and not necessarily those of this site, its owners, its administrators, or its employees. To read all of Manuela's past Made by Manu tutorials, click here. And to see all of Cookie Connection's tutorials, click here.















Comments (53)