 In the last few years that I lived in Italy, tiny wooden boxes of strawberries made their appearance in the grocery store by the middle of February. They were imported, as it was too early for strawberries in Italy. They were so colorful and so neatly arranged in their wooden boxes (like this one) that they caught my attention year after year, marking the countdown to spring for me. I decided to memorialize that countdown with this cookie project.
This project is like many of my others insofar as it shows a novel way to arrange cookies. You see a cookie box, but it doesn’t have a cookie bottom. Instead, it has an interior wafer paper liner. You might say, it's like a frame that contains some strawberry cookies. I tried to represent the box image that I have in my memories as best I could (see where we’re headed here), designing around the size of the only strawberry cookie cutter I have at home. Since the color of the real wooden boxes was the same as my cookie dough, I left the cookie box un-iced.
- Rolling pin with guides, similar to this pin
- 2 (2 x 11-cm/3/4 x 4 3/8-in) rectangular cookies and 2 shorter (2 x 8-cm/3/4 x 3-in) rectangular cookies (To avoid too much hand-cutting, I used two cookie cutters from this six-piece square cutter set; then I hand-cut the squares into rectangles.)
- 4 (3 x 1-cm/1 1/4 x 3/8-in) cookie sticks (I hand-cut one larger cookie and divided it in four pieces with a sharp knife.)
- 1 (2 x 2.5-cm/3/4 x 1-in) strawberry cookie cutter (I used a mini belonging to this two-piece set.)
- Zester or Microplane tool
- Royal icing and pastry tips:
- White very thick consistency in parchment cones (@Julia M. Usher calls it “glue” in her video, and I like to call it “Julia’s glue”.)
- Yellow piping-consistency with PME #0 tip or equivalent
- Red medium-consistency with PME #2 tip or equivalent (A thicker icing will help prevent craters.)
- Green piping-consistency with Wilton #349 leaf tip or equivalent
- Scribe tool
- 1 (20.3 x 28-cm/8 x 11-in) sheet of wafer paper (or white parchment paper)
- Food marker
- Ruler
- Lace craft punch
- Purple gel food coloring
- Round paint brush
- Drop of alcohol (if necessary)
Step 1: Roll, bake, and cut cookies
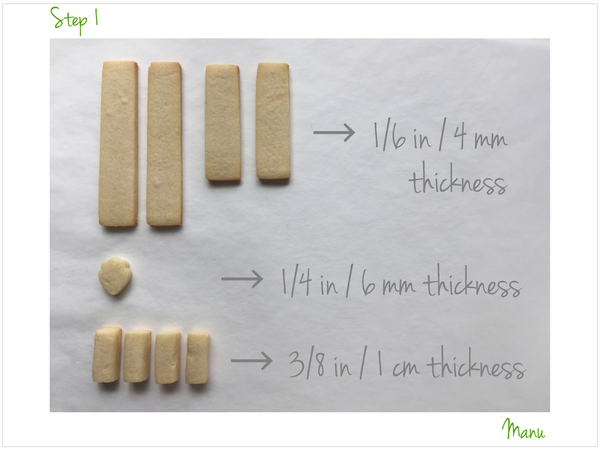
I rolled out the dough to different thicknesses, and used a rolling pin with guides to ensure consistent, even thicknesses. Here's a summary of the shapes and sizes you'll need, divided into three groups based on dough thickness:
- 2 (2 x 11-cm/3/4 x 4 3/8-in) rectangles
- 2 (2 x 8-cm/3/4 x 3-in) shorter rectangles
- 20 (2 x 2.5-cm/3/4 x 1-in) strawberries
- 4 (3 x 1-cm/1 1/4 x 3/8-in) cookie sticks
Step 2: File rectangular cookies and assemble box
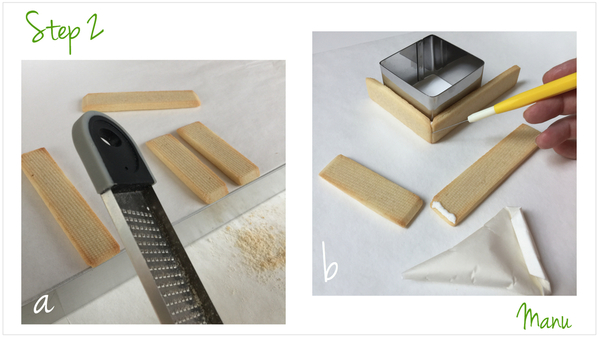
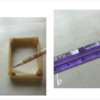
a. Miter each of the short sides of the four rectangular cookies, meaning file them with a zester or Microplane tool at roughly a 45-degree angle (see left photo below). Mitered edges allow the sides of the box to fit together more closely at the corners, eliminate the need to cover seams with royal icing decorations, and give the cookie box a very clean look. (To learn more about mitering, please check out the detailed descriptions in my previous projects: here, here, here, and also here.)
b. Work with one short and one long rectangle at a time. Pipe "Julia's glue" along one of the filed edges on each cookie, and glue the rectangles together so they are perpendicular to one another and stand upright. Prop with a square cookie cutter or other square object, as needed. Before the icing glue has set, remove any excess from the outside corners using a scribe tool. Repeat with the remaining two rectangles. You will end up with two "L"s.
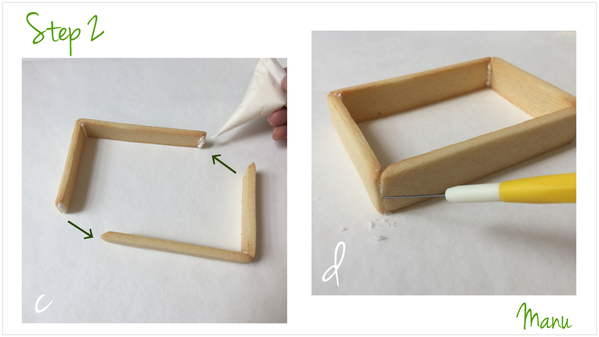
c. Once the glue on the two “L”s has set, pipe some more glue on the remaining edges, and put them together to form a frame.
d. Again, use a scribe tool to remove any excess icing from the outside corners. Let the icing dry.
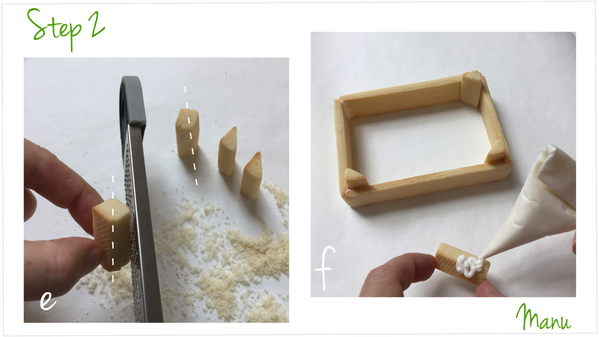
e. File each of the four cookie sticks to reduce them in half (from a square cross-section to a triangular cross-section).
f. Glue each one of them to each internal corner of the frame.
Step 3: Decorate strawberry cookies
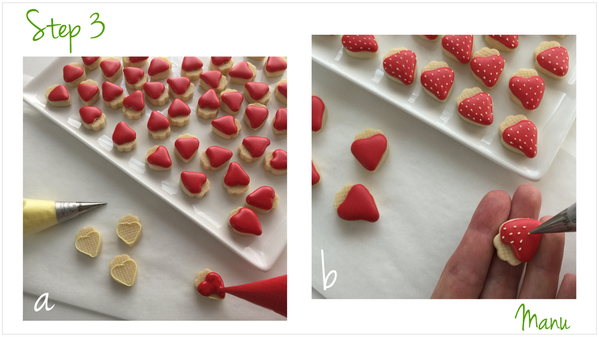
a. Outline the strawberry cookies using yellow piping-consistency royal icing and a PME #0 tip (or equivalent); then flood with red medium-consistency royal icing using a PME #2 tip (or equivalent). Let the icing dry. (Alternatively, you could outline and flood with the same red icing if you don't want to see a yellow border.)
b. Use yellow piping-consistency royal icing and a PME #0 tip (or equivalent) to pipe little seeds all over the strawberries.
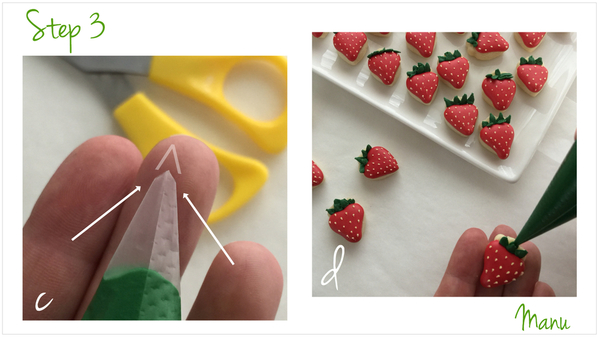
c. We're nearly ready to pipe little leaves on all the strawberries with green piping-consistency royal icing. If you have a Wilton #349 leaf tip (or equivalent), then use it! (It's a really small tip!) If you don’t have one, then simply cut the tip of a disposable pastry bag into a "V" shape. Position the seam on the bag at the top, and cut the sides in the direction of the arrows, as shown in the picture below.
d. Now, pipe those leaves! But be sure to vary their number and orientation on each strawberry, so the berries do not end up looking identical.
Step 4: Trace, cut, paint, and bend wafer paper
a. Set a sheet of wafer paper on your work surface. Using the cookie frame as a guide, trace the bottom of the box with a food marker. To this point, we've just outlined the bottom of what will be the wafer paper liner. Next, we need to draw the rest of the liner - specifically, the parts that will extend up the box sides, between the corner pieces, and over the top edge of the box.
b. The lace edge of the wafer paper should be a little bit taller than the sides of the box. Use a ruler to measure enough additional paper along the sides to accommodate the size of your particular lace craft punch (used in Step 4d).
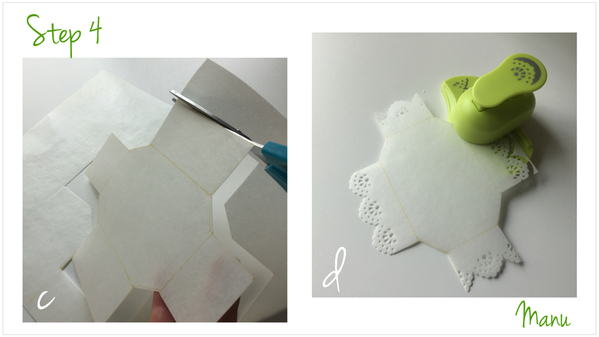
c. Cut along the guide markings you just drew, taking care to cut notches in the corners, so the wafer paper clears the cookies that were glued in those spots in Step 2f.
d. Now, use your lace craft punch to finish the edge of each side. (Julia M. Usher shows this technique, with both wafer paper and frosting sheets, in many of her projects on YouTube.)
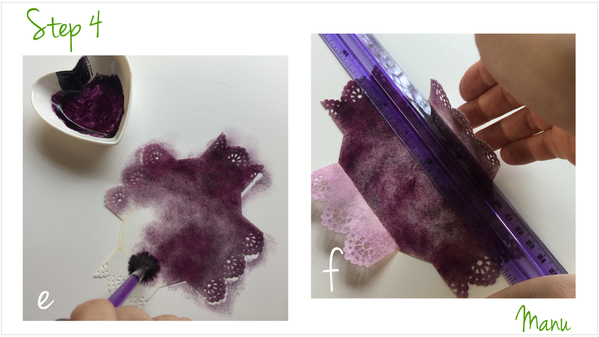
e. Use purple gel food coloring and a round paint brush to paint the wafer paper. Hold the paint brush perpendicular to the paper, and dab on small amounts of coloring ever so gradually. If your paint brush becomes too sticky, add a drop of alcohol (i.e., vodka) to the coloring to thin it a touch. Do not use water. Too much water (or food coloring) can dissolve the wafer paper in seconds.
f. Use your ruler again, but this time to carefully bend the wafer paper along the lines you drew in Step 4a. The food coloring will make the paper softer, so it should bend without cracking.
Note: I used wafer paper because I wanted the project to be totally edible in theory. However, I wouldn’t eat it, so, if you don’t have wafer paper, then white parchment paper will do.
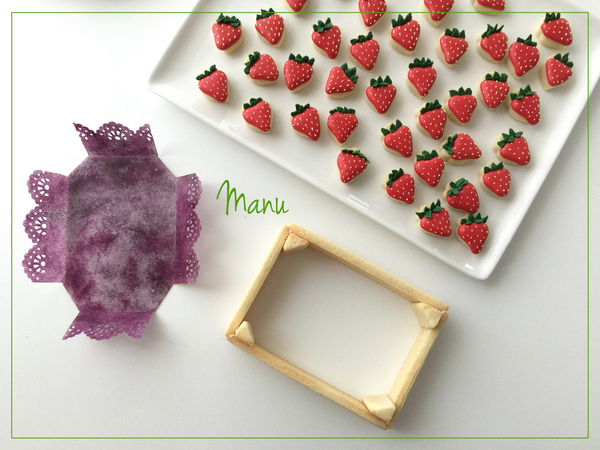
Here’s a photo recap of all that we've made:
Now that we have everything, we are ready to assemble our project!
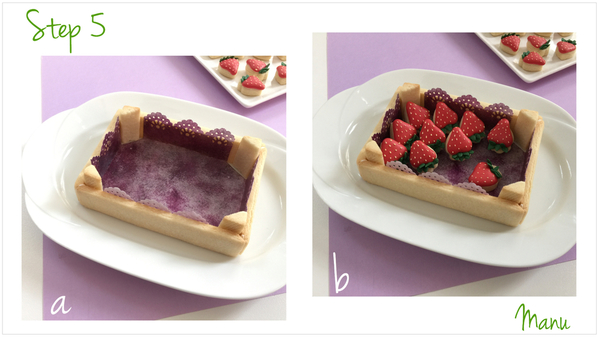
Step 5: Assemble cookie platter
a. Set the cookie frame on a plate, and insert the wafer paper liner, painted side up.
b. Neatly arrange as many strawberry cookies as you can fit inside.
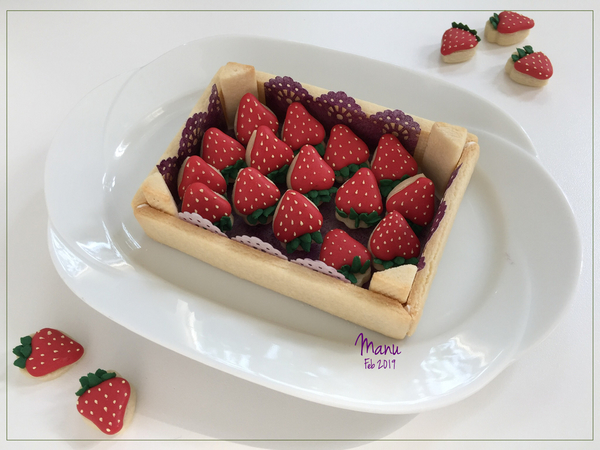
Our cookie box of strawberries is ready! [EDITOR'S NOTE: Yum! It looks both beautiful and delish!]
Ciao,
Manu 🍓🍓🍓


Photo and cookie credits: Manuela Pezzopane
Note: Made by Manu is a Cookie Connection blog feature written by Manuela Pezzopane, where each month she shares the method behind a magical cookie of her own making. This article expresses the views of the author, and not necessarily those of this site, its owners, its administrators, or its employees. To read all of Manuela's past Made by Manu tutorials, click here. And to see all of Cookie Connection's tutorials, click here.






Comments (35)