
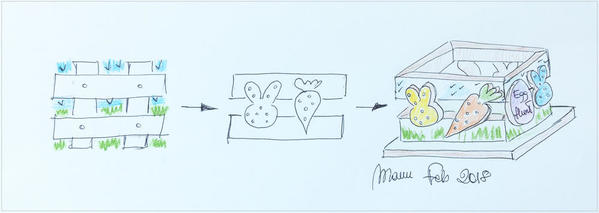
While this Easter cookie box may look complex, it is actually quite easy to decorate and assemble, and a very manageable project for beginners. Imagine each side built as a fence with two vertical planks nailed onto two parallel horizontal planks. In this case, I replaced the vertical planks with two different sets of Easter-themed cookies (an egg and a bunny, and a bunny and a carrot); then I "glued" (with icing) each set of two cookies onto two cookie planks to form one box side. Ultimately, I joined four sides together to create this one see-through springtime box.
I like the idea of not having solid sides to the box. The planks not only make the box look like a fence, but also give it a lighter look. Since one typically sees nature (i.e., sky and/or grass) around a fence, and not random contents of a box ![]() , I decided to paint some scenery along the horizontal cookie planks. I left the Easter-themed cookies relatively simple by decorating them with a popular Easter motif: wet-on-wet dots on a pastel icing base.
, I decided to paint some scenery along the horizontal cookie planks. I left the Easter-themed cookies relatively simple by decorating them with a popular Easter motif: wet-on-wet dots on a pastel icing base.
- Chocolate cookie dough, or other dough of your choice
- Small (4.5-cm/1 3/4-in to 6.5-cm/2 1/2-in) Easter-themed cookie cutters of your choice (I used bunny head, carrot, and egg cutters. See their exact dimensions in Step 1.)
- Rectangular (2.3 x 12.5-cm/7/8 x 5-in) cookie cutter or cutting template (I used a template, but Sweet Sugarbelle's cookie stick cutter would be just perfect.)
- Round (about 2.5-cm/1-in diameter) cookie cutter, for box feet
- Large (14.5-cm/5 1/2-in) square cookie cutter or cutting template, for box bottom
- Sugarcraft knife, if cutting templates are used
- Zester or Microplane tool
- White piping-consistency royal icing, in pastry bag fitted with PME #1 tip or equivalent
- White flooding-consistency royal icing, in tip-less bag or parchment cone with opening equivalent to PME #2 tip (Note: When I have small amounts of royal icing, I prefer going green and using parchment cones to plastic bags. See Julia M. Usher's video to learn how to make them.)
- Very thin paint brush (i.e., 3/0 liner)
- Green, sky blue, and (optional) brown gel food colorings extended with vodka, for edible paint
- Fine black food marker, for sketching birds
- Light green flooding-consistency royal icing, in tip-less bag or parchment cone with opening equivalent to PME #2 tip
- Brown, white, and green very thick-consistency royal icing, for box assembly (I will refer to this icing as "Julia’s glue” or "glue". Again, see another one of Julia's videos for details.)
- Small amounts of sky blue, pink, violet, yellow, and orange flooding-consistency royal icing, in tip-less bags or parchment cones with openings equivalent to PME #2 tips
- Scribe tool or toothpick
- Triangle and/or rulers
- Silicone mat, for assembling box
- Round paint brush, for pushing icing into box seams
Step 1: Roll, bake, and cut cookies
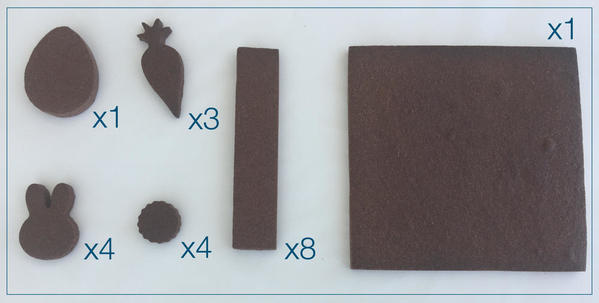
- 1 egg (about 6.5 cm/2 1/2 in long)
- 3 carrots (about 6.5 cm/2 1/2 in long)
- 4 bunny heads (about 4.5 cm/1 3/4 in long)
- 4 rounds (2.5 cm/1 in diameter)
- 8 rectangles (2.3 x 12.5 cm/7/8 x 5 in)
- 1 square (14.5 cm/5 1/2 in sides)
Bake the cookies according to your recipe instructions. Once they have cooled completely, proceed to the next step.
Step 2: File rectangular cookies
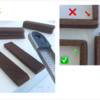
The eight rectangular cookies form the sides of the box. Before decorating these pieces, miter each of their short sides, meaning file them with a zester or Microplane at roughly a 45-degree angle (see left photo below). Mitered edges allow the sides of the box to fit together more closely at the corners, and eliminate the need to cover seams with royal icing decorations. Of course, there are other ways that the sides could be assembled at the corners (see right photo below), and none of them is right or wrong per se. However, I've highlighted my preferred method (mitering) in green. (To learn more about mitering, please check out the detailed descriptions in my previous projects: here, here, and here.)
Don't forget to get rid of the crumbs from filing! Use a small paint or pastry brush to sweep them away, as you don’t want them to end up in your icing in the next step!
Step 3: Decorate rectangular cookies and box base
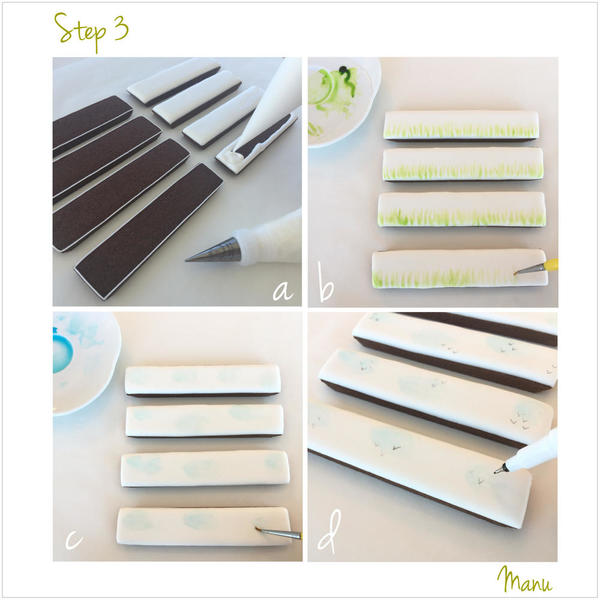
a. Using white piping-consistency royal icing and a PME #1 tip (or equivalent), outline the eight rectangular cookies. Then flood them with white flooding-consistency royal icing, using a PME #2 tip (or equivalent). Let the icing dry at least 8 hours or overnight.
b. Using a fine brush (i.e., 3/0 liner) and green gel flood coloring diluted with vodka, paint some blades of grass along four of the eight cookies. I simply painted vertical strokes starting from the bottom edge and extending about halfway up.
c. On the remaining four cookies, paint some little clouds with sky blue gel food coloring diluted with vodka. The clouds should be very delicate, like watercolors, just to add a suggestion of them in the distance.
d. Draw some flocks of birds (little groups of "V"s) on the clouds with a fine black food marker.
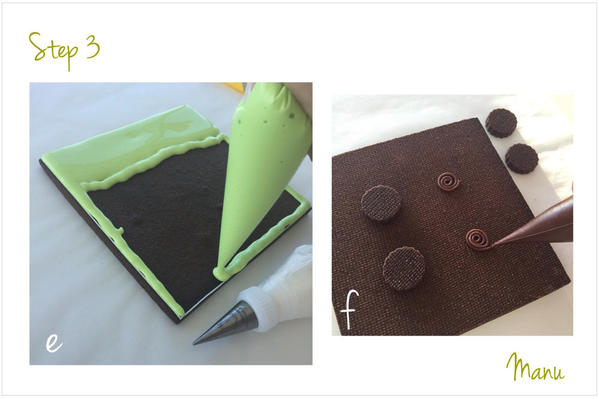
e. Outline the large square cookie using white piping-consistency royal icing and a PME #1 tip (or equivalent). Then flood it with light green flooding-consistency royal icing, using a tip-less pastry bag with an opening equivalent to a PME #2 tip. Let the icing dry at least 8 hours or overnight.
f. Turn the dry square cookie upside down, and stick on the four round cookies using brown Julia’s glue. These cookies will be the box feet. They will elevate the box a bit, making it easier to grab and lift the box later. Let the icing dry again, and then flip over the cookie.
Step 4: Decorate bunny, carrot, and egg cookies
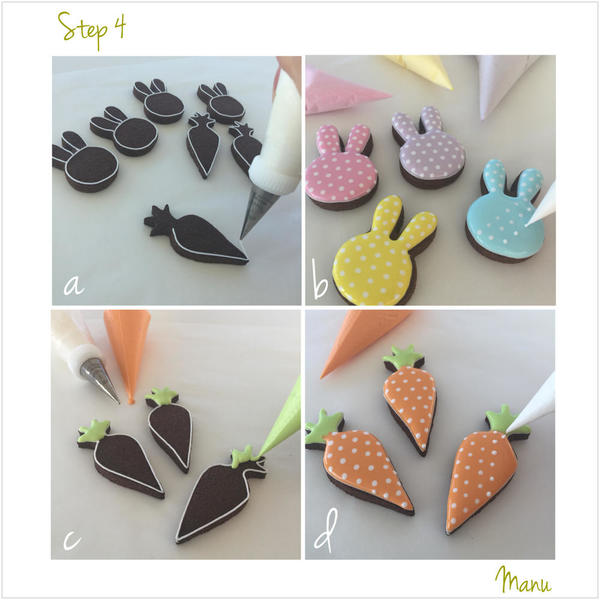
a. Outline all the bunny and carrot cookies, again using white piping-consistency royal icing and a PME #1 tip (or equivalent).
b. Using sky blue flooding-consistency royal icing and a parchment cone with an opening equivalent to a PME #2 tip, flood one of the bunny cookies. While the sky blue icing is still wet, immediately pipe dots on top with white flooding-consistency royal icing and the equivalent of a PME #2 tip. If you work quickly with icing at the right consistency, the dots should settle into the wet base icing, leaving a smooth surface on top. Piping wet icing on wet icing in this fashion is called the wet-on-wet technique.
Repeat the same process with each of the remaining three bunny cookies, but use pink, violet, and yellow for their base coats instead. (Note: It is important to work on one cookie at a time when doing the wet-on-wet technique; otherwise, base coats may dry before the dots are applied.) When everything is piped, let the icing dry completely.
c. Flood the leaves of each carrot cookie with light green flooding-consistency royal icing, using the equivalent of a PME #2 tip.
d. Now, using orange flooding-consistency royal icing and the equivalent of a PME #2 tip, flood a carrot and immediately pipe dots on top with white flooding-consistency royal icing, as done in Step 4b for the bunnies. Repeat this wet-on-wet technique with the remaining two carrots, working on one at a time. Let the icing dry completely.
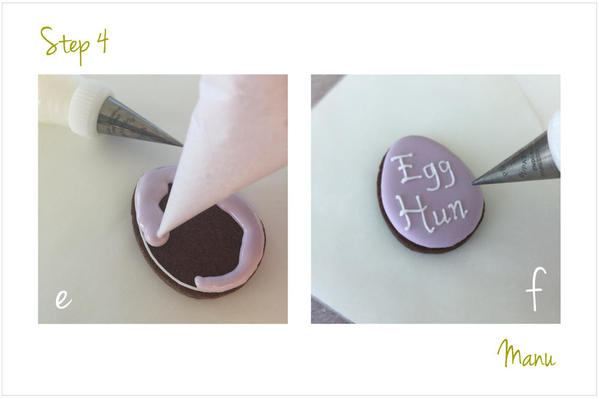
e. Again using white piping-consistency royal icing and a PME #1 tip (or equivalent), outline the egg cookie; then flood it with violet flooding-consistency royal icing, using the equivalent of a PME #2 tip. Let the icing dry until a crust has formed on top.
f. Using white piping-consistency royal icing and a PME #1 tip (or equivalent), pipe a message on the egg. I chose “Egg Hunt” as it fit the egg shape well, and because I planned to fill my finished box with chocolate eggs. A quicker option would be to use a stencil instead of piping.
Step 5: Build sides of box
Now that all of the cookies have been decorated, let's start building the cookie box. But first, here's a visual recap of the decorated box parts:
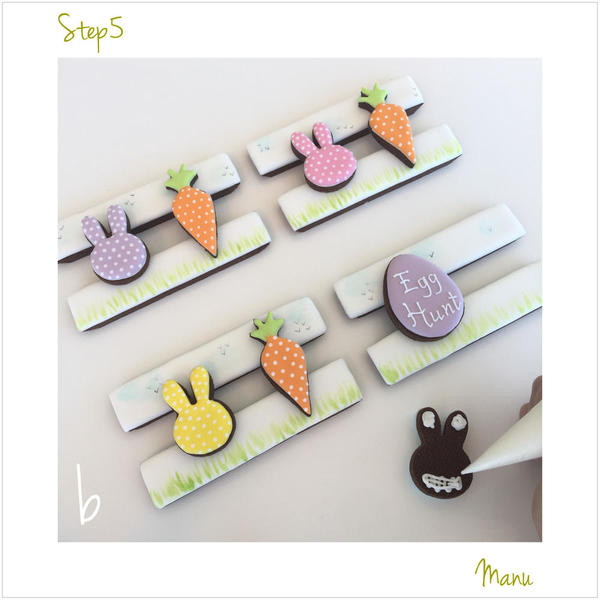
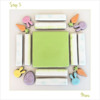
a. To start, arrange the rectangular cookies in pairs, including one rectangle with grass and another with clouds in each pair. Because each pair will become one side of the box, and we want a symmetrical box ![]() , it's important to arrange each pair in exactly the same way. First, the rectangles in each pair should be parallel and spaced to span roughly 7 centimeters (2 3/4 inches), as measured from the bottom edge of the bottom plank (with grass) to the upper edge of the top plank (with clouds). The short sides of the top rectangle in each pair should also be aligned with the short sides of the bottom one, as indicated by the green arrows in the photo below. Use a pair of rulers and/or a triangle to make sure each pair of rectangles is perfectly square.
, it's important to arrange each pair in exactly the same way. First, the rectangles in each pair should be parallel and spaced to span roughly 7 centimeters (2 3/4 inches), as measured from the bottom edge of the bottom plank (with grass) to the upper edge of the top plank (with clouds). The short sides of the top rectangle in each pair should also be aligned with the short sides of the bottom one, as indicated by the green arrows in the photo below. Use a pair of rulers and/or a triangle to make sure each pair of rectangles is perfectly square.
b. Using white royal icing glue, affix two of the Easter-themed cookies decorated in Step 4 to each pair of horizontal planks. Note: Place icing glue only on the top and bottom parts of each Easter cookie, at those points where the cookie will hit the planks. Avoid placing glue in the middle of these cookies, as it will otherwise be very visible on the inside of the box. Use a scribe tool to remove any excess icing along the edges of each cookie.
The sides of the box are done! But before proceeding to box assembly in Step 6, let them dry a minimum of a few hours. Actually, the longer, the better! Be patient, as the sides need to be as strong as solid ones would have been.
Step 6: Assemble box
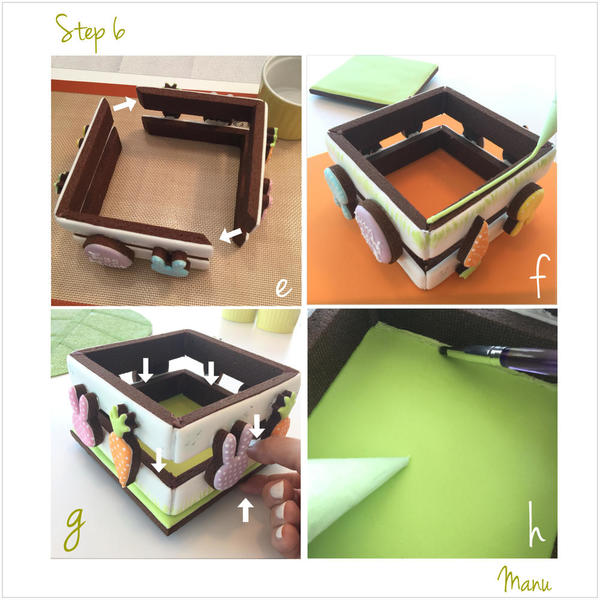
I recommend working on a silicone mat. It will "grip" the cookies, and, if one of the sides accidentally drops during assembly, there will be less chance of it getting broken.
a. Pipe both white and brown icing glue side by side on the mitered edges of one of the sides. Place the white icing along the outward facing edge and the brown icing along the inside edge. This way, once the two sides are attached together, you'll end up with a white seam on the outside box corners (in between white flooded surfaces) and a brown seam on the inside corners (in between chocolate dough), and the icing glue will be less noticeable.
b. Attach two sides together, making sure they are perpendicular to one another. (Again, you can use a triangle to be certain of this, or you can place a large, tall square cookie cutter inside the two cookies, as I did.) Normally, if the consistency of the icing glue is right, paired box sides will stand without any props. However, the cookies attached along the planks add extra weight to the sides, so I propped them from the outside with some cups. Repeat this step for the other two sides.
c. Before the icing glue used in Step 6b has set, remove any excess from the outside corners using a scribe tool. If the seam still doesn't look "clean" enough to you, you can fill it completely by piping more white glue into it, and then spreading the glue smooth with a small paint brush or clean fingertip. You can see the outcome of this step in my pictures of the finished product.
d. Reinforce the corners by piping more brown glue along the inside seams. Again, push the icing into the seams with a paint brush or a clean fingertip; then let the icing dry. You should now have two cookie "L"s, each comprised of two box sides.
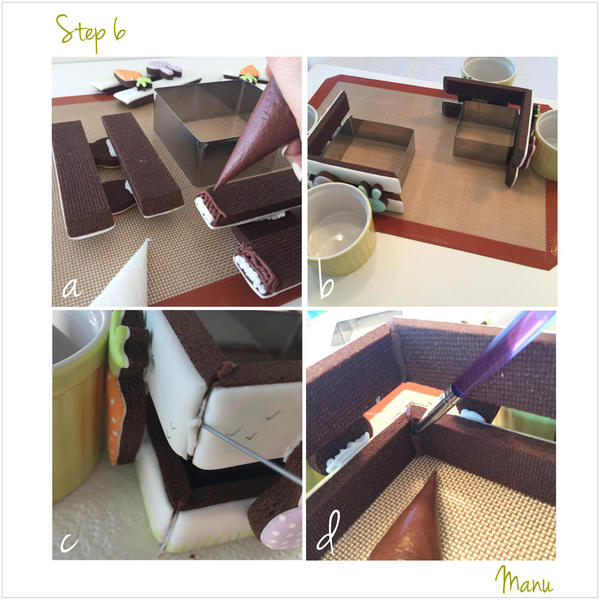
e. Following Step 6a, glue the two cookie "L"s together to form a complete box "frame"; then follow Steps 6c and 6d for the newly created seams. Let the icing dry completely.
f. Turn the frame upside down, and pipe green icing glue all around the lower edge of the frame. (Note: As a general rule, glue color should match the color of the surface to which it is getting applied, so that it is less likely to show.)
g. Carefully flip over the frame, and glue it to the box base. Gently apply pressure along the lower planks, while pressing up on the underside of the base. Important: the sides are now sturdy, but if you apply pressure to the upper planks, there is greater risk of breaking the frame!
h. Remove any excess green icing along the outside edge; then reinforce the bottom inside edges with more green glue, just as the corners were reinforced in Step 6d. Alternatively, skip this step if you don't plan to transport the box and/or if you plan to eat it soon, as you will have an easier time disassembling it without the added reinforcement.
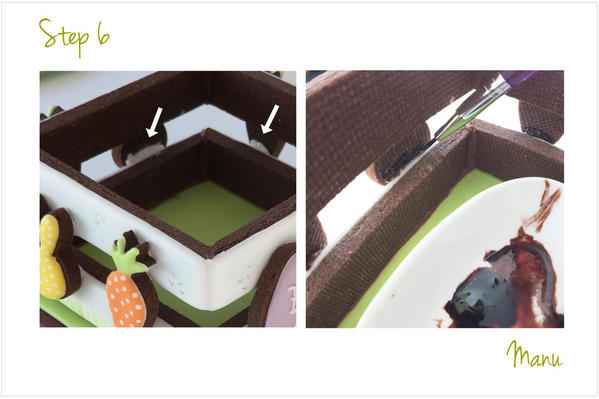
Optional last detail!
In Step 5, when the Easter-themed cookies get glued to the rectangles, it can sometimes be difficult to control the amount of glue that sneaks underneath the planks. Now that the box is assembled, any excess glue may be very visible on the inside of the box. Unfortunately, you can't remove icing once it has dried, but, fortunately, you can disguise it! Simply paint it with brown food coloring extended with vodka . . . or, if time is short, just skip it! ![]() Chances are good that most people won't notice the glue or care about it if they do, as the box will be filled with treats and is sure to be quickly eaten! (Note: I chose white glue to attach the Easter cookies to the white rectangles to avoid brown glue showing on the front of the box. In short, I chose the lesser of two evils.
Chances are good that most people won't notice the glue or care about it if they do, as the box will be filled with treats and is sure to be quickly eaten! (Note: I chose white glue to attach the Easter cookies to the white rectangles to avoid brown glue showing on the front of the box. In short, I chose the lesser of two evils. ![]() )
)
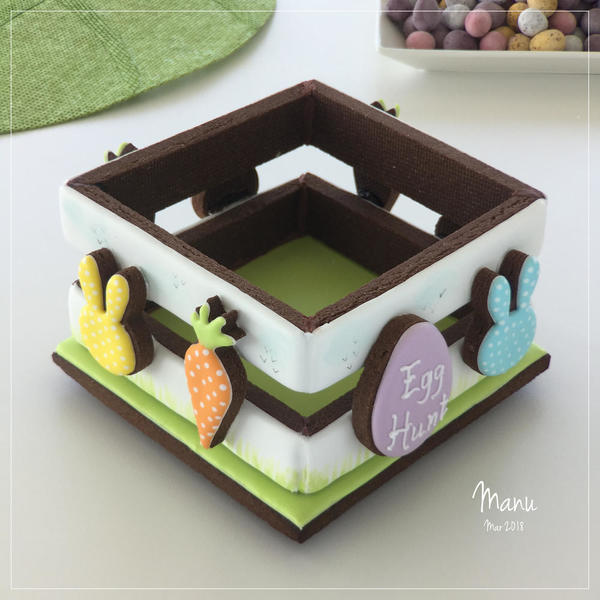
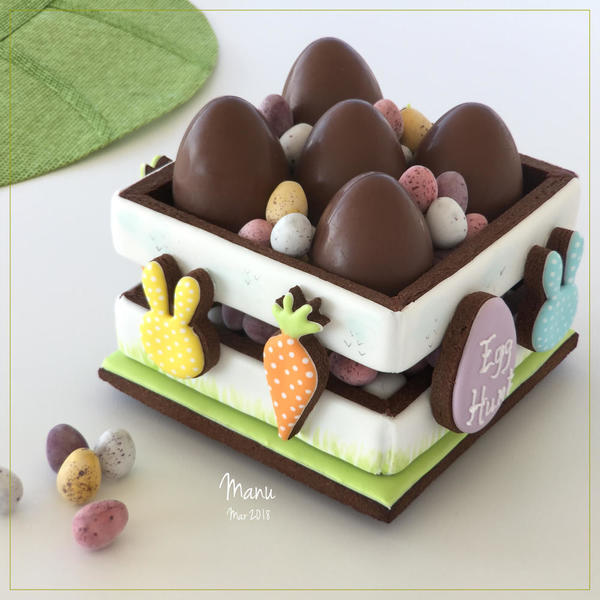
The box is now ready to receive goodies!
Fill it with chocolate cookies, sugar-coated chocolate eggs, or solid chocolate eggs . . . or all of them! I chose a mixture of chocolate and candy eggs!
Happy Easter and springtime, everyone!
Manu🌸


Photo and cookie credits: Manuela Pezzopane
Note: Made by Manu is a Cookie Connection blog feature written by Manuela Pezzopane, where each month she shares the method behind a magical cookie of her own making. This article expresses the views of the author, and not necessarily those of this site, its owners, its administrators, or its employees. To read all of Manuela's past Made by Manu tutorials, click here. And to see all of Cookie Connection's tutorials, click here.










Comments (19)