 It will be Mother’s Day next month, and, while thinking recently about project tutorials, my mind went back many years ago to when I was a mom-to-be.
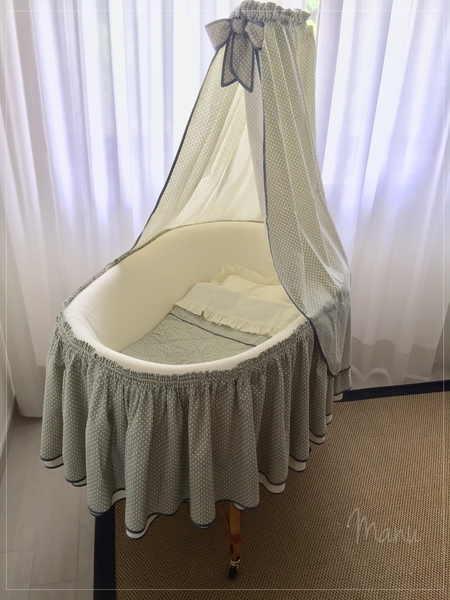 After having embroidered way too many baby bibs, I was ready to build a full-fledged nest! I bought a rattan bassinet structure with the idea that I would sew the cover, skirt, blanket, and sheets myself . . . well, actually, with some help from my craft-y mom. Although I didn’t yet know if I would have a boy or a girl, it was love at first sight when I spotted a fabric with little blue hearts. The pattern and colors were pretty gender-neutral and could have worked either way. Moreover, the store had some other coordinated fabrics - one, in particular, with bigger blue hearts and roses that would have allowed me to add a girly touch if needed, at least to the blanket.
My first child was a boy, so I never did buy the fabric with roses . . . too bad, because two years later, when it was time again to use the bassinet for a girl, that line of coordinated fabrics was out of stock and production. I gave away the bassinet last year, just before moving abroad, but I took one last picture (above) with the idea to “cookie” my memories one day.
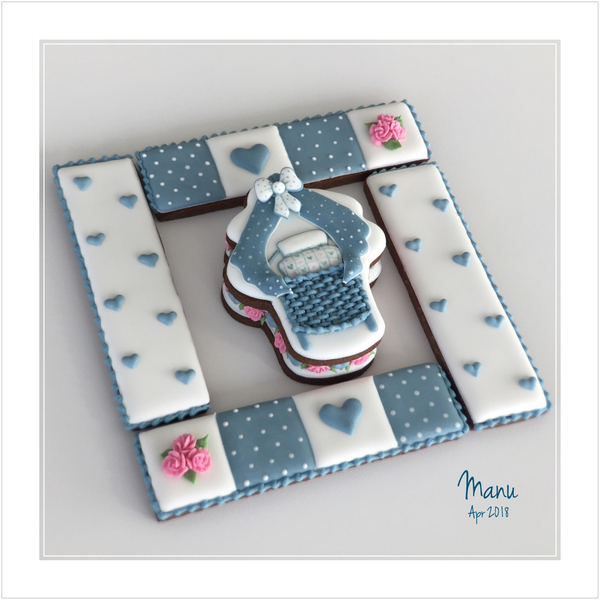
I wish I had been decorating cookies back then and could have made a set like this one as a sweet way to announce my news to my babies' grandparents-to-be. This set includes a bassinet on a cupcake-shaped cookie, framed with four rectangular cookies, with decorations inspired by the fabrics and memories of my early motherhood. Once the bassinet cookie is lifted, another cupcake-shaped cookie is revealed along with the baby's gender! BTW, I felt the bassinet needed some "walls" around it (plus, who doesn't love extra cookies), but the rectangles are completely optional.
- Cookie dough of your choice
- Medium (7 x 9.5-cm/2 3/4 x 3 3/4-in) cupcake cookie cutter (I used Sweet Sugarbelle’s cupcake cutter.)
- Rectangular (3 x 12.5-cm/1 1/4 x 5-in) cookie cutter or cutting template (Optional; see attachment below for template.)
- Sugarcraft knife, if cutting template is used
- White piping-consistency royal icing, in pastry bag fitted with PME #1 tip or equivalent
- White and blue flooding-consistency royal icing, in tip-less pastry bags with openings equivalent to PME #2 tips (I mixed sky blue and black gel coloring to get the blue shade shown here.)
- 13 to 32 little (0.8-cm/3/8-in diameter) pink rose transfers, piped with Wilton #101S tip or equivalent (6 for optional rectangles; 13 for bassinet; and 13 for gender-reveal cookie)
- Templates (again, see attachment) for the following royal icing transfers:
- 2 to 3 large (2 x 1.5-cm/3/4 x 5/8-in) blue heart transfers (2 for optional rectangles; 1 for gender-reveal cookie)
- 13 to 30 little (0.8-cm/3/8-in) blue heart transfers (16 for optional rectangles; 13 to 14 for bassinet)
- 1 (2 x 2.5-cm/3/4 x 1-in) white bow transfer with blue dots (for bassinet)
- Green piping-consistency royal icing, in pastry bag fitted with Wilton #349 tip or equivalent
- Blue piping-consistency royal icing, in pastry bags fitted with Wilton #2 and PME #1 tips or equivalents
- Food marker
- Blue and pink gel food coloring diluted with vodka
- Thin liner paint brush
- White very thick-consistency royal icing, in tip-less pastry bag with opening equivalent to Wilton #8 or #10 tip
Step 1: Roll, cut, and bake cookies
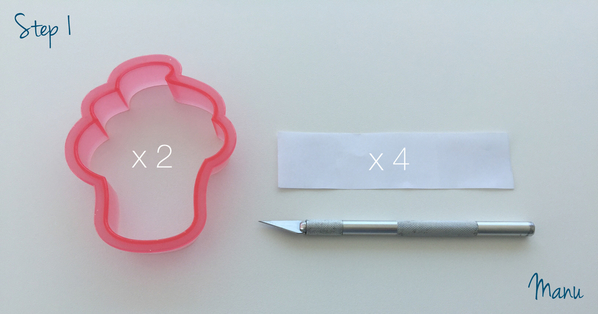
There are only 6 cookies in this project, 4 of which are optional:
- 2 cupcake cookies (To avoid hand-cutting, I chose a standard cupcake cutter, as a bassinet would fit it perfectly, and the shape is pretty easy to find worldwide.)
- 4 (optional) rectangular cookies (In order to properly frame the bassinet, I needed an odd size rectangle, so I resorted to hand-cutting my dough by "tracing" around a template with a sugar craft knife. Again, the template is attached at the bottom of this post.)
Because the two cupcake cookies will eventually be stacked, I rolled out the cookie dough to a thickness of about 0.5 centimeter (slightly less than 1/4 inch) for all of the cookies. Though, if you prefer thicker or thinner cookies, that's fine too.
Once the dough is rolled and cut, bake the shapes according to your recipe's directions. Let the cookies cool completely before proceeding to the next step.
Step 2: Decorate frame pieces (optional)
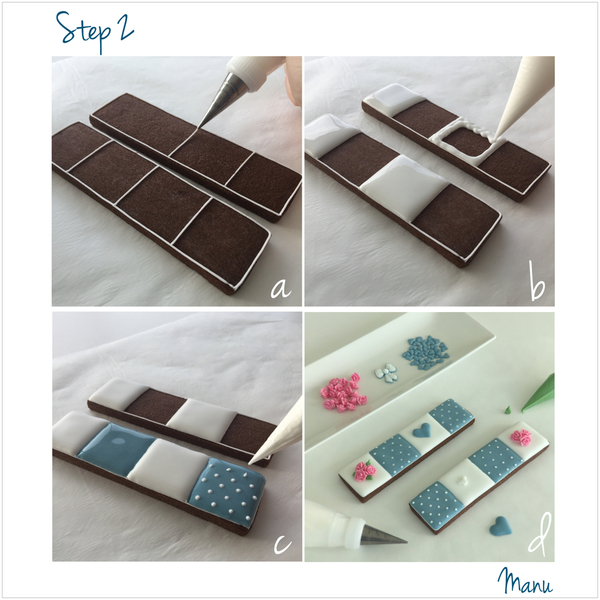
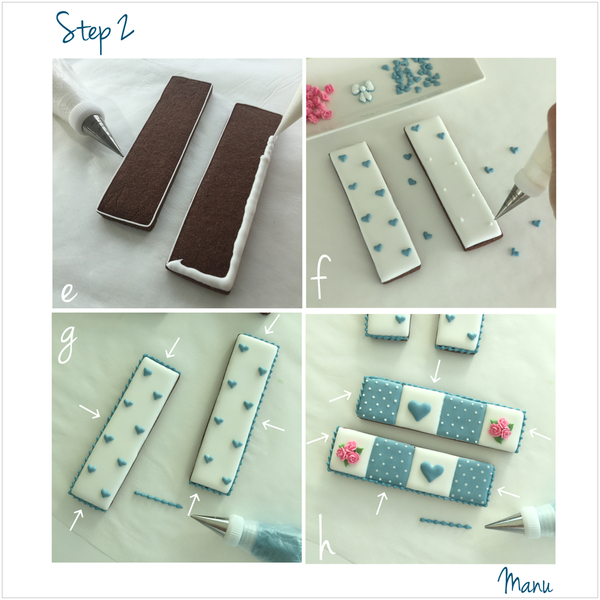
a. Using white piping-consistency royal icing and a PME #1 tip (or equivalent), outline two of the four rectangular cookies, and then pipe three lines across each cookie to divide it into four sections.
b. Flood non-adjacent sections on both rectangles with white flooding-consistency royal icing, using the equivalent of a PME #2 tip. Let the icing dry until a crust has formed on top.
c. Using blue flooding-consistency royal icing and a PME #2 tip (or equivalent), flood the remaining sections on the first rectangle. While the blue icing is still wet, immediately pipe dots on top with white flooding-consistency royal icing and a PME #2 tip (or equivalent). Repeat this wet-on-wet technique (wet icing piped on wet icing) on the other rectangle. Let the icing dry at least 8 hours or overnight.
d. Once the icing is completely dry, glue 1 big blue heart and 3 rose royal icing transfers on the white sections of each rectangle, as shown below, using white piping-consistency royal icing. Using green piping-consistency royal icing and a Wilton #349 tip (or equivalent), pipe some small leaves between the roses. (Note: Again, you’ll find the templates for the heart and bow transfers in the attachment. Instructions for creating 2-D transfers, such as the hearts and bow, can be found in @Julia M. Usher's video here, and instructions for piping roses can be found in this video, also by Julia.)
e. Using white piping-consistency royal icing and a PME #1 tip (or equivalent), outline the other two rectangular cookies that make up the frame. Then flood them with white flooding-consistency royal icing, using a PME #2 tip (or equivalent). Let the icing dry at least 8 hours or overnight.
f. Once the icing is completely dry, glue 8 little blue heart transfers on each of these two rectangles, again using white piping-consistency royal icing for "glue".
g. Using blue piping-consistency royal icing and a Wilton #2 tip (or equivalent), pipe a "trailing beaded" or "pearl" border along three edges of each of the rectangles. (The arrows in the picture below point to the sides that should get borders.) For the border, start by piping a small bead; then gradually move the tip toward you (along the edge) while releasing pressure to create a "tail" on the bead. Maintaining a continuous motion, move the tip slightly forward (away from you) to cover some of the tail just piped, and pipe another bead and tail. Continue piping beads and tails in this way (short back-and-forth movements) until you complete the border on one side. Then release pressure to break the icing flow altogether, and start piping another border afresh on another side. Continue in this vein until the two rectangles each have borders on the three sides indicated below.
h. Following the method in Step 2g, now pipe borders on the first two rectangles decorated in Steps 2a to 2d. (Again, the arrows in the picture below point to the sides that should get borders.)
Step 3: Decorate cupcake cookies (bassinet and gender-reveal cookie)
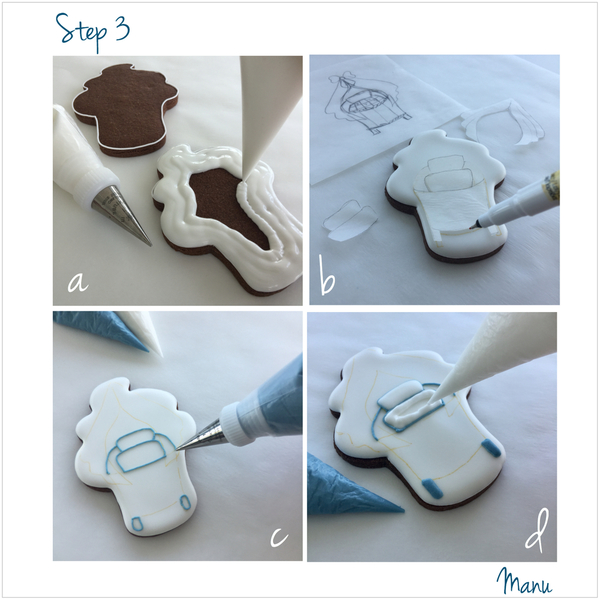
a. Outline the two cupcake cookies using white piping-consistency royal icing and a PME #1 tip (or equivalent). Then flood them with white flooding-consistency royal icing, using a PME #2 tip (or equivalent). Let the icing dry at least 8 hours or overnight. (One cupcake, which will become the gender-reveal cookie, is done for now and can be set aside; it won't be decorated further until Step 4.)
b. Cut the bassinet template (again, in the attachment) into separate pieces to isolate the basket, the pillow and blanket edge, and the canopy. Place these pieces on the remaining cupcake cookie, and, using a food marker, trace the outlines on the cookie. These outlines will be used as piping guides, and will be covered with royal icing in the end, so don't worry if your tracings aren't perfect. You can also try sketching freehand if you prefer.
c. Using blue piping-consistency royal icing, now with a PME #1 tip (or equivalent), outline the pillow, the blanket, and the back edge and feet of the bassinet.
d. Flood the feet with blue flooding-consistency royal icing, using a PME #2 tip (or equivalent). Flood the pillow with white flooding-consistency royal icing, again using a PME #2 tip (or equivalent). Once the icing has crusted on top of the pillow, flood the blanket with the same white icing. Let the icing dry.
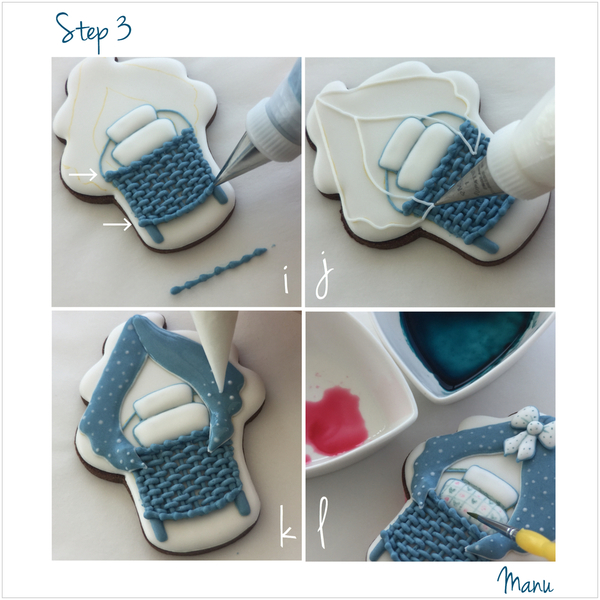
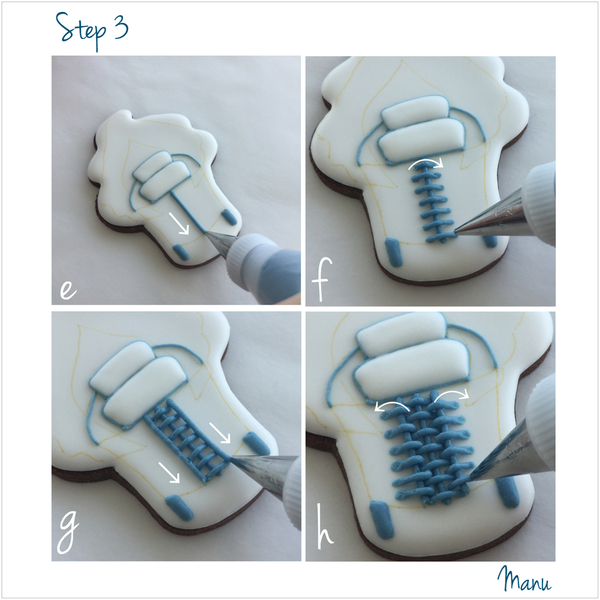
Now we're going to pipe a basketweave pattern in the remaining open area of the bassinet using blue piping-consistency royal icing and a Wilton #2 tip (or equivalent).
e. Pipe a vertical line in the middle of the "basket". We'll pipe both to the left and the right of this line until the entire open area is eventually covered. (Note: I started in the middle to ensure that the basketweave pattern would be centered in the open area.)
f. Next, pipe several short horizontal lines over the vertical line, spacing the lines about one tip-width apart. (You should be able to insert the tip between the lines, so that you can pipe more lines between them in Step 3h, below.)
g. Pipe vertical lines over the ends of the horizontal lines you just piped in Step 3f - one line to the right of the center, and the other line to the left. Again, the vertical lines should be spaced about one tip-width apart.
h. Now, pipe more horizontal lines over the two vertical lines piped in Step 3g, except stagger them between the horizontal lines piped in the center.
Continue in this fashion, repeating Steps 3g and 3h and staggering the horizontal lines as you go, until you have covered the entire open area with basketweave. Let the icing dry.
i. Pipe a border, similar to the ones piped on the rectangles in Steps 2g and 2h, along the upper and the lower edges of the basket to finish the seams. Again, use blue piping-consistency royal icing and a Wilton #2 tip (or equivalent).
j. Once the borders are dry, pipe the outline of the curtain traced in Step 3b, using white piping-consistency royal icing and a PME #1 tip (or equivalent). The outline will extend over and onto the top part of the basket piped in the last step.
k. Flood one section of the curtain, using blue flooding-consistency royal icing and a PME #2 tip (or equivalent), and immediately pipe dots on top with white flooding-consistency royal icing and a PME #2 tip (or equivalent). Let the icing crust, if possible in front of a fan to accelerate drying; then repeat this step for the other curtain section.
l. Now, to decorate the blanket and top of the bassinet! Dilute some blue and pink gel food coloring with vodka (in two separate cups). Paint a blue grid on the blanket using a fine liner brush. Fill the grid by alternately painting little blue hearts and pink "swirl" roses in the openings. Last, glue the bow royal icing transfer on top of the canopy with a bit of piping-consistency royal icing. (I painted small blue polka dots on a white bow, but a plain or striped bow would also look sweet.)
Step 4: Build gender-reveal "sandwich"
It's time to build a cookie "sandwich", or box, with the two cupcake cookies. The upper cookie will serve as the lid, which, once lifted, will reveal the decorations on the other cupcake cookie underneath. Those decorations will be either blue hearts (for a boy) or pink roses (for a girl)!
Note: Credit goes to Ayse Yaman (Instagram: @ayseyamanbutikpasta) for the idea of placing flowers between the cookies. I took inspiration from her stunning macaron "blossom" decorated with buttercream.
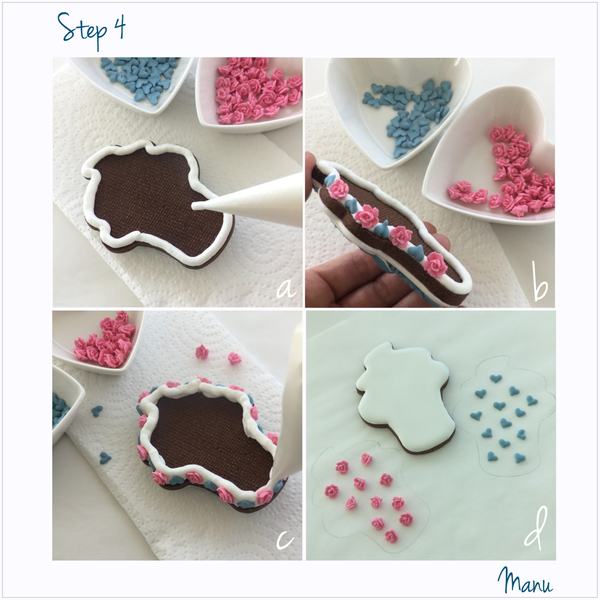
a. Turn the cupcake cookie with the bassinet upside down, and, using very thick-consistency white royal icing, pipe a very large outline around the edge of the cookie. I used a tip-less pastry bag with an opening measuring about 0.6 centimeter (1/4 inch), but a Wilton #8 or #10 round tip would work well too.
b. Quickly stick blue heart and rose transfers on the outline, so that they face out. Be as speedy as you can, because the thick royal icing will crust very fast.
c. Once you have covered the whole edge with the transfers, pipe another outline on top of the first one to build up a "wall". (This wall will prevent the lid from hitting the decorations that will be placed on the cookie underneath.) Once the icing is dry, pipe small green leaves around the roses, as done in Step 2d.
d. Now, take the plain cupcake cookie, flooded in Step 3a, and glue a few roses or blue heart transfers (depending on the baby's gender) in the center. You can also pipe "boy" or "girl" on the cookie, if the decorations alone should leave any doubt! I'll reveal what I did at the end of this post! ![]()
And now that we have decorated all the cookies. . . let’s assemble them and get ready to announce the sweet news!
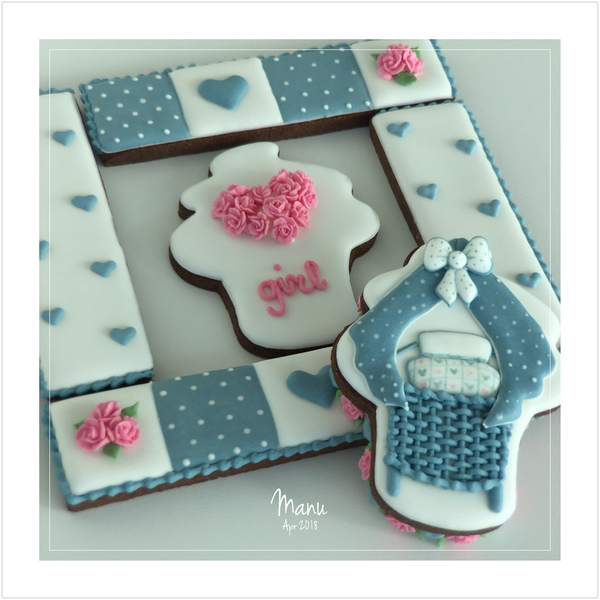
It’s a girl!
In addition to writing "girl", I piped white glue-consistency royal icing in the shape of a heart, and then attached about 13 rose transfers on top.
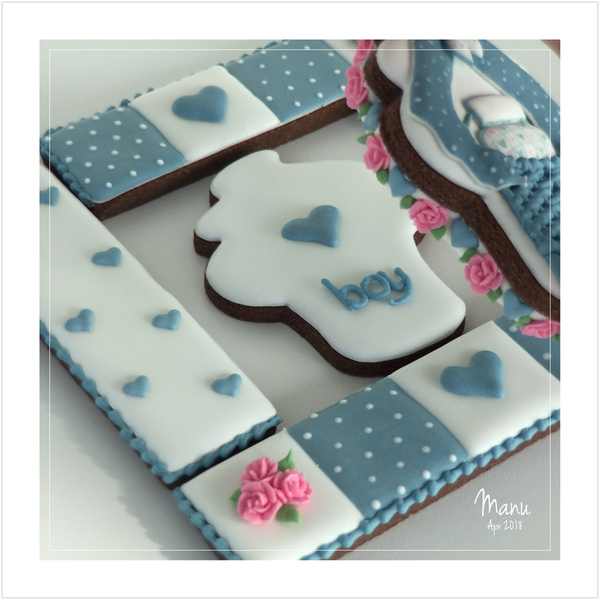
I also decorated a boy's version using just a single heart transfer and the word "boy"!
Ciao, Manu 🌸
[EDITOR'S NOTE: I'd love to see what others do with this project! Hint, hint: Practice Bakes Perfect Challenge #28 is all about recreating projects in Cookie Connection tutorials, and this lovely one is certainly fair game!]


Photo and cookie credits: Manuela Pezzopane
Note: Made by Manu is a Cookie Connection blog feature written by Manuela Pezzopane, where each month she shares the method behind a magical cookie of her own making. This article expresses the views of the author, and not necessarily those of this site, its owners, its administrators, or its employees. To read all of Manuela's past Made by Manu tutorials, click here. And to see all of Cookie Connection's tutorials, click here.




Comments (28)