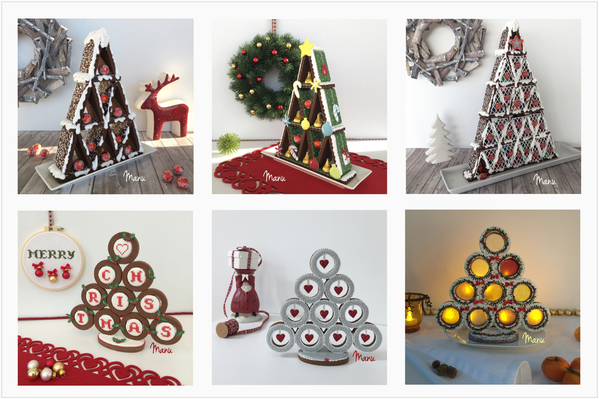
 My past November tutorials have always been about 3-D Christmas trees (read them here and here). To refresh your memory, below is a small gallery of those projects and their variations, which include centerpieces, advent calendars, and a lantern of sorts.
This year, I will instead share an easier and quicker Christmas cookie platter (as we all know how precious time is at the holidays). You will also find a more general winter-themed variation at the very end of this tutorial.
- Cookie dough of your choice
- Rolling pin
- 2 mini (2 to 3-cm/3/4 to 1 3/16-in) heart cookie cutters (I used a Birkmann heart cutter from a mini set and also their single heart.)
- Tree part templates (in "Attachments" under "Files" at the end of this post; dimensions are also listed below in "Cookie Notes")
- Sharp paring knife (or equivalent, for hand-cutting dough)
- Royal icing:
- Piping-consistency white, in pastry bags with PME #2 tip or equivalent (for one-stroke brush embroidery in Step 2) and PME #1 tip or equivalent (for outlining)
- Flooding-consistency green, in tip-less pastry bag with opening equivalent to PME #2 tip
- Flooding-consistency white and red, in tip-less pastry bags with openings equivalent to PME #1 tip
- Piping-consistency yellow and red, in tip-less pastry bags with openings equivalent to PME #1 tip
- Liner paint brush
- Small (about 5.1-cm/2-in) round cookie cutter and large plate (for scoring lines in icing)
- Scribe tool
- Parchment paper
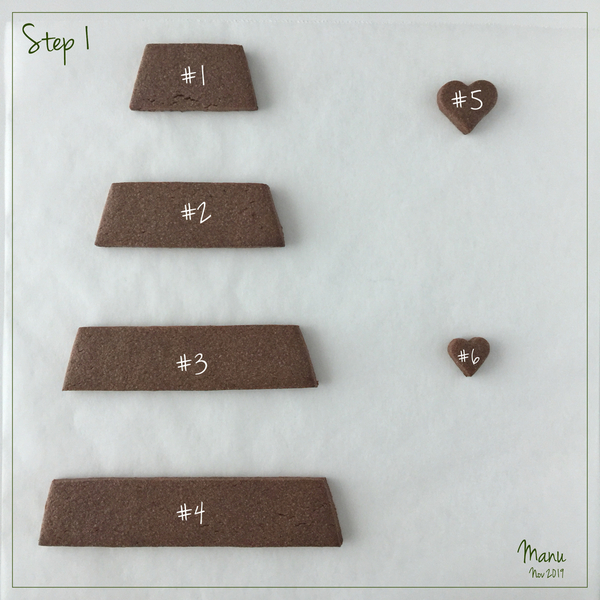
- Top tree section (#1): 4.5 + 6.2 x 3-cm or 1 3/4 + 2 1/2 x 1 3/16-in
- Middle tree section (#2): 8 + 9.3 x 3-cm or 3 1/8 + 3 5/8 x 1 3/16-in
- Large middle tree section (#3): 11 + 12.5 x 3-cm or 4 3/8 + 4 7/8 x 1 3/16-in
- Base tree section (#4): 13.4 + 15 x 3-cm or 5 1/4 + 5 7/8 x 1 3/16-in
- 1 large mini heart (#5): 3 x 2.5-cm or 1 3/16 x 1-in
- 19 smaller mini hearts (#6): 2 x 2-cm or 3/4 x 3/4-in
Step 2: Decorate tree parts #1 and #3
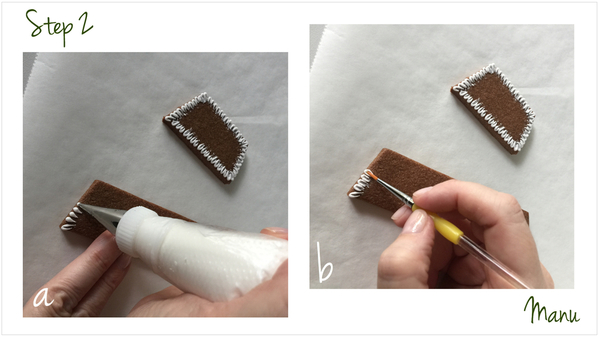
a. Let’s start with parts #1 and #3 of the tree. Using white piping-consistency royal icing and a PME #2 tip (or equivalent), pipe a small bead on the edge of one of these cookies. Move toward the center of the cookie while releasing pressure to create a tail on the bead, like the single beads of a trailing beaded border. Pipe no more than 4 to 5 beads at a time, as you don't want the icing to set before you complete the next step.
b. With a damp liner paint brush, stroke once through the center of each bead (hence the term "one-stroke brush embroidery"), moving in the direction of the tail. The result will look like a little arch of icing. Keep piping beads and brushing through them until the border around each cookie is completed.
c. Change the tip on the pastry bag to a PME #1 (or equivalent), and outline both cookies about 3 millimeters (1/8 inch) from the edge. The goal is for the outline to cover the tails of the beads you just brushed, so only the little arches will be seen once the spaces inside the outlines are flooded in Step 2d.
d. Using green flooding-consistency royal icing and PME #2 tip (or equivalent), flood one of the cookies, and immediately move to Step 2e.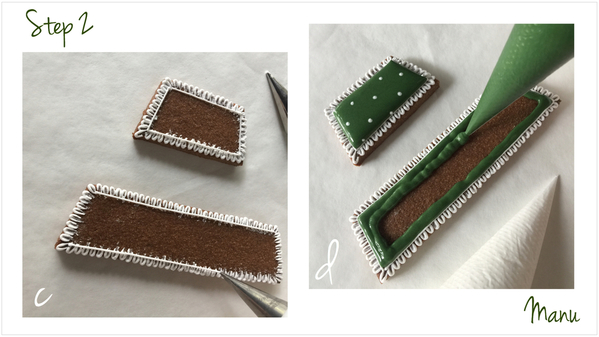
e. While the green icing is still wet, immediately pipe dots on top, using white flooding-consistency royal icing and a PME #1 tip (or equivalent). Start by piping a dot in the center of the cookie, and continue piping dots horizontally to the left and to the right along an imaginary line in the middle of the cookie. Then pipe dots along imaginary lines above and below the center line, staggering the dots between those in the center line. This way, your dots are more likely to look regularly spaced. If you work quickly, all of the dots will settle into the green icing, leaving behind a smooth surface. (This process of applying wet icing to wet icing is called the wet-on-wet technique.)
Repeat Steps 2d and 2e for the other cookie. Let the icing dry completely.
f. Once the icing is completely dry, use a small (about 5.1-cm/2-in) round cookie cutter and a scribe tool to score a curved line (along the cutter edge) into the smaller of the two cookies. The line should intersect the top two corners of the cookie. I used a plate as a guide for scoring the curved line on the bigger cookie. These lines will serve as piping guides for the garland added in the next step.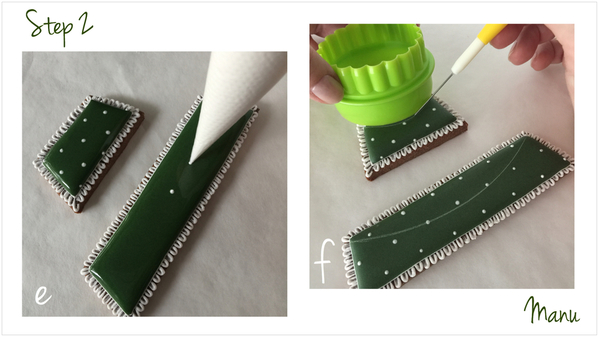
g. Use yellow piping-consistency royal icing and a PME #1 tip (or equivalent) to pipe a line (garland) over the scored marks on each cookie. Let the icing dry a couple of minutes.
h. Now, embellish each line with a trailing beaded border, using the same icing and tip. To pipe this border, start by piping a small bead at one end of the line you just piped; then move the piping bag along the line toward the center of the cookie, releasing pressure to create a tail on the bead. Fill out the entire line with beads in this same fashion, making sure that the next bead covers the end of the tail you just piped.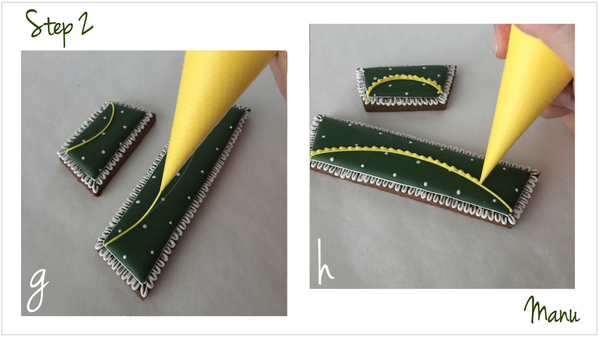
Step 3: Decorate heart cookies and create heart transfers
a. Outline the 19 mini heart cookies and the bigger mini heart cookie using white piping-consistency royal icing and a PME #1 tip (or equivalent). Place the little heart templates (again, you’ll find them in "Attachments") under a piece of parchment paper, and outline two hearts.
b. Flood all of the mini cookies (a total of 20) and the transfer outlines with red flooding-consistency royal icing and a PME #2 tip (or equivalent). Let the icing dry completely.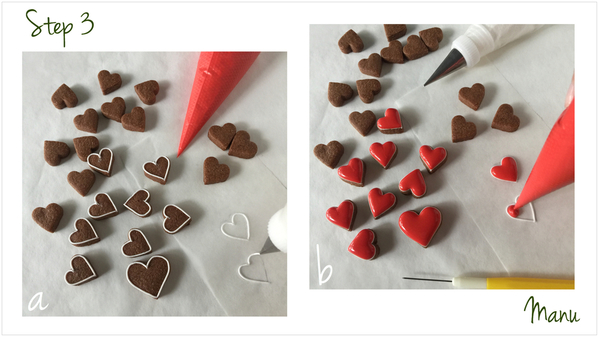
We are halfway there! Here’s a visual recap:
Note: The red transfers aren't pictured above; they'll be used to decorate tree parts #2 and #4 in the next step.
Step 4: Decorate tree parts #2 and #4
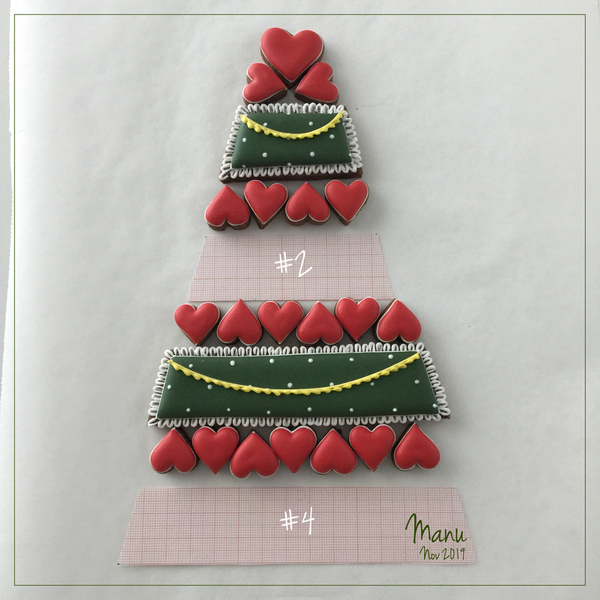
a. Place tree parts #2 and #4 on your work surface, and outline them about 2 millimeters (or about 1/16 inch) from the edge. Again, use white piping-consistency royal icing and a PME #1 tip (or equivalent). Pipe two lines to divide the larger cookie (part #4) into three equal sections, as pictured below. Then pipe two lines to divide part #2 into three sections, but, this time, make the central section about the same size as the sections on part #4.
b. Use green flooding-consistency royal icing and a PME #2 tip (or equivalent) to flood the right section of part #4. (In the photo below, part #2 is already decorated to show you where we’re headed with part #4. The two cookies will be decorated very similarly to create a plaid pattern.)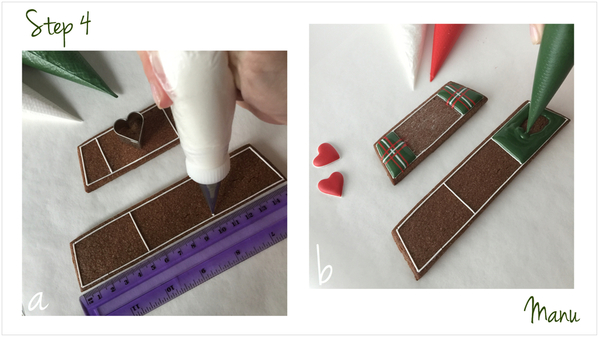
c. While the green icing is still wet, use white flooding-consistency royal icing (and a PME #1 tip or equivalent) to pipe two parallel white lines on top of the green icing. These lines should be close to the ends of the green section, as pictured below. Then, immediately pipe four parallel red lines (one on each side of each white line) using red flooding-consistency royal icing and a PME #1 tip (or equivalent). Proceed immediately to the next step.
d. While the underlying green icing is still wet, rotate the cookie, and pipe a trio of lines perpendicular to the lines just piped in Step 4c and running through the center of the green section. First pipe a white line, and then pipe two red lines close to it, one on each side. Again, if you work quickly, all of the lines will settle into the green icing, leaving behind a smooth surface - and a pattern evocative of plaid!
Move to the left section of part #4, and repeat Steps 4b to 4d. (Note: Part #2 was done the exact same way, except with fewer lines.) Let the icing dry until crusted.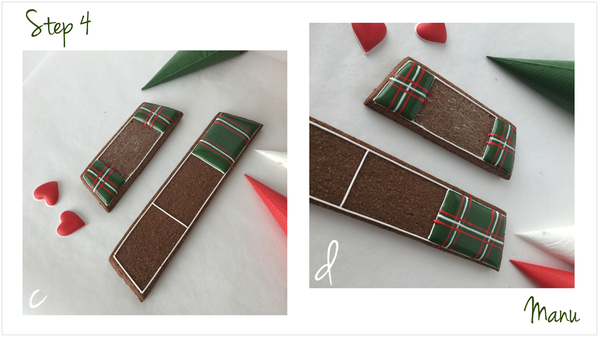
e. Use white flooding-consistency royal icing to flood the central part of both cookies, and let the icing dry completely. (Note: For faster flooding, cut the tip of the piping bag or use a bigger round tip, if needed.)
f. Pipe a dollop of red piping-consistency royal icing on the back side of each heart transfer (made in Step 3), and glue one in the middle of the central section of each cookie.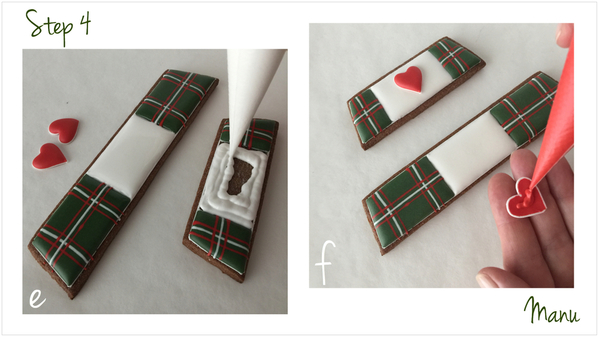
g. Use yellow piping-consistency royal icing and a PME #1 tip (or equivalent) to pipe a trailing beaded border along the lines that separate each section.
h. And last . . . use red piping-consistency royal icing and a PME #1 tip (or equivalent) to pipe a trailing beaded border around the perimeter of each cookie. Let the icing dry completely.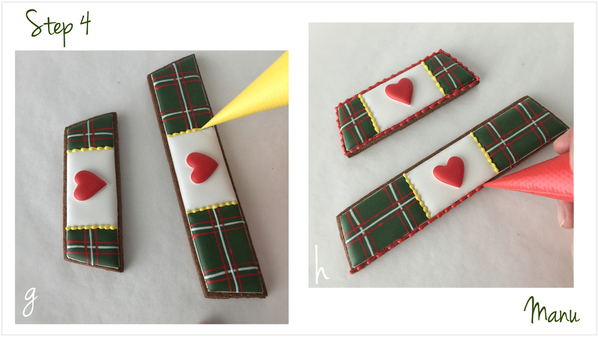
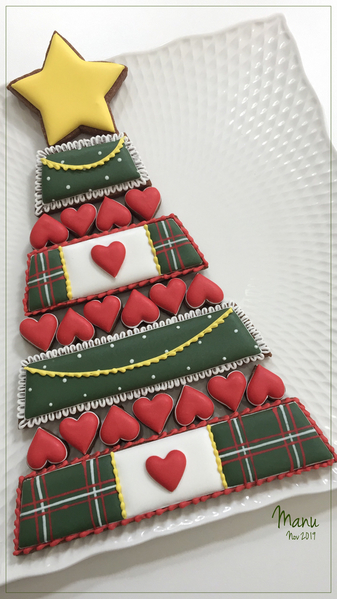
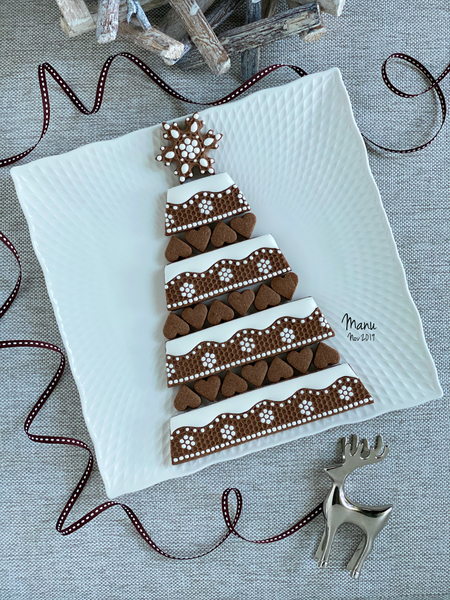
Once the icing has dried, choose a plate and assemble all of the decorated cookies into a tree!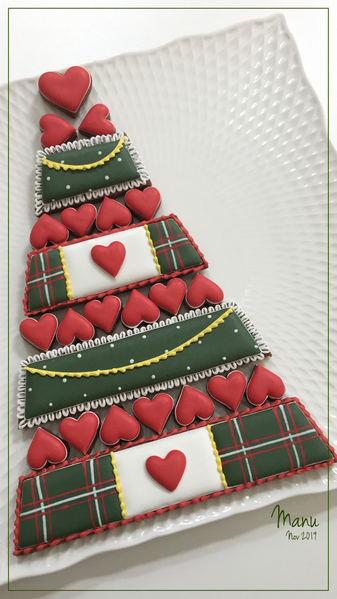
The version below has a large star ⭐️ on top instead . . .
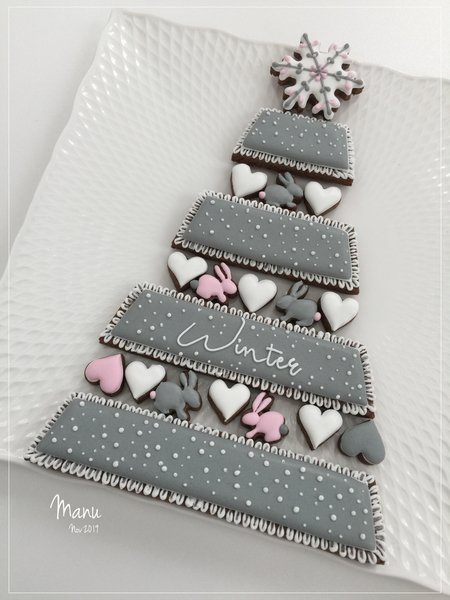
And below is that winter variation I mentioned at the top of this post. It recalls my Cookie Connection "Winter Cookie Platter” tutorial of a couple of years ago (December 2017, to be exact) . . . but once I assembled the pieces, I realized that I should have decorated the base section in white (for snow) and added bunny prints! Rest assured, I have one more tree in the works! ![]()
I hope I have inspired you to try this project. If so, please show me what you make by sharing your cookie tree compositions in the “Clips” section of this site and also in the comments below!
Ciao,
Manu🌲
![]()


 ADDENDUM (December 15, 2019)


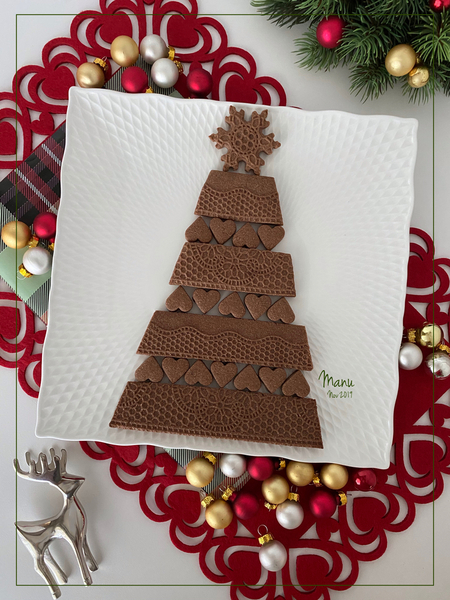
More Christmas tree variations! Both use cookie dough embossed with @SugarVeil mats. In the latter case, I filled in some of the impressions with royal icing!
Happy holidays!


Photo and cookie credits: Manuela Pezzopane
Note: Made by Manu is a Cookie Connection blog feature written by Manuela Pezzopane, where each month she shares the method behind a magical cookie of her own making. This article expresses the views of the author, and not necessarily those of this site, its owners, its administrators, or its employees. To read all of Manuela's past Made by Manu tutorials, click here. And to see all of Cookie Connection's tutorials, click here.






Comments (20)