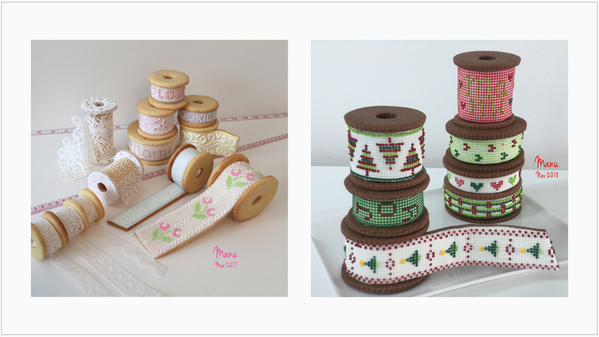
 This is not my first project with cookie spools. The first one, back in 2017, was my entry for Practice Bakes Perfect Challenge #21 (the bimonthly challenge series organized by @Bakerloo Station here on Cookie Connection). On that occasion, I learned to make and use edible lace and to contour cookies, as in many of @Julia M. Usher's curvy 3-D projects. Then last year, I made one more cookie spool set for Christmas.
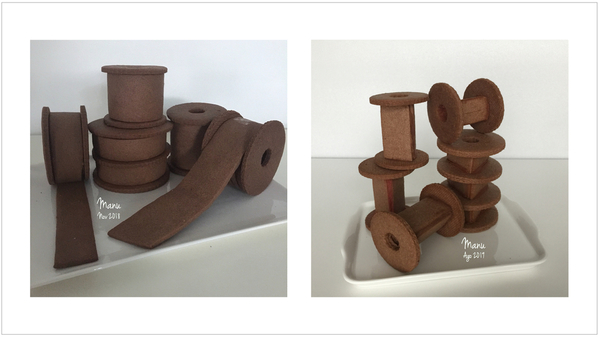
In both of these previous spool projects (pictured above), most of the ribbons were made of cookie dough, with the exception of a few that were made of edible lace or wafer paper. Thanks to Julia’s video tutorials, once I designed the project, I didn’t have to figure out how to contour the cookies; I just had to practice to master the technique that she explains in every little detail. (Practice makes perfect!) You can see the contoured naked cookies, before they got top-coated with royal icing and wrapped in needlepoint lace below, to the left.
This project tutorial is different though, in that the ribbons that cover the spools are made of edible "fabric" using SugarVeil® Confectionery Icing. Contoured cookies are hands down my choice for cookie spools, but I chose a different structure (pictured above, to the right) for the purposes of this intermediate tutorial. This non-contoured structure allows for a simpler 3-D build so that we can focus here on the creation of the edible fabric.
To do that, we will first stencil SugarVeil® Confectionery Icing on the back of a SugarVeil® mat (or any other silicone mat you have at home), and then we will spread a solid layer of SugarVeil® icing on top. Once the icing sets, we will cut the fabric into ribbons and roll them around the cookie spools. There are countless stencils available on the market, so the sky's the limit when it comes to personalizing SugarVeil® fabric. That’s why I chose to use this product for the ribbons rather than other mediums like fondant or wafer paper.
- 2 (6.0-cm/2 3/8-in) fluted round cookies with small (1.8-cm/3/4-in) fluted rounds cut in their centers to make rings
- 3 (6.3 x 4-cm/2 1/2 x 1 5/8-in) rectangular cookies
- Microplane or zester
- Brown very thick-consistency royal icing (Julia M. Usher calls it “glue”; see her video for reference) with parchment cone
- Small and large round paint brushes
- SugarVeil® White Confectionery Icing (one portion left white and another tinted pink)
- Cornstarch
- Any SugarVeil® mat (or any silicone mat)
- Stencil(s) of your choice (I used “Flower Miniprint” by Stephen Benison in the tutorial itself; for the other spools pictured, I used a custom "Manu" stencil by @Kat Rutledge-ibicci, “Thankful” by Julia M.Usher, and “Mini Tri Dot” by Stencibelle)
- Small plastic spreader tool or offset spatula
- Large rubber spatula
- SugarVeil® Confectioner's Spreader
- SugarVeil® Fin (optional)
- Parchment paper
- Zigzag decorative scissors
** Disclosure **
This tutorial is not sponsored by SugarVeil® or any of the other brands I named above. While carefully reading everything posted on the SugarVeil® site in my quest to achieve the best edible lace, I was inspired by their technique of spreading a solid layer of SugarVeil® over lace not yet un-molded from the mat to create fabric. (You can see that technique used to create a bird's nest here.) From that technique sprang my idea to personalize plain fabric with stencils. I tested my idea, it worked, and so I thought I’d share it in a tutorial!
Step 1: Assemble cookie spools
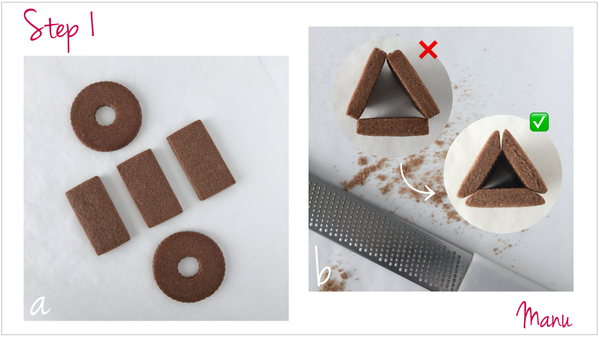
a. The two ring cookies and three rectangle cookies listed above are needed to make one cookie spool. First, we'll assemble a prism using the rectangles, and then we'll glue the rings to the top and bottom of the prism.
b. Start by mitering (filing at an angle) the longer edges of the rectangles using a Microplane or zester. Filing will neaten the corners and ensure complete contact between the cookies along those edges, where we'll later be applying icing "glue". (You can read more about filing cookie edges in my tutorial from June 2017.)
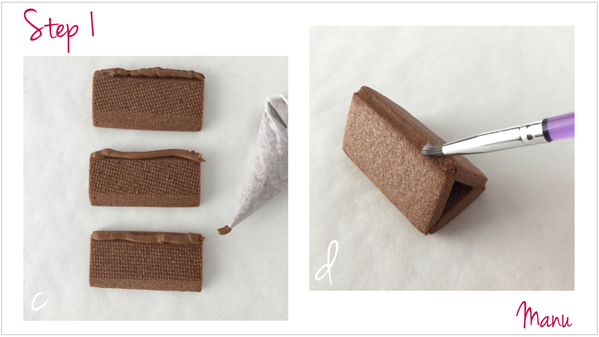
c. Pipe brown icing glue along one of the long edges of each rectangle, and assemble the three rectangles to form a prism.
d. Push the icing into the seams with a paint brush, or with your (clean) finger.
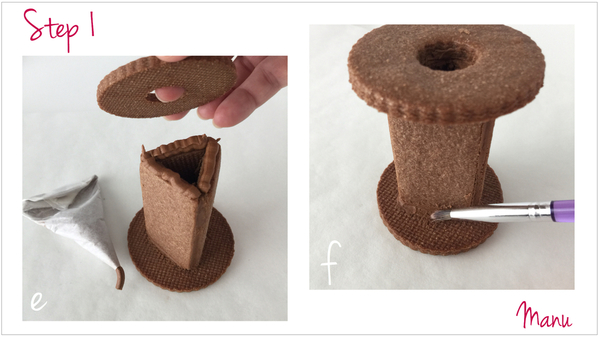
e. Pipe brown icing glue along the bottom of the prism, and set it in the center of one of the ring cookies. Use a damp paint brush to push the excess icing into the seams (and to spread it flat), so the seams look neat and clean. Pipe the same icing glue on the top of the prism, and attach the other ring, making sure it is centered and also parallel to the ring at the bottom.
f. Turn the cookie spool upside down, and spread the icing into and along the seams, just like you did on the other end.
Step 2: Make edible fabric
Prepare white SugarVeil® Confectionery Icing following the directions on the package or in this SugarVeil® video. SugarVeil® is the world’s first spreadable, edible lace, but it can also be used to make fabric when spread on a mat in a solid layer. It is a dry mix to which you just add water. You’ll get a gooey white icing that can be tinted with gel or powder coloring. I used a drop of pink gel coloring to tint part of the icing. Once the icing is spread into/onto a silicone mat, it can either be oven- or air-dried to set it, and, once set, it is then removed from the mat. We're going to use the oven to quick-dry the icing, so preheat it to 200º F (93° C).
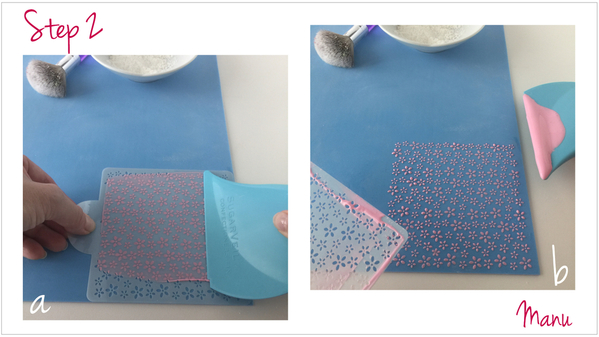
a. Use a large paint brush to dust the back side of a SugarVeil® mat with cornstarch. (Any extra-large mat or long mat normally used to make lace will do.) Place a stencil of your choice at the corner of the mat, and, using a small plastic spreader tool or offset spatula, spread the pink SugarVeil® icing in a thin layer over the stencil.
b. Remove the stencil, place the mat on a baking sheet, and put it in the preheated oven to quick-dry the stenciled design before stenciling the next portion. (It is important to set the stenciled pattern, as otherwise you can mess it up when stenciling the next section or when spreading the solid layer of white icing over it in Steps 2g and 2h. I know from direct experience!)
Drying time for this stencil was about 3 minutes, but drying time can vary with the stencil and thickness and breadth of icing coverage. The icing should be dried just until it is set enough not to smear. If it's brittle, you've over-dried it. Determining the optimum drying time can take a little trial and error, but the drying information on the SugarVeil® site is a useful guide.
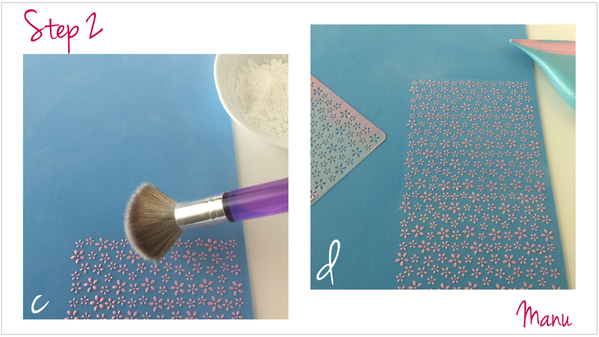
c. Once the mat is out of the oven and off the baking sheet, it will cool down in seconds. Before re-setting the stencil (to stencil the full length of the mat), lightly dust the end of the previously stenciled pattern with cornstarch to keep the stencil from sticking to it (should they make contact).
d. Line up the stencil with the end of the last stenciled section; then repeat Steps 2a through 2c until you've covered the length of the mat.
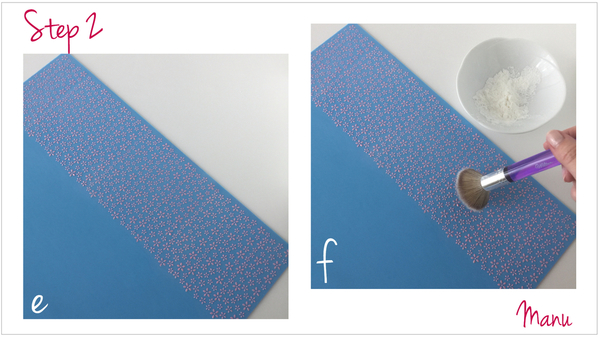
e. And here's the mat fully stenciled along one side! (Since I intended to make one thin ribbon out of this fabric, I didn't need to stencil the entire mat. However, if you want a wider piece of fabric, simply apply these same steps more times until the mat is filled.)
f. Before moving to Step 2g, dust the entire stenciled area with cornstarch. (The SugarVeil® site says that cornstarch ensures easy removal of the icing from the mat, so I didn’t want to risk the fabric sticking to the mat).
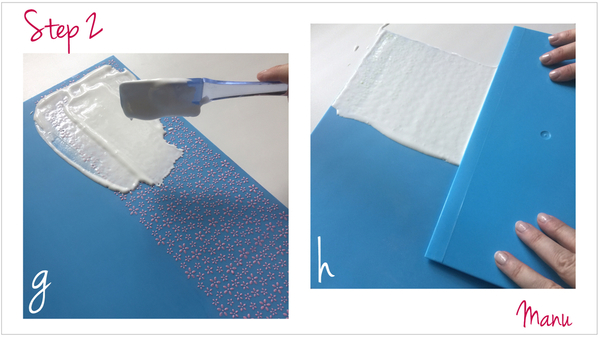
g. Now, use a large spatula to generously cover the entire stenciled surface with white SugarVeil® icing.
h. Use the SugarVeil® Confectioner’s Spreader to smooth the white icing to a uniform thickness. It is important to keep the spreader almost parallel to the mat. Apply just enough pressure to smooth the icing without scraping it (or the stenciled pattern underneath!) off the mat.
SugarVeil® fabric can be made as thin as paper by applying less icing, applying more pressure, and/or swiping the spreader in all directions, but I wanted to make it relatively thick (about 2 mm or just over 1/16 inch, along the edge when wet), so the ribbons have some body. (Note: The fabric will end up closer to 1 mm or just under 1/16 inch thick in the center after it dries.)
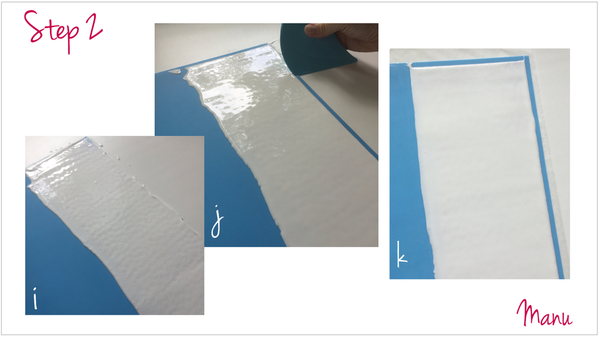
i. Once the icing is smooth . . .
j. . . . use the notch on the SugarVeil® Fin tool to create a crisp, clean edge along the length of the icing. This edge will make it easier to remove the fabric from the mat once the icing has set. If you don’t have this tool, use a (clean) finger.
k. The mat is now ready to be put in the oven to set the icing. For how long? The answer is: it depends on the thickness of your icing layer and your oven. I tested many samples, and drying time ranged from a few minutes for a thin paper-like layer to 15 minutes for a very thick layer. An oven can also have hot spots or not be properly calibrated (i.e., not operate at the temperature at which it's set).
This all being said, visual and tactile cues become very important. Remember: SugarVeil® is set when it is firm and not tacky to the touch. However, it should still have enough moisture to be flexible. If it's brittle, you've dried it too long, and it will sadly crack into pieces.
If you're concerned about over-drying your fabric, there's good news! As I mentioned earlier, icing fabric can be also air-dried, and fabric made this way generally stays flexible longer than its oven-dried counterpart. Drying time in this case depends on the icing thickness, as well as ambient temperature and humidity, and can be anywhere from a few to many hours (which is why I opted to oven-dry)!
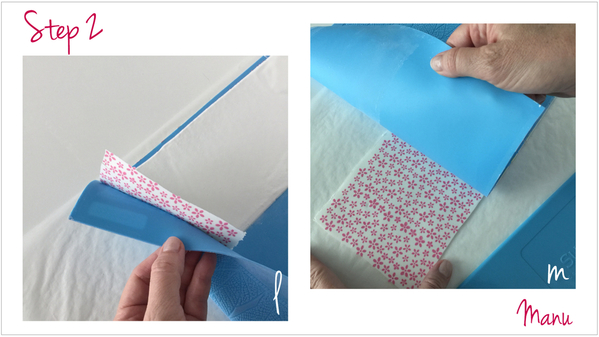
l. The fabric is ready to be removed from the mat when it separates easily along the edge and does not stretch out of shape.
m. You will be tempted to peel the fabric off the mat, but remember to always remove the mat from the fabric by placing the mat face down on a piece of parchment paper and carefully peeling it back. If you tug on the fabric, it could stretch or tear.
Step 3: Assemble edible ribbon and cookie spool
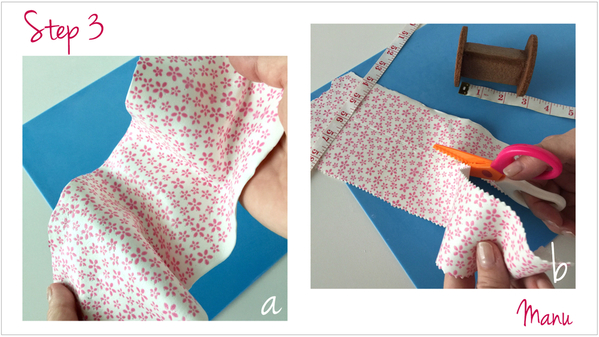
a. Here is the finished SugarVeil® flexible, edible fabric! The stenciled design looks like it was printed or done with the wet-on-wet technique - it is that flat! If you are not planning to use the fabric immediately, store it between parchment paper sheets or silicone mats in an airtight container (such as a large resealable plastic bag) to keep it flexible.
b. Now, measure the width of the cookie spool, and cut a strip of fabric just shy of this measurement. I used zigzag decorative scissors. When you cut, the fabric shouldn’t stick to the scissors. If it does, it is not yet ready to be cut. Let it air-dry a bit longer, or dust the scissors with cornstarch. [EDITOR'S NOTE: Don't let it air-dry too long in a dry environment, as it can quickly get brittle and crack. Since SugarVeil® is mostly sugar, its flexibility can vary greatly with changes in humidity.]
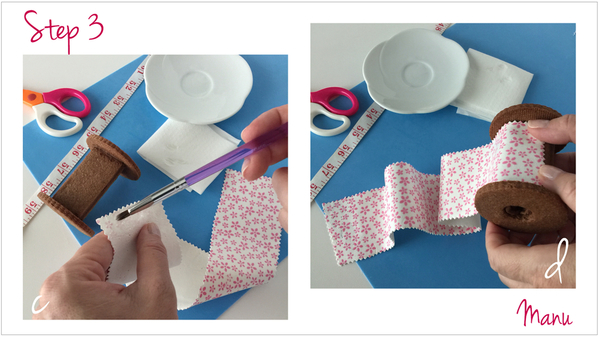
c. Dampen a paint brush by dipping it in a few drops of water; then blot it on paper towels. Moisten one end of the fabric ribbon with the brush. The fabric will absorb the moisture and get sticky.
d. A small amount of pressure will be enough to stick the moistened ribbon end to the cookie spool.
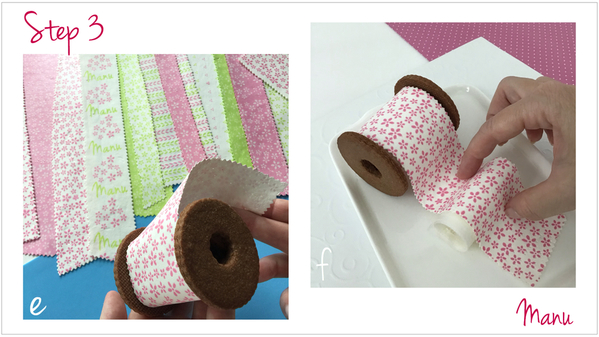
e. Now, roll about half of the fabric strip around the spool. (I wish I owned more stencils, but now that I look at all the fabric samples I made in this picture, four stencils and two colors were more than enough to play with!)
f. Roll up a strip of parchment paper, and place it under the free end of the ribbon to give it some dimension and movement. Eventually, the ribbon will dry to the point that you can remove the parchment prop and the ribbon will hold its shape. But remember, I made my fabric relatively thick, so, even after absorbing some moisture from the environment, it didn't move. [EDITOR'S NOTE: A word of caution to those working in more humid environments with thinner shaped fabric or lace pieces. Again, SugarVeil® is mostly sugar. It will most definitely absorb ambient moisture and can most definitely lose its shape - I know, I've learned the hard way!]
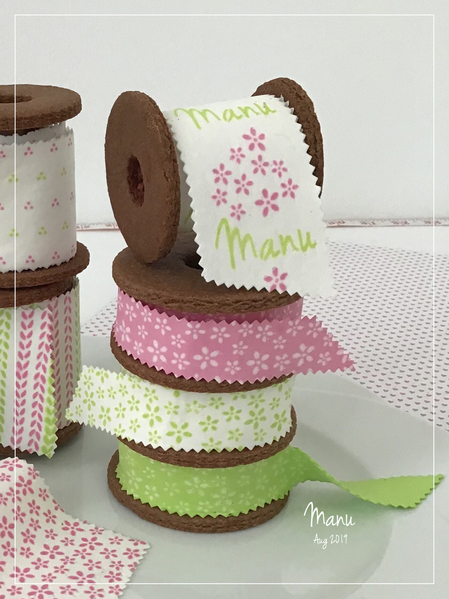
At last, here's the whole cookie spool set with coordinated patterns and colors! Remember to make the spools in different sizes to add interest to your set.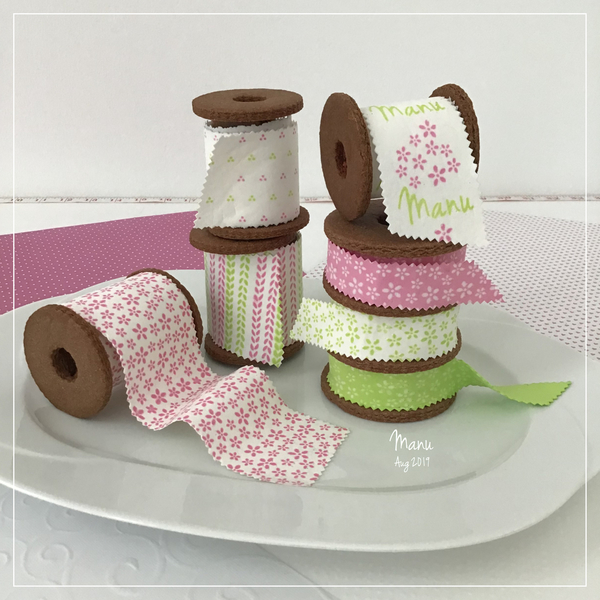
Of all the examples above, the “Manu” ribbon, made by combining two stencils, is probably my favorite. Of course, you could use any other name or message on the ribbon, depending on the stencils you have at home.
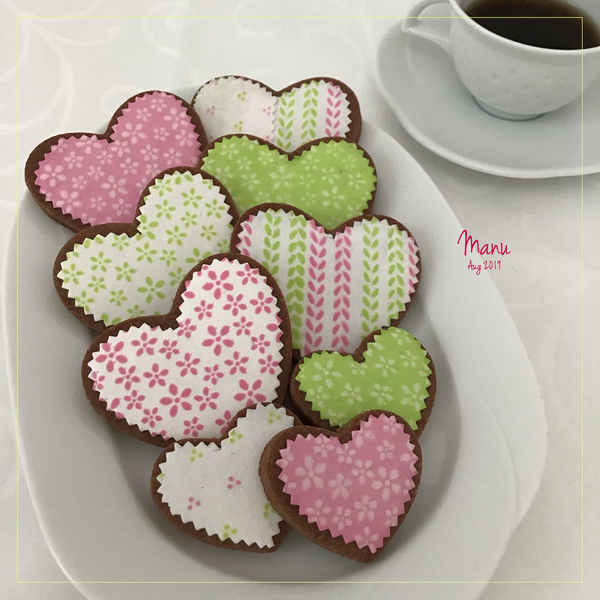
And one last idea for this edible fabric: Use your dough leftovers to bake some heart cookies; then cut your fabric leftovers and glue them on the cookies with a damp paint brush. More cookies ready in minutes!
** Video Recap **
** Other Resources **
Here are some related links from the SugarVeil® site. I found them interesting to read, and they have helped me immeasurably in improving my edible lace skills.
- SugarVeil® Instructions - How to mix SugarVeil® Confectionery Icing
- SugarVeil® Techniques - The many different ways to use SugarVeil® Confectionery Icing
- Mat FAQs - Tips and tricks when working with SugarVeil® mats
- SugarVeil® Setting Times - Approximate setting times for every SugarVeil® mat (setting time varies with depth of the mat pattern, among other things)
- Allowing SugarVeil® Decorations to Dry - The different stages of SugarVeil®, from wet to dry, and how to restore flexibility to dry decorations


Photo and cookie credits: Manuela Pezzopane
Note: Made by Manu is a Cookie Connection blog feature written by Manuela Pezzopane, where each month she shares the method behind a magical cookie of her own making. This article expresses the views of the author, and not necessarily those of this site, its owners, its administrators, or its employees. To read all of Manuela's past Made by Manu tutorials, click here. And to see all of Cookie Connection's tutorials, click here.



Comments (35)