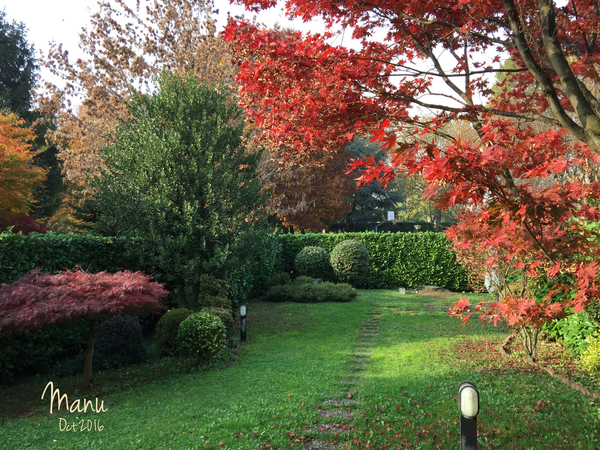
 Fall, autumn, autunno . . . whatever you call it, it's one of my favourite seasons. I designed this project at the end of August, so to get the feeling of autumn, I looked at some old pictures of my yard in Italy. I love the warm explosion of colors, the scent of leaves, the crisp air, and the clear blue skies of this season.
As you'll see, this 3-D project is very easy. I just decorated some thick cookie sticks very simply with words and images related to autumn; then I stacked them to create a lantern. You could use this idea for any season, and you could write the words of a song or a poem instead. (However, pay attention to copyrights if borrowing lyrics or stanzas from others!) The 3-D lantern can be quickly assembled, and easily carried on a plate. It doesn’t require any icing "glue"* either - unless you want to keep it as a lasting decoration. As with many of my previous projects, it's intended to be a centerpiece, to be dismantled and shared among friends over coffee or tea.
*Note: I use the word “glue”, as @Julia M. Usher does in her videos and books, for very thick royal icing used to assemble 3-D cookie projects.
- Dough of your choice, to make 26 (1 x 12-cm/3/8 x 4 3/4-in) cookie sticks
- Rolling pin with guide rings
- Parchment paper
- Sharp knife
- Royal icing:
- White piping-consistency (PME #1 tip or equivalent)
- White flooding-consistency (Wilton #2 tip or equivalent)
- White medium-consistency (PME #1 tip or equivalent)
- Orange piping-consistency (PME #1 tip or equivalent)
- White thick-consistency (for gluing transfers)
- Fall-themed royal icing transfers of your choice, plus assorted food colorings, alcohol, and small paint brushes to paint them (or sprinkles or molded fondant)
- Yellow food marker (optional, if you prefer writing words to piping them)
- LED tealights
- Square plate (with perfectly flat bottom, measuring at least 13 x 13 centimeters, or 5 x 5 inches)
Step 1: Roll, cut, bake, and flood cookie sticks
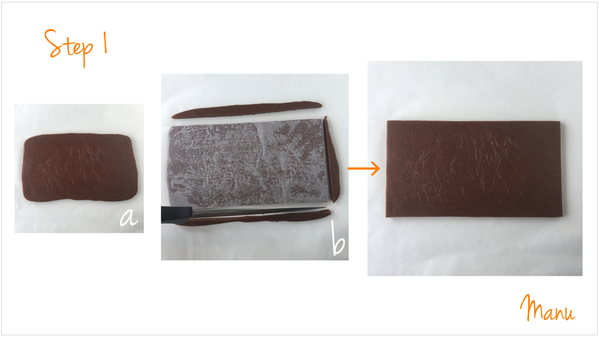
a. Roll out your dough to a thickness of slightly more than 1 centimeter (3/8 inch). I used a rolling pin with guide rings to get a uniform thickness. Relatively thick cookies will make a more stable lantern that's less likely to collapse. (Remember: no icing glue will be used to assemble this project.)
b. Cut out a (12-cm/4 3/4-in-tall) parchment paper rectangle that's long enough to fit your rolled dough. Place it on top of the dough, and use it as a template to trim the dough into a perfect rectangle. Put the dough in the fridge before moving on to the next step, as you will need a firm dough to avoid misshaping your cookies when you cut them.
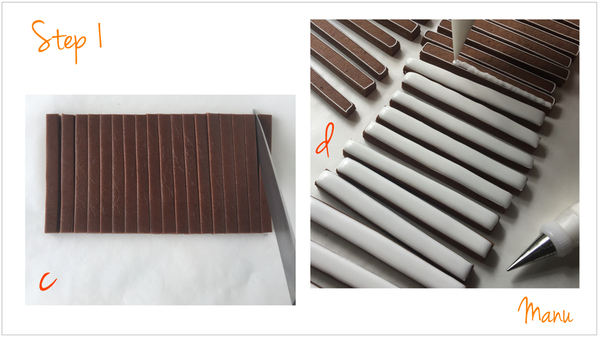
c. Use a sharp knife to cut the dough into long, thin (1 x 12-cm/3/8 x 4 3/4-in) sticks. Put the dough in the fridge again. When the sticks are firm enough to handle without misshaping, transfer them onto a baking sheet, and bake according to your recipe. As a frame of reference, I got 18 cookie sticks from my standard (about 400-g/1-lb) batch of dough. You will need 26 sticks for this project, so prepare enough dough accordingly.
d. Once the cookie sticks have cooled, outline and flood them with white royal icing, and let the icing dry. I used white piping-consistency royal icing and a PME #1 tip to outline, and white flooding-consistency royal icing and the equivalent of a Wilton #2 tip to flood.
Step 2: Decorate cookies with words and royal icing transfers
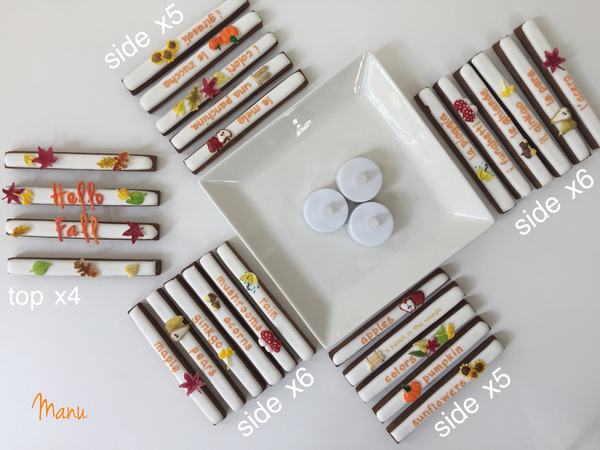
We are going to decorate each cookie with a piped (or written, if you prefer) word and a royal icing transfer (i.e., royal icing piped off the cookie and then later transferred onto it once dry). For the 22 cookies that form the sides of the lantern, center the word and transfer on each cookie, making sure to leave at least 2 centimeters (3/4 inch) free of decorations at both ends. (The cookies will overlap at their ends in the final lantern assembly, so we don’t want to cover those areas with decorations.) For the remaining 4 cookies that will sit on top of the lantern, you can decorate them as much as you want!
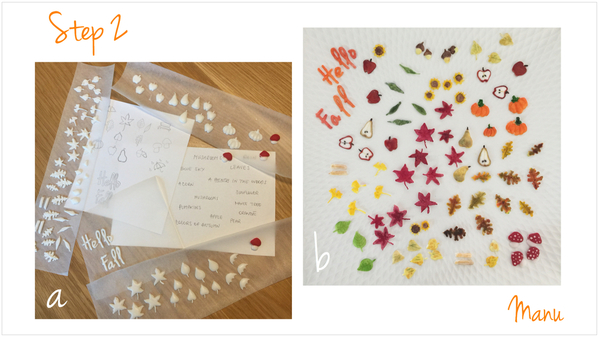
a. Write down a list of words related to fall, and draw little (1- to 2.5-cm/3/8- to 1-in) images that represent those words. (I drew apples, pumpkins, pears, etc., as well as various fall leaves for the lantern top.) Place your drawings under parchment paper, and, using a PME #1 tip (or equivalent), trace over them with white medium-consistency royal icing. I also piped the letters for the words “Hello Fall” (for the lantern top) as transfers. (BTW, I had some leftover red royal icing from a previous project that I used for the mushroom caps!)
b. Once the icing is dry, paint each transfer with food coloring, extended with alcohol as needed/desired. It's best to paint the transfers while they are still stuck to the parchment paper, so they don't move around while you're working on them.
If royal icing transfers are not your thing, you can use sprinkles instead, or molded fondant. But if you like royal icing, then I suggest you take a look at @Aproned Artist's oak tree leaf transfer tutorial to learn how to make curvy transfers; @Julia M. Usher’s video for tips on airbrushing and stenciling transfers; and/or @LilaLoa's blog post about how to make your own royal icing sprinkles.
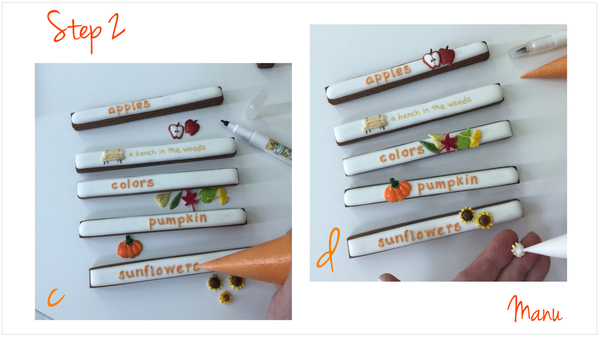
c. Now, using orange piping-consistency royal icing and a PME #1 tip (or equivalent), pipe one of your chosen words on each of 22 cookies. (I decorated half of the sticks with English words, and the other half with those same words in Italian!) Remember to reserve 4 sticks for the lantern top; they will be decorated a bit differently in Steps 2e and 2f.
Note: You can instead use a food marker to write the words, but, in that case, make sure the icing on the cookie sticks is completely dry. Otherwise, the marker will put dents in it.
d. Pipe a dot of white thick-consistency royal icing glue on the back of the transfers that match the words piped in Step 2c; then attach each transfer close to its matching word.
e. Place the 4 cookies sticks that will form the lantern top on your work table, and glue the “Hello Fall” letter transfers on the two cookies in the middle.
f. Now, using the same royal icing glue, attach the various leaf transfers to all of the cookies.
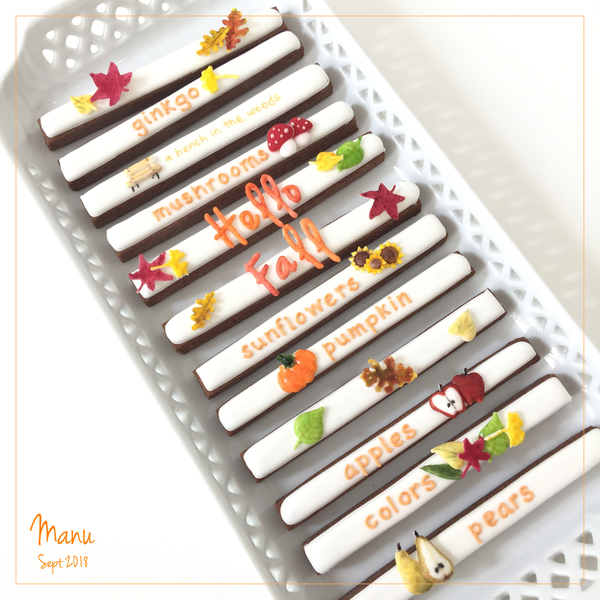
Here’s a visual recap of all the decorated cookies needed to build the 3-D lantern:
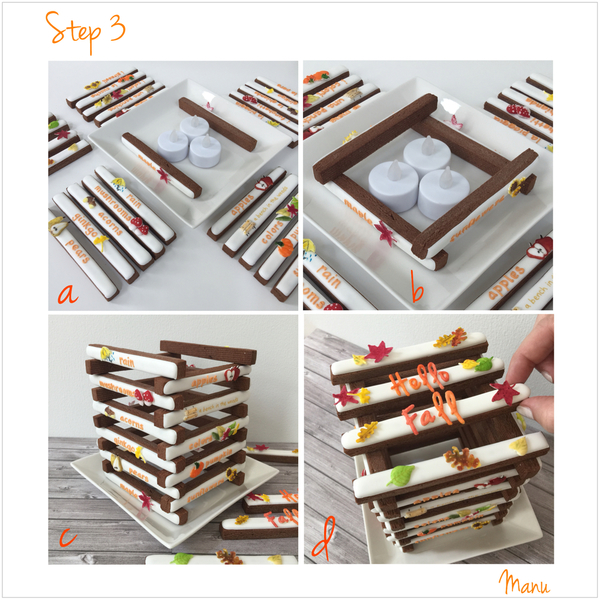
Step 3: Assemble cookies into lantern
a. Place the LED tealights in the center of a square plate. (Remember to turn them on!) Next, set two cookies, decorated sides facing out, parallel to one another on opposing sides of the plate.
b. Create a second cookie layer by setting two cookies on top of the ends of the first two cookies. Again, the decorated sides should face out, and the cookies should be parallel to one another.
c. Continue to add layers in this fashion until you have built up two (opposing) sides comprised of 6 cookies each and another two sides with 5 cookies each.
d. Complete the lantern by laying the remaining 4 cookies across the top with their decorated sides facing up, of course!
And that’s how a fall cookie platter (well, actually two platters like this) . . .
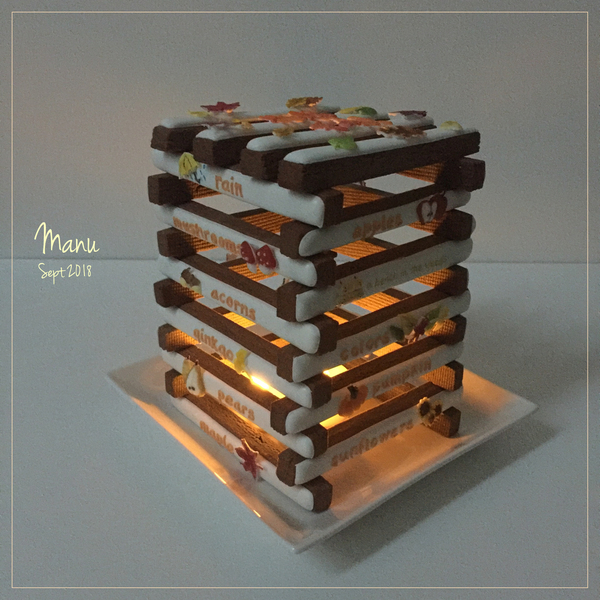
. . . becomes a 3-D cookie lantern!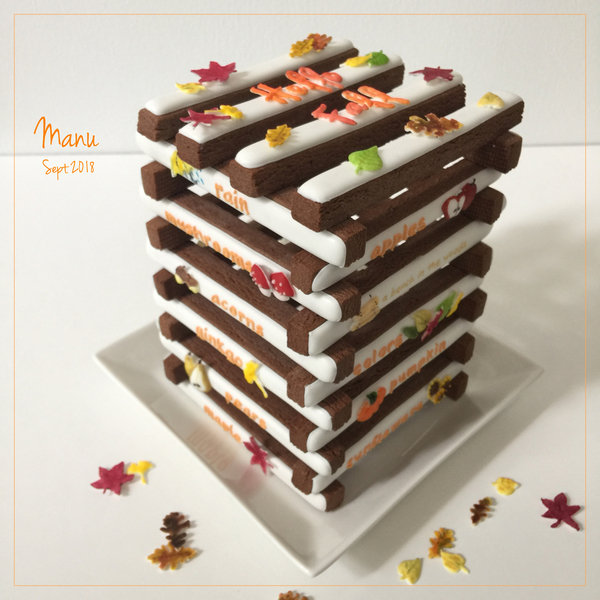
I leave you with the night version:
Happy fall! 🍂🍁🍃
Ciao,
Manu


Photo and cookie credits: Manuela Pezzopane
Note: Made by Manu is a Cookie Connection blog feature written by Manuela Pezzopane, where each month she shares the method behind a magical cookie of her own making. This article expresses the views of the author, and not necessarily those of this site, its owners, its administrators, or its employees. To read all of Manuela's past Made by Manu tutorials, click here. And to see all of Cookie Connection's tutorials, click here.






Comments (33)