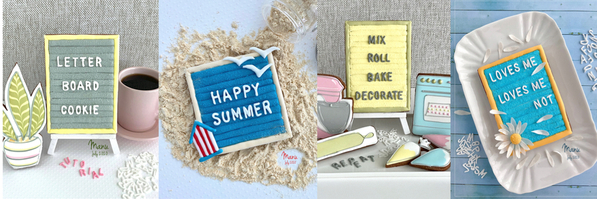
I shared my first felt letter board cookie tutorial three years ago, and have made a few more since! Here's a photo collage of my past projects plus some of their variations for reference and inspiration.
In this new cookie project, the felt letter board is a royal icing transfer* applied to an already iced leaf cookie that can be either airbrushed (Option #1) or handpainted (Option #2). Don’t get intimidated! My approaches to both options are very much geared to absolute beginners. In Step 2, you get to decide which option you prefer (unless you want to skip both and flood the leaf cookie with tinted royal icing instead).
*Note: A royal icing transfer is nothing more than royal icing piped on a surface other than a cookie, which is then allowed to dry before transferring it to a cookie.
Also, note: To create a little receptacle for surprise nonpareils and/or sprinkles, I didn’t flood the area on the leaf cookie under what will be the letter board transfer location. The shape of the letter board transfer is very much up to you and the length of the quote or message that you want to place on top of it.
- Cookie dough of your choice
- Leaf template (see "Attachments" under "Files" at the end of this post) or any large (~16 x 17-cm/6 1/4 x 6 3/4-in) leaf cookie cutter of your choice
- Parchment paper
- Pencil and scissors
- Sugarcraft knife or equivalent
- Scribe tool
- 1 (4-cm/1 9/16-in) square cookie cutter (optional, to use as a scoring guide in Step 2a)
- Royal icing and pastry tips:
- White piping-consistency in pastry bags with PME #1 tip (or equivalent, to pipe lines) and PME #2 tip (or equivalent, to pipe letters)
- White flood-consistency in pastry bag with PME #3 tip (or equivalent; I used a tipless bag)
- Grey thick flood-consistency in pastry bag with PME #3 tip (or equivalent; I used a tipless bag)
- For Option #1 (Steps 2e to 2j): Airbrush system plus yellow, orange, and green airbrush colorings
- For Option #2 (Steps 2k to 2o): Light and dark yellow, orange, and green gel food colorings plus vodka and large round craft paint brush
- Letter board template (see "Attachments" under "Files" at the end of this post)
- Acetate or parchment paper for letter board transfer (the latter only for letter transfers)
- Small paint brush, to create felt texture
- Nonpareils and/or sprinkles of your choice
Step 1: Cut and bake leaf cookie
For this project, you need cookie dough (your choice!) and a large leaf cookie cutter of the approximate dimensions listed above. I didn’t have one, so I plucked a leaf from a tree on my street and traced it to design the template that you'll find in "Attachments" under "Files" at the end of this post.
a. Download my template (as needed), trace it on a piece of parchment paper, and cut it out.
b. Roll your cookie dough to your favorite thickness. Place the template over your cookie dough, and use a sugarcraft knife to cut along the outer edge of the template.
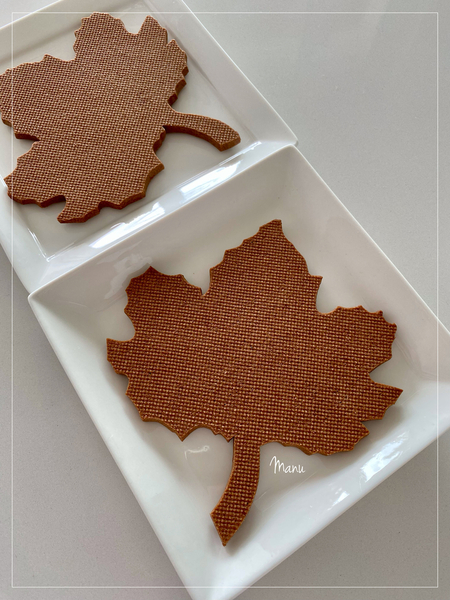
 Remove the excess cookie dough as well as the template, and bake the leaf cookie according to your recipe. Let it cool completely before decorating. I actually baked two leaf cookies to show you the two different decorating methods. They look good just bare like this, don’t they?
Step 2: Flood leaf cookie with royal icing; then airbrush or handpaint it
a. Use a scribe tool to score a square on the cookie. The square should be a little bit smaller than the letter board transfer that gets made in Step 3. It should measure about 4 centimeters (1 9/16 inches) on each side. I used a square cookie cutter as a scoring guide, but you can mark off the area with a ruler, or score by eye.
b. Outline the leaf cookie using white piping-consistency royal icing and a PME #1 tip (or equivalent). I outlined about 0.2 centimeter (1/16 inch) from the cookie edge, because I like the contrast of the bare cookie dough to the royal icing.
 c. Using the same icing and tip, outline the square that you just scored in Step 2a.
d. Flood the space between the two outlines using white flood-consistency royal icing in a pastry bag with a PME #3 tip (or equivalent; I used a tipless bag). The square should remain bare. Let the icing dry completely. Note: If you'd rather not airbrush or paint the leaf in Steps 2e to 2o, simply outline and flood the cookie with tinted royal icing.
Decision Point #1: It's time to choose! Follow Steps 2e to 2j if you own an airbrush and want to take that approach. Or jump to Steps 2k to 2o if you'd prefer to handpaint the leaf. Again, in each case, my approach is tailored to beginners. For airbrushing, I pull back on the airbrush trigger just slightly (to ensure a controlled spray) and move the airbrush away from or closer to the cookie depending on the degree of color saturation that I want (further away for lighter shades; closer for more saturated tones). For painting, I simply dip the paint brush in the food coloring and then blot it on the cookie to create a stippled effect.
Option #1: Airbrush leaf cookie
e. Fill the airbrush with yellow airbrush coloring, and apply a light layer of coloring by spraying at a fair distance (a few inches) from the cookie. Keep the airbrush perpendicular to the cookie and moving at all times, until you've completely covered the icing.
f. Airbrush the leaf with more yellow airbrush coloring (and a bit closer to the cookie) to create a few randomly spaced darker yellow spots.
g. Fill the airbrush with orange airbrush coloring, and create some random orange spots just as you did with the yellow coloring in the previous step.
h. Fill the airbrush with green airbrush coloring, and create some random green spots.
i. Continue to airbrush until you are happy with the color combination. For instance, at the very end, I decided to fill my airbrush with more orange airbrush coloring to create darker orange spots.
j. Ta da! The leaf cookie is now completely airbrushed in the colors of fall!
Option #2: Handpaint leaf cookie
k. Squeeze light and dark yellow, orange, and green gel food colorings onto a saucer, and use some vodka to extend them into paints. Dip the tip of a large round craft paint brush in light yellow food coloring, and apply the coloring all over the iced surface with up-and-down motions of the brush. (This painting technique is called stippling.) Tip: Practice first on another saucer or a piece of paper to make sure that you're loading your paint brush with the desired amount of coloring. The first application of coloring after loading a brush can sometimes be too heavy, so also have a piece of paper towel handy to blot excess coloring off your brush as you paint.
I. Now, dip the brush in dark yellow food coloring, and keep stippling to create some random darker spots. As you continue painting and adding more coloring where you already painted, you’ll see the coloring dry and brush strokes merge together.
m. Repeat Step 2l but use orange food coloring.
n. Now use green food coloring, and keep stippling.
o. And ta da, once again! The leaf cookie is completely handpainted in the colors of autumn. For more painting details, check out my video at the end of this post that shows this cookie variation.
Step 3: Create letter board royal icing transfer
a. Download the letter board template (see "Attachments" under "Files" at the end of this post), and place it under a piece of acetate or parchment paper. Pipe a series of 8 parallel lines using white piping-consistency royal icing and a PME #1 tip (or equivalent). The lines should be about 0.6 centimeter (1/4 inch) apart.
b. Now outline the edge of the letter board with the same icing and tip. To nicely cover the scored square area on the cookie (see Step 2), the letter board should measure about 5.5 centimeters (2 1/8 inches) on all sides.
c and d. Now flood non-adjacent strips using grey thick flood-consistency royal icing and a PME #3 tip (or equivalent). Let the icing set before flooding the remaining strips so that the icing in each strip remains distinct. (Please see Steps 1c and 1d of my previous letter board tutorial for photos, as this process is not properly depicted in Photo 3d below - my mistake!) Let the icing dry completely.
e. Pipe a small amount of the same grey icing onto a saucer. Use a paint brush to apply the icing randomly along each strip with up-and-down motions of the brush. This technique is also called stippling. While you stipple, the icing will start to dry, and you will be left with a felt-like texture on the cookie.
f. To remove the transfer from the acetate or parchment paper, place it near the edge of your work table, and gently peel away the acetate or parchment paper from underneath. If the acetate or parchment paper does not easily peel away from the icing, then the icing is not completely dry. Stop, and allow a little more drying time.
g. Decision Point #2: You can either pipe a message directly on the letter board transfer or pipe letter transfers on parchment paper and then glue them on the board. I went for the second option as it minimizes the risk of making a piping error on top of a perfectly good transfer. Piped letters will dry very quickly and easily pop off parchment paper without breakage. (Note: Do not use acetate in this case, as transfers very rarely pop off acetate even when the transfers are quite dry. In trying to peel away acetate from these delicate transfers, you will most likely break them.) To fit this board, the letters should be about 1 centimeter (3/8 inch) tall and span about 2 strips on the board transfer. Whether you choose to pipe transfers or directly on the board, use white piping-consistency royal icing and a PME tip #2 (or equivalent).
h. To apply letter transfers, a tiny dot of white piping-consistency royal icing is all that's needed. Use the same icing, but remember to change the tip from a PME #2 to a PME #1 (or equivalent); otherwise the dots make peek out from behind the letters, as in my case!
Step 4: Place letter board transfer on leaf cookie
a. To add an element of surprise, fill the empty square space on the leaf cookie with colorful nonpareils and/or sprinkles of your choice!
b. Use white piping-consistency royal icing and a PME tip #2 (or equivalent) to outline around the square on the leaf.
c. While the icing is still wet, carefully attach the letter board transfer to cover the nonpareils and/or sprinkles.
d. And our fall-themed letter board cookie is ready to enjoy!
Here’s a close-up of the airbrushed leaf cookie with a square letter board that says “HELLO FALL”.
For the handpainted leaf, I used a rectangular letter board transfer and the message “AUTUMN”.
And here’s both of them ready to be eaten with a cup of hot coffee [EDITOR'S NOTE: Or with a mug of hot mulled cider, my favorite fall beverage! ![]() ~JMU]. Which is your favorite?
~JMU]. Which is your favorite?

Please enjoy the entire decorating process in the following video recap, which complements this written tutorial.
And if you picked Option #2, here's a quick video showing the painting technique.
Happy fall! 🍁🍃🍂
Manu

Manuela Pezzopane, affectionately called Manu by her friends and family, is the author of the blog feature Made by Manu, where each month she shares the method behind a magical cookie of her own making. In March 2022, Manu also assumed the role of host of our rebranded and reformatted Cookie Connection Challenges: Watch-Learn-Create Series, which debuted in a virtual video format in July 2022. A fan of everything handmade, Manu professes to have tried every possible hobby. However, it wasn’t until the end of 2014, when an American friend invited her to a Christmas cookie exchange, that she first discovered decorated cookies. In 2015, after watching Julia M. Usher's videos and signing up on Cookie Connection, Manu finally attempted her own designs. Since then, cookie decorating has become Manu’s passion, and her mesmerizing video shorts have earned her a large and loyal following throughout the global cookie community. Manu harks from Rome, Italy, where she currently resides. You can email Manu at manubiscottidecorati@gmail.com, follow her on Facebook and Instagram, or explore her past challenges and large library of Made by Manu tutorials here on Cookie Connection.
Photo credit: Manuela Pezzopane
Note: Made by Manu is a Cookie Connection blog feature written by Manuela Pezzopane, where each month she shares the method behind a magical cookie of her own making. This article expresses the views of the author, and not necessarily those of this site, its owners, its administrators, or its employees. To read all of Manuela's past Made by Manu tutorials, click here. And to see all of Cookie Connection's tutorials, click here.


Comments (10)