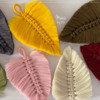
 This month I have for you some colorful leaf cookies, inspired by macramé feathers. Macramé feathers pop up very often in my Instagram feed, and, since I appreciate leaf shapes more than usual during the fall season, I was inspired to make a cookie version of them. Each cookie is decorated using only piping-consistency royal icing. The lines and knots add interest, texture, and dimension to the monochrome cookies.
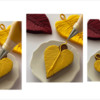
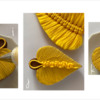
Before making any attempt with royal icing, I made some actual macramé leaves to understand the best way to reproduce the decoration in royal icing. I also thought they might come in handy as a photo backdrop for my cookies! But I really just like making things with my hands, and trying something other than cookie decorating sometimes provides more cookie inspiration! (I took the same approach for my past nautical royal icing knot tutorial here on Cookie Connection.)
Heads up: There is a lot of line-piping involved with this tutorial, so use a royal icing consistency that is soft enough not to give you hand cramps, but thick enough to hold a tight line without adjacent lines merging into one another. Also, I used a very small tip in order to get an outcome as close as possible to real macramé leaves, but you can use a bigger tip to ease and speed the piping.
- Cookie dough of your choice
- Leaf or long heart-shaped cookie cutter of your choice (Alternatively, use my leaf template, shown in Step 1a with dimensions.)
- Sugarcraft knife (or equivalent)
- Royal icing:
- Piping-consistency yellow (or any other colors you like) in pastry bag with coupler
- Pastry tips: Wilton #3, PME #1 (or equivalents)
- Small offset spatula or knife
Step 1: Cut and bake cookies
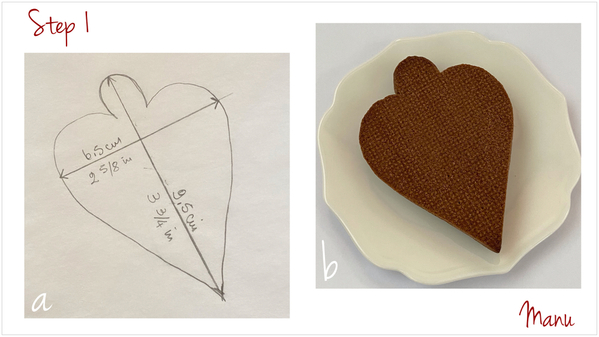
To make the leaf cookies, use a generic leaf cutter, a long heart-shaped cutter, or my leaf template (a). My template measures 2 5/8 x 3 3/4 inches (6.5 x 9.5 centimeters). Roll your dough to your favorite thickness (I rolled mine to a thickness of 1/4 inch, or 0.6 centimeters), and cut out as many leaves as you like. (I cut out six to make the colorful array of leaves shown at the top of this post.) To use my template, just trace it onto parchment paper, and cut it out. Place the template on the cookie dough, and use a sharp craft knife to cut around the edge of the template. Bake the cookies according to your recipe, and let them cool completely before decorating them (b).
Step 2: Decorate cookie
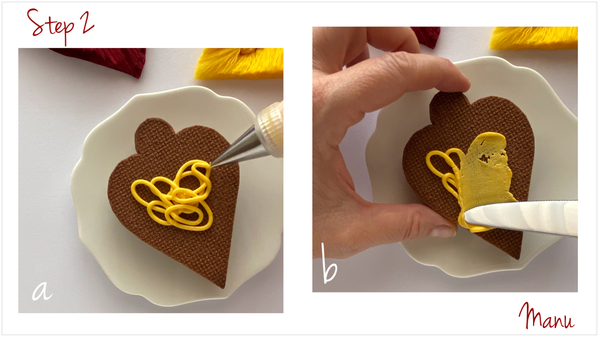
a. Using a Wilton #3 tip (or equivalent), randomly pipe a small amount of yellow piping-consistency royal icing on top of the cookie.
b. Use an offset spatula (or a knife) to spread the icing into a very thin layer. Cover the entire cookie except for the stem area, as shown in Step 2c below. The covered area should end up looking like a heart.
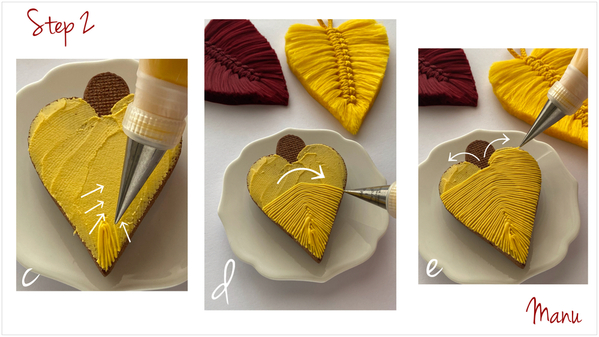
Now, cover the heart-shaped surface with tiny lines piped with a PME #1 tip (or equivalent). I kept the real macramé leaves next to me as reference for piping the lines. And, to keep the piping orderly, I divided it into three main areas, as described in Steps 2c through 2e.
c. Starting at the leaf point, pipe a straight line that runs through the middle of the leaf and extends about 3/4 inch (2 centimeters) into the leaf interior. Now starting from the edge of the leaf, pipe more straight lines next to the central line you just piped. Continue to pipe lines from edge to the middle of the leaf until you cover almost half of the leaf. Repeat on the other side of the leaf, and you will have completed the first area.
d. As you continue piping, you will notice that you will eventually be able to pipe a continuous line across the cookie, that goes from edge to edge. Again, this juncture comes about halfway up the cookie, and marks the beginning of the second piping area. Keep piping parallel lines (more like shallow arches) until you get to the point where the two lobes of the heart intersect, which marks the start of the third piping area.
e. From this point, pipe curvier lines that follow the shape of the lobes, on both lobes, until you cover all of the iced heart surface.
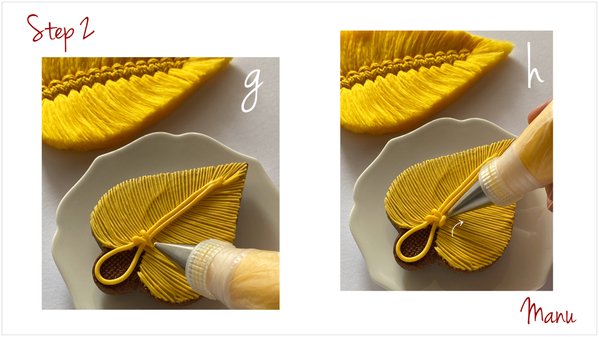
f. Change the tip to a Wilton #3 tip (or equivalent). Starting about 3/4 inch (2 centimeters) away from the leaf point, pipe a continuous line of royal icing through the middle of the leaf. Continue piping into the uniced "stem" area, creating a loop at the top, and, without stopping, pipe another line through the middle of the leaf, parallel to and touching the first line.
g. Now it's time to create the characteristic macramé knots through the middle of the leaf. Keep using the #3 tip. Starting at the base of the loop, pipe two lines to form a “V” across the two center lines you just piped in Step 2f.
h. Now pipe an arch over the point of the “V” to cover those two ends, and the first knot is done!
i. Rotate the cookie, and pipe another “V” and another little arch to complete a second knot oriented in the opposite direction from the first.
j. Keep rotating the cookie and repeating Step 2i until you have covered the two center lines with knots. I fit eight knots on my cookie. But if your leaf cookie is bigger or smaller than mine, you might fit more or fewer knots.
Some piping notes: As you can see, I didn’t follow the pattern of aligned knots in the real macramé leaf. By alternating the knot orientation, I found that there's no need to wait for the icing in each knot to set before proceeding to pipe the next one, as the lines don't touch one another. I also kept the knots more open (that is, not "tied" as tightly as in the real macramé leaf) by giving them a “V” shape. Having a little gap between knots and also within each “V“ will make it easier to pipe tiny lines between them in Step 2m. And last, my pattern of alternating knots gives the center of the cookie a more finished look, in my opinion. (As a kid, I used to cover my wrists with a lot of colorful macramé bracelets with this alternating pattern. Did you?)
k. Change the tip to a PME #1 tip (or equivalent), and finish the loop by piping little arches over its entire length.
And now, the last two steps . . .
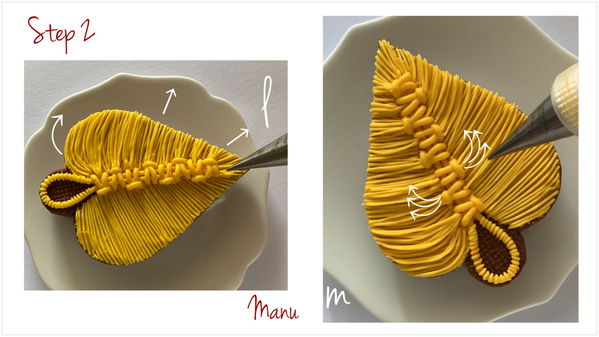
l. Using the same PME #1 tip, pipe more lines over the lines you already piped in Steps 2c to 2e. Again, as a guide, imagine the cookie divided into three main sections. Pipe the lines in each section from the middle of the leaf to the edge, following the arrow shape and direction indicated in the photo below. The lines go from very curved on the lobes to less curved in the central section, to straight in the bottom section near the leaf point.
m. Also, to add texture and dimension, insert the piping tip in the space between each knot, and pipe more lines radiating from center to edge. Next, insert the tip in between each knot “V” and pipe more radiating lines, one over the other, so that each group of lines becomes a sort of tassel departing from the side of a knot. Likewise, insert the tip in the little arch that covers the point of each “V” to pipe another series of tassel-like lines coming from the other side of the knot.
Here’s a video of how I piped the second half of the cookie.
And here’s the final decorated cookie, up close and personal!
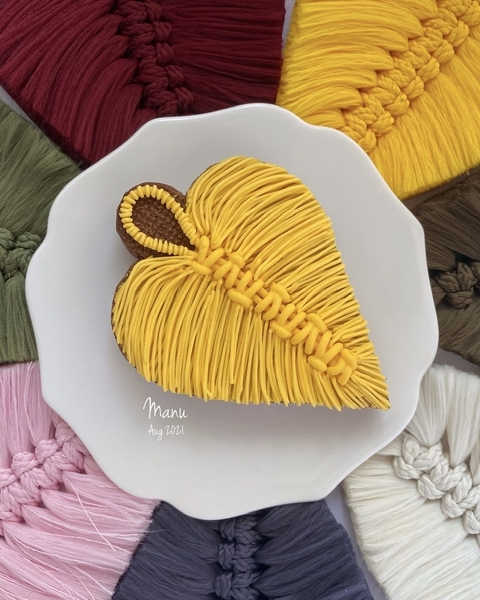
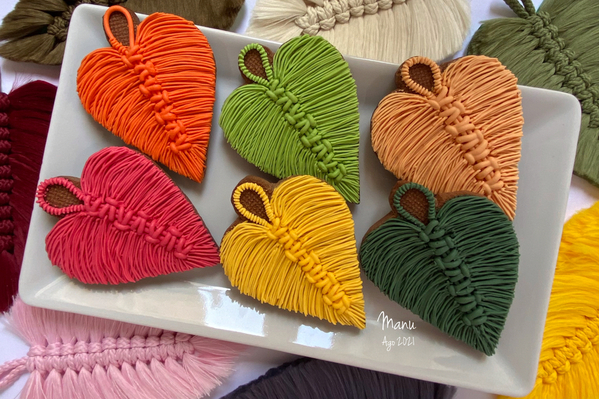
I tinted more icing in fall colors and decorated another five cookies to create this autumn platter . . . I hope you have fun doing the same!
Personal note: This is the 50th tutorial I am sharing here on Cookie Connection. I still remember when, five years ago, Julia offered me the opportunity to contribute monthly project tutorials to her site. I had just started cookie decorating the year before, and I had no idea how to structure a tutorial, how to take pictures of the crucial steps, how to write those steps in English, or where to find inspiration. So my mind immediately went blank with no ideas 😄. But then ideas came month after month, and I can’t believe I've reached this milestone. I just wanted to thank Julia for trusting me and for the patience she has had with tweaking my English, but especially for being the best tutor I could have by giving me guidelines to improve tutorial after tutorial.
Happy fall!
Manu 🍁🍃🍂
[EDITOR'S NOTE: Ahhh, Manu! What a huge milestone this is! Congrats to you, and thank you for thanking me. I truly appreciate your sweet remarks! Indeed, tons of work goes on behind the scenes here on Cookie Connection, and I'm not sure everyone understands quite the magnitude of it. BUT it is not a solo endeavor; it is clearly a team effort, with heart and soul (and countless hours) being poured into it by you and all of my wonderful contributors. This site wouldn't be what it is today without your marvelous tutorials and the work of others over time. I truly hope I have the good fortune of reading another 50 incredible tutorials from you! (Desperately searching for the "fingers crossed" emoji right now! ![]() ) Thank YOU again for all that YOU do for me and the site! I leave you with the following celebratory message! ~ JMU]
) Thank YOU again for all that YOU do for me and the site! I leave you with the following celebratory message! ~ JMU]

Manuela Pezzopane, affectionately called Manu by her friends and family, is a fan of everything handmade, and professes to have tried every possible hobby. However, it wasn’t until the end of 2014, when an American friend invited her to a Christmas cookie exchange, that she first discovered decorated cookies. In 2015, after watching Julia M. Usher's videos and signing up on Cookie Connection, Manu finally attempted her own. Since then, cookie decorating has become Manu’s passion. You can follow Manu on Facebook and Instagram, or email her at manubiscottidecorati@gmail.com.
Photo and cookie credits: Manuela Pezzopane
Note: Made by Manu is a Cookie Connection blog feature written by Manuela Pezzopane, where each month she shares the method behind a magical cookie of her own making. This article expresses the views of the author, and not necessarily those of this site, its owners, its administrators, or its employees. To read all of Manuela's past Made by Manu tutorials, click here. And to see all of Cookie Connection's tutorials, click here.










Comments (23)