 When I first started decorating cookies two years ago, one of the difficulties I encountered was putting together a satisfying set of cookies with the harmony of shapes and colors that I admired in the sets of veteran cookiers. It was hard to mix icing colors and to find the right color combinations, and the cutters available to me didn’t work well together. The latter obstacle is probably why I started adding handcut cookies to my sets, and why they are now such an integral part of my style.
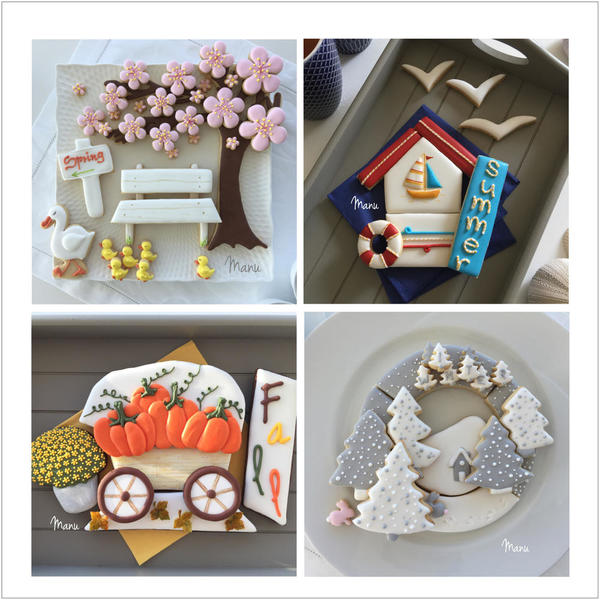
In this tutorial, I wrap up my seasonal series of cookie platters, featuring handcut cookies and designed for cookie-newbies! This project is again very simple, as there are only a couple of techniques on top of handcutting and basic outlining and flooding. Plus, only a few colors are needed, and most of the cookies are minis, because it's easier to flood little surfaces! ![]()
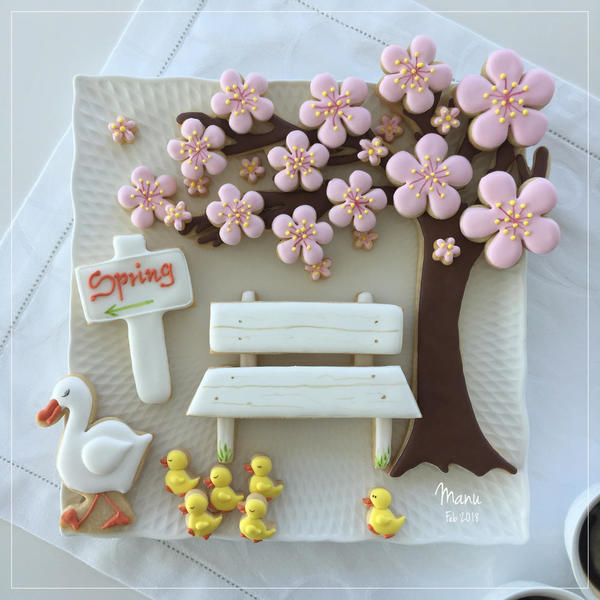
The main lesson shared in this post, and in my previous seasonal projects, is how to give interest and dimension to a cookie set by arranging the cookies in layers. Here, I created depth by positioning the larger cookies (big flowers and duck) in the foreground corners and by overlapping elements (like the bench seat in front of the tree trunk, and, in turn, the ducklings in front of the bench). I also played with perspective in the way I cut and painted the bench seat, and suggested movement with the arrangement of the walking ducks and by painting an arrow on the sign. Lastly, I put everything on a plate that has lines converging at its center, which adds to the illusion of depth. By using such tricks, it is possible to cookie-fy almost every scene around us. And the final result won't look like a beginner project despite its reliance on basic techniques.
- Cookie dough of your choice
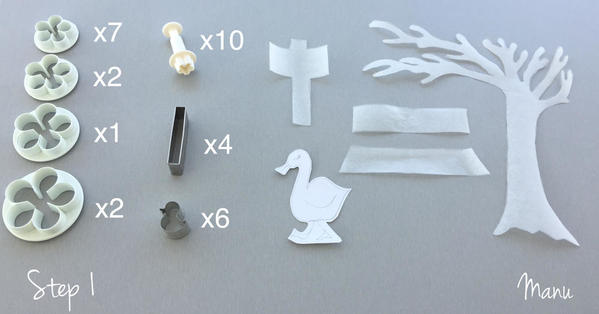
- Assorted templates, for cutting custom shapes (See the attachment, with measurements, at the end of this post.)
- 4 flower cutters ranging from 3 cm/1 1/4 in to 5 cm/2 in (I used this four-piece PME set.)
- Small (13-mm/1/2-in) flower plunger cutter (I used the large one in this set.)
- Narrow (0.8-cm/1/3-in-wide x 5-cm/2-in-long) rectangular cookie cutter, to cut parts of bench (I used this sign post cutter.)
- Mini (2.5-cm/1-in-tall) duckling cookie cutter (I used a cutter from this mini set.)
- Sugarcraft knife or equivalent
- White piping-consistency royal icing, in pastry bag fitted with PME #1 tip or equivalent, for all outlines
- Brown and white flooding-consistency royal icing, in tip-less pastry bags with openings equivalent to PME #2 tip
- Yellow, brown, green, and pink gel food colorings, extended with vodka
- Very thin paint brush, such as a 3/0 liner brush
- Yellow (or pale color) food marker, to write letters
- Orange medium-consistency royal icing, in tip-less pastry bag with opening equivalent to PME #2 tip
- Yellow and pink thick flooding-consistency royal icing, in tip-less pastry bags with openings equivalent to PME #2 tip
- Scribe tool (or equivalent)
- Black food marker, to draw eyes
Step 1: Design scene and cut templates
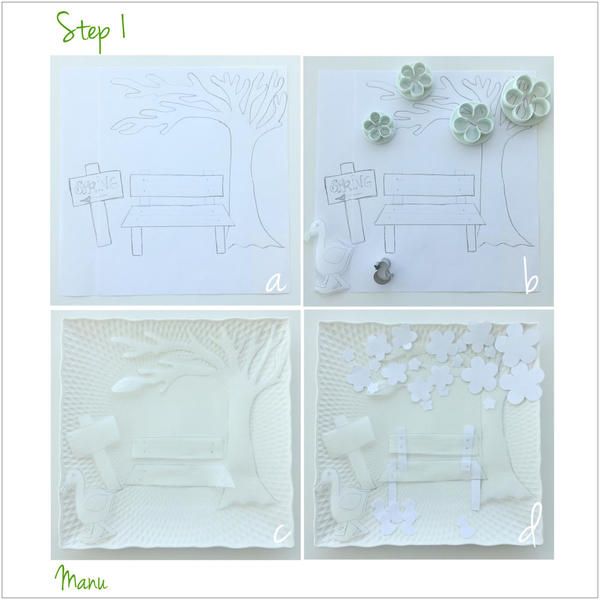
Let’s start by sketching the project. It's best to sketch on a piece of paper that approximates the size and shape of the plate on which the cookies will be served, which, in this case, is a 25-centimeter (10-inch) square (a). After drawing the larger or uniquely shaped elements (like the tree, bench, and sign), I arranged some flower and duckling cookie cutters on top to help me visualize the rest of the design (b). Once the design is visualized to your satisfaction, trace the desired shapes onto parchment paper; then cut out the shapes to use as templates for handcutting the dough in Step 2 (c). I cut out a few more flower and duckling templates than needed for dough cutting, just to see how many cookies I would need to cut later and, again, to help with visualizing the final layout on the plate (d).
With hope that the design will work well once it's transformed into cookies, let’s move to the next step!
Step 2: Roll, cut, and bake cookies
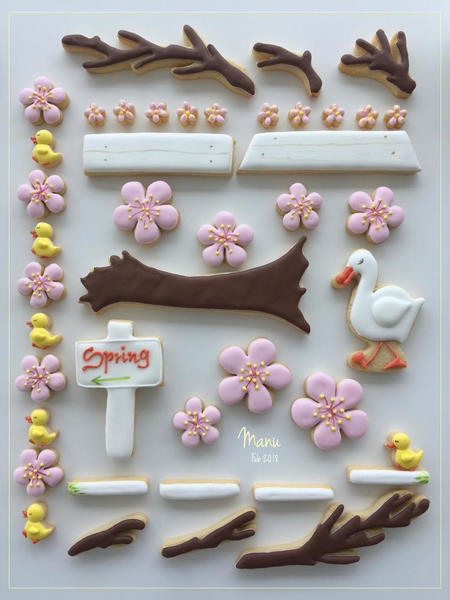
- Cookies using cookie cutters: 12 flowers (7 small, 2 medium, 1 large, and 2 extra large, using the four cutters in the PME cutter set), 10 mini flowers using a flower plunger cutter, 4 rectangular parts for the bench (2 legs and 2 backrest supports), and 6 mini ducklings.
- Handcut cookies: 1 sign, 1 duck, 2 planks for the bench, 1 tree (which will be cut in 7 pieces: 1 trunk and 6 branches). Again, you’ll find a file with the templates and their measurements in the attachments.
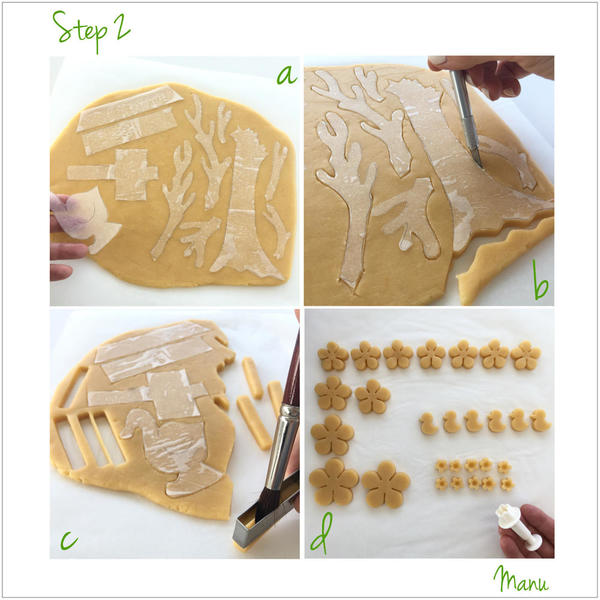
a. Place the cut templates on top of the rolled, chilled dough. As you can see in the photo below, I cut the branches off the original tree template, because, if I had baked the tree in one piece, the smaller branches would have overbaked by the time the trunk was done. Leaving them separate also provides more flexibility when arranging the finished pieces. Moreover, if left attached to the trunk, the branches would very likely break once the tree was put on my uneven plate!
b. Now, carefully cut around the edges of the templates with a sharp sugar craft knife (or equivalent). When you have finished cutting the cookies, make sure the dough is still cold before removing the excess dough. A firm dough will reduce the risk of misshaping the cookies. If the dough is soft, refrigerate it again before completing this step.
c. Use the rectangular cookie cutter to cut the 2 bench legs and 2 backrest supports. If needed, use a soft paint brush to loosen the dough from the narrow cookie cutter, and to avoid denting or misshaping it.
d. Cut out the remaining flowers and mini ducklings. The smallest flowers made with the flower plunger cutter will have tiny holes in their centers from the plunger, but no worries! They will be filled with royal icing later.
Place like-size cookies on the same baking sheet (to ensure even baking), and bake according to your recipe's directions. Let the cookies cool completely before decorating.
Step 3: Outline and flood tree, bench, and sign; then add details
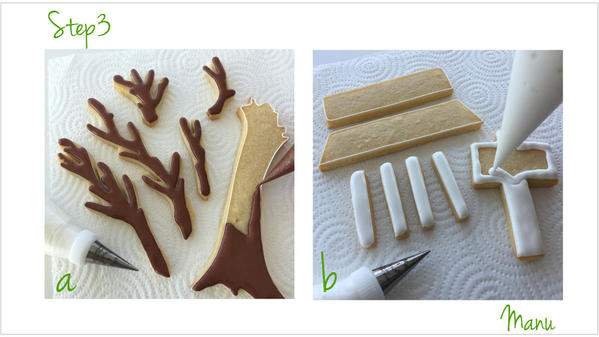
a. Using white piping-consistency royal icing and a PME #1 tip (or equivalent), outline the trunk and all 6 branches. Now, using brown flooding-consistency royal icing and a PME #2 tip (or equivalent), flood the insides of the tree pieces. Let the icing dry about 8 hours or overnight, and then set these cookies aside for the final assembly. (They are done!)
b. Using white piping-consistency royal icing and a PME #1 tip (or equivalent), outline all of the bench parts and the sign. Flood the interiors with white flooding-consistency royal icing, using a PME #2 tip (or equivalent). Let the icing dry about 8 hours before decorating these cookies further in the following steps.
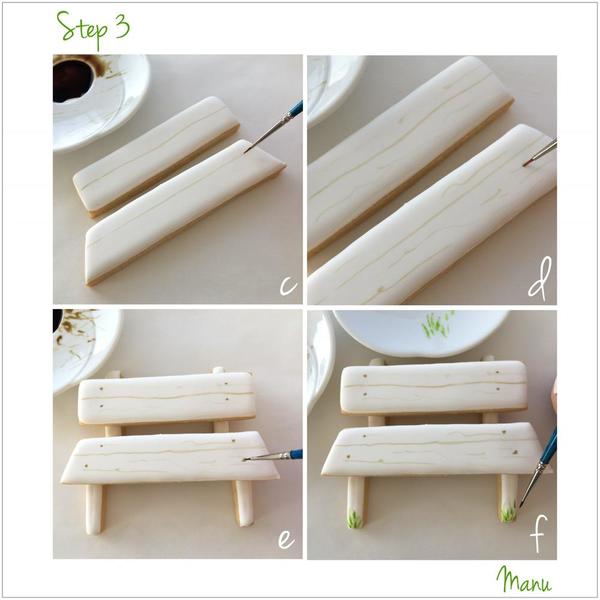
c. On a saucer or in a paint palette, mix together one drop each of yellow and brown gel food coloring, and extend the coloring (i.e., turn it into edible paint) with some vodka. (I prefer to use vodka rather than water, because it evaporates more quickly and is less likely to dissolve the icing.) With a thin paint brush, paint a line in the middle of the bench backrest to demarcate planks. Paint another line on the seat, so that the plank in the back looks about half as wide as the one in the front. Uneven spacing of these lines will create the illusion of depth on the seat.
d. Continue to randomly paint lines of various lengths on the planks. Add little loops to some of the lines to simulate wood grain details.
e. At each end of the backrest, paint a pair of dots, one dot above the other, for nails, as shown below. Paint another two pairs of dots on the seat, but place the dots on the back plank closer to the center of the seat (again, to give a sense of depth).
f. Use the same paint brush and some green gel food coloring extended with vodka to paint blades of grass on the bench legs.
Now for the sign.
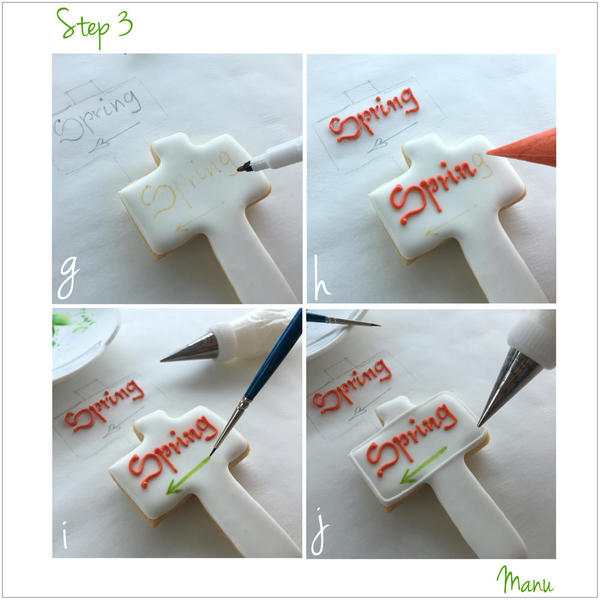
g. Using a yellow (or pale) food marker, draw the word "Spring" on the sign, as well as an arrow. I wrote the word on parchment paper first, as a rehearsal, to have a visual guide when writing on the cookie and to help center the lettering.
h. Using orange medium-consistency royal icing and a PME #2 tip (or equivalent), trace over the letters you drew in the previous step. (Rehearse first on the letters drawn on parchment paper, if you'd like.)
i. Use the extended green gel coloring mixed in Step 3f (for the grass) and the same paint brush to paint over the arrow.
j. Last, outline the top of the sign, using white piping-consistency royal icing and a PME #1 tip (or equivalent).
Step 4: Decorate duck and ducklings
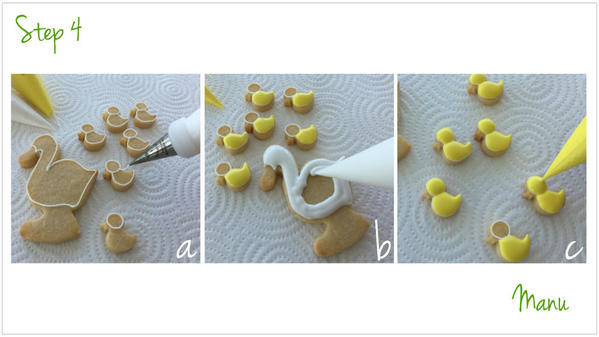
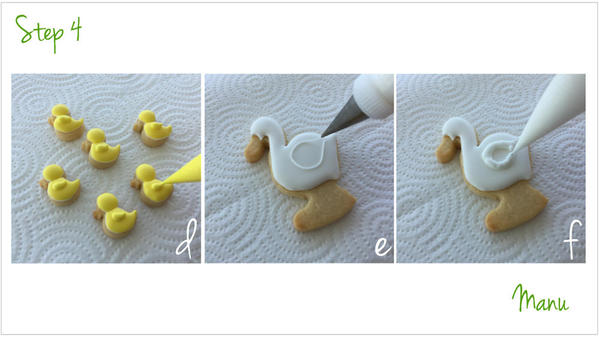
a. Using white piping-consistency royal icing and a PME #1 tip (or equivalent), outline the body of the duck. Also outline the bodies of the ducklings, and then pipe small circles for their heads.
b. Fill the interior of the duck with white flooding-consistency royal icing, using a PME #2 tip (or equivalent). Flood the bodies (but not the heads) of the ducklings with yellow thick-consistency royal icing, again using a PME#2 tip. I kept the yellow icing on the thicker side to avoid "cratering" on these small surfaces. ("Cratering" is a term coined by cookiers that refers to icing sinking back into itself as it dries, resulting in the formation of a hole in the center of the icing. Cratering is more likely to occur on small angular cookie pieces.) Let the icing crust.
c. Now, flood the duckling heads with the same yellow icing used in Step 4b. Waiting for the bodies to crust before piping the heads keeps these two areas distinct and well defined. If I had instead piped the heads right after the bodies, the icing in these two areas would have merged together, resulting in flatter ducklings without cute chubby bodies
d. With the same yellow royal icing and a PME#2 (or equivalent), pipe a wing in the shape of a teardrop on the body of each duckling.
e. Using white piping-consistency royal icing and a PME #1 tip (or equivalent), outline a wing on the body of the white duck. It is important to outline the wing in this case, as an icing "dam" is needed to contain the runnier white flooding-consistency icing that will go inside.
f. Flood the wing interior with white flooding-consistency royal icing, using a PME #2 (or equivalent).
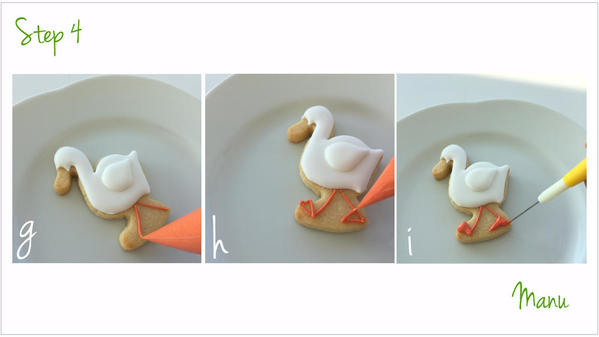
g. Again using orange medium-consistency royal icing and a PME #2 tip (or equivalent), pipe two legs on the duck.
h. Then pipe two triangles for the feet.
i. Flood the insides of the triangles with the same orange icing, and use a scribe tool (or equivalent) to work the icing into the tight corners.
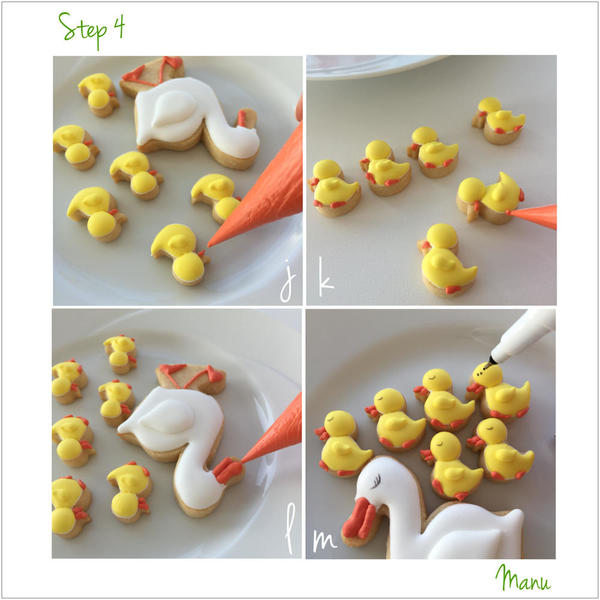
j. Use the same orange icing to pipe the lower part of the bill on the duck; then repeat on each duckling. I turned the duck/ducklings upside down to pipe, as I am right-handed and it is easier for me to pipe from left to right. Otherwise, my hand gets in my line of sight. Let the icing crust while proceeding to the next step.
k. With the same orange icing, pipe two teardrops (for feet) at the bottom of each duckling. Place one teardrop closer to the chest and the other closer to mid-body, so the ducklings look like they are walking.
l. Now, pipe the upper part of the bill on the duck, and then on each duckling. Let the icing dry completely.
m. Once the icing is hard all the way through, use a black food marker to draw the eyes on the duck and ducklings. It is very important to be sure the icing has dried completely; otherwise you risk breaking it with the tip of the marker.
Step 5: Outline, flood, and detail flowers
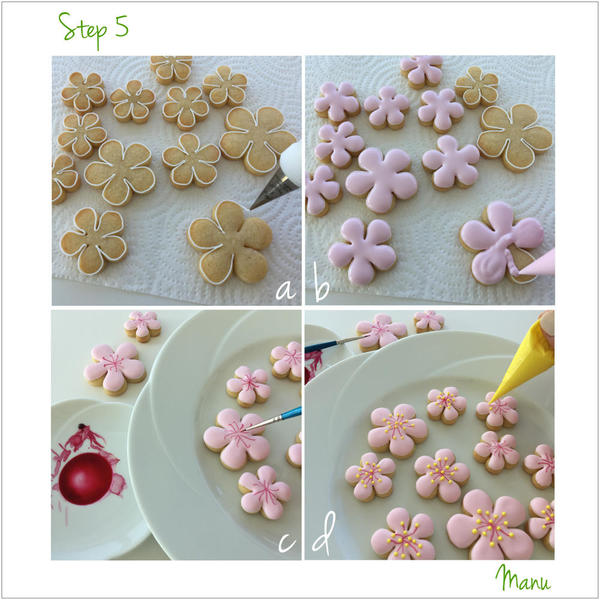
a. Again using white piping-consistency royal icing and a PME #1 tip (or equivalent), outline all 12 flowers cut with the PME cutter set.
b. Now, using pink thick flooding-consistency royal icing and a PME #2 tip (or equivalent), flood the flowers outlined in Step 5a. Let the icing dry.
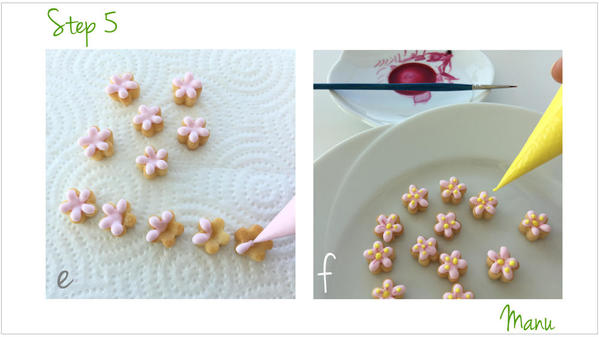
c. Put a drop of pink gel coloring food on a saucer and extend it with some vodka. Using a fine paint brush, paint 6 or 7 thin lines of pink coloring radiating out from the center of each flower, and stopping near the base of each petal. Let the food coloring dry.
d. After a few minutes, pipe a yellow bead at the end of each line you painted in Step 5c, and randomly along the lines toward the center of each flower. Use the yellow thick flooding-consistency royal icing and a PME #2 tip (or equivalent).
e. Now, onto the mini flowers cut with the plunger cutter. Using the pink thick flooding-consistency royal icing and a PME #2 tip (or equivalent), pipe teardrops, one by one, that start at the outer edge of each petal and terminate in a point at the hole in the middle of the flower. Ice all 10 mini cookies in this fashion.
f. Once the icing is dry, paint thin pink lines on each flower and then randomly pipe 3 or 4 yellow beads on top, much as you did in Steps 5c and 5d for the big flowers, above.
Step 6: Assemble cookie platter
And now that all of the cookies are decorated . . .
Let’s assemble the platter, and get ready for sharing these springtime cookies with special friends over tea or coffee!
And to close this long post, I would like to leave you with this video showing the cookie platter assembly process . . . enjoy!
Ciao,
Manu 🌸

Manuela Pezzopane, affectionately called Manu by her friends and family, is a fan of everything handmade, and professes to have tried every possible hobby. However, it wasn’t until the end of 2014, when an American friend invited her to a Christmas cookie exchange, that she first discovered decorated cookies. In 2015, after watching Julia M. Usher's videos and signing up on Cookie Connection, Manu finally attempted her own. Since then, cookie decorating has become Manu’s passion. You can follow Manu on Facebook and Instagram, or email her at manubiscottidecorati@gmail.com.
Photo and cookie credits: Manuela Pezzopane
Note: Made by Manu is a Cookie Connection blog feature written by Manuela Pezzopane, where each month she shares the method behind a magical cookie of her own making. This article expresses the views of the author, and not necessarily those of this site, its owners, its administrators, or its employees. To read all of Manuela's past Made by Manu tutorials, click here. And to see all of Cookie Connection's tutorials, click here.




Comments (33)