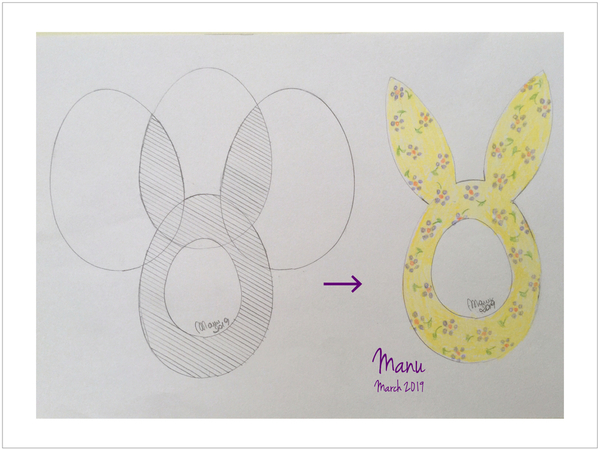
 Easter is just around the corner, so I thought I’d make a chocolate Easter bunny cookie (or an egg with a pair of ears, in actuality)! This project is super easy, as it's done simply by combining basic cookie cutter shapes and decorating techniques. We'll use egg cutters to make the bunny's face and ears, and then we'll combine them into one bigger cookie. This process of making a new cookie shape from existing cookie shapes was, at one time, cleverly called "frankencookie-ing" by someone in the cookie world, and that term has since taken hold among cookiers.
The availability of custom cookie cookie cutters has grown exponentially, especially during the past year. Once a rarity, custom 3-D printed and other types of cutters are just one click away. That being said, you may wonder why there is often a handcutting or frankencookie-ing step in my tutorials. First, I believe it's important to know how to handcut and frankencookie, as these processes enhance creativity. Second, they are also essential steps in the creation of a cookie cutter. For instance, if I wanted to have a certain shape made into a cookie cutter, I would surely make a cookie prototype first to check scale and proportions, and to make sure the final shape won't be too fragile. But, most important, when I write a project tutorial, I always want the reader to be able to make the project right away without having to invest in additional cutters or other tools.
- Chocolate cookie dough (or other dough of choice)
- 1 large (3 x 4-in/7.5 x 10-cm) egg-shaped cookie cutter
- 1 small (1 5/8 x 2 1/4-in/4.2 x 5.7-cm) egg-shaped cookie cutter (This cutter and the large one don’t need to have the exact same shape. I used this one and this one, for example.)
- Parchment paper and food-safe marker
- 2 toothpicks
- Royal icing and pastry tips:
- White piping-consistency with PME #1 tip or equivalent
- Yellow flooding-consistency with Wilton #2 tip or equivalent
- Violet and orange flooding-consistency with PME #1 tip or equivalent
- Green gel food coloring
- Alcohol (vodka or Everclear)
- Fine liner paintbrush
Step 1: Roll, cut, frankencookie, and bake dough
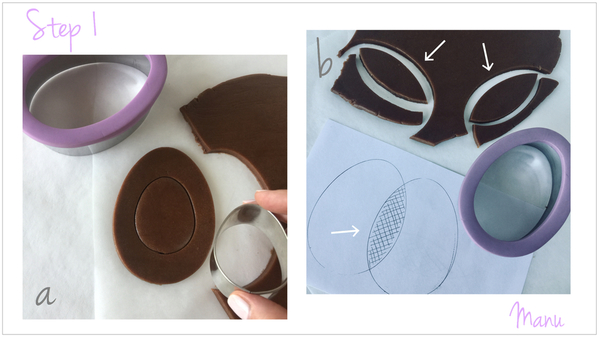
a. Roll your dough to a thickness of 1/4 inch (about 6 millimeters), and cut out an egg shape using the large cutter. Without moving the cut dough, use the smaller egg cutter to cut out an egg shape in the middle of the large egg. (You can reuse the dough cut from the middle, as it will not be used in this project.) The remaining egg-shaped "ring" will become the face of the bunny.
b. Next, use the large egg cutter to cut the two ears. First, cut an egg; then using the same cutter, cut off a slender rabbit ear-shaped piece from one side of the egg, as depicted below. Repeat this process on the other side of the egg to create a matching second ear.
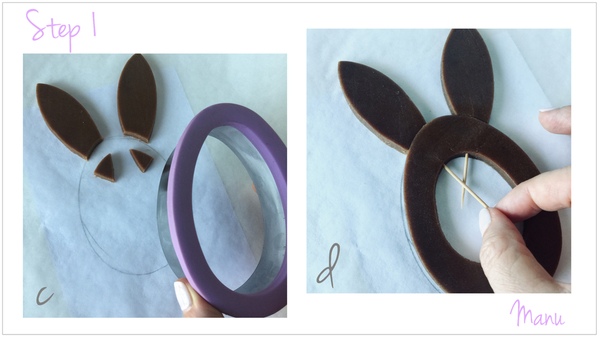
c. Trace the large egg shape on a piece of parchment paper using a food-safe marker. Carefully position the two cut ears on the template so that their bottom ends extend beyond the top of the egg by a half inch (1.3 centimeters) or so. Basically, you want to position them so they look like bunny ears atop the egg! (Note: You may have to chill the dough before moving it, so that it doesn't misshape.) Using the large egg cutter once again, trim off the bottom ends of the ears so that they perfectly conform to the egg shape you've drawn, as shown below.
d. Now, we're ready to join the ears and face. Carefully slide the egg shape cut in Step 1a up against the cut bottom edges of the ears. (Again, you may need to chill the cut egg to avoid misshaping.) I also inserted a toothpick in each ear, to be removed once the cookie is out of the oven, because I found that toothpicks keep the pieces closer together during baking and make the seams sturdier.
Bake the combined frankencookie according to your recipe; then remove the toothpicks, and let the cookie cool completely. (It's best not to move the cookie off the parchment paper until it has been flooded, as it may still be somewhat weak at the seams.)
Step 2: Decorate cookie
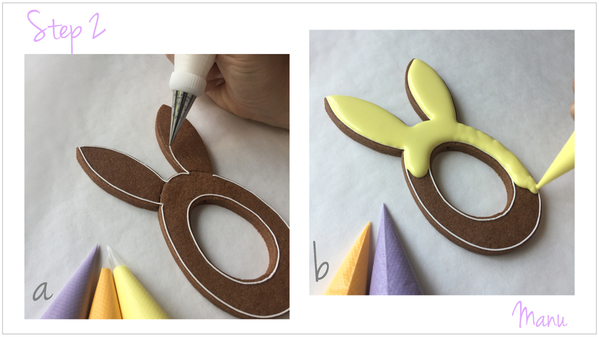
a. Outline the cookie using white piping-consistency royal icing and a PME #1 tip (or equivalent). Make sure to leave a 1/16-inch (about 1.6-millimeter) gap along all of the edges. We will later fill this space with a border.
b. Using a Wilton #2 tip (or equivalent), fill the cookie with yellow flooding-consistency royal icing.
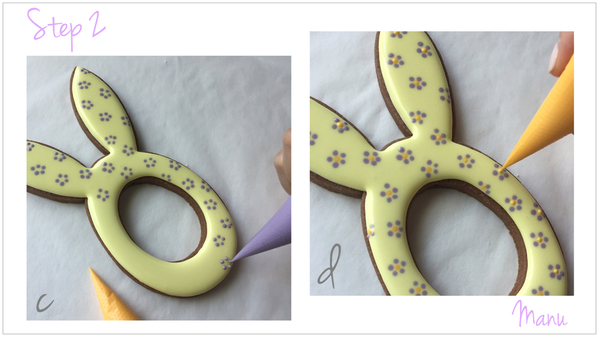
c. While the yellow icing is still wet, immediately pipe random groups of five dots on top to resemble little flowers. Use the violet flooding-consistency royal icing and a PME #1 tip (or equivalent). The dots should settle into the wet base icing, leaving a smooth surface on top. Piping wet icing on wet icing in this way is called the wet-on-wet technique.
d. Again, while the base icing is still wet, pipe a dot in the center of each little violet flower you piped in Step 2c. Use orange flooding-consistency royal icing and a PME #1 tip (or equivalent) for this step. Let the icing dry for eight hours at room temperature. (Alternatively, put the cookie in a dehydrator or in front of a fan to reduce drying time and to minimize/avoid color-bleeding.)
Step 3: Paint details and pipe border
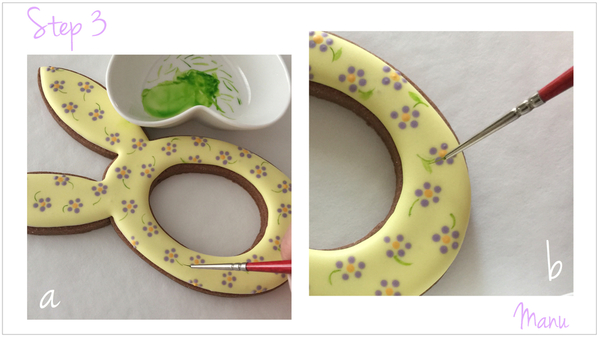
a. Mix a drop of green gel food coloring with a drop of alcohol to create green "paint". Use a fine liner paintbrush to paint a stem on each flower. Change the orientation of the stem on each flower to give the overall pattern an organic look.
b. Now, using the same green paint and brush, paint a little leaf on each stem.
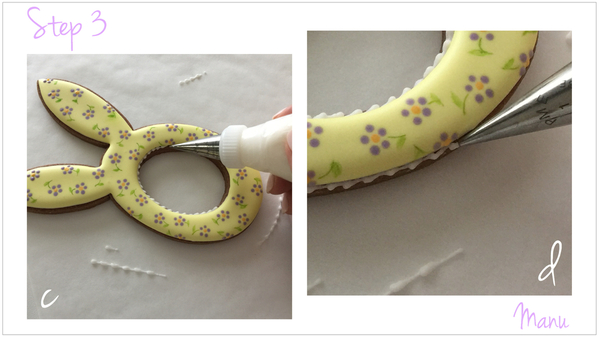
c. Use white piping-consistency royal icing and a PME #1 tip (or equivalent) to pipe a trailing beaded border along the internal edge of the cookie. In other words, pipe a small bead and then, while moving the tip along the cookie edge, release pressure to create a tail on the bead. Move the tip slightly back to cover some of the tail you just piped, and pipe another bead and tail. Continue piping beads and tails in this fashion until you complete the border along the internal edge.
d. Pipe the same trailing beaded border around the external edges of the cookie, encompassing the ears and face.
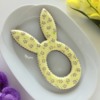
And, ta da, here’s our fully decorated Easter bunny frankencookie:
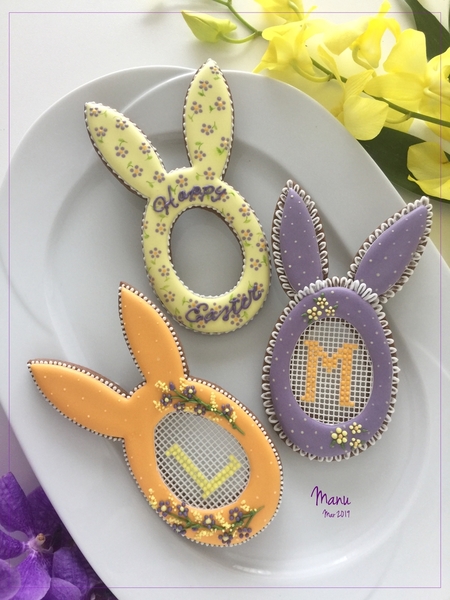
I tried to keep the decoration very minimal. In my opinion, the cookie was already nice without the border, as I like the contrast between the yellow icing and the bare chocolate dough edge. But, if you'd like to go a step further, another option is to pipe “Happy Easter” on top - or a name to turn the cookie into a place card.
The idea of a place card, along with my old embroidery hoop cookie, led me to yet another more elaborate design variation! To make the bottom two cookies below, I first made a needlepoint grid with @SugarVeil®'s Confectionery Icing and Needlepoint Mat, and then I cut it to completely cover the hole in the bunny's face. Next, I “embroidered” a monogram on the needlepoint grid by piping royal icing into its holes, and, last, I glued the grid on the cookie right before flooding it (to hide the edges of the grid).
As always, the sky is the limit when it comes to design variations . . . but that’s all for now.
Ciao,
Manu🐰


Photo and cookie credits: Manuela Pezzopane
Note: Made by Manu is a Cookie Connection blog feature written by Manuela Pezzopane, where each month she shares the method behind a magical cookie of her own making. This article expresses the views of the author, and not necessarily those of this site, its owners, its administrators, or its employees. To read all of Manuela's past Made by Manu tutorials, click here. And to see all of Cookie Connection's tutorials, click here.





Comments (30)