 Because I so much liked using the wet-on-wet technique to make the sunflower in my last tutorial, I decided to use the same technique to make a poppy this month. Poppies are wild; their stalks are irregular; and their petals are always messy. In other words, they're ideal for piping on cookies without fear of failure, because they needn't be perfect like other kinds of flowers. However, it is disappointing how quickly they wilt after being picked . . . and speaking of "quick" . . . it is also the watchword when working wet on wet, especially if your environment is hot and dry. If you feel your icing is drying too quickly, skip Steps 2k and 2l, and make only one bud to save crucial time for other details.
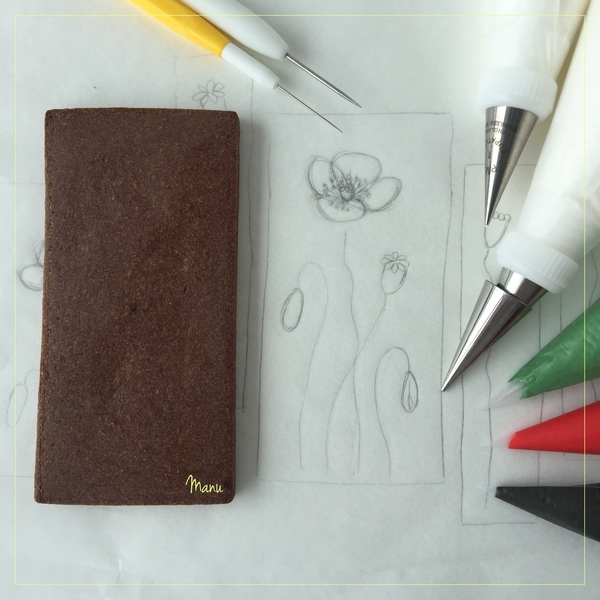
- 1 (6 x 12-cm/2 1/4 x 4 3/4-in) rectangular cookie
- Royal icing:
- Piping-consistency white, in pastry bag with PME #1 tip (or equivalent)
- Thick flooding-consistency white, in pastry bag with Wilton #3 and PME #1 tips (or equivalents)
- Thick flooding-consistency green, dark grey, and red, in tip-less pastry bags with openings equivalent to PME #1 tip. (To use less food coloring for these dark hues, color the icing in advance, and let the color develop for several hours or overnight.)
- Poppy template (See "Files" in the "Attachments" at the end of this post.)
- Scribe tool
In my previous tutorial, I had the honor of a cameo appearance by @Julia M. Usher. She left us with three important tips about the wet-on-wet technique. Rather than linking back to them, I have included her verbatim remarks in the "Editor's Note" below.
................................
[EDITOR'S NOTE: Here in Missouri, I sometimes experience very humid conditions like Manu, and, at other times, very dry ones. I've discovered - the hard way - that humidity can be both friend and foe of this technique. That being said, I have compiled three tips below to help guide you in your unique work environment. ~ JMU]
Important wet-on-wet tips:
(1) Work speed. The key to nice, smooth wet-on-wet effects is to work quickly, especially under dry conditions, without stopping between steps. All icings must be wet and easily "worked" throughout the entire decorating process. If you work too slowly, the icing can crust, and, when you drag your scribe tool through it to create marbled effects, you can leave behind "tracks" or cracks. It's wise to bag all of your icings before you start any wet-on-wet project, so you won't have to interrupt your work flow midstream.
(2) Icing consistency. All icings should be at roughly the same thick flooding-consistency. If icings are at different consistencies, two things may happen. Either they won't settle into each other smoothly or you'll end up with "ragged" marbled effects.
The icing thickness is also critical for reasons related to humidity. A humid environment will give you more working time before icings set, but it will also prolong the drying time when you are done. And the longer the icing takes to dry, the greater the risk of colors bleeding into one another while drying . . . yikes! The good news is you can minimize or avoid bleeding with thicker icing, because it dries more quickly. I always try to push the icing to the thickest possible consistency for this task. It should have some body, but still settle smoothly into other icings and not leave anything but faint tracks (that eventually disappear) when a scribe tool is drawn through it.
(3) Drying method. Again, the faster the icing dries (once you're done), the less chance you'll have of any bleeding. For final drying, set the cookie in front of a fan or in a dehydrator (set at about 90°F to 95°F) to accelerate the process. But not too long in the dehydrator - icing can sometimes expand and crack if it gets too hot. Colors can also get blotchy.
................................
And now that we have those tips behind us, let’s start!
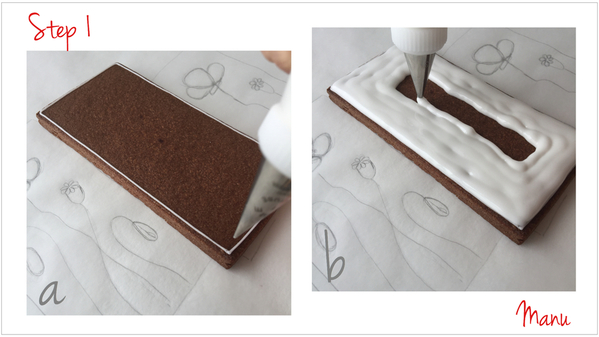
Step 1: Outline and flood cookie
a. Outline the rectangular cookie about 2 millimeters (a little more than 1/16 inch) from the edge, using white piping-consistency royal icing and the equivalent of a PME #1 tip. This outline will serve as "a dam" to prevent the icing from overflowing once we flood the cookie and add more wet-on-wet icing in Steps 2 and 3. Let the outline dry. The space at the edge can be filled with a border or left plain, as I have done.
b. Flood the cookie with white thick flooding-consistency royal icing, using the equivalent of a Wilton #3 tip. Immediately move onto the next step; do not allow the white flooding icing to dry or even crust.
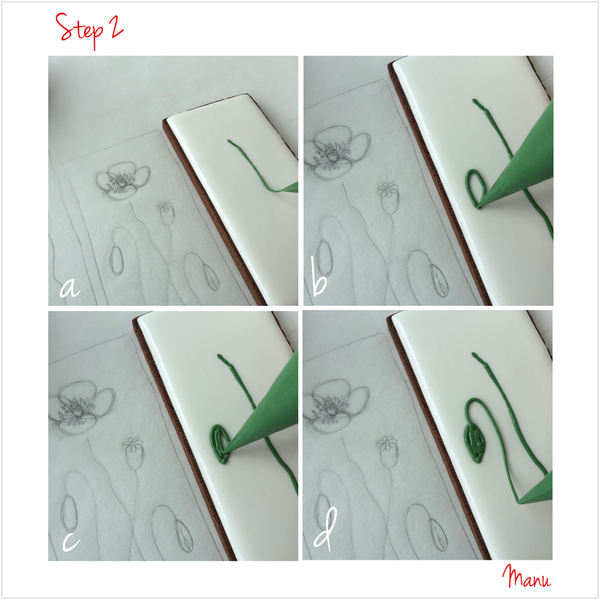
Step 2: Pipe stalks, buds, and seed capsule
a. Using the green thick flooding-consistency royal icing and a PME #1 tip (or equivalent), pipe a stalk in the middle of the cookie. Try to pipe an irregular line. Keep my poppy template close to the cookie as a piping reference and to gauge proportions. (Again, you'll find the template under "Attachments".)
b. Now pipe a long narrow oval (a poppy bud) to the left of the stalk.
c. Fill the oval with green royal icing.
d. Next, to represent a "nodding" bud typical of poppies, pipe a curved stalk attached to the bud.
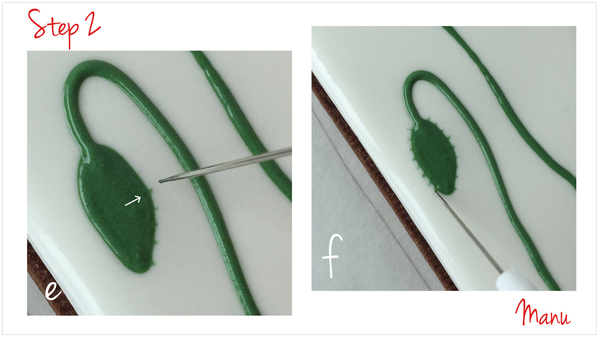
e. To make tiny hairs on the bud, use the scribe tool to drag thin lines of green icing into the white icing.
f. Keep dragging the icing with the scribe tool all around the bud.
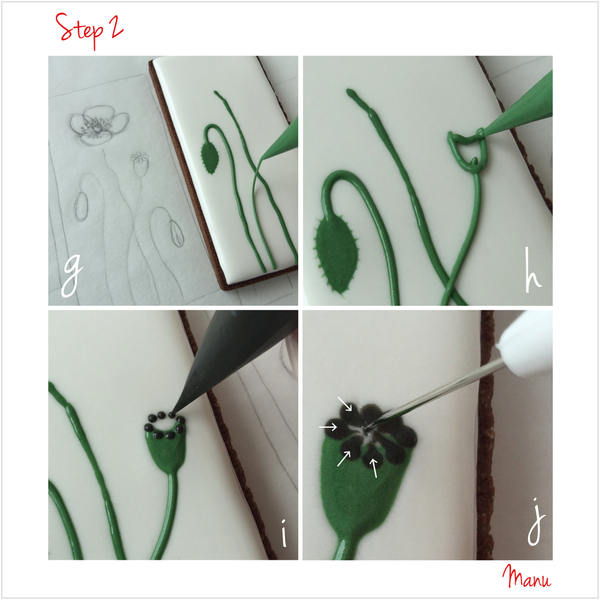
g. Pipe another stalk starting in between the two stalks that you piped in Steps 2a and 2d and intersecting the upright stalk at its center.
h. Pipe a cup shape at the top of the stalk, and fill it with green royal icing. This cup will be the poppy seed capsule.
i. Using dark grey thick flooding-consistency icing and a PME #1 tip (or equivalent), pipe a circle of dots around the top of the cup you just piped.
j. Use the scribe tool to drag each dot toward the center to form the "stigmatic disk" found atop poppy seed capsules. (When you were a kid, did you ever try to use this disk to emboss a little flower on your hand or forehead? I did! Usually it left a grey mark on top of the embossing!)
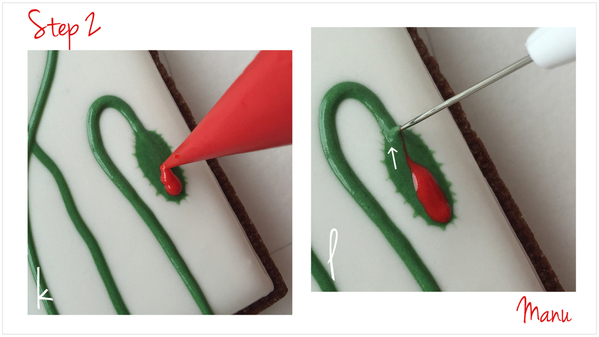
k. Now move to the lower right corner of the cookie, and quickly repeat Steps 2b to 2f to pipe another hairy nodding bud and stalk. Using red thick flooding-consistency royal icing and a PME #1 tip (or equivalent), pipe a blob at the end of the bud.
l. Use the scribe tool to drag the red icing toward the stalk, and to divide the bud into two halves. You'll be left with what appears to be two sepals and a blossoming poppy!
(As noted earlier, if you feel your icing is drying too fast, skip Steps 2k and 2l, and go directly to Step 3.)
Step 3: Pipe large open poppy
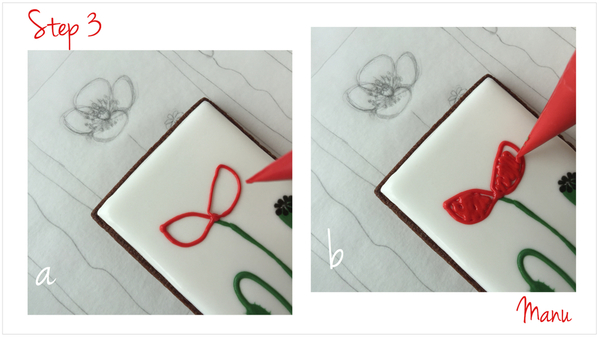
a. Using the same red royal icing and pastry tip, pipe two petal outlines in the shape of “cat eyes”. They don’t need to be perfect or symmetrical. (I piped the petals freehand, but you can project and trace my template image if you prefer.) Start piping each petal at the top of the stalk, and end at that point as well.
b. Fill the two petal outlines with the same red royal icing.
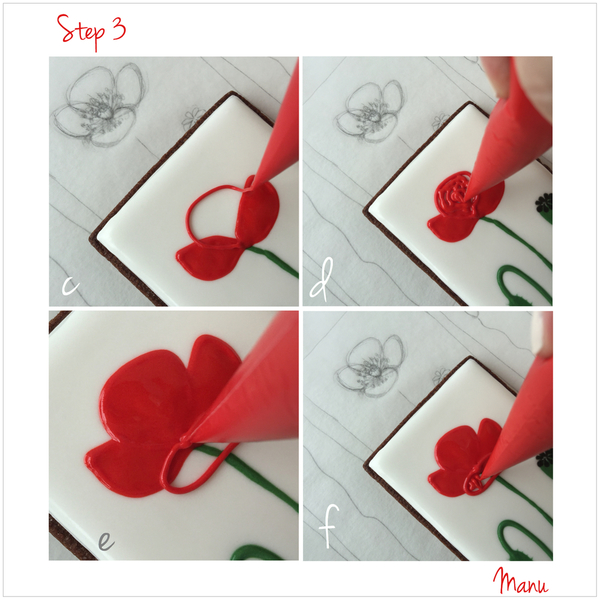
c. Now pipe a “heart-with-no-lobes”-shaped petal in between the two "cat eye" petals.
d. Fill this petal with red royal icing. Try not to over-flood. This way, there will be less red icing on top, and the icing will dry faster. And, remember: fast-drying icing means less chance of colors bleeding!
e. Pipe the outline of a bean-shaped petal underneath the petal you just piped.
f. Now, fill up this final petal!
Keeping up a fast piping pace, add the last wet-on-wet details to the poppy.
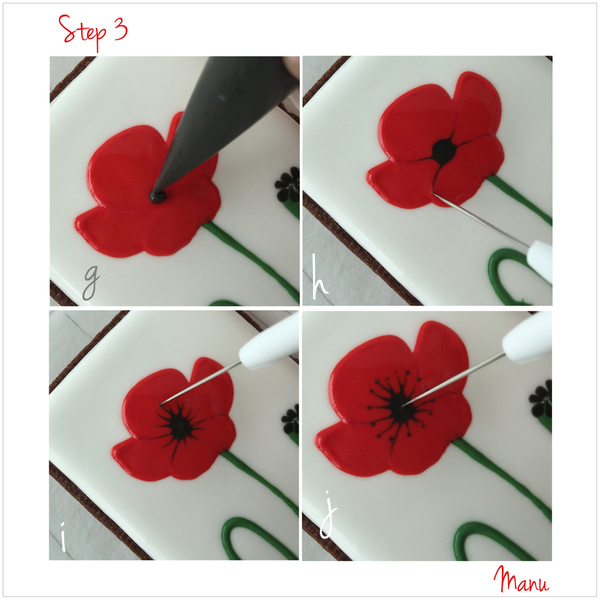
g. Pipe a dot of dark grey icing in the center of the flower, and let it sink into the red icing. (Note: From here on out, for all colors, use the same thick flooding-consistency icing and a PME #1 tip or equivalent.)
h. Use the scribe tool to drag four thin lines of grey icing from the center of the flower and around the petal edges to outline them.
i. Now use the scribe tool to drag out more thin lines, in the shape of "eyelashes", all around the grey dot. These lines should be shorter than the ones drawn in Step 3h, as they're intended to be poppy stamens.
j. Dip the tip of the scribe tool in the center of the grey dot, and apply a dot of grey icing to the top of one of the stamens. Repeat this process for each of the stamens, applying "fresh" grey icing to the tip of the scribe tool each time.
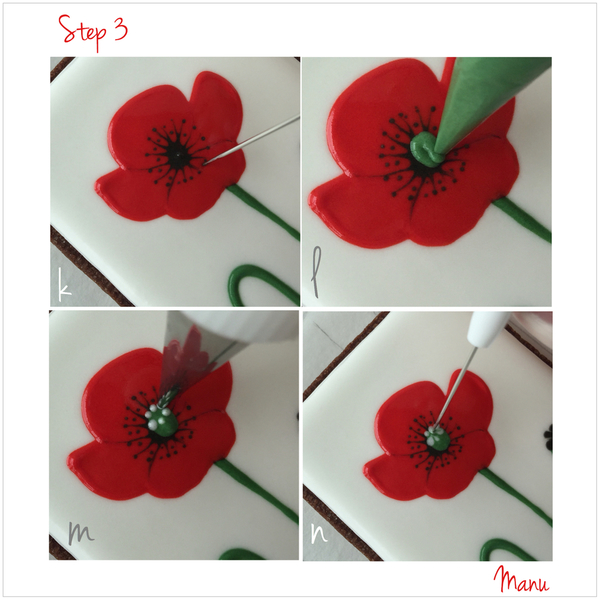
k. Keep dipping the scribe tool into the dark grey icing to draw another round of tiny dots in between the stamens and closer to the poppy center.
l. Pipe a blob of green icing on top of the dark grey center, and let it sink into the center.
m. Now, using white royal icing, pipe a circle of tiny dots on the upper end of the green icing blob.
n. With the scribe tool, drag each dot toward the center to make a stigmatic disk, just like we did in Step 2j!
Now, turn on the air conditioner (if you have one), and let the icing dry in front of a fan or in a dehydrator. Again, the faster the icing dries, the less chance of colors bleeding.
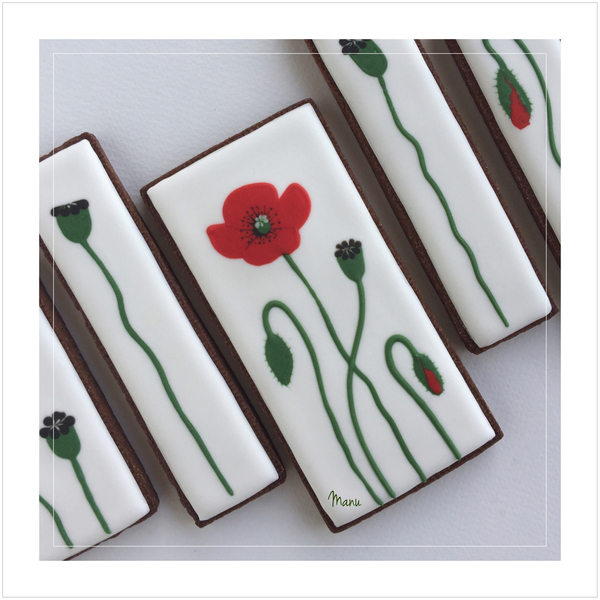
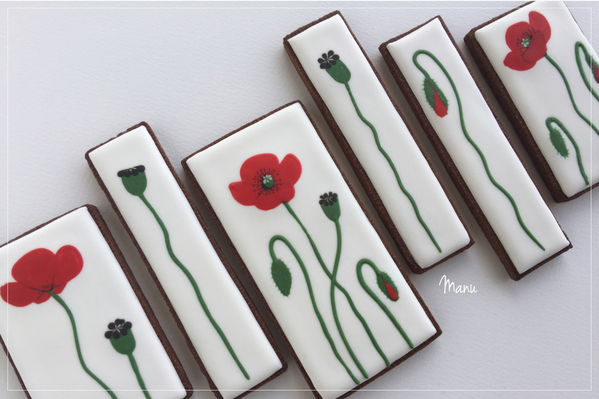
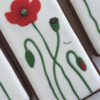
And here's the finished poppy surrounded by more wet-on-wet poppies:
As I often do, I leave you with a quick video that is meant to be a complement to the written tutorial . . . and vice versa. Enjoy!
Ciao,
Manu

Manuela Pezzopane, affectionately called Manu by her friends and family, is a fan of everything handmade, and professes to have tried every possible hobby. However, it wasn’t until the end of 2014, when an American friend invited her to a Christmas cookie exchange, that she first discovered decorated cookies. In 2015, after watching Julia M. Usher's videos and signing up on Cookie Connection, Manu finally attempted her own. Since then, cookie decorating has become Manu’s passion. You can follow Manu on Facebook and Instagram, or email her at manubiscottidecorati@gmail.com.
Photo and cookie credits: Manuela Pezzopane
Note: Made by Manu is a Cookie Connection blog feature written by Manuela Pezzopane, where each month she shares the method behind a magical cookie of her own making. This article expresses the views of the author, and not necessarily those of this site, its owners, its administrators, or its employees. To read all of Manuela's past Made by Manu tutorials, click here. And to see all of Cookie Connection's tutorials, click here.



Comments (30)