One of the things I love most about the cookie community is how cookiers are always coming up with new and creative ways to take cookie decorating to the next level. There have been so many tools, techniques, and media introduced over the past few years that it's hard not to create unique and beautiful pieces of edible art. One of the hottest trends in cookie decorating is to turn flooded royal icing into a richly textured surface, full of character, using the "imprinted icing" technique - a term Julia and I coined for this challenge. It's the perfect technique for our Cookie Connection members to try. While we're usually focused on creating flawlessly smooth icing surfaces, this Practice Bakes Perfect Challenge is all about doing just the opposite!
But before I mention the details of this challenge, let's talk about our AMAZING PRIZE! One lucky entrant will be chosen at random from among all of the challenge entrants to receive a $100 gift certificate for SugarVeil® products, donated by Cookie Connection host and founder @Julia M. Usher.
Says Julia, "SugarVeil® mats could be very cool icing imprinting tools, so what better tie-in to this challenge!"
Very apropos prize, but Julia is getting ahead of me . . . so let's move on to discuss what I mean by imprinted icing.
What is Imprinted Icing?
By definition, "imprint" means to make a mark by pressing against the surface.
- Flood a cookie with royal icing, either by piping on flood-consistency icing or by dipping the cookie into it.
- Immediately place an imprinting item or tool, such as parchment paper, on top of the icing, and press it into the icing.
- Allow the icing to fully dry.
Once the icing has dried, remove the imprinting tool to reveal a uniquely textured surface.
This technique can also be done as a royal icing transfer, just like the cookie in this tutorial by @Aproned Artist. In this case, royal icing was flooded over the top of the imprinting items (silicone and parchment paper). Once dried, the transfer was then flipped over to reveal the textured effect.
A great example of this technique comes from Cookie Connection member @Hani/Haniela's. Inspired by the "concrete" cakes she'd seen online, Hani decided to try replicating this look on cookies using royal icing. You can see the stunning results in her post, Concrete Texture Royal Icing, which offers an excellent tutorial on this technique. Hani also made a video to accompany her written tutorial, so we can see the process in its entirety. Hani's "concrete texture" cookies look amazing, and there are many more incredible effects that can be created using this technique.
This simple blue flooded cookie by Whipped Bakeshop has been imprinted to mimic the crinkled paper that it sits on, while this gold highlighted set includes a variation that looks like folded paper. I love how Katie the Cookie Bee creatively turned this crinkled look into bright yellow pineapple cookies.
Sweet Cheeks by Renee has taken her cookies one step further by adding floral embellishments to her imprinted cookies. Crumpled parchment paper was used to create the texture for this cookie, while this minimally imprinted cookie incorporates air bubbles into the overall design. Notice how the flowers on both cookies perfectly complement the textured icing base underneath them while not detracting from it.
In this video, you can see elevated dough co. peel back parchment paper to reveal a layer of beautifully imprinted icing that adds so much character to her cookie. Not sure what to do with such a unique surface? Katlyn Ballard turned her imprinted cookie into the perfect tombstone.
Fall Feelings by Petra Florean
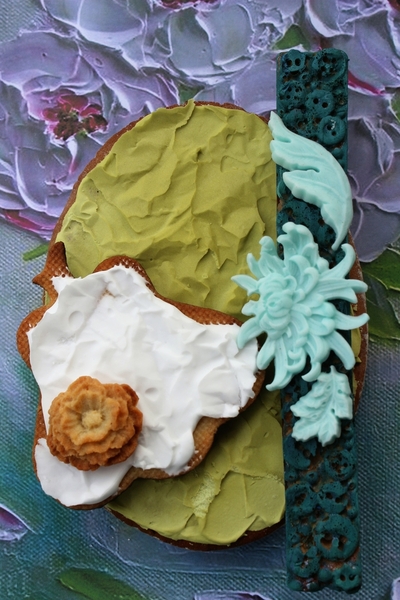
Petra created this beautifully textured look by applying crumpled wax paper to her icing.
Build Up! by PUDING FARM Timea (aka PUDING FARM) experimented with silicone baking sheets and binder cover sheets to create both rough and smooth textured effects that mimic brick and marble.
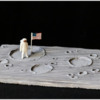
Moon Landing Cookie by Aproned Artist For this tutorial mentioned earlier, Samantha flooded royal icing over the top of silicone circles, which had been placed on top of parchment paper. Once dry, the icing was flipped over, and the paper and silicone circles were removed to reveal a textured effect that looks just like the moon's surface.
Autumn Leaves by mintlemonade (cookie crumbs)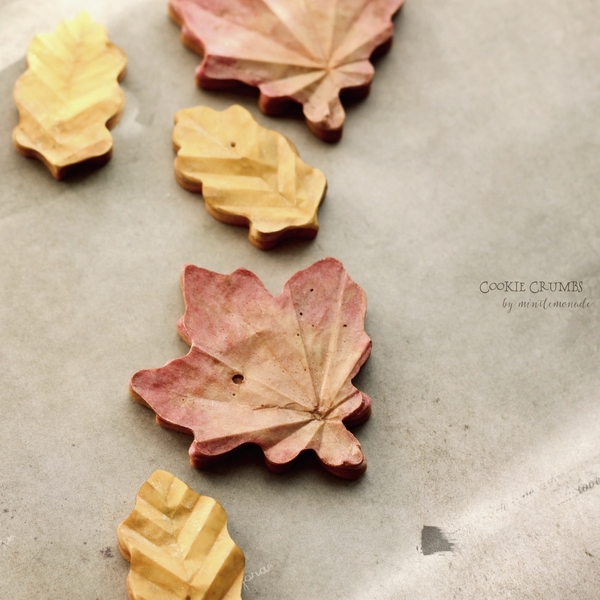
Noriko (aka mintlemonade) created this folded origami effect on her leaf cookies by placing creased parchment paper over her flooded icing. In this video, she shows exactly how these cookies were done.
Get Creative
Now that you understand the basics of this technique, it's time to get creative and take your imprinted royal icing designs to the next level!
The cupcake liner on this cookie by Painted Ladies Pastry is a great example of how you can create that "wow factor" with your designs. In her video tutorial, Painted Ladies Pastry shows us how she created this amazing look.
I also love how the texture of these festive lantern cookies, also by Painted Ladies Pastry, shows so much depth and dimension. It really makes quite an eye-catching impact. The inspiration for this technique came from this video tutorial by Frosted by Meagan.
As you can see, this technique is all about texture, so the more creative you are with your imprinting tools and techniques, the better. Parchment paper is the most commonly used imprinting tool in the examples above, but I would encourage you to experiment with silicone mats and molds, plastic texture mats, plastic wrap, and even stencils - as long as the material you select is food-safe. Also keep in mind that not all tools behave the same way with royal icing. @Julia M. Usher reports the following based on her experiments with royal icing transfers: "Silicone molds and mats will hold their shape quite well through the drying process, but royal icing will take longer to dry next to silicone than parchment paper. Parchment paper is, however, more prone to movement once it gets dampened by the icing. Less flexible imprinting tools, like plastic texture mats (typically used for embossing fondant) or acetate sheets, may be harder to remove from the dry icing without icing breakage." You might try lightly greasing less flexible items to ease removal. (Caution: Fat can break down royal icing, so only apply a small amount, and test first.)
These items are just a few of those that can be used for imprinting. If you look around, you will probably find many more food-safe items that will create an impression (pun intended ![]() )! Whether you experiment with parchment paper, silicone mats, or something else entirely, you are limited only by your imagination. And remember, inspiration can be found everywhere, so make sure to think about the textures, designs, and colors you might use to turn your flooded icing into something spectacular!
)! Whether you experiment with parchment paper, silicone mats, or something else entirely, you are limited only by your imagination. And remember, inspiration can be found everywhere, so make sure to think about the textures, designs, and colors you might use to turn your flooded icing into something spectacular!
RULES:
PLEASE READ THEM CAREFULLY. I would hate to disqualify an entry because someone failed to read ALL of the rules.
1. Create a minimum of three different cookies using the imprinting technique as defined above, which is to say that texture is to be created by first flooding the cookie with royal icing (either by piping or dipping), then immediately pressing an imprinting item on top of the icing, and, finally, allowing the icing to fully dry before removing the imprinting item. (You can also create royal icing transfers, as Aproned Artist did for her lunar landscape, above. ADDENDUM: And you may also use icing thicker than flood-consistency if needed, provided you apply the other basic imprinting principles outlined here.)
2. Do NOT include other forms of textured royal icing in your entry, such as spackling, stippling, scraping, spreading, pressure piping, the crackle effect, pallet knife art, or brush embroidery. Also, do NOT use any medium other than flood-consistency royal icing, and do NOT use techniques that involve removing the imprinting item before the icing is fully dry.
3. The imprinted portion of your design should be the predominant feature of your cookies.
4. You may use any food-safe item as an imprinting tool. These tools can include, but are not limited to, parchment paper, wax paper, plastic wrap, foil, silicone sheets, silicone molds, textured silicone mats (such as SugarVeil® lace mats), Mylar stencils, and plastic texture mats (i.e., typically used for fondant work). Get creative, but make sure the tool is food-safe!
5. Your designs MUST BE ORIGINAL and NOT a copy of any other artist's design.
6. As always, we ask that you make a brand new cookie set for this challenge.
7. And because Cookie Connection is all about learning and sharing, I would love for you to share in the comments section under your entry the different imprinting items that you used, how each item worked for you, where you drew inspiration, and what you learned along the way.
TO ENTER:
- Please post an image of your cookie set to the site under the Practice Bakes Perfect clip set no later than June 20 at 5 pm central.
- Because these challenges are ongoing, we ask that you put "Practice Bakes Perfect Challenge #46" in your photo caption AND in a tag, so that we can tell the challenges apart from month to month. Please use the main title field to uniquely name your cookies as you normally would.
- Please also assign other relevant clip sets and tags to your images, as you normally would (meaning don't just use the Practice Bakes Perfect clip set and leave it at that, or your photos won't easily be found with keyword searches).
- You can enter more than once, but please post only one clip of each distinct entry. Multiple clips of the same entry are not allowed unless added in a comment beneath the one primary clip.
The prize is given entirely at random. This means that everyone who participates in the challenge has an opportunity to be rewarded with this month's terrific prize!
After the challenge has closed on June 20, we will announce the winner in the Saturday Spotlight on June 26. The next challenge will be announced about a week after that Spotlight.
And, remember, these challenges are NOT a competition. They are intended to inspire and motivate you to step outside of your comfort zone, to experiment and be creative, and to try something new. The goal is for you to challenge yourself artistically and technically, and to develop your skills so that you may reach your full potential as a cookie artist. And, of course, the goal is for you to have fun along the way.
I can't wait to see what you create. If you have any questions about this challenge, or if you are looking for ideas, technical advice, or creative help - or if you just want to talk cookies - I would love to chat. You can leave me a comment below, or you can send me a private Cookie Connection message.

 Christine Dutcher's journey as a cookier began in early 2013 when an online search led her to the amazing world of cookie decorating. After spending countless hours learning all that she could, Christine decorated her first set of cookies in October 2013. In 2016, she decided that she would begin to focus on perfecting her skills, challenging herself each time to create more detailed and progressively complex pieces of cookie art. In 2019, Christine became one of the very first sugar artists from around the world to be named as an "Honourary PME Five Star Sugar Artist" by Knightsbridge PME. You can learn more about Christine's work here on Cookie Connection, and by following her Facebook and Instagram pages.
Photo credit: Christine Dutcher
Note: Practice Bakes Perfect is a bimonthly Cookie Connection blog feature written by Christine Dutcher that poses inspiration or challenges to get you to stretch as a cookie artist - for practice, for prizes, and for fun! Its content expresses the views of the author and not necessarily those of this site, its owners, its administrators, or its employees. Catch up on all of Christine's past Cookie Connection posts here.




Comments (20)