
I love summer. And I love flowers too. One of my all-time favourite flowers is the daisy. We call them margaritas in Argentina. (Yes! Exactly like that refreshing drink. ![]() )
)
Daisies have been adopted as a symbol of innocence, simplicity, purity, vitality, and freshness. But aside from these things, for me, daisies mean coming back to my childhood, to the long summer evenings in my grandma’s garden. And, of course, we all know the important “he loves me, he loves me not” mantra, which gets said with each daisy petal plucked!
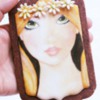
Since I love these white and golden little flowers so much, I thought I would dedicate my second handpainting tutorial to them. Today, we will learn how to create realistic skin tones for faces. Our model, of course, will be Margarita, the daisy fairy. ![]()
Will you join us?
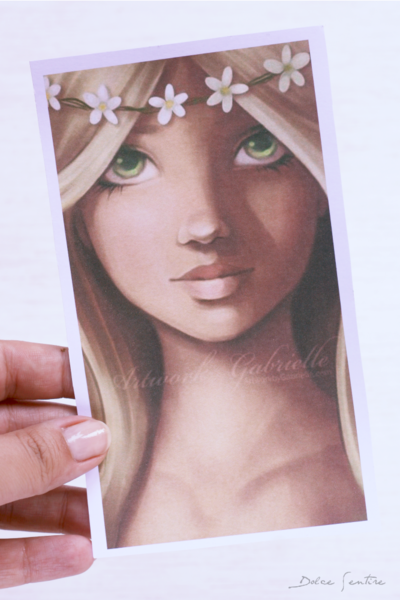
Original illustration by Artwork by Gabrielle
- Cookie flooded with white royal icing
- Illustration of person (For this cookie, I used an original illustration by Artwork by Gabrielle, found here on her Facebook fan page.)
- Palette and assorted gel colors and dusting powders (See image below.)
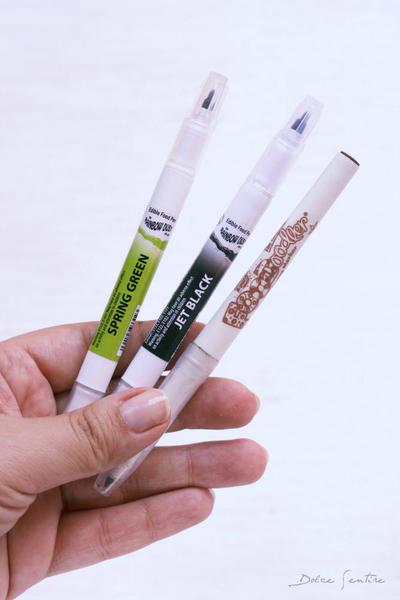
- Edible food coloring pens (See image below.)
- Parchment paper, for tracing illustration
- Non-toxic pencil, for tracing illustration
- Paint brushes (See my favourites here.)
- Vodka, alcohol rejuvenator spirit (such as this brand), or alcohol-based extract
- Small amount white royal icing
- Scribe tool or pastry bag fitted with small round tip
Colors:
My formulas and the brands used are indicated below.
a. Wilton Ivory gel
b. 1 part Wilton Ivory gel + 1 part Sugarflair White powder
c. 1 part Wilton Ivory gel + 3 parts Sugarflair White powder
d. Rainbow Dust Milk Chocolate powder
e. Wilton Golden Yellow gel
f. 1 part Wilton Golden Yellow gel + 1 part Sugarflair White powder
g. Rainbow Dust Pale Terracottta powder
h. 1 part Rainbow Dust Pale Terracottta powder + 1 part Sugarflair White powder
Edible food coloring pens:
- Rainbow Dust Spring Green
- Rainbow Dust Jet Black
- FooDoodler Brown
Let’s start!
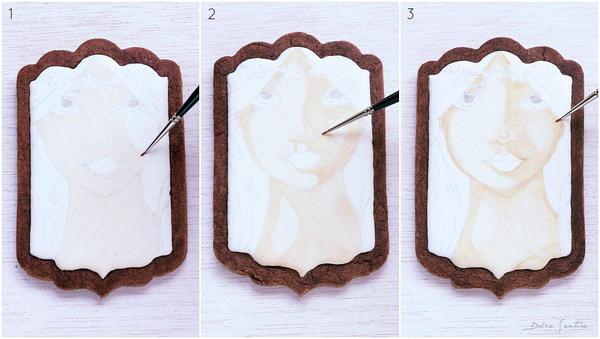
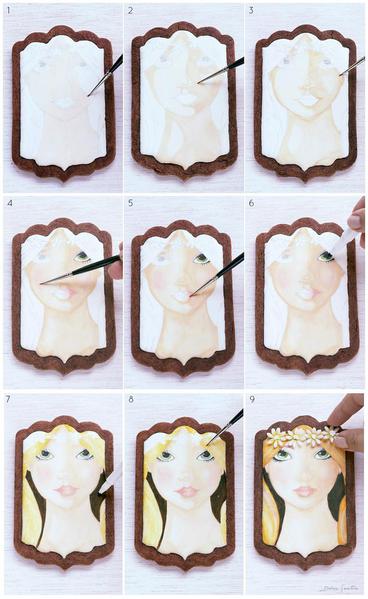
Steps 1, 2, and 3: Begin by tracing the illustration on the cookie flooded with white icing. (For the paper transfer technique, check out my previous Cookie Connection tutorial.) Then put the colors on the palette and mix them with a few drops of vodka (or other alcohol-based medium) and start to base-coat the face of the fairy with the lightest color (image 1, color c).
Now, analyze the illustration and its colors in order to determine where shading should go. Keep in mind that the light source (i.e., a lamp or the sun) is on the left, so the right side of the fairy’s face should be darker than the left side. Once you have identified these areas, apply a layer of very basic shadows with the mid-tone ivory (image 2, color b).
Dip your brush in vodka, dab off any excess alcohol on a piece of paper towel, and blend the shadowed areas (color b) with the lightest color (c). Then add more shadows using the darkest color (image 3, color a) and blend with the lightest tone (color c) again.
Steps 4, 5, and 6: Now, it’s time to color cheeks, lips, and eyes, so start by applying a layer of the dark terracotta tone (image 4, color g) to the cheeks, and blend with vodka in order to create a "fade" between the cheek color and the skin tone. In this step, it is very important to blend well so as to diminish any sharp line between the colors.
For the lips, start with a layer of the lightest terracotta tone (color h) and then shade with the darkest terracotta tone (image 5, color g).
Finally, color the eyes by using the green edible food coloring pen for the iris, and the black one for the pupil, upper and lower eyelids, and lashes (image 6). Add white royal icing highlights to the eyes where the light reflects off the surface of them. (Use a scribe tool or a very small piping tip to apply the icing.)
Of course, you can use fine brushes instead of edible pens, but markers will give you extra control, especially if you are a newcomer to the handpainting technique. ![]()
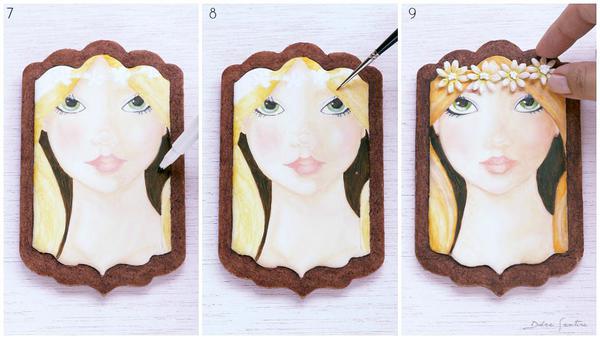
Steps 7, 8, and 9: Coloring hair is the exact opposite of coloring the face: you don’t need to be as concerned with blending colors, because you want movement and a natural look. So focus on the brush strokes, always adding coloring in streaks, in the style of hair. Start with the lighter tone of yellow (image 7, color f) and then add dark shadows under the ears and around the neck with the brown edible marker.
Now, add some hair highlights with the darkest tone of yellow (image 8, color e) and a little bit of brown (color d) to give the hair even more life. Remember: if you blend too much you will lose the texture, and the hair will look unrealistic. So please be careful when blending hair.
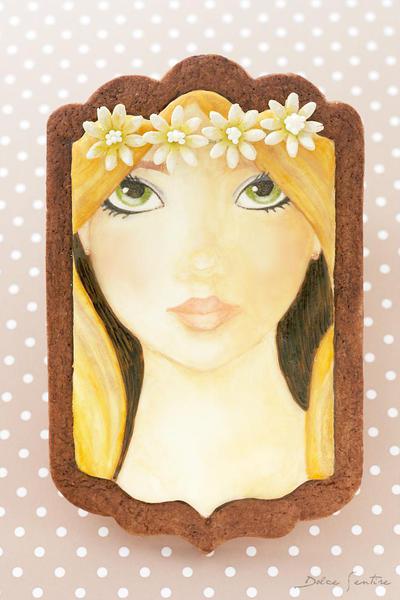
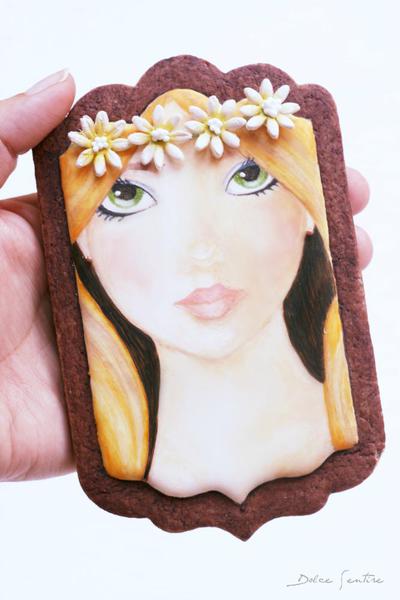
The painting is done! Complete your cookie with a fondant daisy crown and golden nonpareils for earrings (image 9).
Quick photo recap:
Tadaaaaa! Our pretty green-eyed fairy is ready to enjoy a magical evening!
I think I fell in love. And you? Happy flower-y summer!
Cookie and photo credits: Aixa Zunino

 Aixa Zunino is the soul of Dolce Sentire, a virtual corner of sweetness and creativity dedicated to cookie decorating. On her site, this garden engineer, self-taught decorator, and lover of flowers and animals lets her imagination fly, sharing everything she has learned since discovering the world of cookies in early 2012. She combines this activity with courses around Spain (her current home) where she teaches all the secrets to getting dreamy cookies. Meet her on Facebook or her website, and email her your cookie decorating questions or concerns at dolcesentiredolci@gmail.com.
Photo credit: Aixa Zunino
Note: This article expresses the views of the author, and not necessarily those of this site, its owners, its administrators, or its employees. To read more Cookie Connection tutorials, click here.






Comments (34)