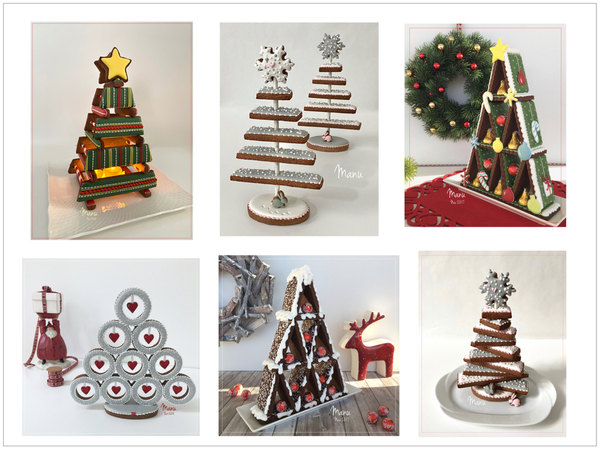
 Once again, I've got a 3-D Christmas tree cookie project this year! Below are some of my 3-D Christmas tree cookies from my previous tutorials here on Cookie Connection. (You’ll find them all in this link.)
But let's not dwell too long on the past; it's always fun to see new and exciting things! Onward!
This project's concept is very similar to my 3-D Winter Wonderland Driftwood Tree, as I also used a paper straw for the central support in the 3-D construction. But, in this case, I used more than horizontal cookie elements. I also inserted some vertical cookie elements between them. And, unlike the previous project where the pieces could slide easily off the straw to be eaten, I used thick-consistency royal icing (or “glue”, as @Julia M. Usher calls it) so that the tree can be easily lifted and moved without threat of falling apart. That being said, this project is more of a decorative piece to display during the Christmas season. So that the tree views well from all angles, all of the cookies are iced on both sides, except for the three naked oval cookies used as horizontal supports for the vertical pieces. If you prefer less icing on your cookies, I recommend that you don't flood both sides of the vertical pieces, but perhaps leave them naked and then stencil both sides instead. (See this variation at the end of this tutorial.)
- Cookie dough of your choice
- Rolling pin with guides
- Cookie cutters:
- 3 (10.6 x 7-cm to 7 x 4.5-cm/4 3/16 x 2 3/4-in to 2 3/4 x 1 3/4-in) oval cookie cutters (I used the three smallest oval cutters from this six-piece nested set.)
- 2 (6- and 4.5-cm /2 3/8- and 1 3/4-in) square cookie cutters (I used the two smallest square cutters from this six-piece nested set.)
- 1 (5-cm/2-in) star cookie cutter
- 2 paper straws, one for cutting holes and another for assembling tree
- Paring knife
- 1 bamboo skewer or lollipop stick, with pointed end
- Royal icing:
- White piping-consistency, in pastry bag with coupler and PME #1 and #2 tips (or equivalents)
- Green flood-consistency, in tipless pastry bag with opening equivalent to Wilton #2 tip
- Red piping-consistency, in tipless pastry bag with opening equivalent to PME #1 tip
- Yellow piping-consistency, in tipless pastry bags with openings equivalent to PME #1 and #2 tips
- Yellow flood-consistency, in tipless pastry bag with opening equivalent to Wilton #2 tip
- Brown very thick-consistency (@Julia M Usher calls it “glue”; see her video for reference), in parchment paper pastry cone
- Scissors, to trim straw and skewer (or lollipop stick), if needed
Step 1: Cut and bake cookies
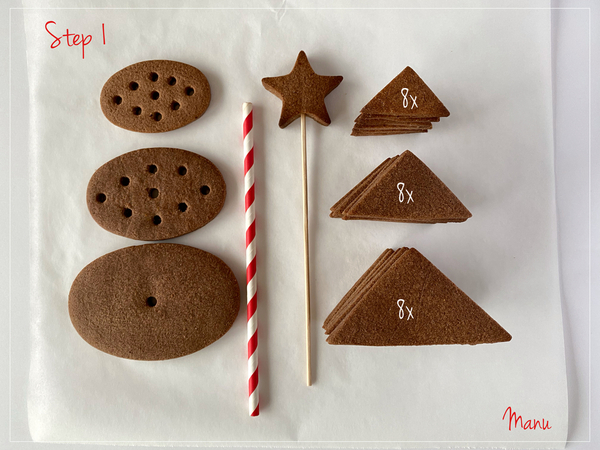
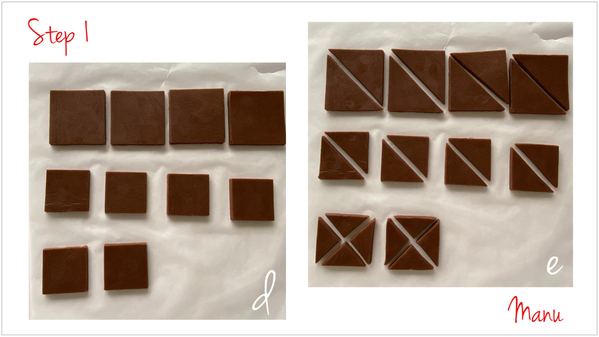
You will need to cut a total of 28 cookies for this project (see visual summary below), in the following quantities and shapes (I will explain more in Steps 1a to 1f):
- 3 oval cookies in three different sizes (from largest to smallest: (1) 10.6 x 7 cm/4 3/16 x 2 3/4 in; (2) 8.8 x 5.8 cm/3 1/2 x 2 1/4 in; and (3) 7 x 4.5-cm/2 3/4 x 1 3/4-in)
- 4 large (6-cm/2 3/8-in) square cookies (cut in half to get 8 large triangles)
- 4 small (4.5-cm/1 3/4-in) square cookies (cut in half to get 8 small triangles)
- 2 small (4.5-cm/1 3/4-in) square cookies (cut in fourths to get 8 extra-small triangles)
- 1 (5-cm/2-in) star cookie
I rolled all of the cookies to a 0.6-cm (1/4-in) thickness except for the star cookie which was rolled to a 1-cm (3/8-in) thickness. A skewer will be inserted into the side of the star to create a lollipop, so it needs to be thicker to accommodate the skewer without misshaping.
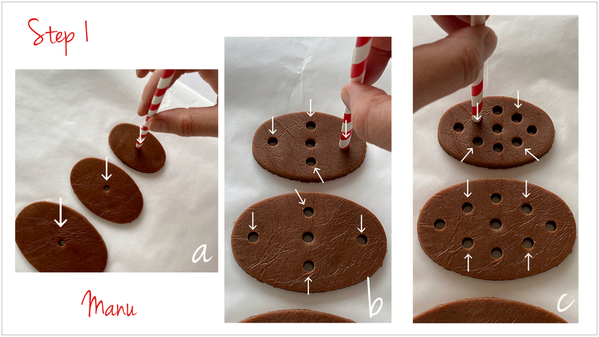
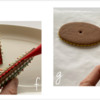
a. Using a rolling pin with guides, roll your dough to a thickness of 0.6 centimeter (1/4 inch). Cut out the three ovals, but, before baking them, use a paper straw to make a hole in the center of each cookie. It is important to plunge the straw perpendicularly into each cookie and to rotate it; otherwise, if the cut is made at some other angle, the final tree may lean.
b. Now use the straw to make four more holes at the edges of the shortest and largest sides of the two smaller ovals, and at a distance of about 1 centimeter (3/8 inch) from those cookie edges.
c. Now make four more holes, on each of the two smaller ovals, between the holes you just made. You should end up with a diamond-like shape centered around the center hole. These eight holes will be used to anchor the triangular cookies when assembling them in Step 3.
Bake the cookies according to your recipe. If the cookie dough has visibly spread, then reinsert the straw into each of the holes, while the dough is still warm, to make sure it can still pass through them.
d. Once again, roll your dough to a thickness of 0.6 centimeter (1/4 inch). Cut out four large squares and six small squares.
e. Use a paring knife to cut in half the four large squares and four of the small squares. Cut the two remaining small squares into fourths. You will end up with 24 triangles, as noted at the start of this step. Bake the cookies according to your recipe, and let them cool completely.
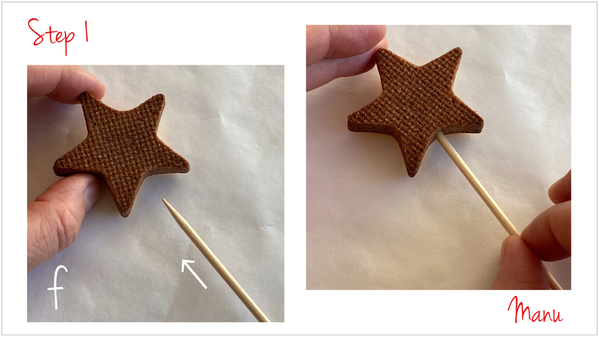
f. Now, roll your dough a bit thicker, to a thickness of 1 centimeter (3/8 inch). Cut out the (5-cm/2-in) star. Bake the cookie according to your recipe. While the cookie is still warm from the oven, insert the pointed end of a skewer (or a lollipop stick) into its side (in the corner between two points) to create a lollipop.
Step 2: Decorate cookies
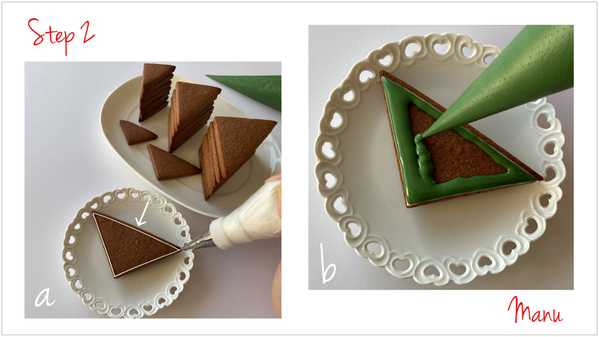
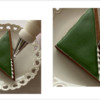
a. Outline all 24 triangle cookies, using white piping-consistency royal icing and a PME #1 tip (or equivalent). When outlining along the longer side of each triangle, leave a 0.2-cm (1/16-inch) space to the edge. A border will be piped in that space later.
b. Using a Wilton #2 tip (or equivalent), flood all of the triangles with green flood-consistency royal icing.
c. Once the icing has dried completely, pipe a trailing beaded border along the hypotenuse (long side) of one of the triangles to fill the space left there. Use white piping-consistency royal icing and a PME #2 tip (or equivalent). Start by piping a bead, and release pressure to create a tail on the bead. Move the tip slightly back to cover some of the tail just piped, and pipe another bead and tail. Keep piping in this fashion to completely fill the space along the edge. Repeat on the remaining triangle cookies.
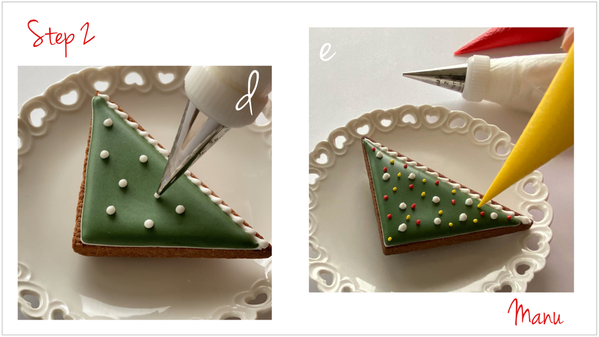
d. Now using the same pastry bag and tip, randomly pipe white dots of icing on the green.
e. Add some tiny red and yellow dots, using red and yellow piping-consistency royal icing and a PME #1 tip (or equivalent).
Repeat Steps 2d and 2e on all of the triangle cookies.
When the icing is completely dry, flip over the triangle cookies, and repeat Steps 2a to 2e on the other sides. Once again, let the icing on these sides dry completely.
f. Use red piping-consistency royal icing and a PME #1 tip (or equivalent) to pipe a trailing beaded border along the longer un-iced cut edge (or side) of each triangle cookie.
g. Use yellow piping-consistency royal icing and a PME #2 tip (or equivalent) to pipe a trailing beaded border along the cut edge (or side) of each oval cookie. The border should completely encircle each oval cookie.
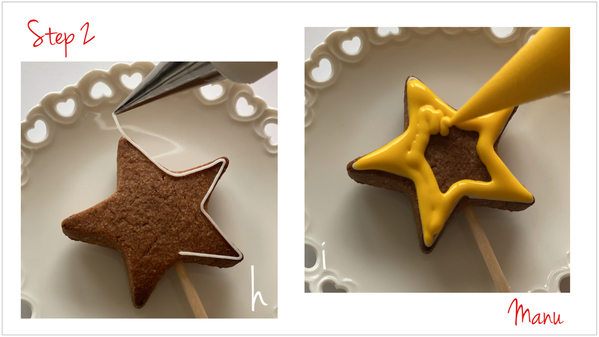
h. Outline the star cookie using white piping-consistency royal icing and a PME #1 tip (or equivalent).
i. Flood the star cookie using yellow flood-consistency royal icing and a Wilton #2 tip (or equivalent). Once the icing is dry, flip over the cookie, and outline and flood the other side too.
Step 3: Assemble cookies into tree
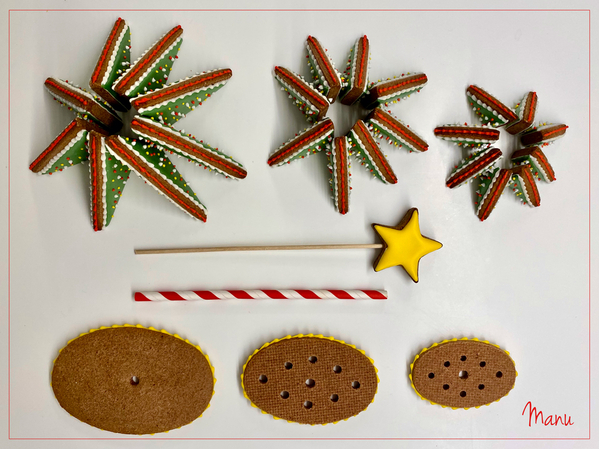
Here’s a visual recap of all of the decorated cookies:
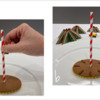
a. Insert the straw into the largest oval cookie.
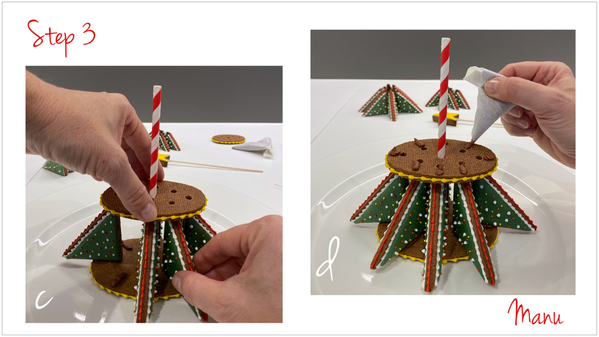
b. Imagine the oval cookie as a clock, and pipe four lines of brown thick-consistency royal icing at the three-, six-, nine- and twelve-o’clock positions, starting about 2 centimeters (3/4 inches) from the edge and finishing at the edge. Then pipe four more lines of the same size between the lines you just piped.
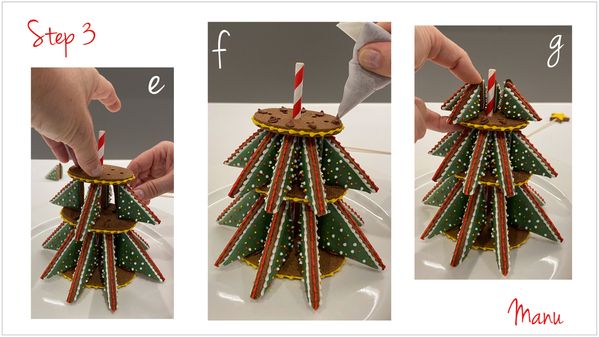
c. Thread the medium oval cookie onto the straw, and stick the eight large triangle cookies, one by one, onto each line of glue while anchoring their uppermost corners in the holes of the medium oval cookie above. The red border on the hypotenuse of each triangle should be facing out. Before the icing dries, adjust the placement of the triangles and the medium oval cookie as needed.
d. Once all of the large triangles are properly anchored in place, pipe eight lines of brown thick-consistency royal icing on the medium oval cookie, just as you did in Step 3b but radiating outward from each hole to the cookie edge.
e. Again, thread the small oval cookie onto the straw, and attach the eight small triangle cookies while anchoring their uppermost corners in the holes of the small oval cookie above. Essentially, repeat exactly what you did in Step 3c for the first "story" of the tree.
f. Once you have completed the second story, pipe eight small lines of brown thick-consistency royal icing on the small oval cookie. Again, the lines should radiate outward from each hole toward the cookie edge.
g. Glue the remaining extra-small triangle cookies to the small oval cookie to complete the third story of the tree.
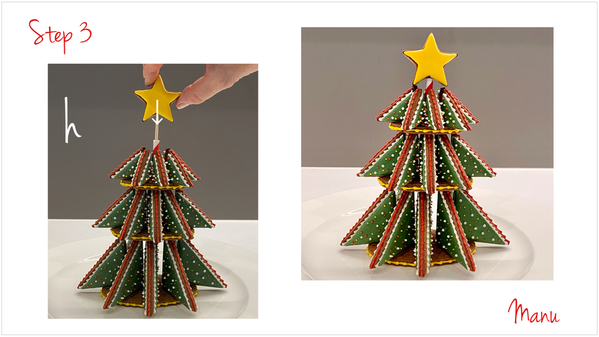
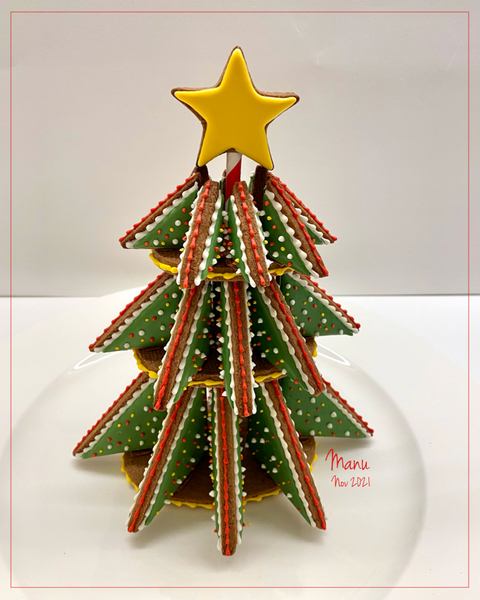
h. If needed, trim the center straw so it is as tall as the treetop. (And also trim the skewer in the star cookie to the same height.) Insert the star lollipop into the straw, and this 3-D Christmas tree cookie is complete!
Here’s a close-up view . . .
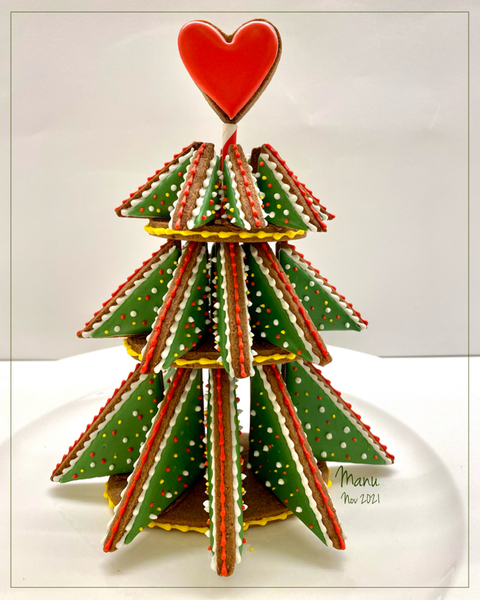
And, for my first variation, let's change the star to a heart . . .
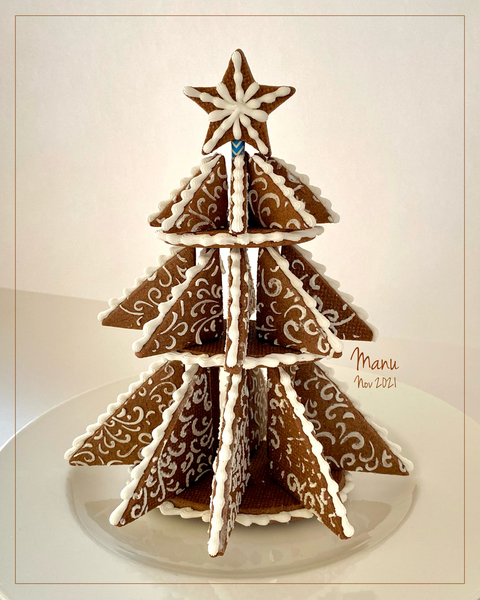
And here’s my second variation - the one I mentioned at the very start of this post. While it's a display piece too, it's more suitable for eating, because the cookies are not fully flooded on both sides. Instead they are largely naked except for some stenciling.
And, last but not least, a video where I show how to assemble the cookies . . .
And that’s all for this month! Happy Christmas tree cookie-decorating!
Ciao,
Manu ❤️

Manuela Pezzopane, affectionately called Manu by her friends and family, is a fan of everything handmade, and professes to have tried every possible hobby. However, it wasn’t until the end of 2014, when an American friend invited her to a Christmas cookie exchange, that she first discovered decorated cookies. In 2015, after watching Julia M. Usher's videos and signing up on Cookie Connection, Manu finally attempted her own. Since then, cookie decorating has become Manu’s passion. You can follow Manu on Facebook and Instagram, or email her at manubiscottidecorati@gmail.com.
Photo and cookie credits: Manuela Pezzopane
Note: Made by Manu is a Cookie Connection blog feature written by Manuela Pezzopane, where each month she shares the method behind a magical cookie of her own making. This article expresses the views of the author, and not necessarily those of this site, its owners, its administrators, or its employees. To read all of Manuela's past Made by Manu tutorials, click here. And to see all of Cookie Connection's tutorials, click here.











Comments (15)