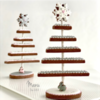
 This month's project tutorial features a 3-D driftwood tree cookie, intended to be a table display for an occasion at home. If you plan to transport it, I recommend packing the individual cookie parts separately and then assembling the tree on site.
As you can see, I'm still experimenting with paper straws and 3-D cookie construction techniques that don't rely on icing "glue"! The thought of not having to glue edible displays and centerpieces is really appealing to me, because the cookies are so much easier to dismantle - and to eat, which is the ultimate objective after all! ![]() That being said, all this project requires is decorating some cookie rectangles and inserting a paper straw through them.
That being said, all this project requires is decorating some cookie rectangles and inserting a paper straw through them.
I love paper straws not only because they can be securely fit into cookies without using glue, but because they are light yet sturdy; they don’t bend easily; they are easy to cut; they cut nicely through raw cookie dough without misshaping it (as the excess dough gets pushed into the straw); and their colors are an added decorative element.
- Cookie dough of your choice
- Rolling pin with guides
- 1 (4.5 x 9-cm/1 3/4 x 3 1/2-in) oval cookie cutter (I used one from this PME set.)
- 1 mini (5-cm/2-in) snowflake cookie cutter
- 5 rectangular cookies (See dimensions listed in Step 1b.)
- Sharp paring knife (or equivalent, to hand-cut dough)
- Paper straw(s)
- Scissors
- Royal icing:
- White piping-consistency, in pastry bags with PME #1 and #2 tips or equivalents
- Pink piping-consistency, in pastry bag with PME #2 tip or equivalent
- Grey and white flood-consistencies (on the thicker side), in tip-less pastry bags with openings equivalent to PME #2 tip
- Liner paint brush (optional, to create tracks)
Step 1: Cut and bake cookies
There are a total of seven (7) cookies in this project, as explained and illustrated below in Steps 1a and 1b. They can be made using any dough you like; just heed my dimensions carefully!
- 1 (4.5 x 9-cm/1 3/4 x 3 1/2-in) oval, for tree base
- 1 mini (5-cm/2-in) snowflake, for tree top
Note: A relatively large dough thickness is needed for the oval tree base so that it is sufficiently heavy to keep the tree from leaning or falling. And, because a straw will be inserted into the side of the treetop snowflake, it too needs to be relatively thick.
- 1 (2.5 x 4-cm/1 x 1 9/16-in) rectangle (#1)
- 1 (2.5 x 6-cm/1 x 2 3/8-in ) rectangle (#2)
- 1 (2.5 x 8-cm/1 x 3 1/8-in) rectangle (#3)
- 1 (2.5 x 10-cm/1 x 4-in) rectangle (#4)
- 1 (2.5 x 12-cm/1 x 4 3/4-in) rectangle (#5)
Note: For the cleanest cuts, use a sharp paring knife, and, to minimize misshaping of dough, be sure it is well chilled.
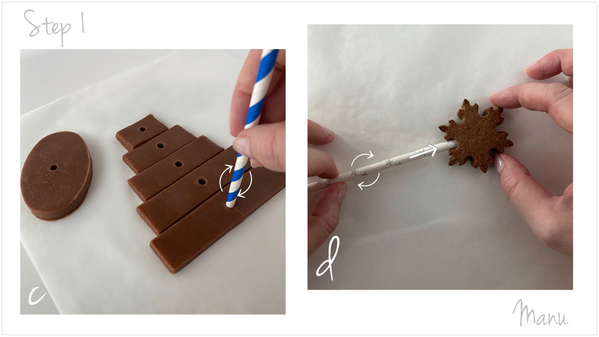
c. Before baking the cookies, use a paper straw to make a hole in the center of the oval cookie and in the center of each cookie stick by plunging it perpendicularly into the dough and rotating it. If you don’t plunge the straw perpendicularly into the base, the final tree will lean. Bake all of the cookies according to your recipe.
d. While the cookies are still warm from the oven, insert the straw into the side of the snowflake cookie to create a kind of lollipop. (If the cookie is baked, rather than raw, you'll be less likely to misshape it when inserting the straw.) If the cookie dough has visibly spread, then reinsert the straw into the holes in the oval cookie and sticks just to make sure it can still pass through them. However, be very careful not to enlarge the holes. In this project, the cookies need to make very good contact with the straw in order to stay in place in the final construction. In fact, it's better not to reinsert the straw if you think the dough hasn't spread that much. If you eventually need to enlarge the holes, you can do so later by carefully rotating the tip of a paring knife in the holes.
Let the cookies cool completely.
Step 2: Where we're headed
This step is a little detour to show you where we're headed. Basically, it's photo-documentation of the tests I did to make sure this construction method would work without the use of royal icing glue. As noted before, I kept the oval base thick to keep the tree from falling. But without the use of icing glue, I had to come up with another idea, explained in Steps 2a and 2b, to make this construction sturdier.
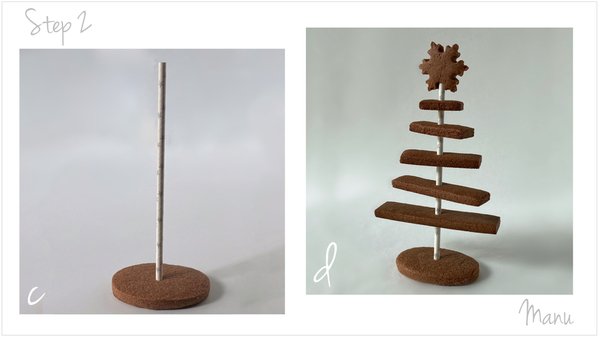
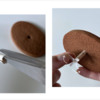
a. Insert scissors into one end of the paper straw, and make four cuts, each about 1 centimeter (3/8 inch) in length, to create four small segments.
b. Insert the straw into the oval cookie, and bend the segments away from the center of the straw. Also press each one between your fingers to make it as flat as possible.

c. Slide the base down the straw until it rests on the bent segments, and place the base on your work surface. The tree base is now ready!
d. I inserted the straw into the remaining cookies, again to see if my idea would work - and it did! However, I recommend that you don't do this step until after your cookies are iced in Step 3, as you may open up the holes too much. But, if that should happen at any point, don’t worry! I've got you covered, as I'll show you in Step 4!
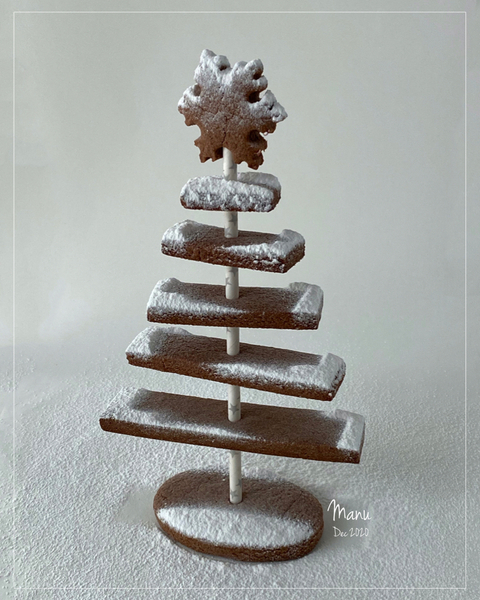
In my exuberance over my success, I got a bit carried away and sifted icing sugar on the tree! ![]() Isn’t it beautiful just bare like this? My tutorial could end here, but I had a different vision (actually a couple!), and I wanted to use royal icing for the decoration. Also, a coat of icing makes the cookie sticks sturdier and less prone to breakage.
Isn’t it beautiful just bare like this? My tutorial could end here, but I had a different vision (actually a couple!), and I wanted to use royal icing for the decoration. Also, a coat of icing makes the cookie sticks sturdier and less prone to breakage.
So, let’s move on to Step 3 where I see my vision through to completion!
Step 3: Decorate cookies with royal icing
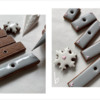
a. Using white piping-consistency royal icing and a PME #1 tip (or equivalent), outline all of the cookie sticks about 2 millimeters (a little more than 1/16 inch) from their edges to leave space for a border. Also, outline the hole in each stick and the snowflake cookie (leaving no space at its edge). Flood the cookie sticks with grey flood-consistency royal icing and a PME #2 tip (or equivalent). Flood the snowflake with white flood-consistency royal icing and the same size tip. Let the icing dry completely.
b. Pipe a tiny heart on two opposing corners of the largest cookie stick using pink piping-consistency royal icing and a PME #2 tip (or equivalent). Repeat on the remaining sticks, alternating the corners that receive hearts on each cookie. Pipe a slightly larger heart in the center of the snowflake cookie as well.
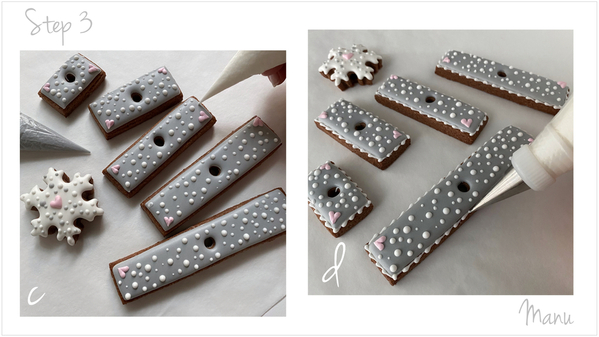
c. Using white flood-consistency royal icing and a PME #2 tip (or equivalent), randomly pipe dots of different sizes over all of the cookie sticks. Start piping little dots and then fill in any gaps with bigger dots. Also pipe some grey dots on the white snowflake using grey flood-consistency royal icing and a PME #2 tip (or equivalent).
d. Using white piping-consistency royal icing now with a PME #2 tip (or equivalent), pipe a trailing beaded border around each cookie stick. Start by piping a bead, and release pressure to create a tail on the bead. Move the tip slightly back to cover some of the tail just piped, and pipe another bead and tail. Keep piping in this fashion all around each cookie stick.
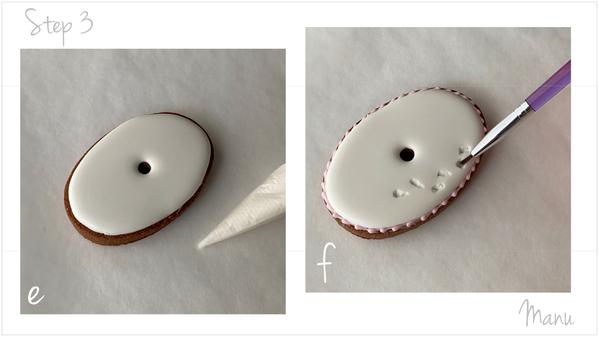
e. Outline the oval cookie as you outlined the other cookies, taking care to leave a space for a trailing beaded border around the edge. Then, using a PME #2 tip (or equivalent), flood the interior with white flood-consistency royal icing.
f. Using pink piping-consistency royal icing and a PME #2 tip (or equivalent), pipe a trailing beaded border in the space left in Step 3e.
Note: I decided at the last minute to add some tracks in the "snow" on the cookie base by gently pressing a liner brush into the icing. However, I should have done this a little bit earlier, when the icing was set but not yet crusted over. I don’t mind the outcome, but you will see less cracking if you press sooner. For more information about this technique and how to do it correctly, see my past Cookie Connection tutorial and this video recap:
Step 4: Assemble cookies into tree
a. Once the icing on all of the decorated pieces is dry, it's time to assemble the tree!
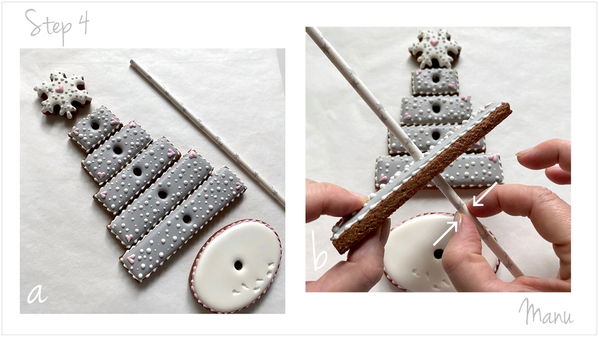
b. Follow Steps 2a to 2d to thread the cookie sticks on the straw. If it happens that the holes become too loose and the cookies slide down the paper straw, no worries! Just pinch the straw between your fingers at the point just beneath where you want a cookie stick to sit, and slide the cookie down the straw to that point. The cookie will stay in place, and the straw won’t bend over (another reason I like straws!). To help you gauge the distance between each cookie stick: in my photos, the sticks are a little more than a finger's width apart; the base and the largest stick are about three fingers' width apart.
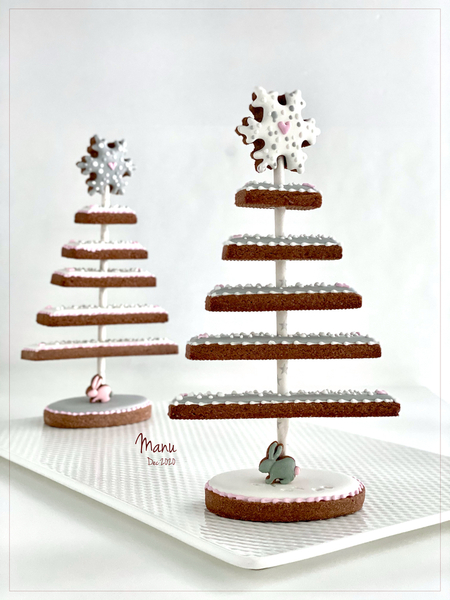
And, ta da, below is the assembled tree! I also made another one in the opposite colors (grey for the snowflake and white for the sticks) with a little bunny cookie at the base. They are really nice in person, but very difficult to capture in a picture.
Here’s a different design. I threaded the cookie sticks from both trees above onto the straw, alternating the colors along the straw. The added weight of the extra sticks makes this cookie construction quite sturdy and eliminates the need to cut the straw at the base, as described in Steps 2a through 2c.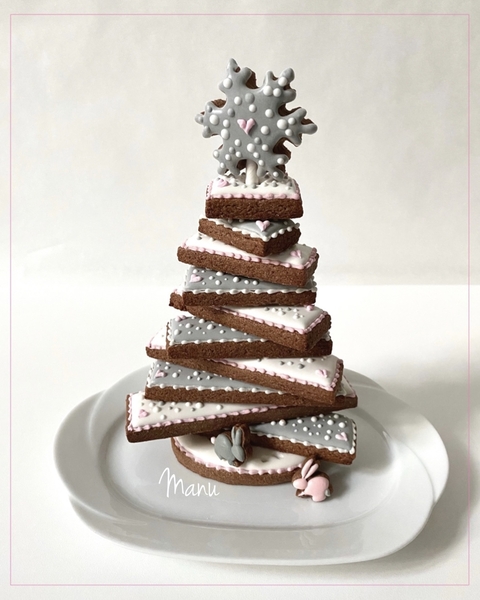
Lastly, here's a quick video showing the assembly process:
- Made by Manu (December 2017): Winter Cookie Platter
- Made by Manu (December 2018): Cable-Knit Hand Warmer Cookies
- Made by Manu (December 2019): One Cookie Shape for Many Snowflakes
Happy winter! ❄️❄️❄️
Manu

Manuela Pezzopane, affectionately called Manu by her friends and family, is a fan of everything handmade, and professes to have tried every possible hobby. However, it wasn’t until the end of 2014, when an American friend invited her to a Christmas cookie exchange, that she first discovered decorated cookies. In 2015, after watching Julia M. Usher's videos and signing up on Cookie Connection, Manu finally attempted her own. Since then, cookie decorating has become Manu’s passion. You can follow Manu on Facebook and Instagram, or email her at manubiscottidecorati@gmail.com.
Photo and cookie credits: Manuela Pezzopane
Note: Made by Manu is a Cookie Connection blog feature written by Manuela Pezzopane, where each month she shares the method behind a magical cookie of her own making. This article expresses the views of the author, and not necessarily those of this site, its owners, its administrators, or its employees. To read all of Manuela's past Made by Manu tutorials, click here. And to see all of Cookie Connection's tutorials, click here.









Comments (18)