
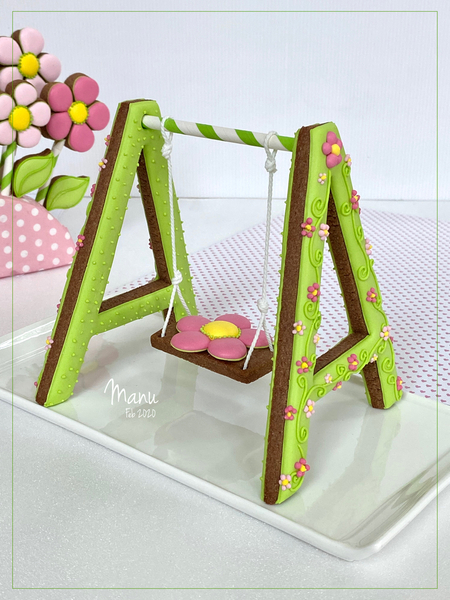
This cookie swing project has been sitting in my mind for a long time, mostly because I was looking for a way to make it completely food-safe, if not edible. I imagined it as a centerpiece or a cake topper. But I couldn't come up with an easy way to make an edible crossbar and swing chains, so I ultimately resorted to the food-grade straw and butcher's string shown in the photo above. The swing seat was to have been a cookie flower, but to make this tutorial easier, I turned the flower into a royal icing transfer "pillow" that gets "glued" to the seat cookie instead. Despite some fits and starts in my design process, everything finally came together. Phew! Let's see what I did . . .
[EDITOR'S NOTE: This tutorial has also been sitting in my moderation queue for a long time! My apologies to Manu who had it ready for posting in February. Due to a crazy class/travel schedule, I am just now getting around to publishing her February tutorial. My bad!]
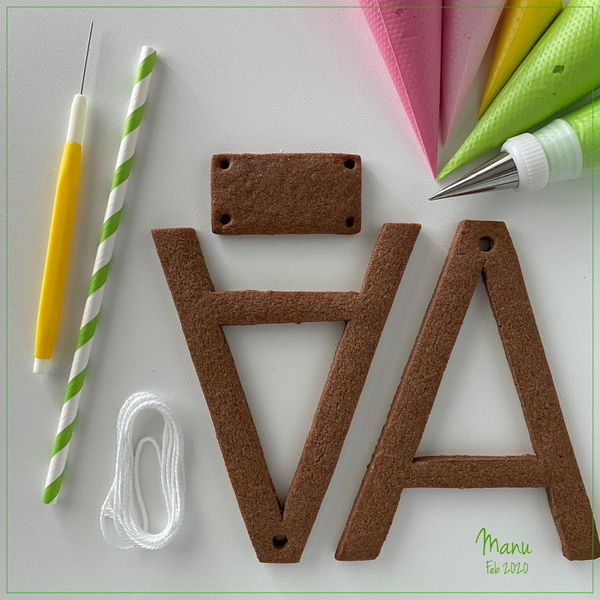
- Cookie dough of your choice
- Templates (in "Files" under "Attachments" at the end of this post)
- 1 (3 x 6-cm/1 3/16 x 2 3/8-in) rectangular cookie cutter (optional)
- Parchment paper and/or silicone baking mat
- Sharp paring knife, for hand-cutting cookies
- Small sugarcraft knife, also for hand-cutting cookies
- Paper straw
- Round #3 piping tip
- Acetate
- Royal icing:
- Piping-consistency green, in pastry bag with PME #1 tip (or equivalent)
- Medium-consistency hot pink and yellow, in pastry bags with PME #3 and #1 tips (or equivalents), respectively
- Flooding-consistency green, in tip-less pastry bag with opening equivalent to PME #3 tip
- Medium-consistency pink, in pastry bag with PME #1 tip (or equivalent)
- Scribe tool (or equivalent)
- 2 (50-cm/19 5/8-in) lengths food-grade string (butcher’s string)
- Scissors, for trimming string
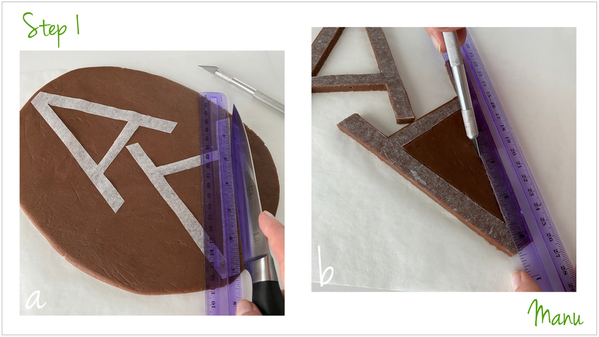
Step 1: Cut and bake cookies
- 2 long, narrow (11 x 14-cm/4 3/8 x 5 1/2-in) “A”-shaped cookies for the swing set sides, and
- 1 (3 x 6-cm/1 3/16 x 2 3/8-in) rectangular cookie for the swing seat.
a. Roll your favorite cookie dough on parchment paper or a silicone baking mat to a thickness of 0.6 centimeters (1/4 inch). Trace the project templates onto parchment paper, and then cut them out. Lay two "A" templates on the dough, and, using a ruler and a sharp paring knife, cut along the outer edges of each “A”. (Note: It's important to roll and cut directly on parchment paper or a silicone baking mat, so that, once the cookies are cut, they can be moved onto the baking sheet directly on the paper/mat without any actual handling of the cookies. Because these pieces are long and thin, they will most certainly misshape if handled directly.)
b. Cut out the triangles inside each “A” using a sharp sugarcraft knife. (Save the excess dough for later use, if desired.)
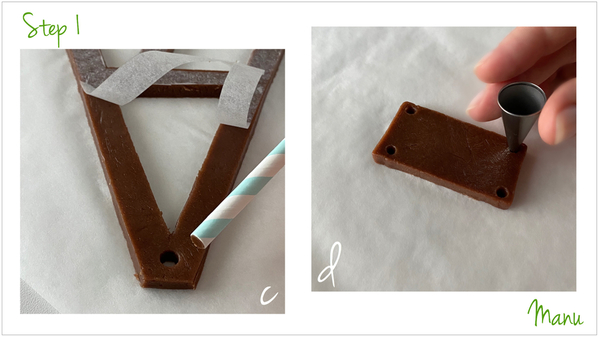
c. Use the paper straw to cut out a little circle at the top of each “A”
d. Use the rectangular cookie cutter to cut out the rectangle. (Or, trace a rectangle of the appropriate size onto parchment paper, and cut out a template.) Again, cut directly on parchment paper or a silicone baking mat to avoid direct handling of the cookie when transferring it to the baking sheet. Use a #3 round tip to make a small hole in each corner of the rectangle.
Bake according to your recipe. Once the cookies are out of the oven and still warm, use the straw and the piping tip, as needed, to re-cut the holes cut in Steps 1c and 1d. The holes can close during baking, and they need to retain their original cut size in order for the project to be properly assembled in Steps 4 and 5. Let the cookies cool completely before decorating them.
Step 2: Make flower royal icing transfers
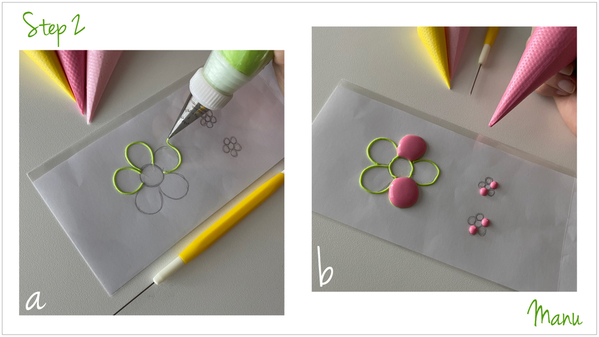
As noted earlier, the swing seat cookie will be decorated with a big flower royal icing transfer (in Step 5d). Two little flower transfers will also be used to cover the holes on the sides of the swing stand (in Step 3d). (Note: Royal icing transfers are nothing more than royal icing piped onto some other surface than the cookie, usually acetate or parchment paper. Once the icing has dried, it is transferred from that surface onto the cookie.)
a. Trace the flower templates (again, see “Attachments” at the end of this post) onto paper, and then place them under acetate. Now, piping directly on the acetate, outline the big flower using green piping-consistency royal icing and a PME #1 tip (or equivalent). The outline isn’t really necessary, as we will be using a medium-consistency royal icing to fill in the petals and flower centers, but it adds a nice finish to the flower edges.
b. Using the hot pink medium-consistency royal icing with a PME #3 tip (or equivalent), flood every other petal of the big flower. For the small flowers, start by piping large dots on non-adjacent petals. Piping non-adjacent petals and allowing drying time in between will ensure that each petal remains distinct. Let the icing crust before piping the remaining petals.
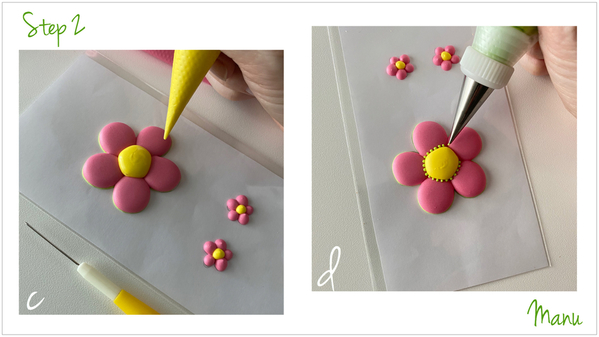
c. Once you have flooded/piped all of the petals and allowed the last ones to crust, fill in all of the flower centers using yellow medium-consistency royal icing with a PME #3 tip (or equivalent). Let the icing dry completely, ideally overnight or longer.
d. To highlight the center of the big flower, pipe little dots around its perimeter using green piping-consistency royal icing with a PME #1 tip (or equivalent). Again, let the icing dry.
To remove the transfers from the acetate without breakage, place a transfer near the edge of your work surface, and gently peel away the acetate from underneath. For photos showing how to do this, see my previous tutorial, Step 3d, here. Important: Do not attempt to remove the transfers from the acetate until they are completely dry; otherwise, they will most certainly break or misshape.
Step 3: Decorate "A" cookies
Both sides of these cookies will be flooded, so be sure to plan for adequate drying time.
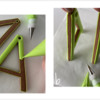
a. Use green piping-consistency royal icing with a PME #1 tip (or equivalent) to outline the two “A”s. Then, use green flooding-consistency royal icing with a PME #3 tip (or equivalent) to flood them. As needed, use a scribe tool (or equivalent) to tease the icing into tight corners. Let the icing dry completely.
b. Flip over the cookies, and repeat Step 3a on the other side of each "A". Again, let the icing dry completely.
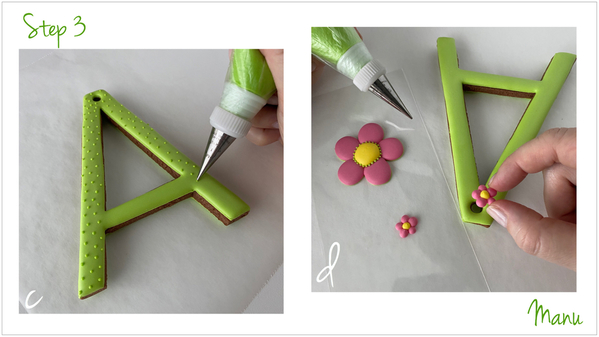
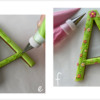
c. Using green piping-consistency royal icing with a PME #1 tip (or equivalent), pipe little dots all over the surface of one side of each "A". These sides will be the internal sides of the swing stand. Let the icing dry completely.
d. Have the small flower transfers made in Step 2 close to you. Flip over one of the "A"s, though first be certain the dots piped in the previous step are absolutely dry. Using a small amount of green piping-consistency royal icing, attach a small flower transfer to each cookie to cover the hole at the top.
e. Now, pipe random swirls all over the surface of the cookie, using the same green piping-consistency royal icing with a PME #1 tip (or equivalent). Repeat this step on the other "A".
f. Using pink and hot pink medium-consistency royal icing with PME #1 tips (or equivalents), pipe random clusters of five dots (little flowers) all over one of the "A" cookies, leaving a small space in the center of each cluster. Using yellow medium-consistency royal icing with a PME #1 tip (or equivalent), complete each flower by adding a small dot in the center. Repeat this step on the other "A" cookie. Let the icing dry completely.
Step 4: Tie string to seat cookie
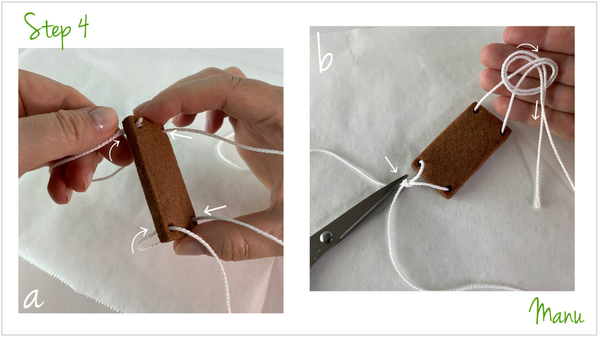
a. Insert one end of the first food-grade string into one of the holes in the rectangular seat cookie. Insert it from the top, and let it run underneath the shortest side of the rectangle; then thread it up through the nearby hole. Repeat this step on the opposite end of the seat using the other piece of string.
b. Now, you have two threads on each side of the seat! Tie the two free ends on each side together, so the knots are the same distance from the cookie top. Trim one end of the thread on each side of the knot.
c. Now, make a loop at the free end of one of the strings, and secure it with a knot. Make sure the loop is big enough to pass the straw (swing crossbar) through it, and that the string is short enough that the swing will adequately clear the "ground" in its final hanging position. Cut off any trailing thread to the side of the knot. Repeat this step on the other side of the cookie seat, making sure that the string lengths on both sides of the swing are the same (so the swing hangs level).
d. Cut the paper straw to about 11.5 centimeters (4 1/2 inches) in length, and insert the straw through the two loops. We are now ready to assemble!
Step 5: Assemble swing stand
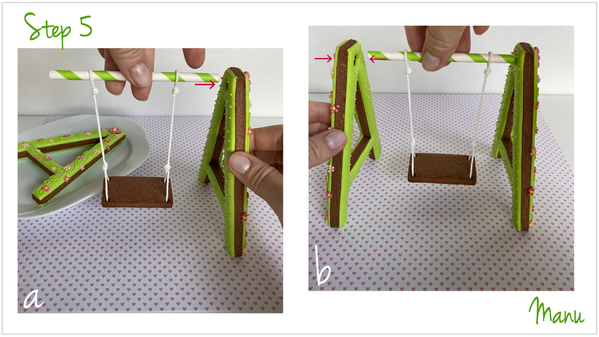
a. Holding the straw between two fingers and one of the "A" cookies in a vertical position (dotted side facing in), insert one end of the straw into the hole at the top of the "A". My straw was sufficiently secure in the hole, so there was no need to glue it with royal icing. If your structure is loose, be sure to pipe some icing "glue" into the hole. (Green piping-consistency icing should be fine for gluing.)
b. Holding the straw horizontal to your work surface, insert the other end into the hole on the other “A” cookie. Again, reinforce with icing glue in the hole, as needed.
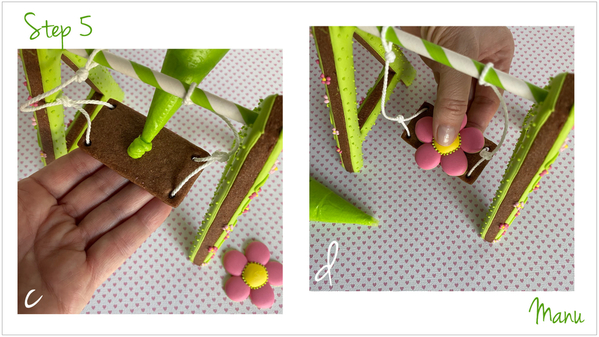
c. Set the big flower transfer close to you, and pipe a dollop of green piping-consistency royal icing on top of the seat cookie.
d. Affix the big flower transfer to the seat cookie by applying a little pressure. Let the icing dry completely.
And here is the finished project!
If we hadn't cut the straw in Step 4d and had made another seat cookie, we could have made two kids happy with this two-seater variation!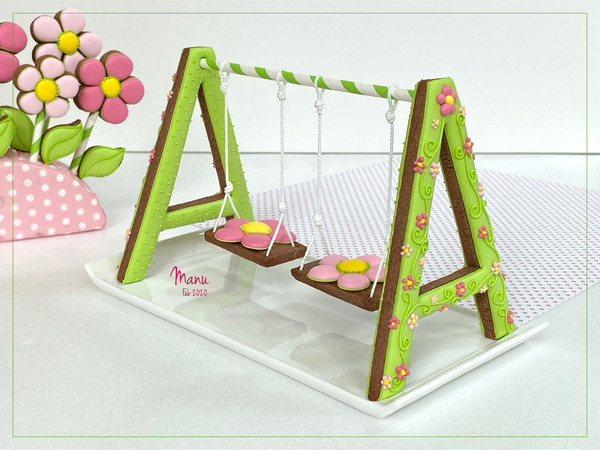
Before parting, I leave you with a short video. Relax for 35 seconds, and enjoy the ride!
Ciao,
Manu 🌸🌿


Photo and cookie credits: Manuela Pezzopane
Note: Made by Manu is a Cookie Connection blog feature written by Manuela Pezzopane, where each month she shares the method behind a magical cookie of her own making. This article expresses the views of the author, and not necessarily those of this site, its owners, its administrators, or its employees. To read all of Manuela's past Made by Manu tutorials, click here. And to see all of Cookie Connection's tutorials, click here.









Comments (26)