Made by Manu: Cable-Knit Hand Warmer Cookies


Years ago, I received two mini hot water bottles from my sister. They had plain knitted covers. One of them was red with a white heart on the front, and the other had the same knitted cover with the colors inverted. (They were too cute together for my sister to buy only one of them!) This memory and the fact that winter is fully upon us are what sparked this project. My hot water bottles were smaller than regular hot water bottles, but not as small as this cookie, which is the size of a hand warmer.

I haven't seen this cookie shape or concept before, so I hope I have brought you something different. The knitting decoration on top is not new, however; in fact, it's very popular, especially at this time of year. Such knit decorations can range from quite intricate and realistic, as demonstrated by Sonja Galmad (aka @iSugarfy (aka swissophie), here) and Evelin Milanesi (aka @Evelindecora, here), to more minimalistic, like those I've piped in this tutorial or other stenciled patterns found online. This is my personal take, very similar to the royal icing knot I made in my June tutorial, but less complicated because the pattern here is relatively straight with only slight curves.

What you’ll need for this project:
  • 1 (5.8 x 10.7-cm/2 1/4 x 4 1/4-in) hot water bottle cookie, flooded with white royal icing and completely dry (You’ll find my cookie template in "Attachments" under "Files" at the end of this post.)
  • Cable-knit pattern template (Also under "Attachments", in the same file noted above.)
  • Edible food marker
  • Royal icing and pastry tips:
    • White piping-consistency with PME #1 tip or equivalent
    • White thick flooding-consistency with Wilton #2 tip or equivalent (To avoid cratering, be sure to keep this icing on the thick side.)

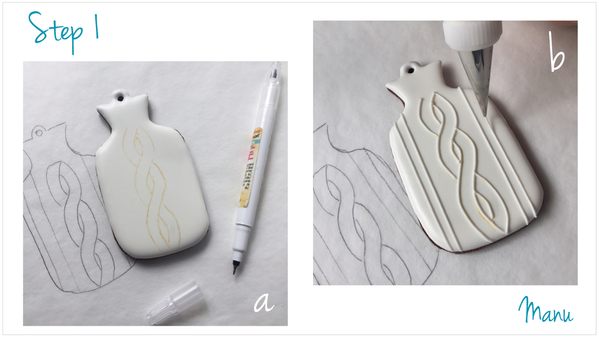
Step 1: Trace, outline, and flood cable-knit pattern

a. Set the iced (and completely dry) hot water bottle cookie on your work surface. Using the cable-knit pattern template as a visual guide, draw the pattern on top of your cookie with an edible food marker. (If you'd prefer not to draw freehand, project and trace the pattern, or transfer it using the paper transfer technique described by @Dolce Sentire - Aixa Zunino here in Step 1.)

b. Using white piping-consistency royal icing and a PME #1 tip (or equivalent), pipe over the outlines of the pattern you drew in Step 1a. Then pipe two parallel lines on each side of the cable-knit pattern. These lines will form the boundaries of two stripes that will be flooded in the next step. (I found it easier to pipe these lines directly on the cookie without marking them beforehand. But, feel free to draw them first if you like.)

97AF5C39-04F7-4DA0-9D70-A3D4E410CD1C

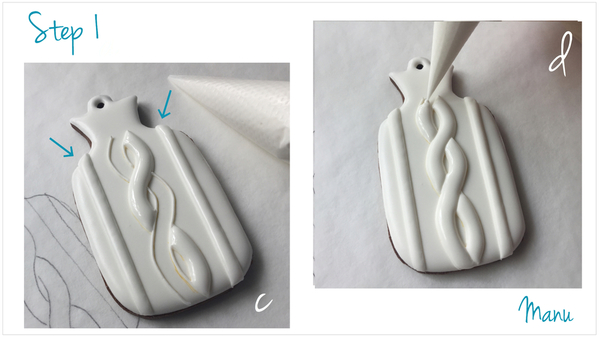
c. Using white thick flooding-consistency royal icing and a Wilton #2 tip (or equivalent), flood the sections of the cable-knit pattern. First flood non-adjacent sections; then allow a little drying time before piping the remaining sections in Step 1d. (Allowing the icing to crust will ensure that each section remains distinct.) In the meantime, flood the stripe on each side of the cable-knit pattern.

d. Finish by flooding the remaining sections of the cable-knit pattern. Let the icing dry completely.

9478C1B1-5C2F-4AF2-ABC3-736A640DBA3E

Step 2: Pipe decorative lines

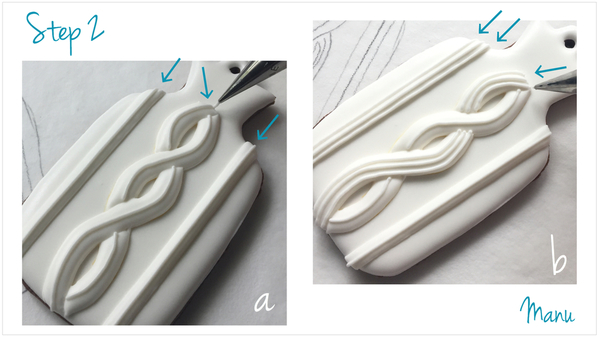
a. Using white piping-consistency royal icing and a PME #1 tip (or equivalent), pipe a central line along the two leads (strands) of the cable-knit pattern, and along the two lateral stripes. Of course, stop piping the line wherever the two leads cross each other, but then resume piping after those intersection points.

b. Now, using the central line you just piped as a visual guide, pipe two parallel lines (one on each side of the central line) on one of the lateral stripes. Do the same along one of the leads of the cable-knit pattern.

ABBF20BB-48B4-4809-AAAD-4B69CA4F4B7E

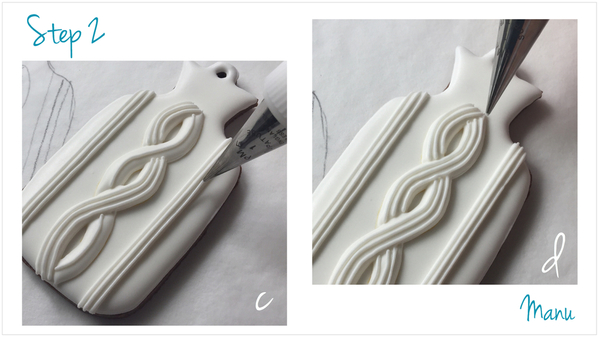
c. Repeat the first part of Step 2b for the other stripe.

d. Repeat the latter part of Step 2b for the remaining lead in the cable-knit pattern.

14552296-F36C-4D9E-92AE-AC7B3FBF9A0A

Step 3: Decorate bottle "neck"

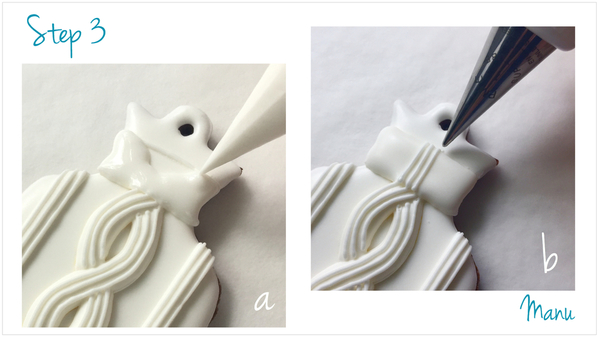
a. Outline and flood the “neck” of the hot water bottle as shown below, and let the icing dry. (Again, use piping-consistency royal icing for outlining, and thick flooding-consistency icing for flooding.)

b. Using white piping-consistency royal icing and a PME #1 tip (or equivalent), pipe a trio of lines in the center of the neck. Start with the middle line, to center the pattern, and then pipe the other two lines, one to each side of the middle line.

0160FAA2-1A30-4A4C-881A-00C8A6256F97

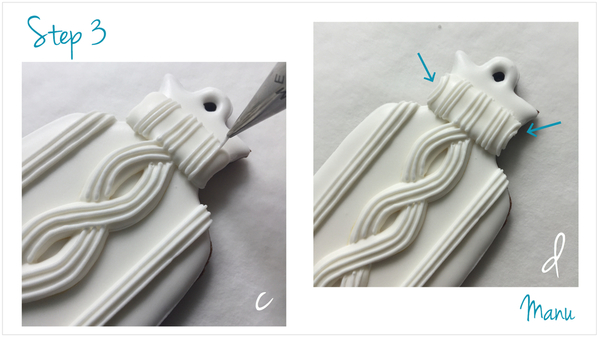
c. Keep piping trios of lines to the sides of the three lines that you just piped.

d. Give a slight curve to the lines that come closest to the sides of the neck.

3DB72FC6-BCF9-43C1-8F8F-F8719F87E8F3

Step 4: Add final details

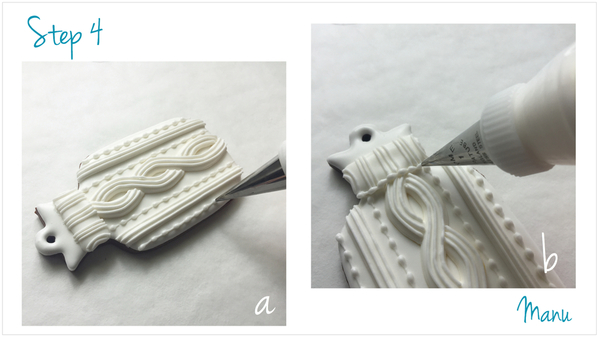
a. Pipe a "trailing" beaded border through the middle of each open section of the hot water bottle "body", starting at the end closest to the neck. (To make this border: Pipe a small bead and move along an imaginary line while releasing pressure to create a tail on the bead. Move the tip slightly back to cover some of the tail just piped, and pipe another bead and tail. Continue piping beads and tails in this way - short, but continuous back-and-forth movements - until you reach the edge of the cookie.) This border reminds me of the seed stitch!

b. Pipe the same border on the lower part of the neck to give it a more finished look.

9CA53210-40B3-4EF9-8857-89C6ED5A0B17

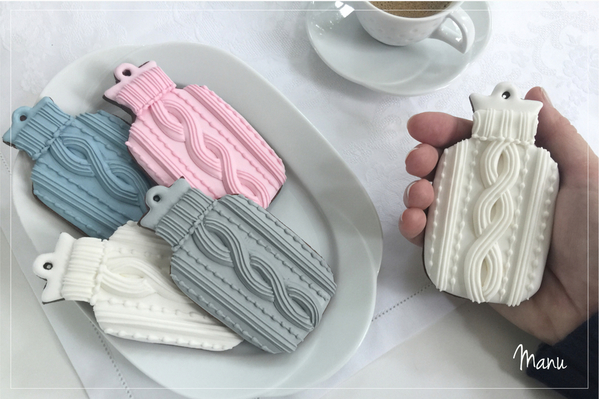
And here’s the finished cookie in my hand with more colored variations on the plate. My cookies don’t work as hand warmers, of course, but sharing them with friends over coffee or hot cocoa will surely warm everyone's hearts!

B1C1952C-D2FD-479E-833A-58B08C9E5CB4

Happy winter!

Manu ❄️ ❄️❄️

Manuela Pezzopane, affectionately called Manu by her friends and family, is a fan of everything handmade, and professes to have tried every possible hobby. However, it wasn’t until the end of 2014, when an American friend invited her to a Christmas cookie exchange, that she first discovered decorated cookies. In 2015, after watching Julia M. Usher's videos and signing up on Cookie Connection, Manu finally attempted her own. Since then, cookie decorating has become Manu’s passion. You can follow Manu on Facebook and Instagram, or email her at manubiscottidecorati@gmail.com.

Photo and cookie credits: Manuela Pezzopane

Note: Made by Manu is a Cookie Connection blog feature written by Manuela Pezzopane, where each month she shares the method behind a magical cookie of her own making. This article expresses the views of the author, and not necessarily those of this site, its owners, its administrators, or its employees. To read all of Manuela's past Made by Manu tutorials, click here. And to see all of Cookie Connection's tutorials, click here.

Attachments

Images (9)
  • Cable-Knit Hand Warmer Cookies - Where We're Headed!: Design, Cookies, and Photo by Manu
  • Steps 1a and 1b - Draw Cable-Knit Pattern and Pipe Over with Royal Icing: Design, Cookie, and Photos by Manu
  • Steps 1c and 1d - Flood Sections of Cable-Knit Pattern and Stripes: Design, Cookie, and Photos by Manu
  • Steps 2a and 2b - Pipe Line Details: Design, Cookie, and Photos by Manu
  • Steps 2c and 2d - Pipe Line Details, Continued: Design, Cookie, and Photos by Manu
  • Steps 3a and 3b - Outline, Flood, and Detail "Neck": Design, Cookie, and Photos by Manu
  • Steps 3c and 3d - Pipe More Line Details on "Neck": Design, Cookie, and Photos by Manu
  • Steps 4a and 4 b - Pipe "Trailing" Beaded Borders: Design, Cookie, and Photos by Manu
  • Final Cookies, Ready To Be Eaten: Design, Cookies, and Photo by Manu
Files (1)

Add Comment

Comments (40)

Newest · Oldest · Popular
GinkgoWerkstatt posted:

Knitting is something I haven't done with Royal Icing yet. But it's still on my imaginary to-do list, because I love the results.

Thank you for this tutorial, Manu! ♥

You are welcome Anne @Former Member! Me too! A long to-do list of things and projects I would like to try... little by little we will both get there!

Sweet Prodigy posted:

I love these. They are not complicated but they do not look "basic" at all. What colours did you use for the other three cookies?

Thank you, Christine @Sweet Prodigy. For this project I have used “Modecor” basic color gels: pink, black and sky blue. I started from the lighter color so I just added some drops of pink to the plain royal icing until I got the shade I wanted. I made the 2 consistencies -piping and flooding- and bagged them. Then I went on and got the grey and  and then the blue, simply by adding some drops of black and some drops of sky blue to the plain icing. I used always the same bowl without rinseing it. This way there is some pink in the grey and some grey (and pink) in the blue. I learned this technique at the beginning of my cookie journey, by reading Karen Summers’ blog (Karen’s Cookies, yes the organizer of the Cookie Con).

I always “forget” that color develop... I mean, I know that, but I don’t have the patience to wait, and although I try to use less food coloring as possible, they always turn darker than I planned!

Manu posted:
Sweet Prodigy posted:

I love these. They are not complicated but they do not look "basic" at all. What colours did you use for the other three cookies?

Thank you, Christine @Sweet Prodigy. For this project I have used “Modecor” basic color gels: pink, black and sky blue. I started from the lighter color so I just added some drops of pink to the plain royal icing until I got the shade I wanted. I made the 2 consistencies -piping and flooding- and bagged them. Then I went on and got the grey and  and then the blue, simply by adding some drops of black and some drops of sky blue to the plain icing. I used always the same bowl without rinseing it. This way there is some pink in the grey and some grey (and pink) in the blue. I learned this technique at the beginning of my cookie journey, by reading Karen Summers’ blog (Karen’s Cookies, yes the organizer of the Cookie Con).

I always “forget” that color develop... I mean, I know that, but I don’t have the patience to wait, and although I try to use less food coloring as possible, they always turn darker than I planned!

I'm not the best when it comes to waiting for colours to develop either. (I have patience for lines but not for colour!) Anyway, I had to ask because the colours you picked are such perfect winter shades. ❤️❤️❤️❤️

Manu posted:
Sweet Prodigy posted:

I love these. They are not complicated but they do not look "basic" at all. What colours did you use for the other three cookies?

Thank you, Christine @Sweet Prodigy. For this project I have used “Modecor” basic color gels: pink, black and sky blue. I started from the lighter color so I just added some drops of pink to the plain royal icing until I got the shade I wanted. I made the 2 consistencies -piping and flooding- and bagged them. Then I went on and got the grey and  and then the blue, simply by adding some drops of black and some drops of sky blue to the plain icing. I used always the same bowl without rinseing it. This way there is some pink in the grey and some grey (and pink) in the blue. I learned this technique at the beginning of my cookie journey, by reading Karen Summers’ blog (Karen’s Cookies, yes the organizer of the Cookie Con).

I always “forget” that color develop... I mean, I know that, but I don’t have the patience to wait, and although I try to use less food coloring as possible, they always turn darker than I planned!

This is a tutorial in itself Manu, thanks. And thanks Christine for asking the question!   Pip

This one (again) is really hand-warming and heart-warming cookies, Manu!   I am in the middle of doing deep cleaning for coming 2019 but just forget about it and I would like to mess around my kitchen and do my cookies!  

Thank you for your another lovely tutorial.  @Manu biscotti decorati

pip posted:
Manu posted:
Sweet Prodigy posted:

I love these. They are not complicated but they do not look "basic" at all. What colours did you use for the other three cookies?

Thank you, Christine @Sweet Prodigy. For this project I have used “Modecor” basic color gels: pink, black and sky blue. I started from the lighter color so I just added some drops of pink to the plain royal icing until I got the shade I wanted. I made the 2 consistencies -piping and flooding- and bagged them. Then I went on and got the grey and  and then the blue, simply by adding some drops of black and some drops of sky blue to the plain icing. I used always the same bowl without rinseing it. This way there is some pink in the grey and some grey (and pink) in the blue. I learned this technique at the beginning of my cookie journey, by reading Karen Summers’ blog (Karen’s Cookies, yes the organizer of the Cookie Con).

I always “forget” that color develop... I mean, I know that, but I don’t have the patience to wait, and although I try to use less food coloring as possible, they always turn darker than I planned!

This is a tutorial in itself Manu, thanks. And thanks Christine for asking the question!   Pip

Thank you @pip... I apologize for all the spelling mistakes 🤦‍♀️

Ryoko ~Cookie Ave. posted:

This one (again) is really hand-warming and heart-warming cookies, Manu!   I am in the middle of doing deep cleaning for coming 2019 but just forget about it and I would like to mess around my kitchen and do my cookies!  

Thank you for your another lovely tutorial.  @Manu biscotti decorati

Thank you so much Ryoko @Ryoko ~Cookie Ave.! Well, you are off to a good start! I wish you all the best for 2019!💕

Post
×
×
×
×
Link copied to your clipboard.
×